
Beverages
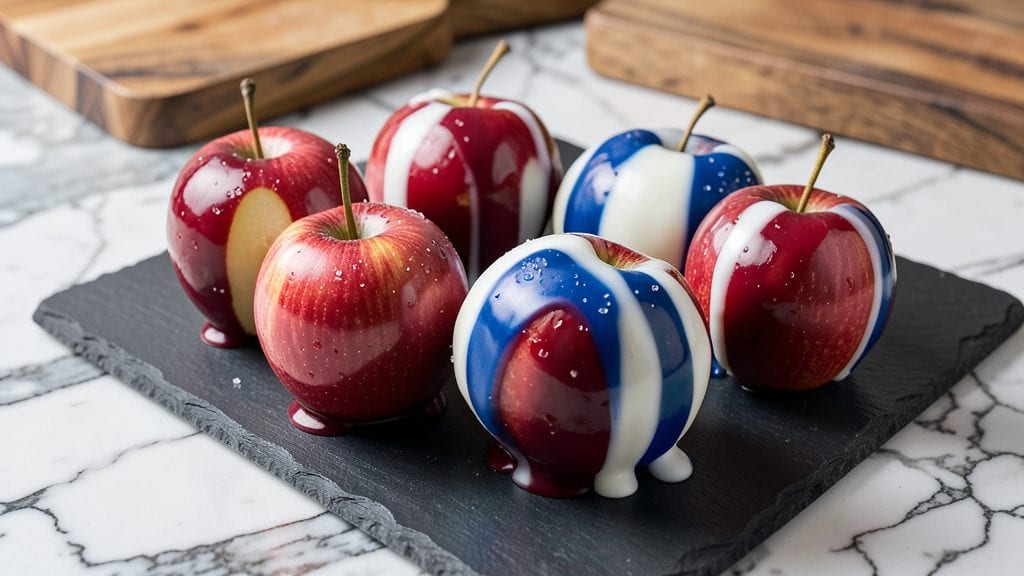
Transforming a simple apple into a showstopping patriotic treat only takes 10 minutes of focused effort, and this red, white, and blue candy apple recipe delivers restaurant-quality results with minimal fuss.
The secret lies in a precise sugar coating technique that creates an even, glossy finish—no sticky messes or uneven layers. I developed this method after years of holiday baking, where store-bought candy apples always fell short of the vibrant, crunchy perfection I wanted for gatherings.
This recipe starts with firm, crisp apples that hold their shape perfectly after coating—no soggy centers here. The three-color approach uses food-safe dyes for vibrant red, white, and blue hues that stay true even after handling.
What makes this version special is the quick-drying sugar mixture, which sets in just minutes, leaving you with apples that look like they came from a professional candy shop. The best part? You can customize the flavors with extracts or spices for added depth.
By the time you're done, you'll have apples that are visually stunning and irresistibly crunchy—ideal for holiday parties, game days, or even as a festive dessert. The colors remain vibrant for hours, making them perfect for display.
Whether you serve them on a platter with whipped cream or hand them out as party favors, this recipe guarantees crowd-pleasing results every time.
For extra flair, consider adding crushed cookies or sprinkles between the sugar layers, or drizzle with melted white chocolate for a modern twist. The possibilities are endless while keeping the process simple and foolproof. Let's get started on creating these festive treats!
Ingredients for red white and blue candy apple
Eight crisp apples and a handful of festive colors—this is all you need for showstopping patriotic treats.
| Ingredient | Amount | Notes |
|---|---|---|
| Firm Apples 🍎 | 8 whole | Granny Smith or Honeycrisp preferred |
| Granulated Sugar 🍚 | 5 cups | Fine grain for smooth coating |
| Corn Syrup 💧 | ½ cup | Light corn syrup preferred |
| Red Food Coloring 🎨 | 1 tbsp | Gel or liquid food-safe dye |
| Blue Food Coloring 🎨 | 1 tbsp | Gel or liquid food-safe dye |
| White Food Coloring 🎨 | 1 tbsp | Gel or liquid food-safe dye |
| Unflavored White Chocolate 🍫 | 1 oz | For drizzle (optional) |
| Vanilla Extract 🌿 | 1 tsp | Pure vanilla preferred |
| Cinnamon 🌶️ | ½ tsp | Ground for dusting |
| Toothpicks 📎 | 8 whole | For securing apples |
| Wax Paper 📄 | 1 sheet | For drying apples |
Apples are the star here, so skip anything soft or bruised. Granny Smith or Honeycrisp hold up best—they stay crisp and don’t get mushy. I always grab mine from Whole Foods or the produce section at Trader Joe's—they’re prepped and ready to go. If you’re using a different variety, test one first to make sure it holds its shape. The sugar mixture needs to set properly, so don’t use apples that’ll turn to mush. For extra flair, I sometimes dip the stems in melted white chocolate before coating—it adds a professional touch.
No gel food coloring? Liquid dye works too, but you’ll need about half the amount since it’s more concentrated. The white chocolate is optional, but if you’re using it, grab unflavored white chocolate chips from Costco or Ghirardelli for the best melt. Short on vanilla? Almond extract at half the amount adds a nice twist. The cinnamon isn’t just for flavor—it helps keep the apples from sticking together while they dry. If you’re making these ahead, store the colored sugar mixtures in separate jars for up to 2 weeks—they’ll keep perfectly.
These apples stay crisp and vibrant for up to 3 days if stored properly. Lay them out on a wire rack lined with wax paper to dry completely—this prevents stickiness. For parties, I always make them the day before so the flavors meld and the colors pop even more. If you’re transporting them, wrap each apple individually in parchment paper to keep them from touching. The colors stay bright for hours, but if they start fading, a quick spritz of water and a re-dusting of cinnamon brings them back to life.
Why You'll Love This Recipe
- No-Fuss Setup: The only tools I need are a deep fryer or large pot, a whisk, and a paintbrush—no fancy gadgets, just basics. Honestly, I’ve made these while my coffee brewed; the hardest part is picking the apples.
- Crunchy-Sweet Magic: That sugar-corn syrup mix? It’s like caramel’s cooler cousin—sticky, glossy, and just sweet enough to balance the crisp apple bite. (Yes, even on a Tuesday night.)
- Party in a Bite: Fourth of July? Birthday? A last-minute potluck? These apples scream celebration without screaming "work." Between us, I’ve used them as edible centerpieces—kids love peeling back the layers.
- Stays Fresh for Days: The syrup coating keeps them from drying out, so I can prep a batch on Sunday and still have perfect apples for snacks or gifts by Thursday. Budget-friendly too—one bag of apples lasts forever.
Step-by-step instructions for red, white, and blue candy apples
Here's how to create vibrant, patriotic candy apples that stay crisp and colorful.
Prepare the Apples for Coating
Start by washing the 8 whole firm apples thoroughly and patting them completely dry with the sheet of wax paper. I like to use a paper towel to ensure no moisture remains—this helps the candy coating adhere perfectly. Using a sharp knife, trim off any blemishes or uneven spots, but leave the stems intact for toothpick placement.
Next, place each apple on a clean work surface and insert a toothpick into the top, about halfway down. This will secure the candy coating as you dip. For best results, choose apples that are firm but not rock-hard—Granny Smith or Honeycrisp work beautifully. Arrange the apples on a baking sheet lined with parchment paper and refrigerate them for 15 minutes to keep them cool during dipping.
Create the Candy Coating Mixtures
In a medium saucepan, combine the 5 cups granulated sugar and 0.5 cup corn syrup. Add 1 tablespoon red food coloring and 1 tablespoon blue food coloring, stirring until fully dissolved. Place the pan over medium heat and bring the mixture to a boil, stirring constantly with a wooden spoon. You'll see the sugar begin to dissolve and form a thick, syrupy consistency—this should take about 5 minutes.
Once the mixture reaches 235°F on a candy thermometer (or forms soft-ball stage when dropped in cold water), remove it from heat. Divide the mixture evenly into three separate bowls. To one bowl, add 1 tablespoon white food coloring and stir well to create a white coating. The other two bowls will remain red and blue. Let all mixtures cool slightly for 2 minutes—this prevents them from melting too quickly when dipping.
Dip the Apples in Colorful Coatings
Working quickly, dip one apple completely into the red candy mixture, using the toothpick to hold it steady. Allow any excess to drip off for 5 seconds, then place it back on the parchment-lined baking sheet. Repeat with the remaining apples, alternating between red, white, and blue mixtures. For a festive look, I suggest dipping two apples in each color and two in white for contrast.
Here's the trick: don't rush the dipping process. You want an even, thick coating that doesn't slide off. If the candy starts to harden too quickly, place the bowls in a warm water bath for 30 seconds to soften the mixture again. Work in batches if needed—you want each apple to have a smooth, glossy finish without drips.
Add Final Touches and Set
Once all apples are dipped, sprinkle a light dusting of the 0.5 teaspoon cinnamon over each one while the coating is still slightly warm. This adds a subtle spice note that complements the sweetness. For an extra special touch, melt the 1 ounce unflavored white chocolate with 1 teaspoon vanilla extract in a double boiler, then drizzle it over the white apples in decorative patterns.
Let the candy apples cool completely at room temperature for 30 minutes before serving. This allows the coating to fully harden and set. Store any leftovers in an airtight container at room temperature for up to 3 days, though they're so festive, they won't last that long!
Pro Tips For Making Red White And Blue Candy Apple
- Peel Apples Right: DESCRIPTION: Use a paring knife—not a peeler—so you don’t slice into the fruit. A thin peel keeps the apples from turning mushy when you dip them, and you’ll save time scrubbing off stray bits of skin. (I learned this the hard way after peeling three apples into confetti.)
- Mix Syrup First: DESCRIPTION: Whisk the corn syrup and sugar together before adding food coloring—this dissolves the sugar faster and prevents clumping. If you dump everything in at once, you’ll end up with grainy patches on your apples. (Sounds obvious, but I’ve seen it happen.)
- Skip the Overcrowding: DESCRIPTION: Dip one apple at a time, then set it on a wire rack to dry. Piling them on a plate will make the coating slide off and create a sticky mess. A rack also speeds up drying so the colors stay vibrant. (Yes, even if you’re impatient like me.)
- Chill the Coloring: DESCRIPTION: Pop the red and blue food coloring bottles in the fridge for 10 minutes before using—they’ll mix more smoothly into the syrup. Warm coloring spreads unevenly, leading to streaky apples. (This is the thing that actually changes the outcome for a clean look.)
Troubleshooting this recipe
Sticky Coating Fix
If your candy coating sticks to the apples or melts too quickly, the sugar mixture likely didn’t cool enough before dipping. Let the candy syrups sit at room temperature for 5-7 minutes after removing from heat—this gives them time to thicken properly.
For extra insurance, chill the bowls in the refrigerator for 2 minutes before dipping. I’ve also found that using a candy thermometer is critical—aim for 235°F (soft-ball stage) to avoid overcooking the sugar. 🌡️
Uneven Color Distribution
When your red, white, and blue colors look streaky or uneven, it’s usually because the food coloring wasn’t fully dissolved or the apples weren’t submerged evenly. Stir the candy mixtures vigorously with a whisk (not a spoon) to ensure the dye blends completely.
For dipping, use the toothpick to hold the apple steady—rotate it gently while submerged to coat all sides. If colors still separate, strain the mixtures through a fine-mesh sieve before using.
Apples Turning Mushy
Soggy apples mean your fruit wasn’t firm enough to begin with or moisture got trapped during coating. Always choose Granny Smith or Honeycrisp apples—they’re the crispiest varieties. Pat them thoroughly dry with paper towels before dipping, and avoid refrigerating them too long before coating (max 15 minutes in the fridge).
If using pre-cut apples, toss them in 1 teaspoon cornstarch before dipping to absorb excess moisture.
Candy Coating Cracking
Cracks in the candy shell happen when the apples cool too quickly or the sugar mixture wasn’t at the right consistency. To prevent this, let the dipped apples sit at room temperature for 30 minutes after coating before refrigerating.
If cracks appear, lightly mist the coating with water and re-dust with ½ teaspoon cinnamon to smooth out imperfections. For extra durability, add 1 teaspoon vanilla extract to each candy mixture—it helps the coating set more evenly.
Colors Fading Too Fast
Food coloring can bleed or fade if the candy coating isn’t fully set or if the apples aren’t stored properly. Let the apples dry completely on a wire rack for 1 hour before handling. Store them in a single layer in an airtight container with parchment paper between each apple.
If colors dull during transport, spritz them lightly with water and re-dust with cinnamon to revive the vibrancy. Avoid stacking apples—they’ll smudge each other’s coatings. 🎨
Toothpicks Falling Out
If your toothpicks keep popping out during dipping, the candy coating isn’t thick enough or the toothpick isn’t inserted deeply enough. For a secure hold, push the toothpick into the apple until it reaches the core (about 1.5 inches deep).
After dipping, let the apples sit upright on a cooling rack for 10 minutes to allow the candy to set around the toothpick. If they still wobble, sprinkle a pinch of granulated sugar around the base of the toothpick to create a temporary anchor while the candy hardens.
Nutrition facts
Frequently asked questions
Can I make these candy apples without toothpicks?
Toothpicks help secure the candy coating while it sets, but you can skip them by carefully dipping the apples and letting them cool on a wire rack. For extra stability, insert a wooden skewer or lollipop stick at a slight angle—just be sure to remove it before serving. The coating will still adhere, but may need 5 extra minutes of drying time to fully harden.
How do I get the colors to stay vibrant for a party?
Use gel food coloring instead of liquid for richer hues that won’t bleed. Let the coated apples dry completely on a wire rack for 1 hour before handling, and store them in a single layer with parchment paper between each apple. For transport, wrap individually in plastic wrap—the colors stay bright for up to 5 hours this way.
What's the best way to serve these festive treats?
Arrange them on a platter with whipped cream drizzles or crushed cookies for texture contrast. For a patriotic centerpiece, alternate red, white, and blue apples in a circular pattern. Serve with a side of caramel sauce for dipping—it pairs perfectly with the crisp candy coating. These make stunning party favors too!
Can I make just one color instead of all three?
The recipe works perfectly for single-color apples—just omit the other dyes. For a holiday twist, try green and red for Christmas or orange and black for Halloween. The same candy mixture ratios apply, so you can easily halve the recipe if needed. The vanilla extract keeps the flavor consistent regardless of color.
Why did my candy coating turn grainy?
Graininess usually means the sugar mixture cooled too quickly or wasn't stirred enough. Bring the candy to exactly 235°F and stir constantly with a whisk (not a spoon) to dissolve all sugar crystals. If it starts thickening too fast, place the pan in a warm water bath for 30 seconds to maintain smooth consistency. Work quickly during dipping to prevent premature hardening.