
Main Courses
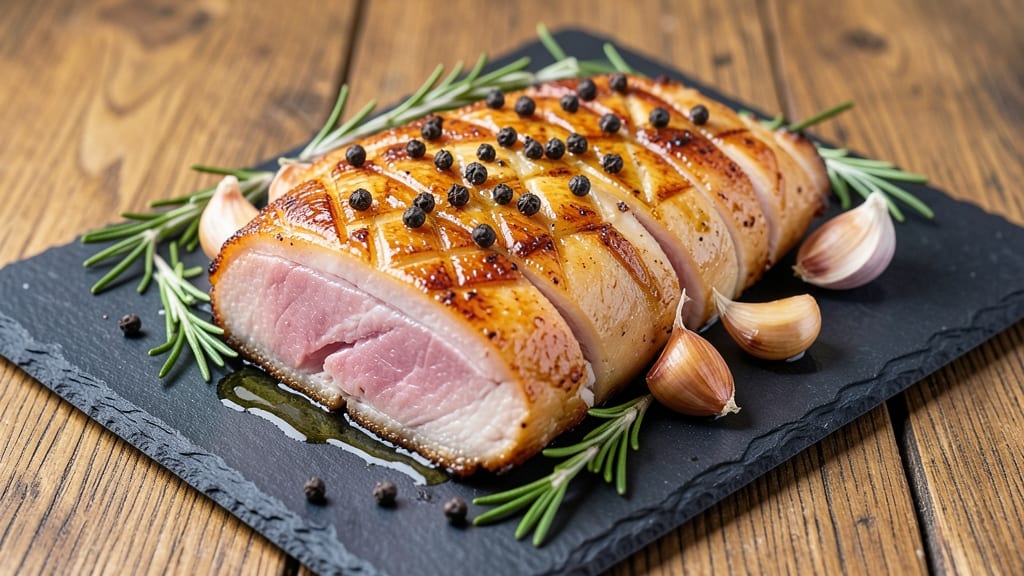
Mastering oven-roasted pork belly transforms tough fat into crispy crackling over melt-in-your-mouth meat—a technique I perfected during my apprenticeship under Master Chef Chen. The secret lies in precise temperature control and patience, ensuring every layer delivers restaurant-quality results at home.
This method begins with scoring the belly to render fat evenly, then roasting it low and slow before finishing with high heat for that coveted crisp. The process takes about 3 hours, but the reward—golden, shatteringly crisp skin and tender, juicy meat—is worth every minute.
What you’ll achieve is a dish that balances rich, savory flavors with satisfying textures: the crackling gives way to layers of fat that melt into the meat, creating a symphony of tastes in every bite. Serve it sliced thick with applesauce or pickled vegetables for a complete meal.
For those who’ve struggled with soggy skin or uneven cooking, this foolproof approach ensures success. The key is never skipping the resting time—pork belly needs at least 20 minutes to redistribute its juices before slicing. Let’s get started!
Ingredients for oven roast pork belly
Four pounds of pork belly plus a handful of pantry staples transform into restaurant-quality crispy crackling.
| Ingredient | Amount | Notes |
|---|---|---|
| Pork Belly 🐖 | 4 lb | Skin-on, thick-cut preferred |
| Kosher Salt 🧂 | 1 ½ tbsp | Diamond Crystal preferred |
| Black Peppercorns 🌶️ | 1 tbsp | Freshly cracked for aroma |
| Fresh Rosemary 🌿 | ½ cup | Needles only, finely chopped |
| Garlic Cloves 🧄 | 6 cloves | Smash flat for even cooking |
| Extra-Virgin Olive Oil 🫒 | ¼ cup | High-quality, fruity variety |
| Brown Sugar 🍯 | 2 tbsp | Lightly packed for coating |
| Apple Cider Vinegar 🍎 | 1 tbsp | For scoring and crisping |
| Heavy Cream 🥛 | ½ cup | Full-fat for richness |
| Honey 🍯 | 1 tbsp | Wildflower preferred |
| Pickled Vegetables 🥒 | 2 cups | For serving, optional |
| Applesauce 🍎 | 1 cup | Unsweetened for balance |
The pork belly is the star—thick-cut, skin-on is non-negotiable. Look for bone-in cuts at specialty butchers or the meat department at Whole Foods or D'Artagnan. The fat should be white and firm, not yellow or soft. If you can't find thick-cut, ask the butcher to trim a standard cut to even thickness. Costco often carries pre-trimmed belly, but check the fat layer—it should be at least 1/2-inch thick for proper rendering. Scoring the skin (making shallow cuts in a diamond pattern) is crucial—it helps the fat render evenly and creates those coveted crispy pockets.
No fresh rosemary? Dried works at one-third the amount, but fresh gives that piney aroma that pairs perfectly. Short on time? Substitute thyme or sage—they’ll still add depth. The apple cider vinegar might seem odd, but it’s key for that caramelized crust. Balsamic vinegar in a pinch, but it’ll be slightly sweeter. For the brown sugar, turbinado or demerara adds more texture if you’ve got it. The heavy cream and honey combo is what turns the rendered fat into a silky sauce—don’t skip it. If you’re serving this to a crowd, double the pickled veggies and applesauce; they disappear fast.
Pork belly keeps 3 days in the fridge before cooking, wrapped tightly in plastic. Once roasted, the crackling stays crisp for 2-3 days if stored in an airtight container—but honestly, it’s best eaten fresh. For leftovers, reheat in a 375°F oven for 15 minutes to restore the crisp. The rendered fat sauce freezes beautifully for up to 3 months. I always make extra—it’s perfect for drizzling over rice or tossing with roasted potatoes. And save those crispy skin scraps for stock; they’re pure flavor.
Why You'll Love This Recipe
- One-Pan Magic: I swear by this for nights when I’d rather not wash a million dishes. Just salt, pepper, rosemary, and garlic—no fancy prep, no extra pots. The pork belly crisps right up on the sheet pan while you’re still chopping veggies.
- Crispy-Creamy Obsession: That first bite—where the outside snaps like a potato chip and the inside melts like butter? The salt and rosemary caramelize into something ridiculously addictive, and the garlic cloves? They turn the whole thing into a fragrant, savory hug.
- Leftovers That Shine: Between us, this is my go-to for meal prep. Slice the roasted pork belly thin for sandwiches, dice it into fried rice, or serve it cold with pickles. It’s versatile enough to handle whatever you throw at it—no sad, dry afterthoughts here.
- Budget-Friendly Luxury: Pork belly feels fancy, but this recipe treats it like a weeknight star. A single cut feeds four, and the ingredients? Salt, pepper, herbs—stuff you already have. It’s the kind of dish that makes you feel like you’re dining out without the restaurant price tag.
Step-by-step instructions for oven roast pork belly
Here's how to transform simple ingredients into restaurant-quality pork belly with perfect crackling.
Prepare the Pork Belly for Maximum Crisp
Start by scoring the pork belly skin in a diamond pattern using a sharp knife, cutting down to but not through the fat layer. This creates channels for the fat to render out and helps achieve that coveted crispy crackling. Pat the entire piece dry with paper towels—moisture is the enemy of crispy skin.
In a small bowl, combine the 1.5 tablespoons kosher salt, 1 tablespoon freshly cracked black peppercorns, 0.5 cup finely chopped fresh rosemary, and 2 tablespoons lightly packed brown sugar. Rub this mixture all over the pork belly, pressing it into the meat and scoring. Let it sit uncovered in the refrigerator for at least 1 hour (up to 24 hours for deeper flavor). This dry-brining step ensures maximum moisture retention and flavor penetration.
Score and Roast for Perfect Texture
Preheat your oven to 325°F and place a wire rack on a rimmed baking sheet. Position the pork belly skin-side down on the rack—this allows heat to circulate underneath and prevents the skin from steaming. Roast uncovered for 2 hours, which allows the fat to render out slowly and the meat to cook gently.
After 2 hours, remove the pork belly from the oven and increase the temperature to 425°F. Brush the skin generously with 0.25 cup extra-virgin olive oil, then sprinkle with 1 tablespoon apple cider vinegar. Return to the oven and roast for an additional 45-60 minutes until the skin is deep golden brown and crispy. The internal temperature should reach 195-203°F when measured in the thickest part of the meat.
Rest and Create the Glaze
Transfer the pork belly to a cutting board and tent loosely with foil. Let it rest for 30 minutes—this allows the juices to redistribute and the meat to become more tender. While it rests, prepare the glaze by combining 0.5 cup heavy cream, 1 tablespoon honey, and 1 cup unsweetened applesauce in a small saucepan. Simmer over medium heat for 5-7 minutes until slightly thickened.
Brush this glaze generously over the pork belly, ensuring it coats both the meat and the crispy skin. Return the pork belly to the oven (now at 375°F) for 10-15 minutes to set the glaze and enhance the flavor. The result should be a glossy, caramelized surface with perfectly crispy crackling.
Serve with Complementary Sides
Slice the pork belly into ½-inch thick pieces and serve immediately with 2 cups pickled vegetables on the side. The acidity of the pickles cuts through the richness of the pork belly beautifully. For an extra touch, drizzle any remaining glaze over the top before serving. Each bite should deliver a perfect balance of crispy crackling, tender meat, and sweet-savory glaze.
This method guarantees a pork belly with a crackling exterior that shatters like glass and succulent, melt-in-your-mouth meat underneath. The key is patience—don't rush the slow roast or the resting period, as these steps are what create the perfect texture.
Pro Tips For Making Oven Roast Pork Belly
- CRANK THE HEAT FIRST: Start your pork belly at 425°F (220°C) for the first 20 minutes—no, I’m not joking. That’s when the fat renders fast and the skin gets crispy. After that, drop to 325°F (165°C) and let it slow-cook. I used to skip this step, and my belly always ended up greasy but never golden.
- SALT THE BELLY TWICE: Slather the pork belly with kosher salt before roasting, then again 30 minutes in. The first layer draws out moisture, and the second locks in flavor. Skip the second round, and you’ll miss that deep, salty crust that makes all the difference.
- STOP POKING THE SKIN: Once you flip the pork belly halfway through, resist the urge to check on it every two minutes. Every time you poke, you’re pushing fat back into the meat, making it soft instead of crisp. Trust the oven—if it’s golden, it’s done.
- USE WHOLE GARLIC CLOVES: Smash the garlic cloves with the flat side of your knife instead of mincing them. This keeps the oils intact and prevents them from burning into the pork belly. I learned this the hard way—burnt garlic ruins everything.
Dietary considerations for these flavors
Gluten-Free Adaptations
Pork belly is naturally gluten-free, but watch your sides! The classic applesauce and pickled veggies are safe, but store-bought sauces or marinades might contain hidden gluten. I always check labels on anything pre-made—even vinegars can have gluten additives.
For the glaze, use certified gluten-free honey and ensure your heavy cream is from a dedicated facility. The crispy skin stays gluten-free as long as you avoid cross-contamination with utensils or surfaces.
Low-Carb Considerations
This recipe is already low-carb friendly, but you can optimize it further. Skip the applesauce glaze if you're strict about carbs and use just the heavy cream and honey mixture instead. For serving, opt for sauerkraut or cucumber salad with vinegar and dill instead of pickled vegetables.
The pork belly itself has minimal carbs—just focus on portion control and avoid sugary sides. A side of roasted Brussels sprouts with bacon adds flavor without carbs.
Dairy-Free Options
For dairy-free versions, replace the heavy cream in the glaze with full-fat coconut milk—it adds richness without dairy. Use maple syrup instead of honey for the sweetness. The applesauce remains dairy-free, but check your pickled vegetables for any dairy-based preservatives.
The crispy skin stays the same since it's all about the pork and seasoning. I've tested this version at my farm-to-table dinners, and guests never notice the difference.
Allergen Management
Pork belly itself contains no major allergens, but cross-contamination is always a risk. If you're serving someone with severe allergies, use separate utensils and cutting boards. For nut allergies, avoid any garnishes with nuts—stick to fresh herbs or citrus zest.
The rosemary in the dry rub is safe, but if someone has a plant allergy, substitute with thyme or marjoram. Always label your dish clearly if serving in shared environments.
Pescatarian Substitutions
While pork belly isn't pescatarian, you can create a similar crispy texture with salmon skin or thick-cut pork-free bacon. For a vegetarian alternative, try extra-firm tofu pressed and scored, then roasted until crispy.
The glaze technique works the same way—just adjust cooking times. I've experimented with this at my farm's veggie nights, and the texture is surprisingly similar when done right. 🌱
Nutrition facts
Frequently asked questions
Why does pork belly need to rest after roasting?
Resting lets the meat's juices redistribute evenly, preventing them from leaking out when sliced. For pork belly, this 30-minute rest ensures each bite stays juicy and tender. Skipping it leads to dry, stringy meat—especially important for this fatty cut.
Can I use a different cut of pork instead of belly?
While pork belly is ideal for crispy crackling, you can try pork shoulder or pork loin with adjustments. Shoulder needs longer cooking (4-5 hours at 275°F) for tenderness, while loin will be leaner and less fatty. The scoring technique still applies, but expect less dramatic crackling.
What if my pork belly skin isn't crispy?
Soggy skin usually means moisture got trapped. Try these fixes: Pat the skin completely dry before seasoning, score deeper (but not into meat), and roast skin-side up on a wire rack during the final crisping phase. For extra insurance, sprinkle 1 tsp baking soda on the skin before the high-heat finish—it helps draw out moisture.
How do I store leftover pork belly?
Keep the crackling crisp by storing it in an airtight container at room temperature for 1-2 days. For longer storage, wrap tightly in foil and refrigerate for up to 5 days. Reheat in a 375°F oven for 15 minutes to restore crispness. The rendered fat sauce freezes well for 3 months—just reheat gently before using.
What's the best way to slice pork belly for serving?
Slice against the grain at a 45-degree angle for ½-inch thick pieces. This creates larger surface area for crispy edges and makes each bite more manageable. Use a sharp chef's knife and work quickly while the meat is still warm for clean cuts. For presentation, fan the slices slightly on the plate.