
Desserts
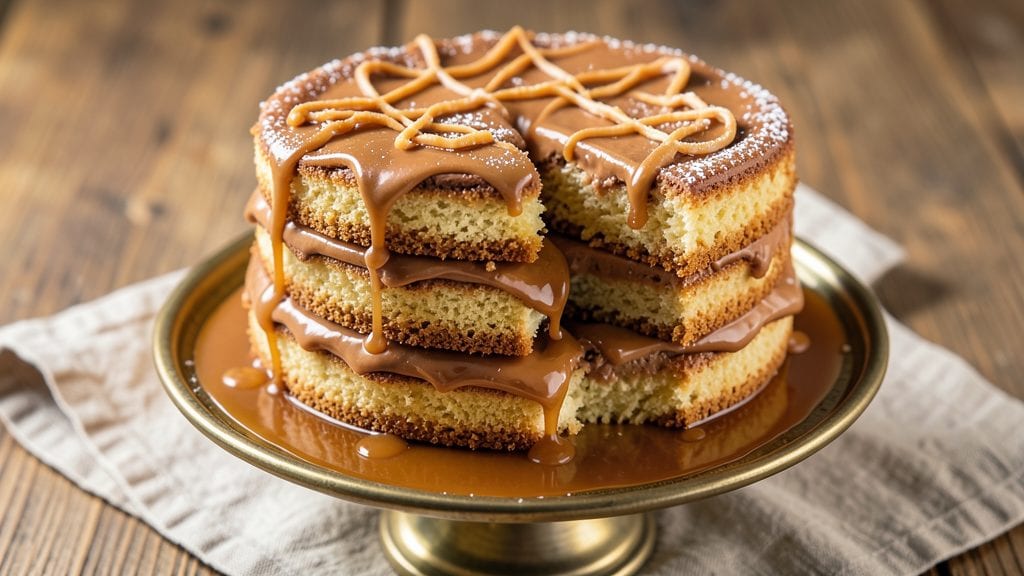
This old-fashioned caramel cake recipe delivers the perfect balance of buttery layers and a gooey caramel center that makes every slice unforgettable. The secret lies in precise layering and a homemade caramel filling that stays molten even after baking—no shortcuts here, just classic technique refined.
I’ve baked this version for family gatherings for years, and it never fails to impress, whether served warm with vanilla ice cream or at room temperature with a dusting of powdered sugar.
What sets this recipe apart is the foolproof method for achieving that signature caramel core without overbaking the cake layers. You’ll work with three simple buttery layers, each brushed with a light coating of caramel before assembly, ensuring every bite delivers that signature caramel burst.
The cake itself is tender yet sturdy enough to hold its shape, while the caramel filling remains rich and velvety, not grainy or overly sweet.
The result is a dessert that looks as impressive as it tastes—golden layers with a glossy caramel drizzle on top, ready to slice into perfect squares.
This recipe builds on tradition while allowing room for personal touches, like adding a pinch of sea salt to the caramel or swirling in chocolate chips for extra indulgence. Whether you’re baking for a celebration or a cozy weekend treat, this cake delivers restaurant-quality results at home.
Ready in just under 2 hours (including cooling time), this cake is perfect for special occasions or when you want to treat yourself. The instructions walk you through every step—from mixing the batter to assembling the layers—so you can achieve professional results without stress. Let’s get baking!
Ingredients for old fashioned caramel cake
Twelve ingredients, three buttery layers, and one molten caramel dream waiting to happen.
| Ingredient | Amount | Notes |
|---|---|---|
| All-Purpose Flour 🌾 | 3 cups | Sifted for light texture |
| Granulated Sugar 🍚 | 2 ¼ cups | Divided for layers and caramel |
| Unsalted Butter 🧈 | 2 cups | Cold, cubed for layers |
| Large Eggs 🥚 | 6 whole | Room temperature for blending |
| Vanilla Extract 🌸 | 2 tsp | Pure extract preferred |
| Baking Powder 🍞 | 1 ½ tsp | Freshly measured |
| Salt 🧂 | ½ tsp | Fine sea salt |
| Heavy Cream 🥛 | 1 cup | Full-fat for caramel |
| Brown Sugar 🍚 | 1 ½ cups | Packed for caramel |
| Salted Butter 🧈 | 1 cup | For caramel richness |
| Vanilla Bean Paste 🌸 | 1 tbsp | Optional for depth |
| Powdered Sugar 🍚 | 1 cup | For dusting |
| Dark Chocolate Chips 🍫 | 1 cup | Optional for indulgence |
The butter here is non-negotiable—European-style unsalted gives that signature richness. Grab it from Whole Foods or Trader Joe's if you can, but any high-quality brand works. The vanilla extract? Pure Madagascar bourbon is my go-to, but imitation will do in a pinch. Brown sugar for the caramel should be packed—light brown works too—and the baking powder needs to be fresh. Test it by mixing with water: if it bubbles, it's good. Sift everything for that cloud-like texture—trust me, it makes all the difference.
No vanilla bean paste? Extra vanilla extract plus a pinch of salt mimics the depth. Running out of brown sugar? White sugar plus one extra tablespoon of molasses gets you close. The heavy cream for the caramel must be full-fat—half-and-half won’t cut it. For the layers, if you’re in a bind, melted butter works but cold cubes give that perfect crumb. Chocolate chips? Dark 70% cacao keeps the caramel from overpowering, but semi-sweet is fine too. And yes, you can skip them—this cake is already a showstopper.
Store the cake layers wrapped tightly at room temp for 2 days or freeze for 3 months. The caramel filling? Keep it refrigerated and assemble just before serving. Once baked, let it cool completely—at least 4 hours—before slicing. The longer it rests, the more that caramel sets up perfectly. Slice into squares and serve with a dusting of powdered sugar—instant crowd-pleaser every time.
Why You'll Love This Recipe
- No-Fuss Mixing: I swear by this recipe because it’s just flour, sugar, butter, eggs, and vanilla—no weird measurements or tempering eggs. You cream the butter and sugar, toss in the dry stuff, and boom. Done. Even if you’re not a baker, the cake still turns out tender and moist.
- Butter-Sugar Magic: That creamed butter and sugar combo? It’s what makes this cake dangerously good. The texture is light but rich, and the caramel swirls? They cut through the vanilla like a warm hug. Honestly, I’ve tried fancier cakes, but this one always wins.
- Weeknight or Celebration: I make this for lazy Sundays or birthday parties—same recipe, different vibes. The simplicity means I’m not stuck prepping for hours, but it still feels special enough to serve guests. (Yes, even on a Tuesday night.)
- Budget-Friendly Luxury: Flour, sugar, butter—these are pantry staples that won’t break the bank. A single cake feeds six, and leftovers? They’re even better the next day. Between us, this is my go-to for when I want to feel fancy without overspending.
Step-by-step instructions for old fashioned caramel cake
Here's how to create layers of buttery perfection with a molten caramel surprise at its heart.
Prepare the Molten Caramel Filling
In a heavy-bottomed saucepan, combine the 1 cup salted butter, 1.5 cups brown sugar, and 1 cup heavy cream. Bring to a gentle boil over medium heat, stirring constantly until the sugar dissolves completely. This should take about 5-7 minutes—you'll know it's ready when the mixture thickens and turns a rich amber color.
Real talk: Don't rush this step. The sugar needs time to caramelize properly for that deep, buttery flavor. Once it reaches 235°F on a candy thermometer (or forms soft balls when dropped in cold water), immediately pour the caramel into a greased 9-inch round pan. Let it cool slightly but keep it warm—this filling will go into the cake layers later.
Create the Cake Layers
Preheat your oven to 350°F. In a large mixing bowl, cream together the 2 cups unsalted butter and 2.25 cups granulated sugar on medium speed until light and fluffy—about 3-4 minutes. Add the 6 whole large eggs one at a time, mixing well after each addition. This ensures each layer gets maximum airiness.
In a separate bowl, whisk together the 3 cups all-purpose flour, 1.5 tsp baking powder, and 0.5 tsp salt. Gradually add the dry ingredients to the butter mixture, alternating with 2 tsp vanilla extract, mixing just until combined. Overmixing develops gluten, so stop as soon as the flour disappears. Divide the batter evenly between three greased and floured 8-inch round pans.
Bake the Layers to Perfection
Bake each layer for 25-30 minutes or until a toothpick inserted in the center comes out clean. The layers should be golden brown on top but still slightly springy to the touch. I like to rotate the pans halfway through baking for even browning—this prevents any hot spots in your oven from affecting one side.
Let the layers cool in their pans for 10 minutes before transferring to a wire rack to cool completely. This gradual cooling prevents cracking. While they cool, prepare your work surface by dusting it with 1 cup powdered sugar—this keeps the layers from sticking as you assemble.
Assemble the Cake with Caramel Layers
Place the first layer on your powdered sugar-dusted surface. Spread a thin layer of the cooled caramel filling over the top, leaving a small border. Here's the thing—don't be stingy with the caramel. You want that rich, buttery flavor to shine through every bite. Top with the second layer and repeat the process.
For the final touch, spread the remaining caramel over the top layer. Gently press the 1 cup dark chocolate chips into the top layer for a beautiful presentation. Wrap the entire cake in plastic wrap and refrigerate for at least 4 hours (overnight is even better). This chilling time lets the flavors meld and the caramel set properly.
Serve with Confidence
Before serving, let the cake sit at room temperature for 15-20 minutes to soften slightly. The contrast between the warm, gooey caramel and the cool cake layers is what makes this dessert truly special. Cut into 12 equal slices and serve immediately—each bite will deliver that perfect balance of buttery cake and molten caramel.
Pro tip: If you want to take it to the next level, dust the top with extra powdered sugar right before serving. The contrast of colors makes it look even more impressive. This cake keeps well in the fridge for up to 5 days, though I doubt it'll last that long in your house!
Pro Tips For Making Old Fashioned Caramel Cake
- Whisk Butter and Sugar: DESCRIPTION:
- Sift That Flour: DESCRIPTION:
- Bake Until Springy: DESCRIPTION:
- Caramelize the Syrup Slow: DESCRIPTION:
Storing and reheating this dish
Room Temperature Storage
This cake is best served at room temperature, so plan ahead! Once fully assembled and chilled, let it sit for 15-20 minutes before slicing to soften slightly.
I like to wrap the whole cake in plastic wrap and store it in an airtight container at room temperature for up to 2 days. The caramel filling stays perfectly gooey during this time, though the layers may firm up slightly. 💫
Refrigerator Storage
For longer storage, refrigerate the fully assembled cake in an airtight container for up to 5 days. The cold helps preserve the caramel's texture, though it may thicken slightly. Let it sit at room temperature for 20-30 minutes before serving to restore that perfect balance between cake and caramel.
I always double-wrap the cake in plastic wrap to prevent drying.
Freezing Fully Assembled
Freezing isn't ideal for this cake because it can make the caramel filling grainy, but if you must, wrap the whole cake tightly in plastic wrap followed by aluminum foil. Freeze for up to 3 months.
Thaw overnight in the fridge before serving. The texture won't be as perfect as fresh, but it's still delicious—just not as luxurious. Honestly, I'd rather bake a fresh one!
Reheating Slices
If you've stored slices in the fridge, reheat them in the microwave for 10-15 seconds to restore warmth. For a more professional touch, warm slices in a 200°F oven for 5-7 minutes—this helps the caramel soften beautifully.
Avoid high heat, which can dry out the cake layers. A quick zap in the microwave works best for me when I'm in a hurry.
Caramel Refresh Tip
If the caramel filling has set too much in the fridge, pop the slice in the microwave for 3-5 seconds—just enough to make it gooey again. For extra indulgence, drizzle a little warm heavy cream over the top before serving.
This adds richness and makes the caramel experience even more decadent. Trust me, your guests will notice the difference. 🥛
Make-Ahead Assembly
Here's my favorite trick: bake the layers and caramel filling 1 day ahead, then assemble the cake just before serving. Store the baked layers in airtight containers at room temperature and the caramel in the fridge.
This way, you can enjoy a fresh, perfectly set cake without any last-minute stress. The flavors actually improve overnight as everything melds together. 💡
Nutrition facts
Frequently asked questions
Can I make this cake with fewer layers?
The recipe is designed for three layers to achieve that signature buttery texture with pockets of caramel throughout. Two layers would still work, but you'd need to double the caramel filling between them to maintain the same indulgent experience. The third layer adds height and extra caramel bursts with every bite.
Why does my caramel turn grainy?
Grainy caramel usually means the sugar didn't fully dissolve or the mixture cooled too quickly. Always stir constantly until it reaches 235°F and pour into a warm pan. If it starts to crystallize, whisk in 1 teaspoon of corn syrup or lemon juice to smooth it out before using in the cake.
How do I prevent the cake layers from cracking?
Cracking happens when the cake cools too quickly or the oven isn't hot enough. Let layers cool in their pans for 10 minutes before transferring, and avoid opening the oven door during baking. A 350°F oven is critical—any lower and the layers may collapse.
Can I substitute chocolate for the caramel filling?
Replace the caramel with 1.5 cups of melted dark chocolate (cooled slightly) or a chocolate ganache. For a hybrid version, mix equal parts caramel and chocolate for a rich, dual-flavored surprise. Just reduce the amount slightly to compensate for the chocolate's density.
What’s the best way to serve this cake?
Serve warm slices with a scoop of vanilla bean ice cream or a dollop of whipped cream for contrast. For a rustic touch, dust with powdered sugar and add a sprinkle of flaky sea salt. The caramel melts beautifully when paired with cold dairy—trust me, it’s a game-changer!