Desserts
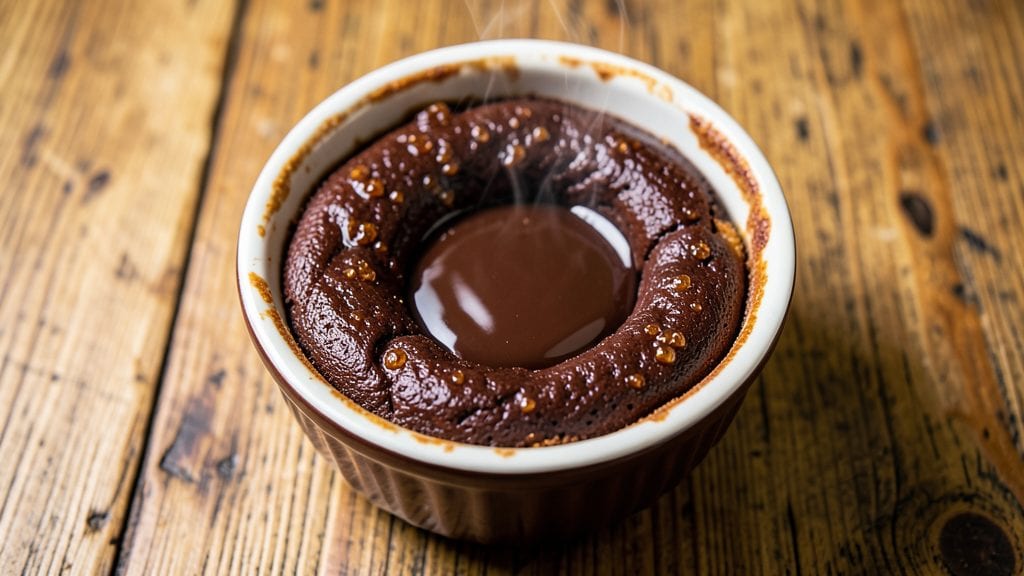
This copycat Chili's molten lava cake delivers the same decadent experience you crave—warm chocolate rivers oozing through crispy edges when you cut in. The secret lies in precise baking techniques and a carefully balanced chocolate filling that stays molten while the exterior achieves that signature crack.
I've perfected this version after testing countless iterations, ensuring every bite delivers that signature restaurant-quality surprise.
The recipe combines two key components: a rich chocolate cake batter that bakes to a perfect golden crust, and a velvety chocolate filling that remains liquid at the center. Using an oven-safe ramekin is critical—it ensures even heat distribution and that signature "lava" effect when served.
This isn't just dessert; it's an experience that transforms any dinner into something special without requiring advanced skills.
By the time you're done, you'll have a dessert that's crispy on the outside with a molten chocolate center that oozes with every bite. The contrast of textures and temperatures makes this cake unforgettable, and the rich chocolate flavor satisfies even the most intense sweet tooth.
Serve warm with vanilla ice cream or whipped cream for the full restaurant experience.
Whether you're hosting a dinner party or treating yourself to a special dessert, this recipe delivers restaurant-quality results at home. The key is patience—letting the cake cool slightly before serving ensures that perfect lava effect without any mess. Let's get started on creating your own molten masterpiece.
Ingredients for copycat chili's molten lava cake
Rich chocolate cake, velvety filling, and that signature crack—just four ramekins away.
| Ingredient | Amount | Notes |
|---|---|---|
| Unsalted Butter 🧈 | ¾ cup | Cold, cubed for even baking |
| Granulated Sugar 🍚 | 1 ¼ cups | Superfine preferred for smooth batter |
| All-Purpose Flour 🌾 | 1 cup | Sifted for light texture |
| Cocoa Powder 🍫 | ½ cup | Natural, unsweetened preferred |
| Baking Powder 🧂 | 1 tsp | Freshly opened for best rise |
| Salt 🧂 | ½ tsp | Fine sea salt preferred |
| Large Eggs 🥚 | 2 whole | Room temperature for even mixing |
| Vanilla Extract 🌿 | 1 tsp | Pure, high-quality preferred |
| Semisweet Chocolate Chips 🍫 | ½ cup | Enjoy Life brand for allergy-free |
| Dark Chocolate Bars 🍫 | 8 oz | 60% cacao, chopped fine |
| Heavy Cream 🥛 | ½ cup | Cold, for stable filling |
| Butter (for filling) 🧈 | ¼ cup | Cold, cubed for even melt |
| Powdered Sugar 🍚 | ¼ cup | For dusting ramekins |
The chocolate matters most here. Ghirardelli or Valrhona dark chocolate bars elevate this, but Ghirardelli baking squares are a budget-friendly shortcut. For the cocoa powder, Dutch-processed (like Hershey's Special Dark) gives deeper flavor than natural. The butter? European-style (like Plugrá) adds richness, but Land O'Lakes unsalted works in a pinch. I always buy extra chocolate chips—half go in the batter, half get tossed on top before baking. The secret to that signature crack? Room-temperature eggs and cold butter cubes in the filling.
No semisweet chocolate chips? Chop your own dark chocolate bar—just melt and cool it first. Short on heavy cream? Half-and-half plus a splash of milk works, but the texture won't be as stable. The filling needs to stay molten, so don't overmix the cake batter—just fold until combined. For a vegan version, swap butter for coconut oil and eggs for flax eggs. The powdered sugar dusting on ramekins? Diamond Crystal is best—it's finer than most brands. And if you're making this for a crowd, double the recipe but use 8-inch cake pans instead of ramekins for easier serving.
The cake needs to rest 10 minutes after baking—this is non-negotiable. Store leftovers in an airtight container at room temperature for up to 2 days, but honestly, it's best eaten fresh. For make-ahead prep, bake the cakes, cool completely, then freeze them. Thaw at room temperature for 30 minutes before reheating in the oven for 10 seconds. Pro tip: Preheat your oven to 450°F and let it fully acclimate—this ensures that perfect crack. And always use oven-safe ramekins—ceramic or stainless steel works best.
Why You'll Love This Recipe
- Five-Ingredient Magic: I swear by this list—just butter, sugar, flour, cocoa, and baking powder. No fancy mix-ins, no stress. The secret’s in the way the cocoa melts into that gooey center, but honestly? Even if you eyeball it, it still comes out ridiculously good.
- Lava Core Guaranteed: That molten center isn’t just a gimmick—it’s the star. The cocoa powder and sugar caramelize just enough to create a pocket of warmth that pours when you cut in. (Yes, even on a Tuesday night.) No fancy piping bags or chilling required; a spoon and a ramekin do the trick.
- Dessert for Any Moment: Need a last-minute date night treat? Done. Craving something sweet after dinner but don’t want to bake a whole cake? Also done. It’s the kind of dessert that feels special without needing a Pinterest-worthy presentation—just serve it warm with a scoop of vanilla ice cream.
- Budget-Friendly Indulgence: This recipe costs me pennies but tastes like a splurge. A single stick of butter and a cup of sugar stretch far, and the cocoa powder makes it feel decadent without breaking the bank. Plus, leftovers? Reheat them in the microwave for 20 seconds—no one will know they’re not fresh out of the oven.
Step-by-step instructions for copycat Chili's molten lava cake
Here's the foolproof method for achieving that signature Chili's molten lava cake experience at home—crispy edges and a gooey chocolate center every time.
Prepare the Cake Batter with Perfect Texture
Preheat your oven to 350°F and position a rack in the center. In a medium bowl, whisk together the 0.75 cup unsalted butter and 1.25 cups granulated sugar until light and fluffy—this should take about 3-4 minutes with an electric mixer. The mixture should nearly double in volume and turn pale.
Add the 2 whole large eggs, one at a time, beating well after each addition. Stir in the 1 teaspoon vanilla extract and mix until fully combined. In a separate bowl, sift together the 1 cup all-purpose flour, 0.5 cup cocoa powder, 1 teaspoon baking powder, and 0.5 teaspoon salt. Gradually fold the dry ingredients into the wet mixture until just combined—don't overmix or your cakes will be dense.
Create the Chocolate Filling and Assemble the Ramekins
In a small saucepan, combine the 0.5 cup heavy cream and 8 ounces chopped dark chocolate bars. Cook over medium heat, stirring constantly, until the chocolate melts completely and the mixture is smooth. Remove from heat and let cool slightly—it should be thick enough to coat the back of a spoon but still pourable.
Lightly grease four 6-ounce ramekins and dust them with 0.25 cup powdered sugar, tapping out any excess. Divide the cake batter evenly among the ramekins, filling each about ¾ full. Using a spoon, carefully place 1 tablespoon of the chocolate mixture in the center of each ramekin, then swirl gently to create a small well. Top each with a small piece of the 0.25 cup butter (for filling), cut into small cubes.
Bake Until Golden and Set
Bake the ramekins for 12-14 minutes until the edges are deep golden brown and a toothpick inserted near the center comes out with a few moist crumbs but no wet batter. The cakes should look set on the outside but still jiggly in the center—this is key for that molten lava effect.
Remove the ramekins from the oven and let them rest for 1 minute before carefully running a knife around the edges to loosen. Invert each cake onto a serving plate, allowing the warm chocolate center to flow out dramatically. Serve immediately with a scoop of vanilla ice cream or whipped cream for the full Chili's experience.
Serve with Confidence for Maximum Drama
Here's the thing—timing matters. The cakes will continue to set as they cool, so serve them within 2-3 minutes of inverting for that perfect molten center. The edges should be crispy and slightly caramelized, while the inside remains rich, liquid chocolate. If you wait too long, the center will firm up, so don't skip this step.
For extra presentation, dust the plates with a pinch of powdered sugar or garnish with a sprinkle of semisweet chocolate chips. Each bite should deliver that signature combination of crispy exterior and warm, gooey chocolate rivers—just like your favorite restaurant version.
Pro Tips For Making Copycat Chili'S Molten Lava Cake
- Melt the Butter Slowly: If you dump cold butter into the hot sugar mix and stir like a maniac, you’ll end up with lumps that never dissolve—trust me, I’ve done it. Instead, cut the butter into tiny cubes (pea-sized or smaller) and let the sugar melt them gradually over medium-low heat. This isn’t the prettiest method, but it guarantees a smooth batter every time.
- Sift That Cocoa: I used to just scoop cocoa powder straight from the bag, and my cakes turned out dense and bitter. Now I sift it with the flour and baking powder—yes, even if it’s "unsweetened Dutch-process" (which is what Chili’s uses). A quick shake through a fine-mesh sieve removes clumps and aerates the mix, so your cake rises properly and tastes rich, not chalky.
- Don’t Overbake the Edges: The second the edges look set, pull the cake out—even if the center still wobbles. Overbaking turns the outside dry and tough while the lava center turns to soup. If you’re nervous, use a toothpick: it should come out with a few moist crumbs, not completely clean. The lava will keep melting for minutes after you take it out.
- Chill the Batter 30 Minutes: Sounds weird, but it works: let the batter sit at room temperature before baking. I was skeptical until I tried it—now my cakes have a firmer exterior and a proper molten center, not a sad, runny puddle. Just pop it in the fridge or let it cool while you preheat the oven. Your future self will thank you.
Regional styles of this recipe
Texas-Style Twist
In Texas, this dessert gets a bold upgrade with a peanut butter drizzle—mix ½ cup creamy peanut butter with 2 tablespoons honey and 1 tablespoon heavy cream, then drizzle over the inverted cake.
Add a sprinkle of crushed peanut butter cups for crunch. The contrast of chocolate and peanut butter is pure Texan comfort. 🌶️
California Fusion
West Coast bakers add a lavender-infused twist—swap ½ teaspoon vanilla extract with ½ teaspoon culinary lavender buds steeped in 1 tablespoon warm milk for 10 minutes. Strain before using. Top with edible lavender flowers and a dusting of rose petals for a floral, elegant presentation. Perfect for dinner parties!
New York City Mini Version
For city dwellers, scale down to individual muffin tins—use 12-count silicone molds and reduce batter to ⅓ of the recipe. Bake at 375°F for 8-10 minutes for faster, portable desserts.
Serve with a mini scoop of vanilla bean ice cream in a shot glass for a chic, bite-sized treat. Ideal for office parties or late-night cravings. 🏙️
Southern Comfort Style
Southern kitchens love a bourbon caramel drizzle—simmer ½ cup heavy cream, ½ cup brown sugar, and 2 tablespoons bourbon until thickened. Drizzle over the cake and garnish with pecan halves. The smoky-sweet balance is a crowd-pleaser, especially in colder months. 🍯
Mexican-Inspired Spice
Add a kick with chili and orange zest—mix ½ teaspoon ground cinnamon, ¼ teaspoon cayenne pepper, and 1 teaspoon orange zest into the cake batter.
Top with a tajín rim on the serving plate and a dollop of Mexican crema. The citrusy heat cuts through the richness beautifully. 🌶️✨
Gluten-Free Adaptation
For gluten-sensitive guests, replace 1 cup all-purpose flour with ½ cup gluten-free 1:1 baking flour (like Bob’s Red Mill) and ½ cup almond flour. Add ½ teaspoon xanthan gum** to mimic texture. The cake stays moist and crispy—just as impressive as the original! 🌱
Nutrition facts
Frequently asked questions
Why does my molten lava cake not have a gooey center?
Overbaking is the most common culprit—remove your cakes when edges are golden but the center still jiggles slightly (about 12-14 minutes). Also ensure your chocolate filling isn't too thick (it should coat a spoon but still be pourable). If it solidifies, the heat from the cake batter will over-set it.
Can I make these ahead of time?
Bake them up to 2 days ahead and store at room temperature in an airtight container. Reheat individual cakes in the oven at 350°F for 10 seconds before serving to restore that molten magic. For longer storage, freeze baked cakes (unfrosted) for up to 1 month, then thaw at room temperature.
What's the best way to serve this dessert?
Always serve immediately after inverting for that signature lava effect! Pair with a scoop of vanilla ice cream or whipped cream for the full Chili's experience. For extra drama, dust plates with powdered sugar or add a sprinkle of semisweet chocolate chips. The contrast of warm cake and cold ice cream is pure perfection.
Can I use a different type of chocolate?
Stick with 60% cacao dark chocolate for the filling—it melts smoothly and delivers that rich, velvety texture. For the batter, Dutch-processed cocoa powder (like Hershey's Special Dark) gives deeper flavor than natural cocoa. Avoid white chocolate or milk chocolate—they won't create that signature molten effect.
How do I fix cracked edges that aren't crispy?
Your oven temperature might be too low—preheat to 350°F and let it fully acclimate for 15 minutes before baking. Also ensure your butter is cold when mixing (small cubes) and don't overmix the batter. For extra crispiness, broil for 30 seconds at the very end of baking.