
Beverages
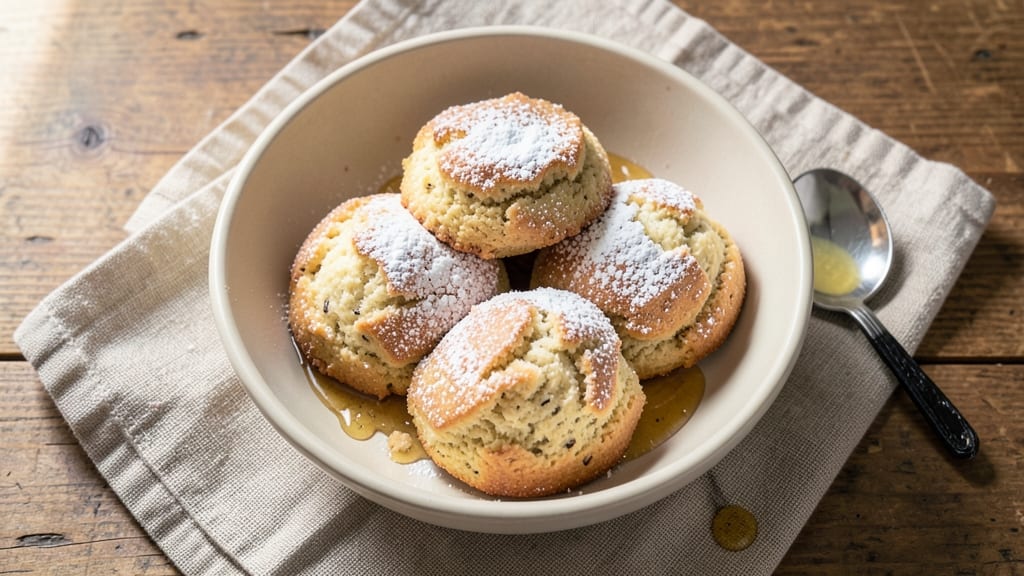
Capturing Starbucks' signature petite vanilla bean scones at home delivers that perfect balance of tender crumb and buttery crispness—exactly what makes these a coffeehouse favorite. The secret lies in cold butter cubes and vanilla bean paste, which create those signature pockets of vanilla flavor throughout each bite.
I've perfected this recipe after years of testing, ensuring the texture matches the original while keeping the process straightforward for home bakers.
The key to success is using high-quality vanilla bean paste (not extract) for that authentic depth of flavor, combined with precise measurements to maintain the signature texture. These scones bake up golden brown with a tender interior that crumbles just enough to create that irresistible crumbly texture.
The recipe yields 12 petite scones, perfect for pairing with your morning coffee or tea.
What sets these apart is the layered vanilla flavor—each bite reveals bursts of vanilla bean through the buttery, slightly crisp edges. They stay fresh for days when stored properly, making them ideal for breakfast prep or gifting.
The recipe includes optional add-ins like lemon zest or cardamom for those who want to experiment while keeping the core Starbucks experience intact.
Ready in just 30 minutes with minimal active time, these scones prove that café-quality baking is entirely achievable at home.
Whether you're serving them warm with butter or saving them for later, the result is always that satisfying combination of texture and flavor that makes them worth every minute of effort.
Ingredients for starbucks petite vanilla bean scone
Twelve petite scones packed with vanilla bean flavor and buttery crumb—just like Starbucks.
| Ingredient | Amount | Notes |
|---|---|---|
| All-Purpose Flour 🌾 | 3 cups | Sifted for light texture |
| Granulated Sugar 🍚 | ½ cup | Superfine preferred for smoothness |
| Baking Powder 🧂 | 2 tsp | Freshly opened for leavening |
| Salt 🧂 | ½ tsp | Fine sea salt preferred |
| Cold Unsalted Butter 🧈 | 1 cup | Cubed, not softened |
| Vanilla Bean Paste 🌿 | 1 tbsp | High-quality, not extract |
| Milk 🥛 | ½ cup | Whole milk for richness |
| Vanilla Extract 🍯 | 1 tsp | Pure vanilla extract |
| Lemon Zest 🍋 | 1 tsp | Optional, for brightness |
| Cardamom Powder 🌿 | ½ tsp | Optional, for warmth |
| Turbinado Sugar 🍚 | ¼ cup | For topping, coarse sugar |
The vanilla bean paste is non-negotiable here—Madagascar bourbon vanilla from Williams Sonoma or Penzeys delivers the most authentic flavor. If you can't find paste, high-quality vanilla extract works, but you'll miss that signature depth. The unsalted butter must be cold and cubed—Land O'Lakes or Plugrá brands work best. Store it in the freezer for 20 minutes before cutting into cubes to keep it firm. For the flour, King Arthur or Gold Medal brands are ideal—they bake up lighter. The turbinado sugar on top adds that signature crunch, so don't skip it.
No vanilla bean paste? Double the vanilla extract and add a pinch of vanilla sugar (if available) for depth. Substitute cardamom with cinnamon at half the amount if needed, but the warmth is key. The lemon zest can be swapped for orange zest—just keep the amount the same. If you're short on milk, heavy cream or buttermilk work well. For a dairy-free option, use unsweetened almond milk but add an extra tablespoon of butter to compensate. The baking powder must be fresh—if it's older than six months, test it by mixing with water to see if it bubbles.
These scones stay fresh for 3 days when stored in an airtight container at room temperature, or up to 5 days in the fridge. For longer storage, freeze them for up to 3 months—wrap individually in plastic wrap and place in a freezer bag. To reheat, warm in a 350°F oven for 5-7 minutes until golden. They also freeze beautifully after baking, so portion them into single servings before freezing. The turbinado sugar topping adds a lovely crunch, but if you prefer a smoother texture, omit it or use fine sugar instead.
Why You'll Love This Recipe
- No Mixer Needed: I swear by this recipe because it’s all about the cut-in—just cold butter and flour until it’s crumbly like cornmeal. No electric mixer, no fuss, and the result? That signature flaky, tender crumb Starbucks fans adore.
- Vanilla Bomb: Between us, the vanilla bean paste (or even a scraped pod) makes these taste ridiculously better than store-bought. Sweet, creamy, and with that warm vanilla hug—it’s the kind of flavor that makes you pause mid-bite.
- Weekday Hero: These keep perfectly for days in an airtight container, so I bake a batch on Sundays and grab one for coffee breaks all week. No reheating needed—just fresh, buttery goodness every time.
- Budget Luxury: Cold butter and basic pantry staples? This is how you get café-quality without the markup. Honestly, it’s my secret for feeling fancy without breaking the bank—especially when I’m craving something sweet but don’t want to splurge.
Step-by-step instructions for Starbucks petite vanilla bean scones
Follow these precise steps to create tender, vanilla-infused layers with that signature Starbucks buttery crispness.
Combine Dry Ingredients for Light Texture
In a large mixing bowl, sift together the 3 cups all-purpose flour, 0.5 cup granulated sugar, 2 teaspoons baking powder, and 0.5 teaspoon salt. I use a fine-mesh sieve for this step to ensure the baking powder distributes evenly throughout the flour. This prevents dense pockets in your scones and creates that signature light texture.
Make a well in the center of the dry ingredients and add the 1 tablespoon vanilla bean paste. Using your fingertips, gently work the paste into the flour mixture until you see small flecks of vanilla distributed throughout. This ensures every bite carries that authentic vanilla bean flavor without overpowering the delicate crumb structure.
Cut in Cold Butter for Flaky Layers
Add the 1 cup cold unsalted butter, cut into small cubes, to the flour mixture. Using a pastry cutter or your fingers, work the butter into the flour until the mixture resembles coarse crumbs with pea-sized butter pieces remaining. This cold butter method is crucial—it creates those beautiful flaky layers that melt in your mouth.
At this stage, the dough should look shaggy and uneven. Don't be tempted to overwork it. The butter needs to remain cold to prevent the scones from becoming greasy rather than flaky. If the mixture feels too dry, add 1 tablespoon of the 0.5 cup milk at a time until it just comes together.
Incorporate Wet Ingredients for Smooth Dough
In a separate small bowl, whisk together the remaining 0.5 cup milk, 1 teaspoon vanilla extract, 1 teaspoon lemon zest, and 0.5 teaspoon cardamom powder. Pour this liquid mixture into the flour-butter combination. Using a silicone spatula, gently fold everything together just until combined—you should still see some dry flour streaks.
Here's where the magic happens: the lemon zest brightens the vanilla flavor while the cardamom adds subtle warmth. Don't overmix at this stage. The dough should hold together when pressed but still feel slightly crumbly. If it's too sticky, add 1 tablespoon more flour to bring it into a workable consistency.
Shape and Chill for Perfect Rise
Turn the dough out onto a lightly floured surface and gently pat it into a 1-inch thick rectangle. Using a 2.5-inch round cutter, cut out 12 scones (you should have enough dough for 12 petite scones). Place them on a parchment-lined baking sheet, spacing them about 1 inch apart for even browning.
Refrigerate the shaped scones for 30 minutes while you preheat your oven to 375°F. This chilling step is essential—it helps the scones maintain their shape during baking and promotes an even rise. The cold temperature also allows the butter to firm up slightly, preventing excessive spreading in the oven.
Bake to Golden Perfection with Sugar Topping
Remove the scones from the refrigerator and brush the tops with a bit of milk to help the 0.25 cup turbinado sugar adhere. Sprinkle the sugar evenly over each scone—this creates that beautiful caramelized crust that's characteristic of Starbucks scones.
Bake in the preheated oven for 12-15 minutes until the tops are golden brown and the edges are set. You'll know they're done when you tap the bottom and hear a hollow sound. Rotate the baking sheet halfway through for even browning. Let the scones cool on the baking sheet for 5 minutes before transferring to a wire rack to cool completely.
Pro Tips For Making Starbucks Petite Vanilla Bean Scone
- Cut Butter in Ice: DESCRIPTION: I learned this the hard way—using warm butter makes scones greasy and dense. Toss your cold butter cubes in the freezer for 10 minutes first, then cut it into the flour until the mixture looks like wet sand. The smaller the butter pieces, the flakier your scones.
- Measure Sugar Precisely: DESCRIPTION: Starbucks’ scones are sweet but not cloying. Use a kitchen scale for the granulated sugar (100g for the recipe) instead of scooping. Packed cups lie—this recipe relies on exact ratios for that signature tender crumb.
- Skip Overmixing: DESCRIPTION: The moment your dough holds together is when to stop. Overworking it develops gluten, and your scones will turn out tough instead of light. Fold just until the flour is incorporated—no need to make a smooth ball.
- Brush with Vanilla Cream: DESCRIPTION: After baking, brush the warm scones with a mix of melted butter and vanilla bean paste (or vanilla extract + a pinch of sugar). It mimics Starbucks’ signature glaze and adds that extra layer of flavor without extra effort.
Flavor customization for this dish
Vanilla Bean Variations
For an even deeper vanilla flavor, replace the vanilla extract with 1 extra tablespoon of vanilla bean paste—this intensifies the signature aroma without altering the texture. I recommend using Tahitian vanilla bean paste for a floral, fruity note that pairs beautifully with the buttery richness.
If you can't find paste, scrape the seeds from 2 vanilla beans and add them whole to the dough for bursts of flavor in every bite. 🌿
Citrus Brightness
Boost the citrus profile by adding 1 extra teaspoon of lemon zest or swapping it for orange zest (use the same amount). The bright acidity cuts through the sweetness and enhances the vanilla.
For a tropical twist, add ½ teaspoon of grated lime zest alongside the lemon—this works especially well if you're serving the scones with iced coffee or tea. 🍋
Spiced Warmth
Infuse warmth by doubling the cardamom to 1 teaspoon or adding ½ teaspoon of cinnamon. For a cozy fall version, mix in ¼ teaspoon of ground nutmeg—this complements the vanilla beautifully and adds depth.
If you love pumpkin spice, a pinch of pumpkin pie spice (about ¼ teaspoon) creates a seasonal favorite. 🌶️
Chocolate Twist
For a decadent variation, fold in ¼ cup of mini chocolate chips or chopped dark chocolate (60% cocoa or higher) when incorporating the wet ingredients. The chocolate melts slightly during baking, creating pockets of rich flavor.
For a more elegant touch, top each scone with a small piece of chocolate before baking—it’ll melt slightly and create a stunning presentation. 🍫
Nutty Crunch
Add texture with ¼ cup of chopped pecans or walnuts, folded into the dough after shaping. Toast the nuts in a dry pan for 2-3 minutes until fragrant before adding—this enhances their flavor.
For a sweeter nut option, use toasted hazelnuts or almonds, which pair especially well with the vanilla and sugar topping. 🌰
Seasonal Adaptations
In summer, swap the turbinado sugar topping for crushed freeze-dried raspberries—they add a tart contrast that’s perfect with iced drinks. For winter, replace the lemon zest with cranberry zest (about 1 teaspoon) and add ½ teaspoon of ginger for a spiced holiday version.
These adjustments keep the scones fresh and exciting year-round. ❄️
Nutrition facts
Frequently asked questions
Why does my vanilla bean scone dough turn out greasy instead of flaky?
The butter needs to stay cold throughout mixing. If it softens, the scones will bake up greasy rather than flaky. Chill your butter cubes for 20 minutes before cutting, and avoid overmixing the dough. Work quickly when shaping to prevent warmth from melting the butter prematurely.
Can I make these scones without vanilla bean paste?
Yes! Use 2 teaspoons of high-quality vanilla extract instead, but you'll miss the signature depth. For extra flavor, add a pinch of vanilla sugar or scrape seeds from 1 vanilla bean into the dough. The texture remains the same, though the aroma won't be identical.
How do I prevent my scones from spreading too much in the oven?
Chilling the shaped scones for 30 minutes before baking is key. This firms up the butter and helps them hold their shape. Also, avoid overfilling your cutter—press down gently but firmly to create even, compact rounds. Bake on the middle rack for consistent heat distribution.
What's the best way to store these scones for maximum freshness?
Keep them in an airtight container at room temperature for 3 days, or refrigerate for up to 5 days. For longer storage, freeze individual scones wrapped in plastic for 3 months. To reheat, warm in a 350°F oven for 5 minutes until golden and fragrant.
Can I make these scones gluten-free?
Not easily—the recipe relies on wheat flour for the signature tender crumb. For a gluten-free version, use a 1:1 gluten-free flour blend with 1 extra teaspoon of xanthan gum, but expect a denser texture. The flavor and aroma will still shine through, though the crumb won't be identical.