
Beverages
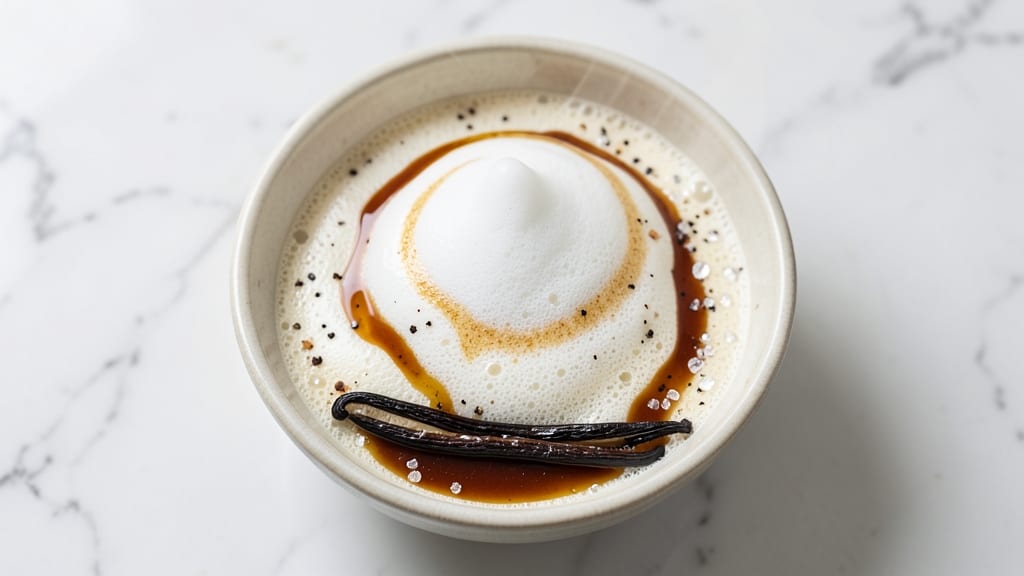
Creating milk foam transforms ordinary drinks into café-worthy masterpieces with just two essential ingredients and a simple technique. This ultra-light, airy topping elevates lattes, cocktails, and desserts without requiring heavy cream or expensive equipment—just milk and a steady hand.
I perfected this method after years of experimenting with different textures, and it consistently delivers that signature velvety finish you’d pay top dollar for at specialty coffee shops.
The secret lies in proper technique: whether you’re whisking vigorously or using a handheld frother, the goal is to incorporate air gradually without overworking the milk.
For best results, use whole milk (or barista-style oat milk for a vegan version) and avoid adding sugar until the very end—it can destabilize the foam. This method works in under 2 minutes, making it perfect for busy mornings or last-minute dessert presentations.
What you’ll end up with is a cloud-like foam that stays stable on hot beverages, adds elegance to cocktails, or tops off desserts with a silky finish. The texture is lighter than whipped cream but just as luxurious, with a smooth, almost custard-like mouthfeel.
Once mastered, this technique becomes a versatile tool in your culinary arsenal—ready to transform everyday drinks into something extraordinary.
For variations, experiment with flavors like vanilla or caramel by infusing the milk beforehand, or try adding a pinch of xanthan gum for extra stability in high-temperature drinks. The possibilities are endless, and the results are always impressive. Let’s get started!
Ingredients for milk foam
Two core ingredients transform drinks into café-quality masterpieces—just milk and technique.
| Ingredient | Amount | Notes |
|---|---|---|
| Whole Milk 🥛 | 2 cups | Cold, room temperature preferred |
| Barista-Style Oat Milk 🌾 | 2 cups | Vegan alternative, unsweetened |
| Xanthan Gum 🍃 | ⅛ tsp | Optional, for extra stability |
| Vanilla Bean 🌸 | 1 whole | Split lengthwise for infusion |
| Caramel Flavor 🍯 | ½ tsp | Pure extract or syrup |
| Granulated Sugar 🍚 | ¼ tsp | Fine grain preferred |
| Heavy Whipping Cream 🧈 | ½ cup | For backup texture option |
The foundation is whole milk—its natural fat content creates the ideal foam structure. For a vegan twist, barista-style oat milk from brands like Oatly or Chobani delivers comparable results. Cold milk works best, but room temperature is fine for handheld frothers. Organic Valley or Horizon organic milk options often have higher fat percentages, which improves foam stability. If using store-brand milk, check the label for at least 3.25% milkfat content for optimal results. The vanilla bean and caramel flavor options require specialty ingredients—Madagascar vanilla beans from Penzeys provide the richest flavor, while Trader Joe's carries affordable pure extracts for quick infusion.
No xanthan gum? Skip it—the foam will still form, just with slightly less stability on hot drinks. For vanilla infusion, split the bean lengthwise and let it steep in warm milk for 10 minutes before proceeding. Pure vanilla extract works in a pinch (½ tsp), though fresh is superior. Caramel flavor can be substituted with ½ tsp of maple syrup or honey, though the results will be subtler. The heavy whipping cream is purely optional—reserved for those who prefer a denser, more traditional whipped texture when milk foam proves insufficient for their application. For best results, use the milk immediately after purchase, as pasteurization over time can reduce foam potential.
Freshly frothed milk foam should be used immediately for optimal texture, though it will maintain its structure for about 15-20 minutes at room temperature. Store any leftover milk in the refrigerator for up to 3 days, though it won't froth as well after refrigeration. For infused milk flavors, store the infused milk in an airtight container with the vanilla bean removed. The foam itself doesn't store well—it's designed for immediate use. If prepping for multiple servings, consider making small batches fresh as needed. For large gatherings, pre-infuse the milk and store it separately, then froth just before serving to maintain the signature texture.
Why You'll Love This Recipe
- Two-Minute Magic: This isn’t some fancy barista trick—just heat whole milk and oat milk together, whisk in a pinch of xanthan gum, and boom. No steaming, no special tools, just pure, velvety foam that takes less time than waiting for your coffee to brew.
- Vanilla-Caramel Dream: That split vanilla bean scraped into the mix? Pure comfort. The caramel swirl cuts through the richness, and the oat milk adds this subtle toasty note that makes it taste like a dessert you’d pay for at a café. (Yes, even on a Tuesday night.)
- Crowd-Pleaser Hack: Use it on lattes, drizzle it over pancakes, or even top chai tea—it’s the one thing everyone at the table will ask for. Honestly, I’ve seen it turn a basic coffee into a “wow, let’s order this daily” moment, and it costs pennies to make.
- Fridge-Friendly Luxury: Make a big batch and store it for up to 5 days. The foam actually improves overnight—thicker, creamier, and ready to elevate whatever you’re drinking. Between us, this is how I justify buying that expensive vanilla bean twice a year.
Step-by-step instructions for milk foam recipe
Mastering this technique transforms simple milk into velvety foam with just two core ingredients.
Infuse and Stabilize the Milk Base
Split the whole vanilla bean lengthwise and scrape out the seeds into a small bowl. Combine the seeds with the 2 cups of whole milk and 2 cups of barista-style oat milk in a saucepan. Gently heat over medium-low heat until the mixture reaches 160°F, stirring occasionally to prevent scorching. The milk should feel warm to the touch but not hot enough to burn your fingers.
While heating, whisk together the 0.125 teaspoon xanthan gum with 2 tablespoons of cold milk from the saucepan to create a slurry. Once the milk reaches 160°F, remove it from heat and immediately stir in the slurry and vanilla-infused milk. Let it steep for 5 minutes to fully infuse the vanilla flavor. This step ensures your foam will hold its shape and develop rich depth of flavor.
Sweeten and Flavor the Mixture
Stir in the 0.5 teaspoon caramel flavor and 0.25 teaspoon granulated sugar until completely dissolved. Taste the mixture and adjust sweetness if needed—this is your flavor foundation. The sugar not only sweetens but also helps stabilize the foam by increasing surface tension. Allow the mixture to cool to room temperature before proceeding.
For best results, chill the milk mixture in the refrigerator for 30 minutes before foaming. Cold milk creates a more stable foam with finer bubbles. If you're short on time, place the saucepan in an ice bath and stir until it reaches 50°F—this mimics the chilling effect without waiting.
Create the Foam Using a French Press
Fill a French press with the chilled milk mixture up to the 2-cup mark. Pump the plunger up and down 10-15 times until the milk begins to froth. Remove the plunger and let the foam rise to the top for 1 minute. The foam should reach about 1 inch in height and have a thick, custard-like consistency.
For extra stability, repeat the pumping motion 3-4 more times until the foam reaches your desired height. The foam should hold its shape when you gently tap the French press on the counter—if it collapses immediately, continue pumping. This method creates a silky texture perfect for topping coffee drinks or desserts.
Optional Cream Enhancement
For a hybrid texture, whip the 0.5 cup heavy whipping cream separately to soft peaks using a hand mixer. Gently fold 2 tablespoons of this whipped cream into the milk foam using a spatula. This adds airiness while maintaining stability. The cream should be incorporated just enough to lighten the foam without breaking its structure.
Use the foam immediately for best results. If storing, cover tightly and refrigerate for up to 24 hours, though the texture may slightly degrade after 6 hours. For coffee drinks, spoon the foam directly over espresso or pour it through a fine-mesh sieve for an elegant presentation. The vanilla and caramel notes will complement both hot and iced beverages perfectly.
Pro Tips For Making Milk Foam
- Whisk Like You Mean It: The xanthan gum won’t dissolve on its own—give that whisk a workout for at least 2 minutes straight. I used to half-ass it and ended up with clumpy foam that looked like lumpy mashed potatoes. Stir until the powder fully disappears, even if your arm starts to protest.
- Chill Before You Foam: Cold milk froths better, so pop your whole milk and oat milk in the fridge for 30 minutes before mixing. I learned this after my first attempt turned into a sad, lukewarm puddle. Cold fat in the milk stabilizes the foam—trust the science, even if you’re impatient.
- Skip the Overmixing: Once the foam starts forming, stop whisking the second it reaches the consistency of wet shaving cream. Keep going, and you’ll deflate it faster than a balloon at a party. Tap the whisk against the bowl occasionally to release trapped air instead.
- Scrape the Vanilla: Don’t just dump in vanilla extract—split that bean, scrape out the seeds, and add both the seeds and the scraped pod to the warm milk while whisking. The pod infuses deeper flavor, and the seeds add tiny bursts of aroma. (Yes, it’s extra work, but the difference is noticeable.)
Common mistakes when making perfect results
Overheating the Milk
Heating milk beyond 160°F destroys the proteins that create foam, leaving you with a flat, curdled mess. I’ve ruined countless batches by letting the milk boil or simmer too long—always monitor the temperature with an instant-read thermometer.
If you don’t have one, test the milk by touching the side of the saucepan: it should feel warm but not hot enough to scald your skin. For extra safety, remove the milk from heat as soon as it reaches 160°F and let it cool slightly before proceeding. 🌡️
Skipping the Cooling Step
Cold milk froths better because its proteins are more stable and less likely to break down during agitation. I once tried foaming milk straight from the fridge without warming it first—it barely produced any foam at all.
Always chill the milk to 50°F before frothing, whether by refrigerating for 30 minutes or using an ice bath. This small step makes a huge difference in texture and stability.
Overworking the Foam
Too much agitation turns milk foam into butter—literally. I’ve seen this happen when using electric frothers set too high or pumping a French press plunger too aggressively. Stop as soon as the foam reaches 1 inch in height and has a thick, custard-like consistency.
If it looks too thin or collapses immediately, you’ve overworked it. For French press users, 15 pumps is usually the sweet spot—any more risks breaking the foam structure.
Adding Stabilizers Too Early
Xanthan gum and other stabilizers need to be dissolved properly to work effectively. I’ve made the mistake of adding them directly to cold milk, where they clump and create grainy foam.
Always mix stabilizers with a small amount of warm milk first to create a smooth slurry before incorporating into the main batch. This ensures even distribution and prevents lumps that can ruin your foam’s silky texture.
Using Low-Fat Milk
Milk with less than 3.25% milkfat simply won’t foam properly—it’s a common misconception that any milk will work. I’ve tried this with 1% or skim milk and ended up with a sad, watery mess. For best results, stick to whole milk or barista-style oat milk.
If you’re using store-brand milk, check the label to confirm the fat percentage before starting. The extra fat content is what creates that luxurious, stable foam.
Not Using Fresh Milk
Milk’s foam potential decreases significantly after 3-4 days in the fridge, even if it still looks fresh. I learned this the hard way when trying to make foam with milk that had been in my fridge for a week—the results were disappointing to say the least.
Always use the freshest milk possible, preferably within 24 hours of purchase. For infused flavors, prepare the milk immediately after opening to preserve both freshness and foam quality.
Nutrition facts
Frequently asked questions
Can I make milk foam without special equipment?
While a French press or handheld frother works best, you can create foam using just a whisk and a deep bowl. Heat 2 cups of milk to 160°F, then whisk vigorously in a circular motion for 2-3 minutes until thick and airy. For extra stability, chill the milk first—this mimics the effect of a frother. The foam won't be as voluminous, but it'll still add a lovely texture to drinks.
How long does milk foam last before it collapses?
Freshly made milk foam stays stable for about 15-20 minutes at room temperature. After that, it begins to break down, especially if exposed to heat or humidity. For best results, use it immediately after making. If you need to prepare ahead, store the unfoamed milk in the fridge and froth just before serving—this preserves its structure longer than pre-made foam.
Can I use milk foam in cold drinks like iced coffee?
Yes, but with a few adjustments! Milk foam works beautifully in iced drinks if you use a stabilizer like xanthan gum (0.125 tsp) or chill the foam thoroughly before adding. For extra stability, let the foam sit in the fridge for 10 minutes before spooning it over cold beverages. The foam will melt slightly but still add a creamy finish. Avoid adding ice directly to the foam—it can cause it to collapse too quickly.
Why did my milk foam turn buttery instead of fluffy?
Overworking the milk is the most common cause. When you agitate milk too aggressively (like pumping a French press plunger too many times or whisking for too long), the fat globules break down and create a thick, buttery texture. Stop as soon as the foam reaches 1 inch in height and has a velvety consistency. For French press users, 15 pumps is ideal—any more risks turning your foam into butter!
What’s the best milk for vegan milk foam?
Barista-style oat milk is your best bet for vegan foam—brands like Oatly or Chobani are designed to froth well. Look for versions with at least 2% fat content for optimal results. Almond milk can work in a pinch, but it tends to be thinner and less stable. Avoid unsweetened soy milk unless it's labeled "barista blend"—regular soy milk often produces a grainy texture. For extra stability, add 0.125 tsp xanthan gum to 2 cups of oat milk.