Side Dishes
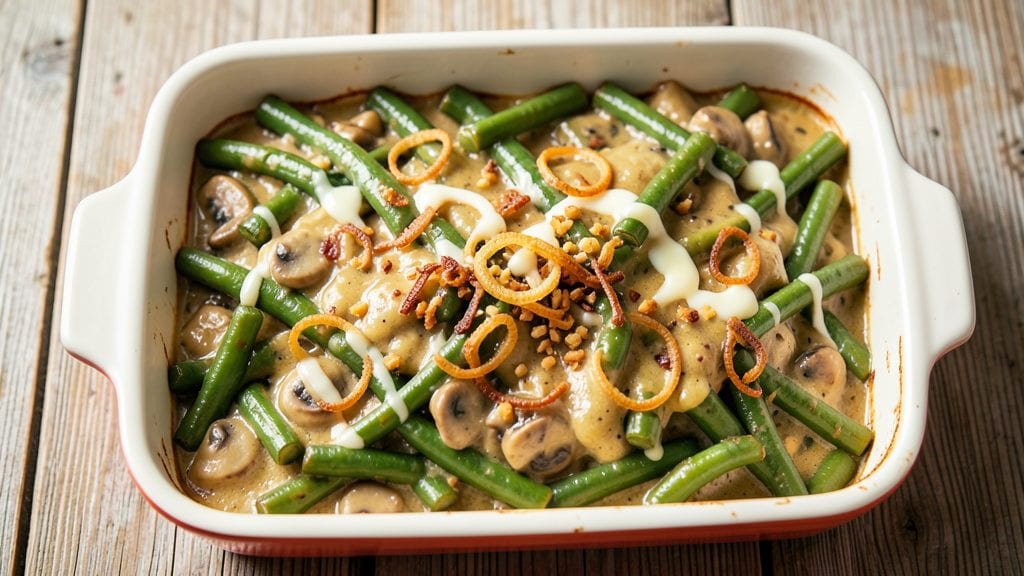
The Betty Crocker green bean casserole recipe delivers that nostalgic, comforting flavor we all love—crispy fried onions on top and creamy mushroom soup beneath.
This classic side dish has been a holiday staple for generations, and I’ve perfected it to ensure the top stays perfectly golden while the filling remains rich and velvety. The key lies in layering the ingredients just right and baking at the correct temperature to achieve that signature texture.
What makes this recipe special is how it balances simplicity with restaurant-quality results. You’ll need just a handful of ingredients—green beans, cream of mushroom soup, milk, and those iconic crispy fried onions—that come together in about 30 minutes of active prep time, plus baking.
The secret to the crispy top isn’t just the onions; it’s also the way the soup mixture is spread evenly before baking, creating a golden, crackly crust that’s impossible to resist.
By the time it emerges from the oven, you’ll have a casserole with a crispy, caramelized top that shatters at every bite and a creamy, savory filling that’s rich with mushroom flavor.
This dish is the kind that brings everyone to the table, whether it’s for Thanksgiving, Christmas, or a cozy weeknight dinner. The aroma alone will have your kitchen smelling like holiday magic, and the texture contrast makes every forkful unforgettable.
For those looking to modernize the classic, I’ve included variations like using gluten-free fried onions or substituting the mushroom soup with a homemade version. The beauty of this recipe is its versatility—it’s a comfort food that can be tailored to fit dietary needs without sacrificing flavor.
Let’s get started on creating that perfect casserole.
Ingredients for betty crocker green bean casserole
Six ingredients make this nostalgic holiday classic—crispy, creamy, and impossible to resist.
| Ingredient | Amount | Notes |
|---|---|---|
| Fresh Green Beans 🥦 | 2 lbs | Trimmed and cut into 2-inch pieces |
| Cream of Mushroom Soup 🍄 | 2 cans | Condensed, 10.5 oz each |
| Milk 🥛 | ½ cup | Whole milk for creaminess |
| Crispy Fried Onions 🧅 | 1 ½ cups | Topping, store-bought or homemade |
| French Fried Onions 🧅 | ½ cup | For extra crunch layer |
| Butter 🧈 | 3 tbsp | Unsalted, melted |
| Salt 🧂 | ½ tsp | Kosher or sea salt |
| Black Pepper 🌶️ | ¼ tsp | Freshly ground preferred |
| Garlic Powder 🧄 | ½ tsp | For subtle depth |
| Dried Parsley 🌿 | 1 tbsp | For garnish |
| Parmesan Cheese 🧀 | ¼ cup | Freshly grated, optional |
| Heavy Cream 🥛 | ¼ cup | For extra richness |
The green beans are your base, so grab fresh, crisp ones—the kind with bright green color and no woody ends. Trader Joe's or Whole Foods usually have the best quality, but any grocery store's fresh section works. If you're short on time, frozen green beans work too (just thaw and drain well). For the soup, Betty Crocker or Campbell's are classic choices, but homemade mushroom soup takes this dish to the next level. The key here is to blanch your green beans first—boil for 3 minutes, then shock in ice water. This keeps them vibrant and prevents mushiness in the casserole. Don’t skip this step—trust me on it.
No crispy fried onions? French fried onions from the baking aisle are a great shortcut—they’re smaller and add extra crunch. Want to go gluten-free? Check the baking section for gluten-free fried onions or make your own with crushed potato chips and a little butter. Short on milk? Heavy cream or half-and-half works too, but it’ll be richer. The Parmesan is optional but adds a nice salty kick—freshly grated is best, but pre-shredded in a pinch. For extra depth, add a pinch of nutmeg or thyme to the soup mixture. And if you’re feeling fancy, swap the condensed soup for a homemade version using mushrooms, cream, and a splash of white wine.
This casserole reheats beautifully—honestly, it’s even better the next day once everything melds together. Store leftovers in an airtight container for up to 4 days in the fridge. For holidays, make it ahead and bake it fresh when guests arrive—the aroma alone will have everyone gathering. If you’re prepping for a crowd, double the recipe and use a larger baking dish. The crispy top stays crunchy for about 15 minutes after baking, so serve it right away if you’re serving it immediately. Freezes well too—just reheat covered at 350°F for 20-25 minutes.
Why You'll Love This Recipe
- No-Sweat Weeknight Win: I swear by this when I’ve got better things to do than stand at the stove. Trim the green beans—if you even bother—toss them in boiling water, then dump in the soup and milk. The onions? Just sprinkle. Done. That’s 20 minutes of my life I’ll never get back, but honestly? Worth it.
- Creamy Crunch Magic: Between us, the secret’s in the layers. The creamy mushroom soup base is rich but not heavy, the green beans stay tender, and those fried onions? Chef’s kiss. The top ones get all crispy while the bottom ones stay soft—like a perfect hug for your taste buds. (Yes, even on a Tuesday night.)
- Leftovers That Don’t Lie: This casserole actually improves the next day. The flavors meld, the onions get even crunchier, and it reheats like a dream. I make a double batch on Sundays, freeze half, and boom—holiday dinner side dish or lazy Friday night solved. No sad, soggy leftovers here.
- Budget-Friendly Crowd-Pleaser: Fresh green beans might sound fancy, but they’re cheaper than takeout and healthier than most restaurant sides. Add the canned soup and milk, and you’ve got a dish that feeds six for under $10. My in-laws think it’s gourmet. My wallet thanks me. (And the kids? They’ll eat it anyway.)
Step-by-step instructions for Betty Crocker green bean casserole recipe
Here's how to make the classic green bean casserole with that perfect crispy topping and creamy sauce.
Blanch the Green Beans
Trim the ends off the 2 lbs of fresh green beans and cut them into 2-inch pieces. This makes them easier to eat and ensures even cooking. Bring a large pot of salted water to a boil and add the green beans. Cook for 4-5 minutes until they're bright green and tender but still slightly crisp. Drain immediately in a colander and rinse with cold water to stop the cooking process. This blanching step is crucial—it preserves their color and texture while making them ready to absorb the creamy sauce later.
Don't overcook them or they'll turn mushy. You want them to hold their shape but still be tender enough to eat. Spread them out on a baking sheet to cool completely before proceeding. This prevents them from steaming in the casserole dish and becoming soggy.
Make the Creamy Sauce Mixture
In a large bowl, combine the 2 cans of cream of mushroom soup, 0.5 cup of milk, 0.25 cup of heavy cream, 3 tbsp of melted butter, 0.5 tsp of salt, 0.25 tsp of black pepper, and 0.5 tsp of garlic powder. Mix everything together until smooth and well combined. This creamy base is what gives the casserole its signature rich flavor. I like to use a whisk for this step to make sure there are no lumps in the sauce.
Taste the mixture and adjust the seasoning if needed. You might want to add a little more salt or pepper depending on your preference. This is also where you can add the 0.25 cup of freshly grated parmesan cheese if you're using it. The sauce should be thick but still pourable—it'll thicken more as it bakes.
Layer the Casserole
Preheat your oven to 350°F. In a 9x13-inch baking dish, spread half of the blanched green beans evenly across the bottom. Then pour half of the creamy sauce mixture over the green beans. Repeat with the remaining green beans and sauce, making sure everything is covered. The layers should be about equal in thickness.
Here's where the magic happens: sprinkle half of the 0.5 cup of french fried onions evenly over the top layer of sauce. Then scatter the 1.5 cups of crispy fried onions across the entire surface. The french fried onions add a nice crunchy layer between the creamy sauce and the crispy topping. Don't skip this step—it's what creates that perfect texture contrast.
Bake to Golden Perfection
Place the casserole dish in the preheated oven and bake for 35-40 minutes. The casserole is done when the top is golden brown and bubbly, and the edges are slightly crispy. You'll know it's ready when you see the crispy fried onions turning a deeper golden color and the sauce starting to bubble around the edges.
About 10 minutes before the casserole is done, sprinkle the 1 tbsp of dried parsley evenly over the top. This adds a fresh pop of color and flavor that complements the rich creaminess. Let the casserole rest for 5-10 minutes after baking—this helps the layers set and makes it easier to serve without spilling the creamy sauce.
Pro Tips For Making Betty Crocker Green Bean Casserole
- Blanch Beans First: DESCRIPTION: If you’re using fresh green beans, drop them in boiling salted water for 3 minutes before draining—this softens them just enough to absorb the creamy sauce without turning mushy. (Yes, even if the recipe says "raw," trust me on this.)
- Stir the Sauce: DESCRIPTION: After mixing the soup, milk, and seasoning, give it a quick stir on the stove for 2–3 minutes—just until it’s hot and smooth. This cuts the graininess of the powdered soup and makes the sauce cling better to the beans.
- Layer Onions Last: DESCRIPTION: Sprinkle the French fried onions right before baking, not after. They’ll crisp up perfectly on top while the rest of the casserole cooks, and you won’t end up with soggy bits at the bottom.
- Skip the Extra Milk: DESCRIPTION: The recipe calls for milk, but if you’re using condensed cream of mushroom soup, you might not need all of it—start with ¾ cup and adjust. Too much milk makes the topping soggy, and nobody wants a sad, watery green bean disaster.
Pro cooking tips for betty crocker green bean casserole
Crispy Top Secrets
The golden, crackly topping isn't just about the fried onions—it's about even heat distribution. Spread the onions in a single layer before baking to prevent clumping.
I like to use a pie crust brush to lightly coat them with melted butter before sprinkling—this gives them an extra crispy edge. 🌟
For that restaurant-quality finish, broil the casserole for 2-3 minutes at the very end. Watch it like a hawk—this is where the magic happens! The broiler adds deep caramelization while keeping the green beans underneath perfectly tender.
Just make sure your oven rack is in the middle position for even browning.
Layering Like a Pro
Don't just dump everything in—layer strategically. Start with a thin layer of green beans, then sauce, then half the french fried onions before the final sauce layer. This creates a textural sandwich that keeps the crispy elements separate from the creamy filling.
I use a spatula to spread the sauce evenly, ensuring no dry spots develop during baking.
The French fried onions in the middle layer prevent the crispy topping from sinking into the creamy sauce. If you're short on time, toast potato chips with a little butter for a quick crunchy substitute—they work surprisingly well! 🧅
Temperature Control
Never skip preheating your oven—this is non-negotiable for that perfect texture. I always bake at 350°F for the first 30 minutes, then increase to 375°F for the final 5-10 minutes to get that deep golden color. This two-stage approach gives you even cooking without burning the top.
Use an oven thermometer to verify your oven's actual temperature—many run 15-25°F hotter than set. If your casserole isn't browning enough, try covering it loosely with aluminum foil for the first 20 minutes, then uncovering to crisp. This prevents over-browning while ensuring the top gets crispy.
Make-Ahead Magic
This casserole actually tastes better the next day—the flavors meld and the crispy top stays crunchy for hours. Assemble it completely, cover tightly with plastic wrap, and refrigerate for up to 24 hours before baking.
When ready to bake, add 5-10 minutes to your cooking time since it'll be cold.
For holiday prep, bake it completely, then refrigerate. Reheat covered at 300°F for 20 minutes—this gentle heat keeps the crispy topping intact. The secret? Re-crisp the top under the broiler for 1-2 minutes before serving to restore that golden crunch. 💫
Nutrition facts
Frequently asked questions
Can I use frozen green beans instead of fresh?
Frozen green beans work perfectly—just thaw and drain them well before using. For best results, pat them dry with a paper towel to remove excess moisture, which helps prevent a soggy casserole. The texture will be slightly different but still delicious.
How do I make the crispy topping extra crunchy?
For maximum crunch, broil the casserole for 2-3 minutes at the end of baking. Spread the fried onions in a single layer before baking, and consider brushing them lightly with melted butter for extra golden color. Avoid overcrowding—they need space to crisp!
Can I make this casserole ahead of time?
Yes! Assemble it completely, cover tightly, and refrigerate for up to 24 hours before baking. For holidays, bake it fully, then refrigerate and reheat covered at 300°F for 20 minutes. Re-crisp the top under the broiler for 1-2 minutes before serving.
What can I substitute if I don't have cream of mushroom soup?
Try a homemade version with 1 cup sautéed mushrooms, 1 cup heavy cream, and 1 tbsp flour thickened on the stove. For a quick fix, use cream of celery soup or even a béchamel sauce with mushroom powder. The flavor will be slightly different but still rich and creamy.
Why did my casserole turn out watery?
Watery results usually happen from overcooking the green beans or using too much liquid. Make sure to drain them well after blanching and use the exact measurements of milk/cream in the recipe. If it's still too thin, bake uncovered for 5-10 extra minutes to evaporate excess moisture.