
Main Courses
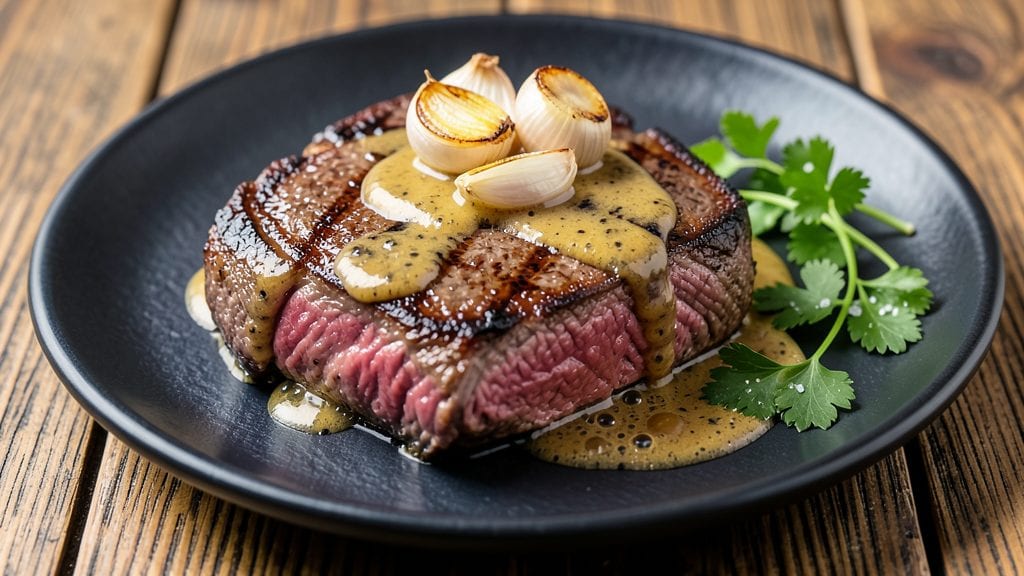
Mastering a thick sirloin steak recipe means achieving that perfect balance of crispy crust and tender interior—just like your favorite steakhouse. After years of testing different methods, I’ve found the reverse-sear technique delivers the most consistent, restaurant-quality results every time.
The secret lies in gentle cooking first, then a quick sear to lock in flavor and create that coveted crust.
This method works best with 1.5-inch-thick sirloin cuts, which stay juicy when cooked low and slow before hitting the hot pan. You’ll need a meat thermometer to monitor internal temperatures precisely—no more guessing or overcooked edges.
The process takes about 45 minutes total, but the hands-off time means minimal effort for maximum impact.
What you’ll end up with is a steak that’s deeply caramelized on the outside while remaining buttery and pink in the center, depending on your preferred doneness. The crust will be so crispy it practically shatters, while the interior stays tender enough to cut with a fork.
This isn’t just a steak—it’s a showstopping centerpiece for any dinner table.
Pair it with classic sides like roasted garlic mashed potatoes or a simple arugula salad for a complete meal. The reverse-sear method ensures you’ll never overcook another steak again—just follow these steps, and you’ll achieve hotel-style results in your own kitchen. Let’s get started!
Ingredients for thick sirloin steak
Fourteen ingredients, one perfect steak—this is your hotel-style reverse-sear game plan.
| Ingredient | Amount | Notes |
|---|---|---|
| Sirloin Steak 🥩 | 2 whole | 1.5-inch thick, bone-in preferred |
| Kosher Salt 🧂 | 1 ½ tbsp | Diamond Crystal preferred, coarse grain |
| Freshly Ground Black Pepper 🌶️ | 1 tbsp | Freshly cracked for maximum flavor |
| Extra-Virgin Olive Oil 🫒 | 2 tbsp | High smoke point, fruity variety |
| Unsalted Butter 🧈 | ½ cup | Cold, cut into 1-inch cubes |
| Garlic Cloves 🧄 | 4 cloves | Smashed, skin-on for extra flavor |
| Fresh Rosemary 🌿 | ¼ cup | Chopped, fresh sprigs preferred |
| Fresh Thyme Leaves 🌿 | ¼ cup | From stems, finely chopped |
| Yellow Onion 🧅 | 1 whole | Large, sliced into 1/4-inch pieces |
| Heavy Cream 🥛 | ¼ cup | Full-fat, room temperature |
| Red Wine 🍷 | ½ cup | Bold, dry variety like Cabernet |
| Beef Tallow or Lard 🧈 | ¼ cup | For oven roasting, optional |
The steak is non-negotiable here. Sirloin with 1.5-inch thickness is your golden ticket—thinner cuts won't deliver that buttery interior. Local butchers often have the best cuts, but if you're shopping at Whole Foods or Costco, look for 'dry-aged' labels. That marbling? It's what turns into flavor during cooking. The garlic and herbs? Fresh is non-negotiable—dried just won't cut it. I always grab extra rosemary because half gets tucked under the steak while it rests. For the wine, Cabernet Sauvignon or Merlot work best—they're bold enough to stand up to the beef.
No beef tallow? Use extra olive oil or duck fat—just make sure it has a high smoke point. Running out of rosemary? Thyme plus a pinch of smoked paprika works in a pinch, but the aroma is different. The butter should be cold and cubed—if it's soft, chill it for 20 minutes. For the salt, Diamond Crystal is your best bet—it's coarser and dissolves better. Prefer Morton's? Use it, but you might need to add a pinch extra. The onions? Yellow or red both work, but yellow adds a touch more sweetness. And that heavy cream? Full-fat only—low-fat won't give you the same luxurious finish.
The steak keeps best in the fridge for 3-4 days if you vacuum-seal it, but honestly, it's best eaten fresh. The aromatics—garlic, rosemary, thyme—lose their punch after 2 days, so prep them day-of. The butter cubes can be prepped ahead and stored in the freezer for up to 3 months. I like to make a double batch of the herb mix and freeze half—just thaw overnight in the fridge. The wine reduction? Use it within 5 days or freeze it in ice cube trays for later. This isn't a leftovers kind of dish—it's meant to be enjoyed fresh, crust shattering with every bite.
Why You'll Love This Recipe
- I’ll be real: sirloin isn’t the cheapest cut, but this method stretches it further than you’d think. A single steak feeds two with seconds, and the leftovers? Thinly sliced for sandwiches the next day or chopped into a hearty salad. Zero waste, maximum flavor.
- Four-Ingredient Magic: I swear by this recipe because it’s that simple—just salt, pepper, olive oil, and butter. No fancy marinades or last-minute shopping runs. The secret’s in the sear: high heat, a hot pan, and letting the butter baste the steak while it cooks. That’s it.
- Crispy-Creamy Perfection: Honestly, the flavor is where this recipe shines. The kosher salt and pepper create this perfect crust, while the butter basting gives you that rich, velvety finish inside. It’s the kind of steak that makes you close your eyes and savor every bite—no sauce needed.
- Weeknight or Weekend: Between us, this steak works for everything. Toss it on the grill for a summer BBQ, pan-sear it for a quick Tuesday dinner, or even prep it ahead for a date night. It’s the one dish that feels special without requiring hours of effort.
Step-by-step instructions for thick sirloin steak with reverse-sear technique
This method guarantees perfectly pink centers with a flawless crust every time.
Prepare the Steaks for Even Cooking
Remove the steaks from the refrigerator and let them sit at room temperature for 30 minutes. This ensures even cooking throughout the thick cut. Pat them dry completely with paper towels—moisture is the enemy of a good sear. Season both sides generously with the 1.5 tablespoons kosher salt and 1 tablespoon freshly ground black pepper, pressing the seasoning into the meat so it adheres well.
Here's the thing—don't rush this step. The salt needs time to penetrate the surface, creating a flavorful crust while preventing excessive moisture loss. I like to season immediately before cooking to maintain maximum freshness in the herbs and spices.
Low-Temperature Oven Roast to Perfect Doneness
Preheat your oven to 275°F. Line a baking sheet with aluminum foil and place the steaks on top. Add the 0.25 cup beef tallow or lard to the pan—this helps render fat and creates a self-basting environment. Roast the steaks for 45-60 minutes, depending on thickness, until the internal temperature reaches 110-115°F when measured with a meat thermometer.
This low-temperature phase is where the magic happens. The steaks cook slowly and evenly, developing deep flavor without developing a crust. I check the temperature frequently after the 30-minute mark—your oven might run hot, so start checking at the 20-minute mark. The steaks should be slightly pink in the center but not cold.
Build the Herb Butter and Sear the Steaks
While the steaks are roasting, prepare the herb butter by combining the 0.5 cup unsalted butter, 0.25 cup fresh rosemary, 0.25 cup fresh thyme leaves, 4 smashed garlic cloves, and 1 whole yellow onion (sliced) in a small saucepan. Cook over medium-low heat for 8-10 minutes until the butter melts and the aromatics are fragrant but not browned. Remove from heat and set aside.
Heat a heavy skillet over high heat until smoking hot. Add the 2 tablespoons extra-virgin olive oil and swirl to coat. Remove the steaks from the oven and let them rest for 2 minutes. Sear each steak for 2-3 minutes per side until a deep golden-brown crust forms. The high heat creates the perfect crust while keeping the interior tender.
Rest and Serve with Red Wine Reduction
Transfer the seared steaks to a cutting board and let them rest for 10 minutes. This resting period allows the juices to redistribute throughout the meat, ensuring each bite is moist and flavorful. While they rest, deglaze the skillet with 0.5 cup red wine, scraping up all the browned bits from the bottom. Simmer for 3-4 minutes until reduced by half, then stir in the 0.25 cup heavy cream and simmer for another 2 minutes until slightly thickened.
Slice the steaks against the grain into ½-inch thick portions. Spoon the red wine reduction over the top and serve immediately. The steaks should have a perfect pink center with a deep, flavorful crust. Each bite delivers the rich, buttery herb notes combined with the bold wine reduction—a true restaurant-quality experience.
Pro Tips For Making Thick Sirloin Steak
- SEAR HARD FIRST: Get that pan screaming hot—we’re talking blue smoke—before adding the steak. I used to ease into it, and the crust never formed right. A screaming-hot cast iron or stainless steel for 30-60 seconds guarantees that golden-brown crust you crave, even on thick cuts.
- SALT BEFORE HEAT: Season the steak generously with kosher salt at least 40 minutes before cooking—yes, even if you’re in a rush. This lets the salt penetrate deep, so every bite tastes seasoned, not just the surface. Skip this, and you’ll end up with a salty crust but bland middle.
- BUTTER BASTE LATE: Add the unsalted butter and herbs only in the last 2 minutes of cooking. Dump it in too early, and you’ll turn the pan into a greasy mess instead of a flavorful sauce. Let that butter foam and sizzle—it’s the quickest way to upgrade a simple steak.
- REST UNDER FOIL: Tent the steak with foil for the first 5 minutes of resting—this traps heat and keeps it juicy while you finish the sauce. I learned this after slicing into a steak that was perfect inside but dry at the edges. Trust me, the foil trick fixes that.
Storing and reheating this thick sirloin steak
Fridge Storage Tips
For maximum freshness, store your cooked sirloin steak in an airtight container lined with parchment paper to prevent sticking. I use glass Pyrex containers with snap-on lids—they keep the steak moist and make reheating easier.
Place it in the fridge within 2 hours of cooking and consume within 3-4 days. The crust loses its crispness after 2 days, but the meat stays tender and flavorful. 💫
Freezer Prep for Later
To freeze, wrap the steak tightly in plastic wrap first to prevent freezer burn, then place it in a heavy-duty freezer bag with all air squeezed out. Label with the date—this steak stays excellent for up to 3 months.
For best results, thaw overnight in the fridge before reheating. Never microwave-thaw—it creates uneven cooking and ruins the texture.
Stovetop Reheat Method
My go-to reheat method is a gentle stovetop sear to restore that crispy crust. Heat a skillet over medium heat, add 1 tablespoon butter, and place the steak in for 2-3 minutes per side until warmed through.
For extra moisture, add 1 tablespoon beef broth to the pan. This method takes 5-7 minutes total and keeps the meat juicy. 🔥
Oven Reheating Technique
Preheat your oven to 300°F and place the steak on a baking sheet lined with foil. Add 1 tablespoon olive oil and cover loosely with foil to retain moisture. Bake for 10-12 minutes, checking at the 8-minute mark.
The internal temperature should reach 135°F for medium-rare. This method works best for larger portions and maintains even heating.
Microwave as Last Resort
If you're in a rush, use the microwave on 50% power for 1-2 minutes total, covered with a damp paper towel. Let it rest for 2 minutes afterward to redistribute juices. This method is quick but won't restore the crust—reserve it for sandwiches or quick meals where presentation isn't critical.
Reviving the Crust
Want that restaurant-quality crust after reheating? After warming the steak, transfer it to a hot skillet for 30 seconds per side to crisp up the exterior. This works best with the stovetop or oven methods.
A quick brush of melted butter before serving adds shine and extra flavor. The key is speed—don't overcook once you return it to the pan. ✨
Nutrition facts
Frequently asked questions
Why does the recipe specify 1.5-inch thick steaks?
The 1.5-inch thickness is crucial for the reverse-sear method. Thinner cuts would overcook during the low-temperature phase, while thicker cuts might not develop a proper crust. This thickness gives you that perfect balance of tender interior and crispy exterior—just like steakhouses achieve.
Can I use this method for other steak cuts?
This technique works best with sirloin, ribeye, or New York strip cuts that have good marbling. For leaner cuts like flank steak, adjust the oven temperature to 250°F and monitor closely. The key is maintaining the 110-115°F internal temp before searing.
What if my oven isn't precise at low temperatures?
If your oven runs hot, use an oven thermometer to verify the actual temperature. For 275°F recipes, you might need to adjust to 250°F if it reads higher. Alternatively, cook on the middle rack with a baking stone for better heat distribution. The goal is slow, even cooking—not fast browning.
How do I know when the steak is done without a thermometer?
For medium-rare, press the steak gently—it should feel slightly soft in the center. A finger test works too: press your thumb and forefinger together (firm = medium, soft = rare). But for consistency, invest in a meat thermometer—it's the only foolproof method.
Can I make this ahead of time?
Cook the steaks up to 2 days ahead and refrigerate in an airtight container. Reheat using the stovetop method to restore the crust. For parties, prepare the wine reduction separately and keep it warm—just reheat and pour over the steak when serving. The flavors actually improve with a day's rest!