Main Courses
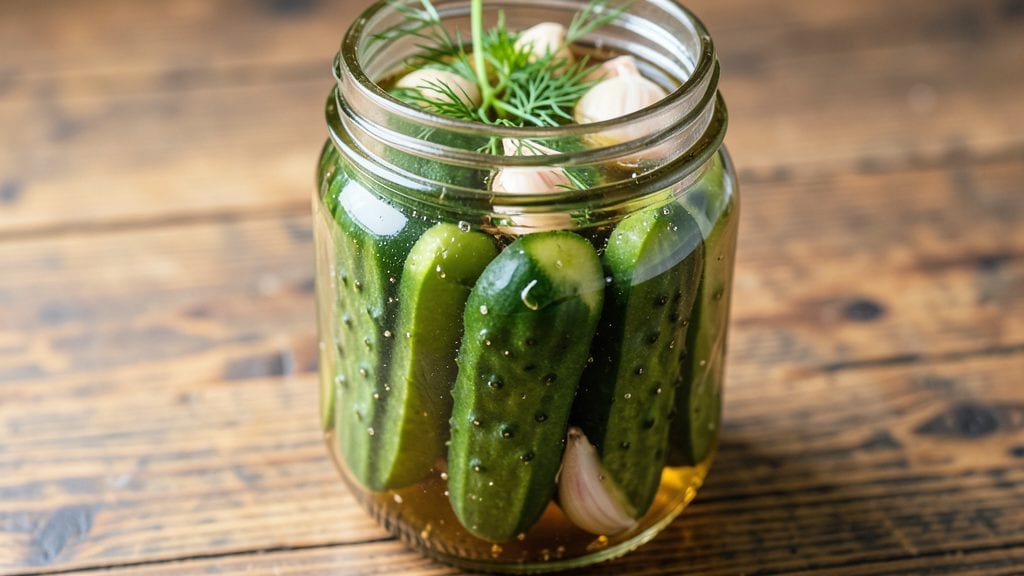
Ted’s Montana Grill’s signature pickles are the secret weapon behind every legendary burger—crisp, tangy, and packed with that signature dill crunch. I’ve spent years perfecting this recipe after my first grilling class, where students begged for the recipe that made their burgers taste like a Montana roadhouse. The key? A precise brine balance and the right cucumber prep—no shortcuts here.
This isn’t your grandma’s refrigerator pickle—it’s a restaurant-style recipe with bold dill flavor, thin garlic slices, and a vinegar brine that keeps them crisp for days. The process is simple but requires patience: slicing cucumbers uniformly, layering them with spices, and letting the flavors meld for at least 24 hours.
No fancy equipment needed, just a jar and a taste for authenticity.
By the time you’re done, you’ll have pickles so good they’ll disappear from the jar faster than burgers at a cookout. The crunch is addictive, the tang cuts through rich meat perfectly, and the dill gives them that signature aroma that makes these pickles unforgettable.
Serve them alongside burgers, sandwiches, or even as a snack—just don’t blame me if you make a whole batch.
Pro tip: Use Kirby cucumbers for the classic crunch, and don’t skip the garlic—it’s what gives them that restaurant-level depth. This recipe makes enough for a crowd, so double it if you’re hosting. Let’s get pickling!
Ingredients for ted's montana grill pickle
Pickling cucumbers, vinegar, dill, and garlic—just enough to make restaurant-style pickles at home.
| Ingredient | Amount | Notes |
|---|---|---|
| Kirby Cucumbers 🥒 | 4 lbs | Whole, unpeeled, uniform size |
| White Vinegar 💧 | 3 cups | Distilled, not apple cider |
| Granulated Sugar 🍚 | 2 cups | White, not brown |
| Kosher Salt 🧂 | 1 cup | Non-iodized, coarse grain |
| Fresh Dill Weeds 🌿 | 1 ½ cups | Packed, stems removed |
| Garlic Cloves 🧄 | 12 whole | Thinly sliced, peeled |
| Black Peppercorns 🌶️ | 1 tbsp | Crushed, not ground |
| Mustard Seeds 🌶️ | 1 tbsp | Yellow, whole |
| Celery Seeds 🥬 | 1 tsp | Ground, not whole |
| Red Pepper Flakes 🌶️ | 1 tsp | Adjust for heat preference |
| Dill Seed 🌿 | 1 tsp | Optional for extra flavor |
| Water 💧 | 1 cup | Filtered or distilled |
Kirby cucumbers are non-negotiable here—they’re the secret to that signature crunch. Local farmers markets often have them in summer, but Costco or Trader Joe's usually carry them year-round. Look for ones that are firm and uniform in size—no soft spots. The vinegar is the backbone of the flavor, so grab white vinegar (not apple cider), and measure it precisely. Fresh dill is a must for that bold, restaurant-style flavor—dried just won’t cut it. I always grab extra because it wilts fast, and you’ll want it fresh for the best aroma. For the garlic, thinly slice those cloves (about 1/16-inch thick)—it’s what gives these pickles that extra depth.
No Kirby cucumbers? Persian cucumbers are your next best bet—they’re smaller and crunchier, though you’ll need about 20% more by weight. Fresh dill too expensive? Dried dill at half the amount works in a pinch, but trust me, fresh makes all the difference. Short on vinegar? White wine vinegar adds a nice complexity, though it’ll taste slightly different. The spices are all about balance—skip the red pepper flakes if you’re sensitive to heat, but don’t skip the mustard seeds. They add a subtle punch that’s key to that Montana Grill taste. For storage, I use quart-sized mason jars—they’re perfect for layering and keeping everything crisp.
These pickles get better with time—at least 24 hours before eating, but up to 4 weeks in the fridge. The longer they sit, the more the flavors meld together. I always make a double batch because they disappear fast. Store them in the fridge with the brine—never rinse them before serving. The brine is part of the magic. If you’re gifting them, use a glass jar with a tight seal and they’ll keep for up to 6 months unrefrigerated. Just remember: patience is key here. The first batch might not be perfect, but once you nail the balance, you’ll be hooked.
Why You'll Love This Recipe
- No-Fuss Prep: Honestly, I just toss the Kirby cucumbers—whole or sliced—into a jar with vinegar, sugar, salt, and dill. No peeling, no fancy tools, just a quick rinse and pack. That’s it. The only "work" is waiting, which I do while scrolling through my phone.
- Tangy-Sweet Magic: Between us, the balance here is chef’s kiss—the vinegar’s sharp bite softens just enough to let the sugar caramelize those cucumbers into something addictive. Fresh dill? It turns "pickle" into "I’d eat this straight from the jar" good.
- Party or Pantry: I keep a batch in the fridge for summer BBQs, but it’s also my go-to for lazy weeknight sandwiches. Slap these on burgers, toss in salads, or just snack—no judgment. They last months, so I never run out when guests show up.
- Budget Stretch: Kirby cucumbers are cheap, and this recipe makes enough to fill jars for gifts or backup snacks. Sugar and vinegar cost pennies, and dill lasts forever in the freezer. It’s the kind of recipe that makes me feel like I’m winning at grocery shopping.
Step-by-step instructions for ted's Montana Grill pickles
Here's how to make these signature crunchy pickles that bring bold flavor to every bite.
Prepare the Cucumbers and Brine Base
Start by thoroughly washing the 4 lbs Kirby cucumbers, then trim off the blossom ends. Pack them tightly into a large glass jar, leaving about 1 inch of headspace at the top. This ensures they stay submerged during the pickling process.
In a separate bowl, combine the 3 cups white vinegar, 2 cups granulated sugar, 1 cup kosher salt, and 1 cup water. Stir until the sugar and salt completely dissolve—this creates the flavorful brine. I like to use a whisk for this step to ensure everything blends smoothly. The mixture should be clear with no visible sugar or salt crystals remaining.
Add Aromatics and Spices
Carefully pour the warm brine over the packed cucumbers, making sure they're completely covered. Then, add the 12 whole sliced garlic cloves, 1 tbsp crushed black peppercorns, 1 tbsp mustard seeds, 1 tsp celery seeds, 1 tsp red pepper flakes, and 1 tsp dill seed directly into the jar. Gently press down on the cucumbers to submerge everything.
Next, add the 1.5 cups fresh dill weeds, packing them tightly around the cucumbers. This step is crucial for that signature Montana Grill flavor—don't skip it! The fresh dill will infuse the pickles with vibrant, herby notes that balance the tangy vinegar. If you're worried about the dill floating, you can weigh it down with a small plate or cabbage leaf.
Seal and Ferment for Perfect Crunch
Seal the jar tightly with a lid and let it sit at room temperature for 24 hours. This initial fermentation period allows the flavors to begin melding together. After 24 hours, transfer the jar to the refrigerator and let it pickle for an additional 4-6 days, giving you that perfect balance of crispness and tang.
I know it's tempting to eat them sooner, but patience here is key. The longer they sit, the more flavorful they become. You'll know they're ready when the cucumbers are firm but slightly softened, and the brine has taken on a beautiful golden hue from the spices. The pickles should also be noticeably crunchier than fresh cucumbers.
Check and Store for Maximum Freshness
After the 4-6 days, carefully remove the pickles and check their doneness. They should be bright green with a satisfying crunch. If they're still too firm, return them to the fridge for another day or two. The pickles will continue to develop flavor even after opening, so don't worry if they're not perfect right away.
Once you're happy with the texture, transfer the pickles to clean jars or containers. Store them in the refrigerator, where they'll keep their crispness and flavor for up to 3 months. The brine can be reused for another batch of pickles if stored separately—just heat it gently to sterilize before reusing. These pickles are perfect for burgers, sandwiches, or even as a tangy snack on their own!
Pro Tips For Making Ted'S Montana Grill Pickle
- SLICE CUCUMBERS UNIFORM: Kirby cucumbers are stubborn—cut them into ½-inch slices, not random chunks. I learned this the hard way when my first batch looked like a salad instead of pickles. Use a sharp knife and keep the slices the same thickness so they crisp evenly.
- BOIL THE BRINE FIRST: Sugar and salt dissolve better in hot vinegar. Heat the vinegar, sugar, and salt together until fully combined before adding cucumbers—this prevents clumpy brine and ensures even flavor. (Yes, even if you’re impatient like me.)
- PACK CUCUMBERS TIGHTLY: Don’t leave gaps in the jar—they’ll turn mushy. Use a spoon to press slices down firmly, especially in the middle. My grandmother swore by this, and she was right: tight packing = crunchy pickles.
- STORE IN COLD DARKNESS: Skip the fridge for the first 24 hours—let the jar sit at room temp so the flavor develops. After that, move it to the fridge, but keep it away from light or the dill will turn bitter. (Your future self will thank you.)
Make-ahead tips for this ted's montana grill pickle
Prep Ahead Strategy
Start your prep the night before for maximum convenience—I always slice the 12 garlic cloves and measure out all spices into small bowls. This way, morning assembly is a breeze.
The fresh dill should be washed and roughly chopped, then stored in a sealed container in the fridge to preserve its aroma. I even prep the brine ingredients in advance, so all I need to do is mix and pour the next day. 💫
Brine Prep Shortcut
Make the brine up to 3 days ahead and store it in an airtight container in the fridge. When ready to pickle, simply bring it to room temperature before pouring over the cucumbers.
I like to add a splash of lemon juice (about 1 tbsp) to the brine the day before to enhance brightness. This is especially helpful if you're hosting and need to streamline your timeline.
Cucumber Prep Efficiency
Use a mandoline slicer set to 1/8-inch thickness for perfectly uniform cucumber slices—they'll pickle evenly and stay crisp. If you don't have one, a sharp chef's knife works too, but take your time for consistent cuts.
I like to soak the sliced cucumbers in ice water for 10 minutes before packing them into jars to maintain their crunch during prep. 🥒
Batch Cooking Tips
Double the recipe for crowd-sized batches—just use quart-sized mason jars and adjust the fermentation time slightly. I find that larger batches need an extra 24 hours at room temperature to ensure even flavor penetration.
Label your jars with dates so you can track freshness. These pickles make fantastic gifts—just tie a ribbon around the jar and add a handwritten note about the 4-week shelf life.
Flavor Boosting Tricks
Add ½ tsp ground turmeric to the brine for a golden hue and subtle earthy note that mimics the restaurant version. For extra depth, include 2 thinly sliced jalapeños (seeds removed) along with the garlic.
These additions take just 5 minutes to prepare but elevate the flavor profile significantly. I always make a test batch with these extras to see how my guests react.
Storage Hacks
Transfer pickles to smaller jars (like pint-sized) for easy portion control at gatherings. The brine can be frozen in ice cube trays for future batches—just thaw and reheat before reusing. For long-term storage, I vacuum-seal the pickles in their brine to extend freshness to 6 months in the pantry.
This method preserves both texture and flavor perfectly for holiday gifts or emergency snack stashes. ❄️
Nutrition facts
Frequently asked questions
Why do these pickles need to ferment for 24 hours before refrigerating?
The initial 24-hour room temperature fermentation kickstarts the flavor development and helps the spices infuse properly. This step ensures the cucumbers absorb the tangy vinegar and aromatic herbs evenly, creating that signature Montana Grill crunch and depth. Skipping it can leave them tasting flat or overly acidic.
Can I use Persian cucumbers instead of Kirby cucumbers?
Yes, but you'll need about 20% more by weight since Persian cucumbers are smaller. They'll still give you that satisfying crunch, though Kirby cucumbers are ideal for their uniform size and thicker skins. The recipe will work, but expect slightly more variation in shape and texture.
How do I know when the pickles are perfectly crisp?
They're ready when they're bright green, firm but slightly softened, and the brine has a golden hue from the spices. Test one after 4-6 days—if it's too crunchy, leave them another day or two. The longer they sit, the more flavorful they become, but they should never feel mushy.
Can I adjust the spice level for kids or sensitive eaters?
Simply reduce or omit the red pepper flakes and mustard seeds—these are the main heat contributors. For a milder version, use ½ tsp red pepper flakes or swap them for extra dill seed. The tangy vinegar and garlic will still shine through.
What's the best way to serve these pickles like at Ted's Montana Grill?
Serve them straight from the jar alongside burgers, sandwiches, or grilled meats for that authentic Montana Grill experience. For extra flair, arrange them on a platter with a sprinkle of fresh dill and a side of the tangy brine. They're also perfect as a snack with cheese boards or charcuterie—just don't forget the napkins!