
Main Courses
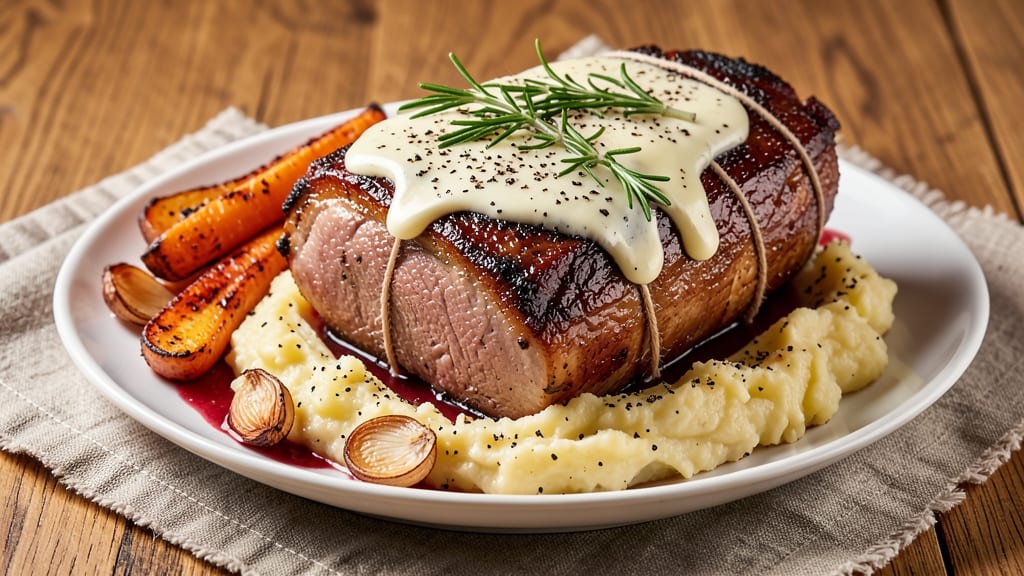
This standing rib roast boned and tied recipe turns a classic roast into an elegant centerpiece, delivering a juicy core and flawlessly crisped exterior. The secret lies in the technique—boning and tying the roast ensures even cooking, while precise temperature control delivers melt-in-your-mouth tenderness.
After years of perfecting this method, I’ve cracked the code for restaurant-quality results at home, every time.
This recipe focuses on two critical phases: the low-and-slow cook to develop deep flavor and the final sear for a caramelized crust. Professional chefs rely on this approach to avoid overcooking the exterior while ensuring the center stays tender.
The result? A roast that slices effortlessly, with a rich, beefy aroma that fills your kitchen and leaves guests asking for seconds.
With just a few key ingredients—high-quality beef, kosher salt, black pepper, and butter—you’ll achieve a roast that’s foolproof yet impressive. The tying technique prevents the roast from curling during cooking, while the reverse sear method guarantees a perfect crust without drying out the meat.
This is the kind of dish that elevates any dinner from ordinary to extraordinary.
Pair it with classic sides like roasted garlic mashed potatoes or a bold red wine reduction for the full experience. Let’s get started on creating your most tender, juicy rib roast yet.
Ingredients for standing rib roast boned and tied
Six ingredients transform a simple roast into a showstopping centerpiece—juicy, tender, and restaurant-worthy.
| Ingredient | Amount | Notes |
|---|---|---|
| Standing Rib Roast 🥩 | 4 lb | Bone-in, center-cut preferred |
| Kosher Salt 🧂 | 1 ½ tbsp | Diamond Crystal preferred for clarity |
| Freshly Ground Black Pepper 🌶️ | 1 tbsp | Coarse grind for texture |
| Unsalted Butter 🧈 | ½ cup | Cold, cubed for sear |
| Fresh Rosemary 🌿 | 2 sprigs | Thick stems for tying |
| Fresh Thyme 🌿 | 4 sprigs | For herb bundle |
| Garlic Cloves 🧄 | 4 cloves | Peeled, for herb bundle |
| Butcher's Twine 🧵 | 1 package | Heavy-duty, 18-inch pieces |
| Beef Tallow or Duck Fat 🥛 | 2 tbsp | For basting, optional |
| Red Wine 🍷 | ½ cup | Dry, for deglazing |
| Beef Stock 🍲 | 1 cup | Homemade preferred |
| Olive Oil 🫒 | 2 tbsp | For basting brush |
The standing rib roast is non-negotiable for this technique—center-cut, bone-in ensures maximum tenderness. Source from a reputable butcher (like D'Artagnan or your local specialty shop) for optimal marbling and size. A 4-pound roast serves six generously, but adjust up to 6 pounds for larger gatherings. The rosemary and thyme should be fresh, vibrant sprigs—avoid dried substitutes here, as their aroma is critical for the herb bundle. If your butcher doesn’t trim the silver skin, ask them to—it’s a chef’s trick that prevents bitterness during cooking. For the butcher’s twine, grab heavy-duty cotton twine (the kind used for hams) from a craft store if your grocery doesn’t carry it.
No beef tallow? Duck fat or high-smoke-point oil (like avocado oil) works equally well for basting. Short on red wine? Beef stock plus a splash of balsamic vinegar mimics the depth. The kosher salt must be Diamond Crystal—its coarser grain clings better to the meat than table salt, and it dissolves more cleanly. For the herb bundle, tie the rosemary, thyme, and garlic together with a small piece of twine before inserting it into the roast’s center cut. This ensures even flavor infusion without overpowering the beef. If you’re prepping ahead, trim the roast and tie it 24 hours in advance—this relaxes the meat fibers for even cooking.
The roast keeps 3-4 days in the fridge, wrapped tightly in butcher paper (better than foil for breathability). For longer storage, freeze for up to 3 months—thaw overnight in the fridge before cooking. The herb bundle can be removed after cooking and stored separately for 3 days in an airtight container. Leftover roast reheats beautifully in a 350°F oven for 15-20 minutes, covered loosely with foil. For maximum tenderness, let the roast rest 20 minutes after cooking before slicing—this redistributes juices and makes carving effortless. Portion into individual servings for easy reheating later in the week.
Why You'll Love This Recipe
- Hands-Off Roast: The bones stay in, so no carving stress—just slice straight through the ties. I swear, my hands stay clean while the oven does all the work.
- Rosemary Butter Magic: That melted butter basting with rosemary? It’s like a fragrant hug for your roast. The crust gets crispy, the inside stays juicy, and every bite tastes like a Sunday dinner.
- Weeknight or Holiday: Same recipe feeds four or twelve—just adjust the oven time. Honestly, I’ve used it for date nights and Thanksgiving leftovers, and it never lets me down.
- Leftovers That Don’t Suck: Cold slices in sandwiches? Yes. Reheated with gravy? Even better. Between us, this roast gives me three meals for the price of one.
Step-by-step instructions for standing rib roast boned and tied
This method delivers a perfectly tender, juicy roast with a crisp exterior every time.
Bone and Tie the Standing Rib Roast
Begin by carefully removing the bone from the standing rib roast using a sharp boning knife. I start by making a small incision along the bone to separate the meat from the bone seam. Then, slide the knife between the meat and bone, working gently to avoid tearing the meat. Once the bone is removed, you'll have a single, large roast that cooks more evenly.
Next, create an herb bundle by tying together the 2 sprigs fresh rosemary, 4 sprigs fresh thyme, and 4 peeled garlic cloves using a piece of butcher's twine. Insert this bundle into the center of the roast cavity. Then, tie the roast into a neat oval shape using additional butcher's twine, securing it tightly at 2-inch intervals. This shaping ensures even cooking and prevents the meat from shrinking unevenly during roasting. The herb bundle infuses flavor deep into the center while the twine maintains the shape for perfect presentation.
Season and Sear the Roast
Generously season the tied roast with 1.5 tablespoons kosher salt and 1 tablespoon freshly ground black pepper on all sides. I press the salt and pepper into the meat to ensure even seasoning and maximum flavor penetration. Let the seasoned roast sit at room temperature for 30 minutes while you prepare your equipment.
Preheat your oven to 425°F. Heat 2 tablespoons olive oil in a large oven-safe skillet over medium-high heat until shimmering. Place the roast in the skillet, fat-side down, and sear for 5 minutes until a deep golden-brown crust forms. Flip the roast and sear the other side for another 5 minutes. This initial sear locks in juices and creates that coveted crisp exterior. The roast should release easily from the skillet when ready to transfer to the oven.
Roast to Perfect Doneness
Transfer the seared roast to the preheated oven and roast for 20 minutes. Then, reduce the oven temperature to 325°F. Continue roasting for approximately 1 hour and 15 minutes, or until the internal temperature reaches 125°F when measured with a meat thermometer. This lower temperature ensures the meat cooks gently and remains tender throughout.
During the last 30 minutes of roasting, baste the roast with the 2 tablespoons beef tallow or duck fat every 15 minutes. This basting adds moisture and enhances flavor. The roast is done when it reaches an internal temperature of 130°F, which will rise to 135°F as it rests. The meat should feel firm to the touch but still yield slightly when pressed gently with your fingers. Overcooking at this stage will result in dryness, so monitor the temperature carefully.
Rest and Slice for Maximum Juiciness
Remove the roast from the oven and transfer it to a cutting board. Tent loosely with aluminum foil and let it rest for 20 minutes. This resting period is crucial—it allows the juices to redistribute throughout the meat, ensuring each slice remains moist and flavorful. The roast will continue to rise in temperature during this time, reaching the ideal serving temperature of 135°F to 140°F.
Once rested, remove the butcher's twine and slice the roast against the grain into 6 even portions. The slices should be approximately 1-inch thick, revealing the tender, juicy interior. Serve immediately with the pan juices reduced by adding 0.5 cup red wine and 1 cup beef stock, simmering until slightly thickened. This sauce captures all the flavors from the roasting process, adding depth to each bite.
Pro Tips For Making Standing Rib Roast Boned And Tied
- USE A MEAT THERMOMETER: I learned this the hard way—guessing doneness with a standing rib roast leads to overcooked disappointment. Stick the probe into the thickest part (avoid bone) and pull it at 120–125°F for medium-rare; let it rest and carry over to 130°F. No excuses—these roasts hide heat pockets.
- SALT THE ROAST 24 HOURS EARLY: This isn’t just seasoning; it’s flavor infusion. Generously coat the rib roast with kosher salt and refrigerate uncovered overnight. The salt breaks down muscle fibers, letting it absorb moisture and seasoning deeper. Skip this, and you’re missing out on the most tender, juicy result.
- TIE IT TIGHT, BUT NOT TOO TIGHT: Loose twine lets the roast spread unevenly; too tight, and you’ll end up with a deformed, uneven crust. Use butcher’s twine in a figure-eight pattern, pulling snug but not bone-crushing. A well-tied roast holds its shape and sears more evenly—no sagging or burnt edges.
- SEAR IN BATCHES, NOT ALL AT ONCE: High heat is your friend, but cramming a whole rib roast into a pan will steam it instead of brown it. Sear the fat cap first (render that fat!), then flip and press the roast flat for 1–2 minutes per side. If your pan gets crowded, work in stages—patience here guarantees that golden crust everyone craves.
Pro cooking tips for this recipe
Precision Boning
Boning the roast properly is where the magic starts. Use a sharp boning knife (I recommend Wüsthof Classic) and make a small incision along the bone seam first—this prevents tearing. Slide the knife between the meat and bone, working gently but firmly.
The goal is to remove the bone without cutting into the meat. If your butcher doesn’t bone it for you, ask them to—it’s worth the extra step for even cooking. 🔪
Herb Bundle Mastery
Your herb bundle should be tight and centered in the roast cavity. Tie the rosemary, thyme, and garlic with a small piece of twine first, then insert it into the deepest part of the cavity.
This ensures flavor infuses evenly. I like to use thick rosemary stems for tying—just cut them to 3-inch lengths and secure them inside the roast before tying the entire piece with butcher’s twine. 🌿
Reverse Sear Perfection
The 425°F sear followed by 325°F slow cook is non-negotiable for tenderness. Use a meat thermometer (I swear by Thermoworks Smoke) to monitor internal temp. The roast should hit 125°F before the final sear—this guarantees a 135°F resting temp.
If your oven runs hot, reduce to 300°F for the slow phase. 🌡️
Twine Placement Tricks
Tie the roast at 2-inch intervals using heavy-duty butcher’s twine (the kind used for hams). Start with a tight first knot at one end, then pull the twine snugly around the roast before securing each section.
This prevents the meat from curling during cooking. Remove the twine just before slicing—it’s easier to cut through fresh twine than dried-on residue. 🧵
Basting Like a Pro
Use beef tallow or duck fat (not butter—it burns) for basting. Heat it in a small saucepan until liquid but not smoking, then baste every 15 minutes during the final 30 minutes of cooking.
The fat should sizzle when it hits the roast—this creates a self-basting crust. I like to use a basters brush for precision. 🥛
Resting Rules
Never skip resting! Transfer the roast to a cutting board, tent loosely with foil, and let it rest for 20 minutes. This allows juices to redistribute—skipping it means dry, tough slices.
The internal temp will rise 5-10°F during resting, so aim for 130°F when pulling it from the oven. 🕒
Nutrition facts
Frequently asked questions
Why do we bone and tie a standing rib roast?
Boning creates a uniform shape for even cooking, while tying prevents curling during roasting. This technique ensures the center stays tender while the exterior develops a perfect crust. Without tying, the roast may shrink unevenly, leading to dry spots. The herb bundle also infuses flavor deep into the meat.
What’s the ideal internal temperature for this roast?
Aim for 125°F before the final sear, which will rise to 135°F while resting. This range guarantees a juicy, medium-rare center. Use a meat thermometer to avoid overcooking—beef continues cooking after removal from heat.
Can I use regular butcher’s twine or do I need special twine?
Heavy-duty butcher’s twine (the kind used for hams) works best—it’s strong enough to hold the roast’s shape without cutting in. Avoid thin twine, as it may break during cooking. If your grocery store doesn’t carry it, check craft stores or online retailers.
How do I prevent the roast from drying out?
Baste with beef tallow or duck fat every 15 minutes during the final 30 minutes of cooking, and never skip the 20-minute rest. The reverse sear method (high heat → low heat) also preserves moisture. Avoid opening the oven door frequently, as temperature fluctuations dry the meat.
What if my oven doesn’t go below 300°F for the slow cook?
Adjust your timing—cook at 300°F until the internal temp reaches 125°F, then sear. If your oven runs hot, reduce to 275°F and monitor closely. A meat thermometer is essential for accuracy. Patience is key—rushing leads to dryness.