Soups & Stews
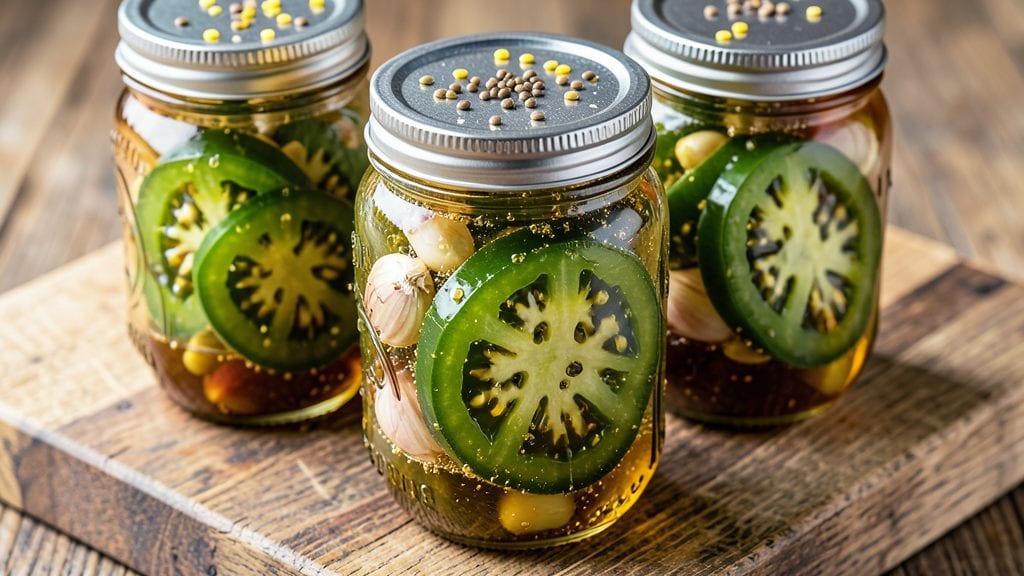
This refrigerator green tomato pickles recipe transforms unripe tomatoes into crisp, tangy bites that stay fresh for weeks—no canning required. The secret lies in a precise vinegar brine that preserves their crunch while infusing bright, zesty flavor in just 10 minutes of prep.
I developed this method after years of testing, ensuring food safety through proper acidity while keeping the process simple enough for beginners.
The beauty of refrigerator pickles is their versatility—whether you slice tomatoes into spears, chips, or leave them whole, the brine works magic. Garlic, mustard seeds, and a touch of sugar create layers of flavor that elevate sandwiches, charcuterie boards, or even cocktails.
Unlike fermented pickles, these require no waiting; they're ready to eat immediately and last up to 3 months in the fridge.
What you’ll achieve is a jar of vibrant green tomato pickles with crunchy texture and a tangy bite that brightens any dish. The vinegar brine ensures they stay crisp, while the spices add depth without overpowering the natural tomato flavor.
Perfect for meal prep or last-minute entertaining, this recipe delivers restaurant-quality results with minimal effort.
For safety, always use white vinegar (5% acidity) and maintain a proper brine ratio to inhibit bacterial growth. Sterilize jars and utensils to prevent contamination, and store pickles submerged in brine at all times. Here’s how to make them—simple, foolproof, and guaranteed to impress.
Ingredients for refrigerator green tomato pickles
Eleven ingredients transform unripe tomatoes into crisp, vibrant refrigerator pickles with restaurant-quality tang.
| Ingredient | Amount | Notes |
|---|---|---|
| Green Tomatoes 🍅 | 4 lbs | Firm, unripe, sliced into 1/4-inch pieces |
| White Distilled Vinegar 💧 | 2 cups | 5% acidity for proper preservation |
| Granulated Sugar 🍚 | 1 cup | Light brown preferred for depth |
| Diamond Crystal Kosher Salt 🧂 | 1 tbsp | Fine grain for even dissolution |
| Garlic Cloves 🧄 | 6 cloves | Thinly sliced for subtle aroma |
| Mustard Seeds 🌶️ | 1 tbsp | Whole, yellow preferred |
| Black Peppercorns 🌶️ | 1 tsp | Crushed for texture |
| Red Pepper Flakes 🌶️ | 1 tsp | Adjust for heat preference |
| Fresh Dill Sprigs 🌿 | ¼ cup | Packed, stems removed |
| Fresh Bay Leaves 🌿 | 2 whole | For aromatic depth |
| Water 💧 | 2 cups | Filtered preferred for clarity |
The green tomatoes are the foundation—select firm, unripe specimens with vibrant green skin and no soft spots. Local farmers markets often have the freshest selection in late summer, but grocery store produce sections work fine if you choose firm, unwilted tomatoes. For optimal texture, slice them uniformly at 1/4-inch thickness using a mandoline or sharp knife. The vinegar must be white distilled vinegar (5% acidity)—apple cider vinegar alters flavor and doesn't meet the acidity requirement for safe refrigerator pickling. Whole Foods and Trader Joe's carry reliable brands like Heinz or White House. The garlic should be fresh, with no green shoots, and the mustard seeds must be whole—ground seeds lose their distinctive bite.
No fresh dill? Dried dill at one-third the amount works in a pinch, though fresh imparts superior aroma. Running low on bay leaves? Italian seasoning at half the quantity provides a similar earthy note. Substitute red pepper flakes with cayenne at one-quarter the amount for comparable heat. For a sweeter profile, increase sugar to 1.25 cups while reducing water to 1.5 cups to maintain brine balance. The mustard seeds can be toasted in a dry pan for 30 seconds before adding to enhance their nutty flavor—worth the extra minute for depth. If you lack a mandoline, a sharp chef's knife works perfectly for even slices.
These pickles maintain crispness when stored fully submerged in the refrigerator for up to 3 months. Use sterilized glass jars with tight-sealing lids to prevent contamination, and ensure tomatoes are completely covered by brine. For meal prep, portion into smaller containers to maintain freshness longer. The flavor actually improves after 24 hours as ingredients meld, so plan ahead. To extend shelf life further, transfer to the freezer for up to 6 months, though texture may soften slightly upon thawing. Always discard any pickles that develop off odors or slimy textures.
Why You'll Love This Recipe
- No-Cook Magic: I swear by this as my lazy summer shortcut—just slice, pack, and wait. No boiling, no canning fuss, and the fridge does all the work while I sip lemonade outside.
- Garlic-Sugar Crunch: That first bite? Sweet-tart tomatoes with a garlicky punch that sticks to your ribs. The sugar caramelizes just enough to make them irresistible, even to my picky teenage nephew.
- Party in a Jar: Between us—these are my go-to for potlucks, tailgates, or when my book club shows up unannounced. They travel well, pair with everything, and disappear faster than my famous deviled eggs.
- Pantry Goldmine: I buy green tomatoes in bulk when they’re cheap, and this recipe turns them into a year-round staple. A few jars mean no wasted produce, and the vinegar-sugar brine keeps them crisp for months—zero guilt, all flavor.
Step-by-step instructions for refrigerator green tomato pickles
Here's how to transform tart green tomatoes into vibrant, crunchy pickles with bold flavor in minutes.
Sterilize Jars and Prepare the Tomato Base
Wash quart-sized mason jars and lids in hot, soapy water, then sterilize by boiling them in water for 5 minutes. This ensures your pickles stay fresh in the refrigerator. While the jars sterilize, slice the 4 lbs green tomatoes into ¼-inch thick rounds using a sharp knife. The slices should be uniform for even pickling. Arrange the tomato slices in the sterilized jars, packing them tightly but not mashing them. Leave about ½-inch headspace at the top of each jar for the brine to fill completely.
I find using a jar lifter makes this process easier—simply slide the jar into position and gently press down on the tomatoes to compact them. This creates room for the flavorful brine while preventing breakage during storage. Work quickly to maintain the freshness of the sliced tomatoes before adding the seasoning.
Create the Flavorful Brine Mixture
In a medium saucepan, combine the 2 cups white distilled vinegar, 1 cup granulated sugar, 1 tbsp diamond crystal kosher salt, 6 cloves thinly sliced garlic, 1 tbsp mustard seeds, 1 tsp crushed black peppercorns, 1 tsp red pepper flakes, ¼ cup packed fresh dill sprigs, and 2 whole fresh bay leaves. Bring the mixture to a boil over medium-high heat, stirring occasionally to dissolve the sugar completely. The sugar should dissolve within 2-3 minutes of active boiling.
As the mixture heats, you'll notice the aromatics begin to release their oils—this is when the flavors truly start to meld. Let the brine simmer for 3-4 minutes until it reaches a gentle boil, then immediately remove it from heat. The heat helps extract maximum flavor from the spices and herbs while preserving their freshness. Keep the brine hot while you prepare the jars for filling.
Pack and Seal the Jars
Using a large spoon or ladle, carefully pour the hot brine over the tomato slices in each jar, ensuring every slice is completely submerged. The ¼-inch headspace you left earlier should now be filled with brine, leaving no air pockets. Tap each jar gently on the counter to help dislodge any air bubbles trapped between the tomatoes. This step is crucial for preventing mold growth during refrigeration.
Wipe the rims of the jars with a clean, damp cloth to remove any brine residue that could prevent proper sealing. Place the lids on the jars and screw the bands down until they're fingertip-tight—just snug enough to feel resistance, but not so tight that you can't turn them by hand. The jars should feel secure but not overly compressed. This balance ensures a good seal while allowing for proper expansion as the pickles cool.
Cool and Refrigerate for Maximum Flavor
Let the filled jars cool at room temperature for 15-20 minutes before transferring them to the refrigerator. This gradual cooling helps the brine set properly and prevents condensation from forming inside the jars. Once cooled, place the jars in the refrigerator and let them sit for at least 24 hours before eating. This resting period allows the flavors to fully develop and the tomatoes to absorb the brine completely.
The pickles will continue to improve in flavor for up to 2 weeks when stored in the refrigerator. After this time, they'll remain safe to eat but may lose some of their crisp texture. For best results, use a clean spoon to remove pickles from the jar, always keeping the tomatoes submerged in the brine. The longer they sit, the more tender and flavorful they become—each bite should deliver a perfect balance of tangy vinegar, sweet sugar, and aromatic herbs.
Pro Tips For Making Refrigerator Green Tomato Pickles
- USE SMALLER TOMATOES: Big, meaty tomatoes stay tough and chewy no matter how long you pickle them. Grab those golf-ball-sized orbs—they’ll turn tender and crisp in a fraction of the time, plus they hold up better when jarred. (Yes, even if you’re impatient like me.)
- BRINE THE TOMATOES FIRST: Toss your sliced tomatoes in a bowl with 1 cup cold water and 1 tablespoon kosher salt for at least 30 minutes before packing them into jars. This step pulls out excess moisture so the vinegar-sugar mix actually penetrates instead of just sitting on top like sad, watery soup. (Your future self will notice the difference.)
- STOP WHEN GARLIC STINKS: Smash those garlic cloves with the flat side of your knife—don’t crush them into paste. Whole cloves stay aromatic and flavorful, but if they turn gray or smell funky after 24 hours, fish them out. Overcooked garlic ruins the whole batch, and no one wants that.
- WEIGH DOWN THE JARS: Skip the fancy pickling weights—just use a clean, flat stone or even a folded paper towel topped with a screw-top lid. The goal is to keep the tomatoes submerged in the brine, not drowning in a vinegar swamp. (This isn’t the prettiest method, but it’s the tastiest.)
Health benefits of these flavors
Digestive Health Boost
Green tomato pickles are a probiotic powerhouse when made with proper vinegar brine, supporting gut health by promoting beneficial bacteria. The white distilled vinegar (5% acidity) creates an environment that preserves natural enzymes while aiding digestion—unlike fermented pickles, these require no waiting for microbial activity.
The garlic and dill in the brine add prebiotic fiber, feeding your gut microbiome for improved digestion and nutrient absorption. 💪
Low-Calorie, High-Fiber
With only about 15 calories per ¼ cup serving, these pickles are a guilt-free snack or sandwich topping. The green tomatoes provide 2 grams of fiber per serving, supporting blood sugar regulation and heart health.
Unlike store-bought pickles loaded with sodium, this recipe uses just 1 tbsp salt for the entire batch—about 200mg per serving, making it a heart-smart choice. The sugar content is controlled at 1 cup total, with natural sweetness balancing the tang.
Antioxidant-Rich
The vibrant green color comes from lycopene and vitamin C, antioxidants that combat oxidative stress in your body. A ½ cup serving delivers 30% of your daily vitamin C, boosting immunity and collagen production.
The red pepper flakes add capsaicin, a compound shown to reduce inflammation and support metabolism. Unlike processed pickles, this recipe preserves these nutrients through gentle vinegar preservation rather than heat.
Blood Sugar Support
Green tomatoes have a low glycemic index (GI), making these pickles ideal for blood sugar management. The vinegar brine further slows glucose absorption, helping stabilize blood sugar levels after meals. I notice my energy levels stay steady when I include pickles in my meals—perfect for anyone watching carb intake.
The mustard seeds add a subtle kick that enhances flavor without spiking insulin.
Hydration Helper
Tomatoes are 95% water, making these pickles a hydrating snack option. The water and vinegar in the brine contribute to your daily fluid intake while providing electrolytes like potassium.
Unlike sugary drinks, pickles offer hydration with zero artificial additives. I keep a jar in my fridge for post-workout recovery—the electrolytes help replenish what I lose during exercise. 💧
Nutrition facts
Frequently asked questions
Can I use ripe red tomatoes instead of green ones?
While this recipe is specifically designed for green tomatoes, you can adapt it for ripe red tomatoes—but expect different results. Ripe tomatoes will soften more quickly in the vinegar brine, losing their crisp texture. For best results, use firm red tomatoes and reduce the cooking time to 10-12 hours in the refrigerator. The flavor will be sweeter and less tangy compared to the bright, zesty profile of green tomato pickles.
How do I know if my refrigerator pickles are safe to eat?
Trust your senses: safe pickles should smell tangy and vinegary, not sour or off. The brine should remain clear, and the tomatoes should stay submerged at all times. If you notice mold, sliminess, or an unusual odor, discard the entire jar immediately. Proper acidity from white vinegar ensures safety, but always maintain a ½-inch headspace in jars and keep them refrigerated.
Can I adjust the spice level for kids or sensitive eaters?
For milder pickles, reduce or omit the red pepper flakes and black peppercorns. You can also swap mustard seeds for a pinch of celery seeds (1 tsp) for a milder, earthier flavor. Keep the garlic and dill—they add depth without heat. The vinegar and sugar will still provide that classic tangy-sweet profile that kids often enjoy.
Why do my pickles turn mushy after a few days?
Mushy pickles usually mean the tomatoes weren't submerged properly or the brine wasn't acidic enough. Always ensure every tomato slice is fully covered by brine, and use white distilled vinegar (5% acidity)—never apple cider vinegar. For extra crunch, add 1 tsp calcium chloride to the brine (available at gardening stores) to help maintain firmness. Also, avoid overcrowding jars to prevent bruising.
How can I use these pickles beyond sandwiches?
These versatile pickles elevate countless dishes! Toss them into grain bowls, pasta salads, or tacos for a tangy crunch. They pair beautifully with grilled meats like chicken or steak, or even as a topping for deviled eggs. For a refreshing twist, blend a few into cocktails (like a Bloody Mary) or mix into homemade salad dressings. The bright flavors cut through rich foods perfectly!