Side Dishes
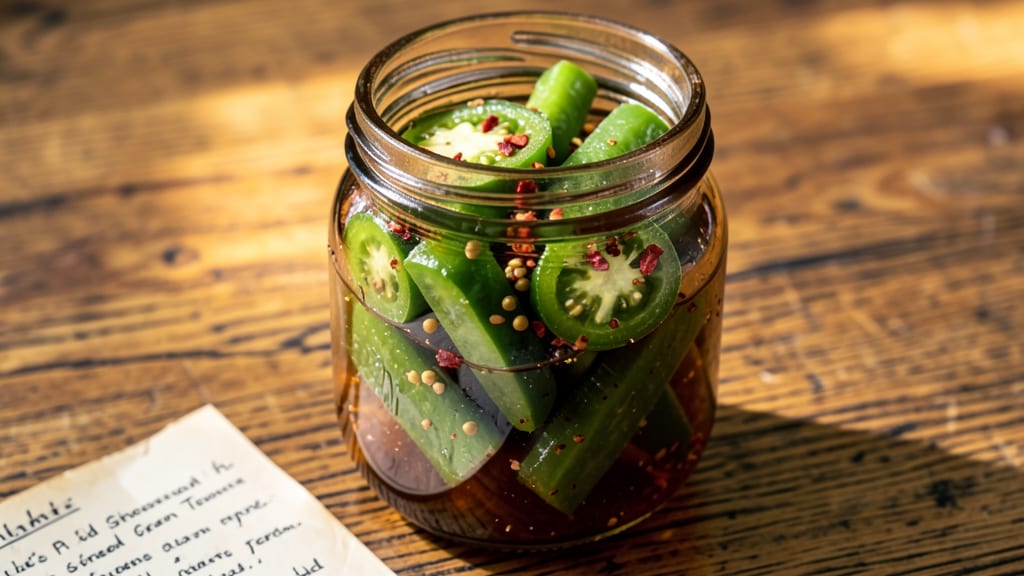
Grandma's old-fashioned pickled green tomatoes recipe preserves that perfect balance of tangy, sweet, and crunchy that makes summer taste like home. The process is straightforward but requires attention to detail—sterilizing jars, crafting the right brine, and processing tomatoes just enough to keep them crisp.
I learned this method from my grandmother, who swore by the 2-hour active time and 24-hour wait for the flavors to truly meld.
This recipe delivers authentic Southern flavor with a vinegar-kissed crunch that transforms unripe tomatoes into a side dish worthy of any picnic table. The key lies in the brine—a mix of vinegar, sugar, and spices like mustard seed and red pepper flakes—that penetrates the tomatoes while maintaining their texture.
My grandmother always said, "The first jar is for the table, but the second is for the pantry."
By the time you're done, you'll have jars of vibrant green tomatoes with a satisfying crunch and a tangy bite that pairs perfectly with fried chicken or sandwiches.
The preservation process ensures they'll keep for months, ready to bring a taste of summer to any meal. This isn't just a recipe—it's a tradition worth passing down.
Whether you're making it for a family gathering or stocking your pantry, this method delivers restaurant-quality results with minimal effort. The sterilization step might seem like extra work, but it guarantees safe, long-lasting pickles that taste fresh every time. Let's get started on preserving that summer crunch.
Ingredients for grandma's old fashioned pickled green tomatoes
Just ten ingredients transform green tomatoes into tangy, crunchy summer treasures—Grandma’s way.
| Ingredient | Amount | Notes |
|---|---|---|
| Green Tomatoes 🍅 | 3 lb | Firm, unripe, sliced into spears |
| White Vinegar 💧 | 2 cups | Distilled white preferred |
| Granulated Sugar 🍚 | 1 ½ cups | White or light brown |
| Coarse Kosher Salt 🧂 | ½ cup | Diamond Crystal preferred |
| Mustard Seeds 🌶️ | 1 tbsp | Yellow or brown seeds |
| Red Pepper Flakes 🔥 | 1 tsp | Adjust for heat preference |
| Garlic Cloves 🧄 | 6 whole | Smashed lightly for flavor |
| Dill Weed 🌿 | 1 tbsp | Dried or fresh chopped |
| Pint Glass Jars 🍶 | 4 whole | With lids, sterilized |
| Ice ❄️ | 1 cup | For chilling water |
| Water 💧 | 2 cups | For sterilizing jars |
The tomatoes need to be truly green and firm—unripe but not rotten. Local farmers markets often have perfect ones in summer, but the grocery store produce section works too. Look for tomatoes that are bright green, not starting to turn yellow or soft. The jars are critical—Ball or Mason jars are the gold standard, but any clean, airtight jar will do. Sterilize them by boiling in water for 10 minutes (that’s where the ice water comes in—chill the jars after sterilizing to prevent cracking). My grandma always said, "Clean jars mean happy pickles."
No white vinegar? Apple cider vinegar works too, though it’ll have a slightly sweeter taste. Running short on mustard seeds? Skip them entirely—the red pepper flakes and dill carry plenty of flavor. Fresh dill is ideal, but dried dill at half the amount works in a pinch. The garlic can be minced if you’re feeling fancy, but smashing it lightly with the flat side of a knife is quicker and still packs flavor. For heat control, start with half the red pepper flakes and adjust to taste after the first jar.
These pickles taste even better after 24 hours, but they’re ready to eat after just a few. Store in the fridge for up to 3 months, or process in a water bath for long-term storage (that’s the canning method Grandma used). The brine gets better with time—save the leftover liquid to pour over fresh tomatoes for instant pickled flavor. I always make extra jars; they disappear faster than you’d think, especially when fried chicken’s on the menu.
Why You'll Love This Recipe
- No-Fuss Jar Prep: I swear by the lazy genius of this recipe—just slice tomatoes, toss them in jars with vinegar, sugar, and salt, then let time do the work. No fancy gadgets, no hovering over the stove, and honestly? The jars stay crisp and bright for months.
- Tangy-Sweet Magic: That perfect balance of vinegar’s bite and sugar’s sweetness? It’s the kind of flavor that makes you reach for seconds without thinking. The mustard seeds add a tiny crunch that takes it from good to oh-wow—simple, but unforgettable.
- Party Snack Hero: Between us, these are my go-to for potlucks, tailgates, or just a lazy Sunday spread. They’re pretty enough to serve on a platter, but sturdy enough to grab with your hands—no fuss, just flavor that disappears fast.
- Pantry Goldmine: A single batch lasts me weeks, and I’m not exaggerating. The vinegar and sugar preserve them beautifully, so you’re always covered for sandwiches, charcuterie boards, or that last-minute craving. Plus, green tomatoes are cheap—this recipe turns budget-friendly into smart shopping.
Instructions for Grandma's old-fashioned pickled green tomatoes
Here's how to preserve that summer garden flavor with just a few simple steps.
Prepare the Green Tomatoes
Start by washing the 3 lb green tomatoes thoroughly and patting them completely dry. I like to work with firm, unripe tomatoes—they hold their shape best during pickling. Using a sharp knife, slice each tomato into ½-inch thick spears, keeping them uniform for even cooking.
As you slice, look for any soft spots or bruises—they'll break down in the brine and make your pickles mushy. Discard any questionable pieces and keep only the firmest spears. You should end up with about 8-10 cups of sliced tomatoes, depending on their size. This is where Grandma's secret begins—using only the best-quality tomatoes makes all the difference.
Sterilize the Jars and Prepare the Brine
While you're slicing tomatoes, prepare the 4 whole pint glass jars by sterilizing them. Place them upside down on a baking sheet and put in a 250°F oven for 15 minutes. This ensures they're completely clean and ready for the hot brine. Keep the oven on—you'll use it again in a moment.
In a large pot, combine the 2 cups white vinegar, 1.5 cups granulated sugar, 0.5 cup coarse kosher salt, 1 tbsp mustard seeds, 1 tsp red pepper flakes, 6 whole garlic cloves (lightly smashed), and 1 tbsp dill weed. Bring this mixture to a boil over medium-high heat, stirring until the sugar and salt completely dissolve. The liquid should be clear and slightly syrupy when it reaches a rolling boil.
Pack the Jars and Process the Tomatoes
Remove the sterilized jars from the oven and carefully pack each one tightly with the sliced green tomatoes, leaving about ½-inch headspace at the top. Use a wooden spoon to press the tomatoes down gently—this prevents air pockets and ensures they stay crisp. Distribute the mustard seeds, red pepper flakes, and garlic cloves evenly among the jars for maximum flavor in every bite.
Ladle the hot brine from the pot into each jar, filling them to within ½-inch of the rim. The tomatoes should be completely submerged in the liquid. Wipe the rims of the jars with a clean, damp cloth to remove any residue that might prevent proper sealing. Then, place the lids on the jars and screw the bands down fingertip-tight.
Process in a Water Bath
Fill a large stockpot with 2 cups water and add the 1 cup ice to create an ice bath. Place the jars in the pot, ensuring they're completely submerged in the water. Bring the water to a gentle boil over medium heat—this should take about 15-20 minutes. Once boiling, process the jars for 15 minutes to ensure they seal properly and the tomatoes reach the perfect level of tangy crunch.
After processing, carefully remove the jars using tongs and place them on a clean towel. Let them cool at room temperature for 12-24 hours before refrigerating. This slow cooling allows the flavors to meld together beautifully. Once chilled, store the jars in the refrigerator, where they'll keep for up to 6 months. The longer they sit, the more flavorful they become!
Enjoy Your Homemade Pickles
When you're ready to serve, open a jar and taste the result—bright, tangy, and just slightly sweet with a hint of spice. These pickled green tomatoes are perfect for sandwiches, charcuterie boards, or simply eating straight from the jar with a fork. The texture should be crisp with just a hint of softness, and the flavor should balance the vinegar's sharpness with the sugar's sweetness.
If you find the pickles too tangy after a few days, simply drain them and rinse briefly under cold water before storing again. The beauty of homemade pickles is that you can adjust the flavor to your liking—add more sugar for sweetness, more red pepper flakes for heat, or even a splash of hot sauce for extra kick. Grandma always said the best pickles are the ones that taste just right for your table!
Pro Tips For Making Grandma'S Old Fashioned Pickled Green Tomatoes
- STORE TOMATOES FIRST: I learned this the hard way—skipping a 24-hour fridge rest after slicing makes them soggy. Toss them in a colander, sprinkle with a pinch of salt, and let them sit uncovered. This draws out excess moisture so your jars stay crisp, not mushy, after pickling.
- BRINE THE SLICES: Salt the tomato slices before packing them into jars. Toss them in a bowl with 1 teaspoon kosher salt per pound and let sit 10 minutes—this seasons them deep and prevents blandness. (Yes, even if you’re impatient like me.)
- USE 1:1 VINEGAR TO WATER: The classic 50/50 vinegar-to-water ratio isn’t just tradition—it’s balance. Too much vinegar makes them harsh; too little and they won’t keep. Measure carefully: for every cup of vinegar, add a cup of water. No guesswork.
- STERILIZE JARS HOT: Skip the dishwasher’s “sanitize” cycle—it’s not enough. Boil jars and lids in a pot of water for 10 minutes right before filling. Cold jars sweat condensation, which dilutes your brine and risks mold. (Your future self will thank you.)
Pro cooking tips for grandma's old fashioned pickled green tomatoes
Sterilization Secrets
Never skip sterilizing your jars—this is where Grandma’s method guarantees safety and shelf life. I use a 250°F oven for 15 minutes, but a boiling water bath works too. Place jars upside down on a baking sheet to prevent condensation from dripping inside.
After sterilizing, chill them in an ice water bath for 5 minutes—this prevents thermal shock and cracking when you add the hot brine. 💧
Brine Balance
The perfect brine ratio is 1:1 vinegar to water, but we’re using straight vinegar here for maximum tang. Stir the sugar and salt into the vinegar until completely dissolved—this ensures even flavor distribution.
I like to bring it to a full boil first, then reduce to a simmer before packing the jars. This prevents the tomatoes from floating and ensures they absorb the brine evenly.
Tomato Texture
For that signature crunch, slice tomatoes into ½-inch thick spears and pack them tightly into jars. Leave ½-inch headspace at the top—this prevents mold growth and allows for liquid expansion.
I press the tomatoes down gently with a wooden spoon, but avoid mashing them. The goal is to maintain their shape while letting the brine work its magic. 🍅
Processing Precision
Water bath canning at 212°F for 15 minutes is non-negotiable for safe, long-lasting pickles. Use a canning rack to keep jars off the bottom of the pot, and ensure they’re fully submerged. After processing, let jars cool undisturbed for 12 hours—this allows the lids to seal properly.
Listen for the satisfying pop as the lids seal—this means your pickles are ready for the pantry!
Flavor Development
These pickles taste best after 24 hours of resting, but they’re ready to eat after just a few. The longer they sit, the more the flavors meld—Grandma always said, “Patience is the secret ingredient.”
Store in the fridge for up to 6 months, and save the leftover brine to pickle fresh tomatoes later. It’s like liquid gold for your next batch!
Troubleshooting Tips
If your tomatoes turn mushy, you likely used overripe ones or didn’t leave enough headspace. For cloudy brine, ensure all ingredients are fully dissolved before packing the jars. And if a jar doesn’t seal?
No problem—just refrigerate it and use it within 2 weeks. Grandma’s method is forgiving, but attention to detail makes all the difference. ✨
Nutrition facts
Frequently asked questions
Can I use yellow or orange green tomatoes for this recipe?
While traditional recipes call for bright green tomatoes, yellow or orange varieties work beautifully too. The color change happens during pickling, so you'll end up with golden pickles that still have that perfect tangy crunch. Just ensure they're firm and unripe before starting.
How do I know when my green tomatoes are ready to pickle?
Look for tomatoes that are firm, bright green, and completely unripe—no yellowing or soft spots. Squeeze gently: they should feel solid like a baseball, not mushy. The best ones are usually found in late summer when green tomato season peaks. Avoid any with cracks or bruises.
Can I adjust the spice level in the brine?
Start with the 1 tsp red pepper flakes as written, but you can easily reduce it to ½ tsp for mild flavor or increase to 2 tsp for extra heat. For a different spice profile, try adding ½ tsp turmeric for color or ½ tsp celery seed for depth without heat.
What can I do with leftover pickling brine?
Save that leftover brine—it's pure pickling gold! Use it to quickly pickle fresh green tomatoes (just pour over sliced tomatoes in a jar), or store it in the fridge for up to 2 weeks. You can also dilute it with equal parts water for a tangy salad dressing or marinade.
Why did my pickled tomatoes turn out too soft?
This usually happens when tomatoes are overripe, sliced too thin, or packed too tightly without enough headspace. For next time, use firmer tomatoes, slice them ½-inch thick, and leave that crucial ½-inch headspace. Also ensure your jars are properly sealed during processing.