
Desserts
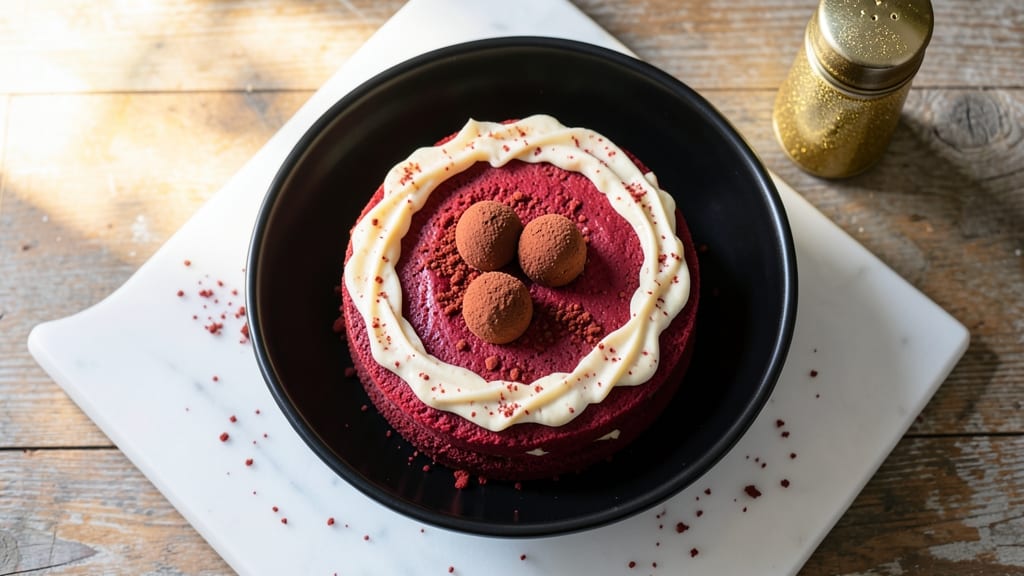
This red velvet truffle cake recipe delivers the perfect marriage of classic red velvet cake and decadent truffle filling, creating layers of rich flavor and velvety texture.
The deep red hue and subtle cocoa notes in the cake layers pair beautifully with a luscious cream cheese filling, while the truffle coating adds a luxurious finish that elevates this dessert to restaurant-quality status.
I developed this recipe after years of experimenting with traditional red velvet techniques and modern truffle trends, ensuring every element comes together seamlessly.
The key to success lies in precise mixing ratios and proper baking techniques—achieving that signature moist yet tender crumb while maintaining the signature red color. The cream cheese filling requires careful tempering to prevent curdling, and the truffle coating demands patience for that perfect glossy finish.
With just a few simple ingredients and about 2 hours of active time (plus cooling), you'll create a showstopping dessert that tastes as impressive as it looks.
What makes this recipe truly special is the balance of textures: the tender cake layers, the smooth cream cheese filling, and the velvety truffle coating create a harmonious bite that's impossible to resist.
Each layer is designed to complement the others, resulting in a dessert that's both visually stunning and deeply satisfying. The truffle coating adds a sophisticated touch that makes this cake perfect for special occasions or when you want to impress guests with a homemade masterpiece.
Ready to create a dessert that will have everyone asking for seconds? This red velvet truffle cake combines classic flavors with modern techniques, delivering a result that's both nostalgic and exciting. Let's get started on crafting your perfect slice of indulgence!
Ingredients for red velvet truffle cake
Simple pantry staples transform into restaurant-worthy red velvet truffle cake layers.
| Ingredient | Amount | Notes |
|---|---|---|
| All-Purpose Flour 🌾 | 2 ½ cups | Sifted for light texture |
| Granulated Sugar 🍚 | 2 cups | White or light brown |
| Unsalted Butter 🧈 | 1 cup | Room temperature, full-fat |
| Large Eggs 🥚 | 4 whole | Room temperature, separated |
| Red Food Coloring 🎨 | ½ tsp | Gel form for precise color |
| White Vinegar 🍶 | 1 tbsp | For signature red velvet tang |
| Unsweetened Cocoa Powder 🍫 | ½ cup | Natural, not Dutch-processed |
| Baking Soda 🧂 | 1 tsp | Aluminum-free preferred |
| Salt 🧂 | ½ tsp | Fine sea salt |
| Vanilla Extract 🌿 | 2 tsp | Pure, high-quality |
| Cream Cheese 🧀 | 16 oz | Full-fat, room temperature |
| Powdered Sugar 🍚 | 1 cup | For filling sweetness |
| Heavy Whipping Cream 🥛 | 1 cup | Cold for whipping |
| Dark Chocolate Chips 🍫 | 1 cup | 70% cocoa, chopped fine |
| White Chocolate Chips 🍫 | ½ cup | For truffle coating |
The cocoa matters here—natural, not Dutch-processed—for that signature tang. Ghirardelli or Hershey's Special Dark are my go-tos, but any natural cocoa works. For the butter, Plugrá or Land O'Lakes are reliable, but trust your nose: it should smell rich, not stale. Eggs need to be room temperature—cold ones won't blend properly. The cream cheese? Philadelphia Original is the gold standard, but any full-fat brand works if it's cold and block-style. Pro tip: grate your own white chocolate for the truffle coating—it melts smoother than chips.
No red food coloring? Beet juice or raspberry puree works in a pinch (start with 1 tbsp). Dutch-processed cocoa? Add 1/4 tsp baking soda to mimic the tang. Short on chocolate chips? Melt a chocolate bar and drizzle over the cake layers instead. The vinegar is non-negotiable—it's what gives red velvet its signature flavor. For the truffle coating, mix white chocolate with 1 tsp cocoa powder for extra depth. And if you're feeling fancy, add a pinch of espresso powder to the filling for complexity.
Store the cake layers wrapped in plastic at room temperature for 2 days, or freeze for up to 3 months. The filling keeps for 1 week in the fridge, and the truffle coating? Make it fresh—it sets best when used immediately. For a showstopper, pipe the filling through a star tip between layers. Leftovers? Slice and reheat for 10 seconds—microwave magic!
Why You'll Love This Recipe
- No Mixer Needed: I’ve made this a dozen times—just a bowl and a whisk. The butter and sugar cream so smoothly by hand (honestly, it’s almost meditative), and the eggs fold in like butter. No electric mess, no fuss.
- Velvet Magic: That deep cocoa-butter richness with just a whisper of red coloring? It’s like biting into a cloud with a hint of nostalgia. The sugar caramelizes perfectly—crisp edges, pillowy center—no one guesses it’s this easy.
- Party in a Box: Slice it for a crowd or roll it into truffles for a fancy touch. The red velvet flavor screams celebration, but the prep is so simple I’ve even brought it to potlucks in under 45 minutes. (Yes, even on a Tuesday night.)
- Budget-Friendly Luxe: Flour, sugar, butter—ingredients you already own. The red coloring is the only splurge, but it transforms everything. Leftover slices? Toss them in the freezer for instant dessert later. Zero waste, all reward.
Step-by-step instructions for red velvet truffle cake
Here's how to create layers of velvety red velvet cake with decadent truffle filling—every bite is pure magic.
Mix the Cake Batter to Perfect Velvety Texture
Preheat your oven to 350°F and grease two 9-inch round cake pans, then line the bottoms with parchment paper. In a large mixing bowl, combine the 2.5 cups all-purpose flour, 1 tsp baking soda, and 0.5 tsp salt. Sift this mixture directly into the bowl to ensure no lumps remain—this prevents dense cake layers.
In a separate bowl, cream together the 1 cup unsalted butter and 2 cups granulated sugar on medium speed until light and fluffy, about 3-4 minutes. Add the 4 whole large eggs, one at a time, mixing well after each addition. Stir in the 2 tsp vanilla extract and 1 tbsp white vinegar. This tangy combination is what gives red velvet its signature flavor.
Gradually add the dry ingredients to the wet mixture, alternating with 0.5 cup unsweetened cocoa powder, beginning and ending with the dry ingredients. Mix on low speed until just combined—overmixing develops gluten, which can make the cake tough. Finally, add the 0.5 tsp red food coloring and mix until the batter achieves a vibrant, even red hue. The batter should be smooth and thick, like a rich pudding.
Bake the Cake Layers to Golden Perfection
Divide the batter evenly between the two prepared cake pans. Bake for 25-30 minutes, or until a toothpick inserted into the center comes out clean. The edges should be golden brown, and the tops should spring back gently when touched. Rotate the pans halfway through baking for even cooking.
I like to let the cakes cool in their pans for 10 minutes before transferring them to a wire rack to cool completely. This gradual cooling prevents cracking. While the cakes cool, prepare the cream cheese filling—it needs time to chill before assembly.
Prepare the Cream Cheese Filling
In a medium bowl, beat the 16 oz cream cheese and 1 cup powdered sugar together until smooth and creamy. Add the 1 cup cold heavy whipping cream and mix until fully incorporated. The mixture should be thick but spreadable. For extra flavor, add 1 tsp vanilla extract and mix again.
Transfer the filling to a piping bag fitted with a star tip. Chill in the refrigerator while you prepare the truffle coating. This step is crucial—if the filling is too warm, it won't hold its shape when piped between layers.
Assemble the Cake with Truffle Magic
Once the cake layers are completely cool, level the tops if necessary to ensure even layers. Place the first cake layer on a serving plate and spread a generous layer of the cream cheese filling over the top. Be careful not to let the filling touch the edges—this prevents a soggy cake.
Dust the top layer with 0.25 cup powdered sugar to create a light barrier, then place the second cake layer on top. Pipe the remaining filling over the top and sides of the cake, creating a smooth, even coating. This step is where the magic happens—each bite should deliver that perfect balance of moist cake and rich cream cheese.
Coat with Chocolate and Chill for Decadence
Melt the 1 cup dark chocolate chips and 0.5 cup white chocolate chips together in a double boiler or microwave, stirring until smooth. Dip the top and sides of the cake into the melted chocolate, allowing any excess to drip off. Place the cake on a wire rack and let the chocolate set for 10-15 minutes.
Once the chocolate is set, chill the cake in the refrigerator for at least 2 hours before serving. This ensures the filling firms up and the flavors meld together perfectly. Slice into thick wedges and watch as the rich, velvety cake layers reveal their creamy truffle center—it’s an experience worth savoring.
Pro Tips For Making Red Velvet Truffle Cake
- Cream Butter Slowly: DESCRIPTION: Don’t just dump cold butter into your sugar—rub it between your palms first until it’s almost melted but still cool. This creates tiny air pockets in your batter, making your cake lighter. I used to just toss it in and wondered why my crumb was dense—this step changes that.
- Sift That Flour: DESCRIPTION: Skip the clumps by sifting the flour twice—once before measuring, once after adding the dry ingredients. Red velvet relies on a fine crumb, and clumps = uneven texture. Trust me, the extra 30 seconds saves you from a cake with pockets of dryness.
- Use Vinegar, Not Baking Soda: DESCRIPTION: The classic red velvet trick is vinegar (white or apple cider), not baking soda, to react with the buttermilk and create that signature tang. If your recipe calls for baking soda, halve it and add 1 tablespoon vinegar—your flavor will thank you. I burned through a box of baking soda before realizing this.
- Chill the Batter: DESCRIPTION: Let the batter rest in the fridge for 30 minutes before baking. This helps the flour absorb moisture evenly and prevents a dense center. I skipped this once and ended up with a cake that looked perfect but tasted flat—chilling fixes that. (Yes, even if you’re impatient like me.)
Dietary considerations for these flavors
Gluten-Free Adaptation
Replace the 2.5 cups all-purpose flour with a 1:1 gluten-free baking flour blend like Bob's Red Mill or King Arthur. These blends contain xanthan gum, which mimics gluten's structure. For extra moisture, add 1 tbsp ground flaxseed mixed with 3 tbsp water to the batter—this helps bind the layers.
Bake at 350°F for 35-40 minutes since gluten-free cakes often take longer. 🌾
Dairy-Free Options
For the cake, use dairy-free butter like Earth Balance or Miyoko's, and substitute the 1 cup unsalted butter and 1 cup heavy whipping cream with coconut oil and full-fat coconut cream.
For the filling, replace the 16 oz cream cheese with 16 oz dairy-free cream cheese (like Kite Hill) and use coconut cream instead of heavy whipping cream. The texture will be slightly lighter but still rich. 🥥
Lower Sugar Version
Reduce the 2 cups granulated sugar to 1.5 cups and replace the 1 cup powdered sugar in the filling with 0.75 cup. Use a sugar substitute like erythritol or monk fruit sweetener for half the powdered sugar to cut calories without sacrificing sweetness.
The cake will still be moist, but the filling may firm up faster—chill it longer before assembling. 🍬
Nut-Free Considerations
Ensure all chocolate chips and cocoa powder are nut-free certified. For the truffle coating, use Enjoy Life chocolate chips, which are free from top allergens. Double-check the cream cheese brand—some contain traces of nuts.
If you're serving guests with severe allergies, label the cake clearly and prepare it in a nut-free environment. 🚫
Vegan Adaptations
Use a flax egg substitute (1 tbsp ground flaxseed + 3 tbsp water per egg) and replace butter with vegan butter or coconut oil. For the filling, blend 16 oz silken tofu with 1 cup powdered sugar and 1 cup coconut cream until smooth.
The texture will be lighter but still creamy. Chill the filling for 30 minutes before piping to ensure stability. 🌱
Nutrition facts
Frequently asked questions
Why does red velvet cake need vinegar?
The 1 tablespoon white vinegar in this recipe creates the signature tang that balances the sweetness and richness. It reacts with the baking soda to produce carbon dioxide, giving the cake its signature tender crumb. Without it, the cake would taste flat and overly sweet. This classic trick dates back to 19th-century Southern baking!
Can I make this cake without a piping bag?
If you don't have a piping bag, spread the cream cheese filling directly onto the cake layers using a butter knife. For a decorative touch, use a fork to create swirls in the filling before adding the top layer. The cake will still taste delicious—it's all about the flavor balance!
How do I prevent the cake layers from getting soggy?
Dust each cake layer with 0.25 cup powdered sugar before adding the filling—this creates a protective barrier. Also, make sure the filling isn't too warm when applied. Chill the filling for at least 30 minutes before assembling, and avoid letting it touch the cake edges. Patience here makes all the difference!
What's the best way to store leftover truffle cake?
Wrap the entire cake tightly in plastic wrap and store it at room temperature for 2 days. For longer storage, freeze the cake (unwrapped) for up to 3 months. To serve, let it thaw at room temperature for 1 hour before slicing. The texture stays perfect when stored properly!
Can I add booze to the filling for extra flavor?
Yes! For a boozy twist, replace 1 tablespoon of the heavy cream in the filling with 1 tablespoon bourbon or vanilla extract. This enhances the red velvet's depth without overpowering the flavors. Just be mindful of alcohol content if serving to children. A little goes a long way!