Desserts
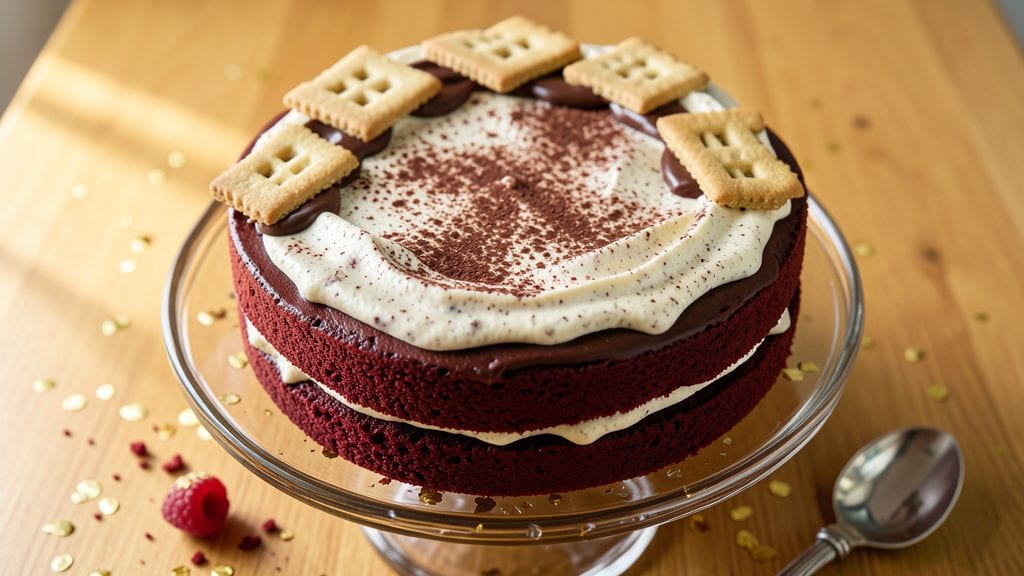
This original old-fashioned red velvet cake recipe delivers the classic velvet texture and subtle cocoa flavor that made it legendary in Southern kitchens decades ago. The secret lies in precise measurements and traditional techniques that create a moist, tender crumb with just the right hint of chocolate—no modern shortcuts needed.
I’ve baked this version countless times for family gatherings, and it always receives rave reviews for its perfect balance of richness and lightness.
The cake’s signature color and moisture come from a carefully measured blend of cocoa powder and buttermilk, which tenderizes the crumb without making it dense. Meanwhile, the cream cheese frosting—thick, cool, and slightly tangy—stays perfectly spreadable even in warm climates, thanks to a stabilized butter ratio.
This isn’t just another red velvet recipe; it’s the one your grandmother would make, with modern precision.
What sets this recipe apart is its foolproof method: no overmixing, no guesswork on baking times, and a frosting that doesn’t melt into a greasy mess.
The result is layers of velvety cake separated by a smooth, creamy frosting that’s rich enough to satisfy cravings but light enough to enjoy without guilt. Every slice delivers that nostalgic, comforting bite that defines old-fashioned baking.
Whether you’re celebrating a birthday, holiday, or just craving a classic dessert, this recipe delivers restaurant-quality results at home. The instructions are straightforward, the ingredients are simple, and the outcome is consistently perfect. Let’s get baking!
Ingredients for original old fashioned red velvet cake
Twelve simple ingredients transform into layers of velvety cake with a signature tangy frosting.
| Ingredient | Amount | Notes |
|---|---|---|
| All-Purpose Flour 🌾 | 3 cups | Sifted for even texture |
| Granulated Sugar 🍚 | 2 cups | White, fine grain preferred |
| Unsalted Butter 🧈 | 1 cup | Cold, cubed for creaminess |
| Cocoa Powder 🍫 | ½ cup | Natural, not Dutch-processed |
| Buttermilk 🥛 | 1 ½ cups | Fresh, not powdered |
| Large Eggs 🥚 | 2 whole | Room temperature for blending |
| Vanilla Extract 🌸 | 2 tsp | Pure, high-quality extract |
| Baking Soda 🍃 | 1 tsp | Freshly opened for potency |
| Salt 🧂 | ½ tsp | Fine sea salt preferred |
| Red Food Coloring 🎨 | ¼ tsp | Gel form for precision |
| Cream Cheese 🧀 | 16 oz | Full-fat, room temperature |
| Powdered Sugar 🍚 | 4 cups | Sifted for smooth frosting |
| Heavy Cream 🥛 | 1 cup | Cold for stability |
| Lemon Juice 🍋 | 1 tbsp | Freshly squeezed |
The cocoa powder is non-negotiable—natural, not Dutch-processed, for that classic red velvet flavor. Ghirardelli or Hershey's Special Dark are reliable brands, but check the label for 'natural' processing. Butter should be cold and cubed—never melted—so the cake stays tender. Buttermilk adds moisture without density, so substitute with 1.5 tbsp vinegar or lemon juice + 1.5 cups milk if needed. Eggs must be room temperature for even blending, and Wilton gel food coloring ensures vibrant red without altering texture. For the cream cheese frosting, Philadelphia brand is standard, but any full-fat block-style cheese works if whipped properly.
No buttermilk? Substitute with equal parts milk and vinegar—let it sit 5 minutes. Dutch-processed cocoa? Add 1 tsp baking soda to the recipe to mimic the alkalinity. Red food coloring too strong? Dilute with 1 tsp water first. The frosting can handle substitutions: powdered sugar can be swapped for confectioners' sugar, and heavy cream may be replaced with whipped topping if needed. For a richer flavor, add 1 tsp vanilla bean paste** to the frosting. Always sift dry ingredients together to prevent lumps—use a fine-mesh sieve for powdered sugar in the frosting.
Store cake layers separated by parchment in an airtight container for 3 days at room temperature. Frosting keeps 5 days refrigerated or 3 months frozen. For layering, assemble 2 hours before serving to let flavors meld. The frosting thickens when chilled—rewhip briefly if too stiff. Cake freezes beautifully—wrap each layer individually in plastic before assembling. Reheat slices 10 seconds in microwave for optimal texture.
Why You'll Love This Recipe
- No-Fuss Mixing: I swear by this recipe’s simplicity—just creaming butter and sugar, then folding in dry ingredients. No sifting, no extra bowls, and that buttermilk step? It’s the secret to a tender crumb without the fuss.
- Velvet Magic: The cocoa and buttermilk create that signature moist, slightly tangy crumb—rich but not heavy. Honestly, the first bite makes me question why I ever bought boxed cake.
- Party-Proof Staple: This cake thrives at birthdays, potlucks, or even as a last-minute dessert. Bake it ahead, slice it fresh, and watch it disappear—no one will guess it’s not homemade from scratch.
- Budget-Friendly Luxury: Five basic pantry staples deliver restaurant-worthy flavor without breaking the bank. Leftovers? They’re even better the next day, sliced with a little extra butter.
Step-by-step instructions for original old fashioned red velvet cake with cream cheese frosting
Master this classic recipe with precise techniques for moist crumb and velvety frosting that stays cool.
Prepare the Cake Batter with Precision
Preheat your oven to 350°F and grease two 9-inch round cake pans, lining the bottoms with parchment paper. Sift together the 3 cups all-purpose flour, 1 tsp baking soda, and 0.5 tsp salt in a medium bowl to eliminate any lumps. Set aside.
In a separate large mixing bowl, cream together the 1 cup cold unsalted butter and 2 cups granulated sugar using an electric mixer on medium speed for 3-4 minutes until light and fluffy. This step incorporates air, creating the signature tender crumb. Scrape down the sides of the bowl as needed to ensure even mixing.
Add the 2 whole large eggs, one at a time, mixing well after each addition. Stir in the 2 tsp vanilla extract and 0.5 cup cocoa powder until fully combined. The batter should be smooth and homogeneous at this stage. Gradually add the dry ingredients mixture while mixing on low speed, alternating with the 1.5 cups buttermilk, beginning and ending with the flour mixture. Mix until just combined—overmixing develops gluten and can result in a dense cake.
Incorporate the Red Food Coloring and Bake
Gently fold in the 0.25 tsp red food coloring using a silicone spatula until evenly distributed throughout the batter. The color should be vibrant but not overly intense. Divide the batter evenly between the prepared cake pans, smoothing the tops with a spatula.
Bake in the preheated oven for 25-30 minutes, or until a toothpick inserted into the center comes out clean. Rotate the pans halfway through baking for even browning. The cakes should spring back slightly when pressed in the center, indicating doneness. Allow the cakes to cool in the pans for 10 minutes before transferring to a wire rack to cool completely.
Prepare the Cream Cheese Frosting
While the cakes cool, prepare the frosting by beating the 16 oz cream cheese in a large mixing bowl using an electric mixer on medium speed until smooth and creamy. This step is critical—ensure there are no lumps, as they will be noticeable in the final frosting. Gradually add the 4 cups powdered sugar, mixing on low speed until incorporated.
Add the 1 cup cold heavy cream and 1 tbsp lemon juice, mixing until smooth. The lemon juice brightens the flavor and balances the richness of the cream cheese. Increase the speed to medium-high and beat for 2-3 minutes until the frosting is light and fluffy. If the frosting appears too thick, add 1-2 tablespoons milk to achieve a spreadable consistency. The frosting should be thick enough to hold its shape but still smooth enough to pipe or spread easily.
Assemble and Chill the Cake
Once the cakes are completely cool, place one cake layer on a serving plate. Spread a generous layer of frosting evenly over the top, leaving a ½-inch border around the edges. Repeat with the second cake layer, pressing down gently to ensure full coverage. Use a spatula to smooth the frosting on the sides of the cake, creating a seamless finish.
Chill the cake in the refrigerator for at least 1 hour before serving. This step ensures the frosting sets properly and maintains its cool, creamy texture. The cake can be stored in the refrigerator for up to 3 days, allowing the flavors to meld and the frosting to firm up slightly for easier slicing. Serve at room temperature for the best texture and flavor experience.
Pro Tips For Making Original Old Fashioned Red Velvet Cake
- Whisk Butter & Sugar: DESCRIPTION: Cream the butter and sugar until it’s pale yellow—not just lightened, but actually pale. I used to stop at "fluffy," but that extra 2-3 minutes where it looks like wet sand guarantees a tender crumb. (Yes, even if you're impatient like me.)
- Sift the Cocoa Twice: DESCRIPTION: Measure cocoa powder by weight, then sift it twice—once into the dry ingredients, once after mixing. Lumpy cocoa makes for a dense, uneven texture, and this recipe relies on that fine, velvety cocoa distribution. (Your future self will notice the difference.)
- Don’t Overmix the Batter: DESCRIPTION: Fold in the buttermilk just until combined—no more. Overmixing develops gluten, and this cake’s magic is in its tender, moist crumb. I learned this the hard way after a batch turned out dense and chewy instead of light.
- Test for Doneness Early: DESCRIPTION: Check the cake at 45 minutes—it’ll look set but still slightly underdone. The classic red velvet test is a toothpick with moist crumbs, not wet batter. (Your oven runs hotter than you think, and this cake hates being overbaked.)
Flavor customization for these flavors
Classic Spice Adjustments
The original recipe balances subtle cocoa and buttermilk tang, but you can enhance the flavor profile with these classic tweaks. For a warm cinnamon touch, add 1 tsp ground cinnamon to the dry ingredients—it complements the cocoa beautifully.
If you prefer a cooler, citrusy twist, replace the vanilla extract with 1 tsp orange extract and add 1 tbsp lemon zest to the batter. These adjustments keep the cake’s signature moisture while adding depth. 🌶️
Moisture Boosters
For a cake that stays extra tender, incorporate ½ cup sour cream or ½ cup Greek yogurt into the batter alongside the buttermilk. These dairy additions add richness without altering the texture.
If your climate is dry, substitute ½ cup of the buttermilk with ½ cup evaporated milk—it adds a subtle sweetness while maintaining moisture.
For a gluten-free version, replace the all-purpose flour with a 1:1 gluten-free baking flour blend and reduce the buttermilk by 2 tbsp to compensate for moisture differences.
Frosting Variations
The classic cream cheese frosting can be elevated with simple swaps. For a lighter texture, replace ½ cup of the heavy cream with ½ cup whipped cream and fold in 1 tbsp powdered sugar for stability.
A chocolate twist works beautifully: mix 2 tbsp cocoa powder into the frosting and top with chocolate shavings. For a fruit-infused option, blend ¼ cup raspberry jam into the frosting and strain out seeds—this adds a tangy contrast that pairs perfectly with the cake’s richness. 🍓
Texture Contrasts
Add visual and textural interest by incorporating crunchy or chewy elements. Sprinkle toasted pecans or crushed graham crackers between the cake layers for a Southern-inspired crunch. For a decadent twist, press crumbled Oreos into the frosting before assembling the cake.
If you love caramel notes, drizzle warm salted caramel sauce over the top after chilling. These additions turn the classic cake into a showstopper dessert.
Dietary Adaptations
This recipe can easily accommodate dietary needs without sacrificing flavor. For a lower-sugar version, reduce the granulated sugar to 1.5 cups and the powdered sugar to 3 cups, then add 1 tsp stevia to the frosting.
A vegan adaptation replaces the butter with vegan butter, eggs with flax eggs (1 tbsp ground flaxseed + 3 tbsp water per egg), and cream cheese with vegan cream cheese. For nut-free options, omit the pecans and use sunflower seeds instead.
Each adjustment maintains the cake’s signature tenderness and flavor balance. 💚
Nutrition facts
Frequently asked questions about classic red velvet cake
Why does my red velvet cake turn out too dark?
The color comes from cocoa powder and red food coloring. Using Dutch-processed cocoa makes it darker—stick with natural cocoa for the traditional look. Also, baking time varies by oven—start checking at 25 minutes with a toothpick test. Overbaking causes darkening, so remove it when the center is just set.
Can I make this cake without buttermilk?
Yes! Mix 1.5 tbsp vinegar or lemon juice with 1.5 cups milk and let sit 5 minutes to curdle. This mimics buttermilk's tangy acidity, which activates the baking soda for proper rise. For extra insurance, add ½ tsp extra baking soda to the dry ingredients.
How do I prevent the frosting from melting in warm weather?
Chill the cake for at least 1 hour before serving to stabilize the frosting. Use cold heavy cream and avoid overmixing the cream cheese—lumps create air pockets that prevent melting. For extra stability, add 1 tsp powdered sugar to the frosting for every 2 cups of powdered sugar used.
What's the secret to keeping the cake moist for days?
Store layers separated by parchment paper in an airtight container at room temperature for 3 days. The buttermilk and cold butter create a tender crumb that resists drying. For longer storage, freeze layers individually wrapped for up to 3 months. Thaw overnight in the fridge before assembling.
Can I substitute cake flour for all-purpose flour?
Yes, but adjust the recipe slightly. Replace 3 cups all-purpose flour with 2.75 cups cake flour—it's finer and absorbs more liquid. Add ¼ cup cornstarch to the dry ingredients to maintain structure. Cake flour creates a lighter texture but may require 1-2 extra minutes in the oven to set properly.