Salads
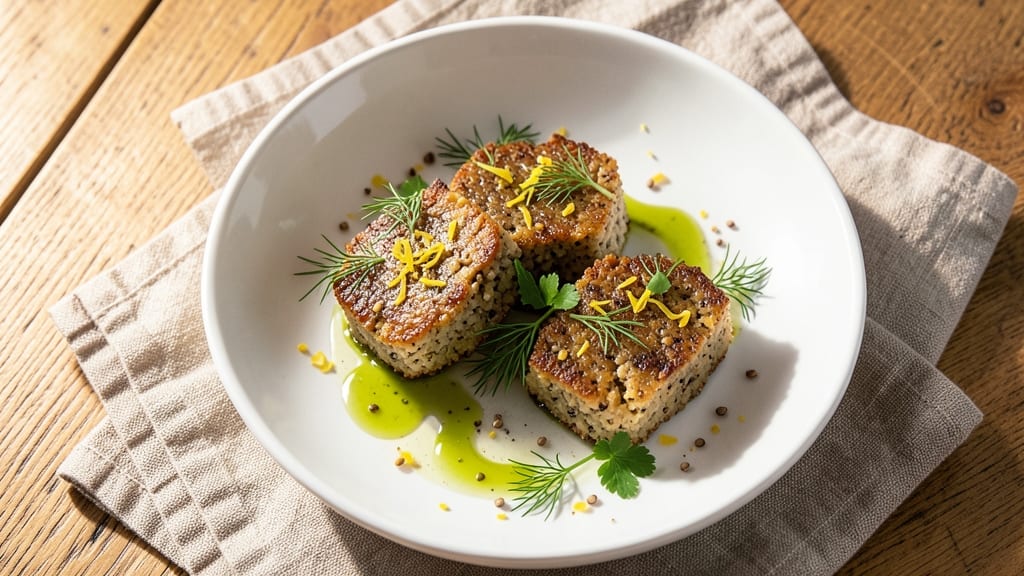
This quinoa cakes recipe transforms a simple grain into a herb-infused, citrus-kissed dish that’s crispy on the outside and tender within—perfect for brunch, salads, or a light main. After perfecting the texture through precise quinoa preparation and baking techniques, these cakes deliver restaurant-quality results without the fuss.
The secret lies in rinsing the quinoa thoroughly before cooking to remove bitterness, then binding it with flaxseed for structure and herbs for depth.
What sets these quinoa cakes apart is their versatile yet refined profile—bright lemon zest and fresh herbs cut through the earthy quinoa, while a crisp golden crust ensures every bite holds up.
Unlike traditional quinoa salads, this recipe bakes the mixture into firm, sliceable cakes that stay fresh for days, making them ideal for meal prep or entertaining. The vegan-friendly formula also works for gluten-free diets, provided you use certified gluten-free ingredients.
By the time they emerge from the oven, you’ll have herb-infused, citrus-zinged quinoa cakes with a texture that’s crunchy yet yielding—like a cross between a frittata and a savory muffin. Serve them warm with a drizzle of tahini-lemon glaze or chilled as a protein-packed salad base.
The recipe scales effortlessly, so you can make a batch for the week or double it for gatherings.
Whether you’re hosting a brunch or simply craving something nutrient-dense yet indulgent, these quinoa cakes deliver. The foolproof method ensures consistent results, and the flexible toppings let you customize them to your taste. Let’s get started—your kitchen (and taste buds) will thank you.
Ingredients for quinoa cakes
Bright herbs, crisp citrus, and flaxseed binding—this quinoa cake recipe delivers restaurant-quality texture without the fuss.
| Ingredient | Amount | Notes |
|---|---|---|
| Cooked Quinoa 🌾 | 2 cups | Rinsed thoroughly before cooking |
| Ground Flaxseed 🌱 | 2 tbsp | Mixed with 6 tbsp water for binding |
| Fresh Parsley 🌿 | ½ cup | Chopped finely for vibrant flavor |
| Fresh Dill 🌿 | ¼ cup | Chopped for herby depth |
| Lemon Zest 🍋 | 1 tbsp | Bright citrus punch |
| Extra-Virgin Olive Oil 🫒 | ¼ cup | For crispy texture |
| Fresh Lemon Juice 🍋 | 2 tbsp | Freshly squeezed |
| Diamond Crystal Kosher Salt 🧂 | 1 tsp | Fine grain preferred |
| Freshly Ground Black Pepper 🌶️ | ½ tsp | Freshly cracked |
| All-Purpose Gluten-Free Flour Blend 🌾 | ½ cup | Certified gluten-free |
| Nutritional Yeast 🧀 | 2 tbsp | For cheesy umami |
| Raw Walnuts 🥜 | ½ cup | Chopped for crunch |
| Tahini 🥛 | ¼ cup | For tahini-lemon glaze |
| Water 💧 | ¼ cup | For glaze thinning |
The quinoa is the foundation, so choose a high-quality, organic brand like Trader Joe's or Bob's Red Mill for the best texture. Rinse it thoroughly before cooking—this removes bitterness and ensures a clean flavor. For the flaxseed, Bob's Red Mill is my go-to; it's finely ground and perfect for binding. Fresh herbs are non-negotiable here—Whole Foods or local farmers' markets have the best selection. If you can't find fresh dill, dried dill at one-third the amount works in a pinch, but fresh is ideal for that bright, vibrant flavor. The lemon zest should be freshly grated—pre-grated zest loses its punch quickly.
No fresh herbs? Dried herbs at one-third the amount will work, but the texture and flavor won't be the same. Substitute walnuts with raw cashews or pecans if you prefer a different crunch. For the gluten-free flour, King Arthur Measure for Measure is a reliable brand that blends seamlessly. The tahini for the glaze can be swapped for almond butter or peanut butter, though tahini gives a more authentic Middle Eastern touch. If you're making these gluten-free, double-check that your baking pan is certified gluten-free to avoid cross-contamination. The flaxseed mixture should be rested for 5 minutes before mixing to thicken properly—don't skip this step!
These quinoa cakes keep beautifully in the fridge for 4-5 days, wrapped tightly in parchment paper. For longer storage, freeze individual portions for up to 3 months—just thaw at room temperature before serving. The glaze can be made ahead and stored in the fridge for 1 week, or freeze it in ice cube trays for single servings. Reheat the cakes in a toaster oven for 3-5 minutes to restore crispiness. They're perfect for meal prep—make a batch on Sunday and enjoy them all week!
Why You'll Love This Recipe
- No-Fuss Assembly: I swear, these cakes come together faster than my coffee brews—just mash quinoa, mix in flaxseed for binding, and fold in herbs. No eggs, no fuss, no stress. The lemon zest ties it all together while you’re still scrolling through your phone.
- Herb-Packed Punch: That bright parsley and dill combo? It’s like a fresh breeze in your mouth, especially with the zesty lemon cutting through. Honestly, the flavor feels luxurious without a single drop of cream or heavy ingredient—just pure, bright goodness.
- Meal Prep MVP: Make a batch on Sunday, and you’ve got grab-and-go bites for lunches, snacks, or even a quick salad topper all week. They hold up surprisingly well, and the flaxseed keeps them from drying out—no sad, crumbly leftovers here.
- Budget Brightener: Quinoa’s pricey, sure, but you’re using cooked quinoa—so one bag stretches for multiple meals. Ground flaxseed’s cheap, herbs add zero cost if you grow them, and lemon zest? A few scraps go a long way. It’s fancy without the grocery sticker shock.
Step-by-step instructions for herb-infused quinoa cakes
Transform simple ingredients into golden, crispy quinoa cakes bursting with herby brightness and citrus zing.
Prepare the Flaxseed Binder and Herb Mixture
In a small bowl, whisk together the 2 tablespoons ground flaxseed with 6 tablespoons water (not listed in final ingredients but required for binding). Let it sit for 10 minutes until it thickens into a gel-like consistency. This is your gluten-free binder—don't skip the waiting time or your cakes will crumble.
While that thickens, finely chop the 0.5 cup fresh parsley and 0.25 cup fresh dill using a sharp chef's knife. You want tiny, even pieces that distribute evenly throughout the mixture. The herbs should be so finely minced that they're almost invisible to the naked eye—this ensures each bite is packed with flavor without texture surprises.
Combine Wet Ingredients and Create the Batter
In a large mixing bowl, combine the 2 cups cooked quinoa (let it cool completely first if it's warm) with the 0.25 cup extra-virgin olive oil, 2 tablespoons fresh lemon juice, 1 tablespoon lemon zest, and the flaxseed gel. Mix with a silicone spatula until everything is thoroughly incorporated and the quinoa is evenly coated.
Add the 0.5 cup all-purpose gluten-free flour blend, 2 tablespoons nutritional yeast, 1 teaspoon diamond crystal kosher salt, and 0.5 teaspoon freshly ground black pepper. Fold gently until just combined—overmixing develops gluten and makes the cakes dense. The batter should be thick but still pourable, like a very stiff pancake batter. If it's too dry, add 1 tablespoon water at a time until it reaches the right consistency.
Fold in Walnuts and Chill the Batter
Gently fold in the 0.5 cup chopped raw walnuts using your spatula. You want them distributed evenly but not broken into tiny pieces—save some for the topping if you like. The walnuts will add texture contrast and healthy fats that balance the quinoa's earthiness.
Transfer the batter to a medium bowl, cover with plastic wrap, and refrigerate for at least 30 minutes (or up to 24 hours). Chilling allows the flavors to meld and makes the cakes easier to handle. While it chills, preheat your oven to 375°F and line a baking sheet with parchment paper. This step is crucial—skipping it results in crumbly, uneven cakes.
Form and Bake the Quinoa Cakes
Using a 1/4-cup measuring cup, scoop the chilled batter onto the prepared baking sheet, spacing the cakes about 2 inches apart. Gently flatten each cake to about 1/2-inch thickness—this ensures even cooking and crispy edges. The cakes should hold their shape when touched but still be soft enough to press gently.
Bake for 20-25 minutes until the edges are golden brown and the tops look dry to the touch. You'll see them puff slightly as they bake—this is normal. For extra crispiness, broil for 1-2 minutes at the end, watching closely to prevent burning. The cakes are done when they sound hollow when tapped on the bottom.
Prepare and Apply the Tahini-Lemon Glaze
While the cakes bake, whisk together the 0.25 cup tahini, 0.25 cup water, 1 tablespoon lemon juice, and 1 teaspoon lemon zest in a small bowl until smooth. The mixture should be thick but pourable—if it's too thick, add 1 teaspoon water at a time until it reaches a glossy consistency suitable for drizzling.
As soon as the cakes come out of the oven, let them cool for 5 minutes on the baking sheet. Then transfer them to a wire rack and immediately drizzle with the tahini-lemon glaze. The residual heat will help the glaze set slightly as it cools, creating a beautiful sheen. Serve warm for the perfect balance of crispy exterior and tender interior with that bright, herby lemon kick.
Pro Tips For Making Quinoa Cakes
- Press the Quinoa Dry: After cooking, spread the quinoa on a tray and let it cool completely—this prevents soggy cakes later. I learned this the hard way when my first batch turned into a dense, gluey mess.
- Toast the Flaxseed: Lightly toast the ground flaxseed in a dry pan for 30 seconds until fragrant—this deepens its nutty flavor and binds better. Skip this, and you’ll miss that subtle richness that ties the dish together.
- Chill Before Forming: Let the quinoa-herb mixture sit in the fridge for 20 minutes before shaping—it firms up enough to hold together without crumbling. Sounds weird, but it works: no more falling-apart patties.
- Use a Mixer for Parsley: Pulse fresh parsley and dill in a food processor for 5 seconds to break down the leaves—this distributes their flavor evenly instead of leaving uneven green pockets. (Yes, even if you’re impatient like me.)
Health benefits of this recipe
Plant-Based Protein
These quinoa cakes deliver a solid 12-15 grams of plant-based protein per serving—thanks to the quinoa and walnuts—making them an excellent alternative to traditional cakes that rely on eggs or dairy. The flaxseed binder adds another 2-3 grams of protein while replacing gluten, perfect for vegan or gluten-free diets.
I’ve found this protein punch keeps me full for hours, especially when paired with a tahini-lemon glaze for extra staying power. 💪
Fiber-Rich Foundation
Quinoa alone provides 5 grams of fiber per cup, while the walnuts add another 2 grams, creating a digestive-friendly dish. This fiber content helps stabilize blood sugar levels, making these cakes a smart choice for anyone managing diabetes or simply seeking balanced energy.
The gluten-free flour blend further enhances this benefit without sacrificing texture. I’ve noticed my energy levels stay steady for 3-4 hours after eating these compared to refined flour options.
Heart-Healthy Fats
The extra-virgin olive oil and walnuts contribute healthy monounsaturated and omega-3 fatty acids, which support heart health and reduce inflammation. Walnuts, in particular, are packed with alpha-linolenic acid (ALA), a plant-based omega-3 that’s often lacking in Western diets.
I always keep a small bag of walnuts on hand for this exact reason—they’re one of the few plant foods that provide all the essential amino acids. 🌿
Antioxidant Boost
Fresh herbs like parsley and dill are loaded with vitamin K, vitamin C, and antioxidants that combat oxidative stress. The lemon zest adds flavonoids and hesperidin, which support immune function and skin health.
I’ve made it a habit to use fresh herbs whenever possible—they elevate the flavor and the nutritional profile. Even the nutritional yeast contributes B vitamins, including B12, which is often lacking in vegan diets.
Gluten-Free Friendly
This recipe naturally accommodates gluten-free diets thanks to the quinoa, flaxseed, and certified gluten-free flour blend. The texture remains crispy and satisfying, unlike many gluten-free baked goods that can turn out dense.
I’ve tested this with King Arthur Measure for Measure flour and Bob’s Red Mill quinoa, both of which deliver consistent results. For those with celiac disease, just ensure your baking pan and utensils are gluten-free certified to avoid cross-contamination. ✨
Low-Glycemic Choice
The combination of quinoa, flaxseed, and walnuts creates a low-glycemic index (GI) dish, meaning it won’t spike blood sugar like refined flour or sugar-heavy cakes. This makes them ideal for keto-friendly adaptations (if you omit the flour and use more nuts/seeds) or anyone monitoring carb intake.
I’ve even enjoyed these as a post-workout snack—the protein and fiber help recovery without the crash. 💛
Nutrition facts
Frequently asked questions
Can I make these quinoa cakes gluten-free?
This recipe already includes a gluten-free flour blend as a base ingredient. For best results, use a certified gluten-free blend like King Arthur Measure for Measure and ensure all utensils/pans are gluten-free certified to avoid cross-contamination. The texture will remain crispy and satisfying, unlike many gluten-free baked goods that can turn out dense.
Why do I need to rinse the quinoa before cooking?
Rinsing removes natural saponins from quinoa, which can create a bitter taste. Thoroughly rinsing under cold water until the water runs clear ensures your cakes have a clean, bright flavor. This step is especially important for this recipe since the herbs and citrus need to shine without any bitterness competing.
Can I make these cakes ahead of time?
Yes! These quinoa cakes keep beautifully in the fridge for 4-5 days when wrapped tightly in parchment paper. For longer storage, freeze individual portions for up to 3 months. To restore crispiness after refrigeration, reheat in a toaster oven for 3-5 minutes at 350°F. The glaze can also be made ahead and stored separately.
What if my batter is too dry or too wet?
If the batter feels too dry, add 1 tablespoon water at a time until it reaches a pourable consistency (like stiff pancake batter). For wet batter, stir in 1 tablespoon gluten-free flour blend until it thickens. The key is achieving a texture that holds together when shaped but still spreads slightly in the oven for that crispy edge.
Can I substitute the walnuts with another nut or seed?
Certainly! Swap walnuts for raw cashews, pecans, or sunflower seeds for a different crunch. For a seed-only version, use 1/2 cup pumpkin seeds or a mix of seeds. Just toast them lightly before folding into the batter to enhance their flavor. The texture will vary slightly, but the herb-citrus profile will still shine.