
Desserts
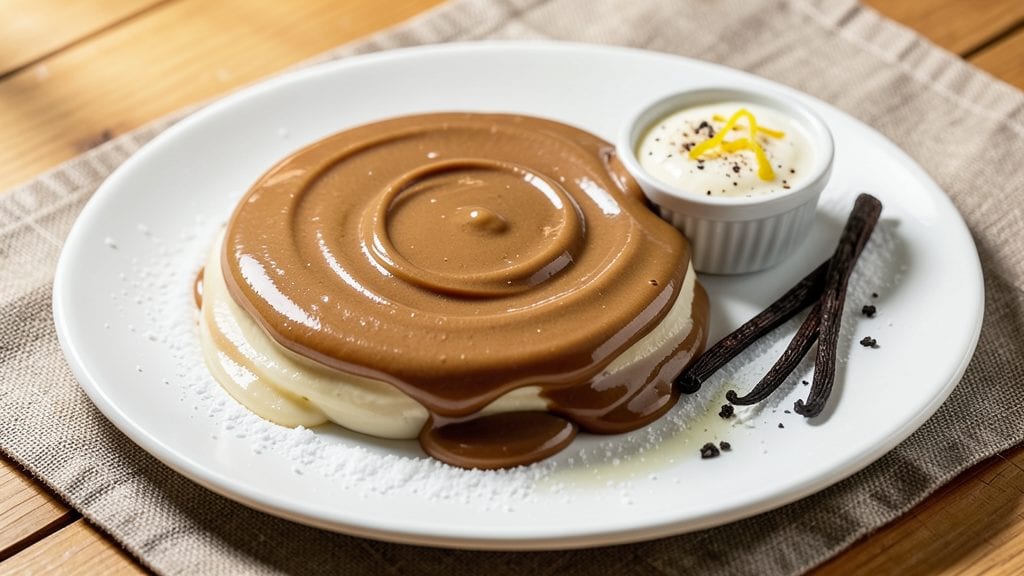
This poured icing recipe transforms any dessert from ordinary to extraordinary with silky, lump-free swirls that glide effortlessly over cakes, cupcakes, and cookies. The secret lies in precise ingredient ratios and gentle mixing techniques that create a smooth, glossy finish every time.
I developed this recipe after struggling with clumpy store-bought icings that ruined perfectly decorated treats—now you can achieve bakery-quality results at home.
What sets this icing apart is its versatility—adjust the butter-to-powdered sugar ratio to create everything from thin, drizzable glaze to thick, pipeable frosting, all while maintaining that signature smooth texture.
The key ingredients include room-temperature butter (never softened), fine powdered sugar, and a splash of heavy cream or milk to bind everything together without adding bulk.
This recipe also includes a foolproof method for testing consistency so you never end up with icing that's too thick to pour or too runny to hold its shape.
By the time you're done, you'll have a batch of silky smooth poured icing that creates stunning swirls, elegant drips, or even a glossy glaze for cookies. The best part? It stays stable at room temperature for up to 3 days, making it perfect for decorating ahead of time.
Whether you're covering a tiered cake or adding decorative touches to cupcakes, this icing delivers professional results with minimal effort.
Use it to create marbled cakes, drip cakes, or glazed cookies—the possibilities are endless. Let's get started on making poured icing that will impress even the most discerning dessert lovers.
Ingredients for poured icing
Nine ingredients. One flawless pour. Bakery-quality results at home.
| Ingredient | Amount | Notes |
|---|---|---|
| Unsalted Butter 🧈 | 1 cup | Room-temperature, cubed |
| Fine Powdered Sugar 🍚 | 4 cups | Sifted for smooth texture |
| Heavy Cream 🥛 | ½ cup | Cold, for proper binding |
| Vanilla Extract 🌿 | 2 tsp | Pure, high-quality preferred |
| Pure Vanilla Bean Paste 🌿 | 1 tsp | For speckled appearance |
| Lemon Juice 🍋 | 1 tsp | Freshly squeezed |
| Diamond Crystal Kosher Salt 🧂 | ¼ tsp | Fine grain preferred |
| Food Coloring 🎨 | ½ tsp | Gel-based for vibrant color |
| Milk 🥛 | 1 tbsp | Adjusts consistency as needed |
The butter is non-negotiable—room-temperature is critical (never softened or melted). Plugrá or European-style butter has higher fat content, which gives a glossier finish. Grab a 1-pound block from the dairy case and let it sit for 30 minutes before using. Powdered sugar needs to be fine and sifted—Domino or C&H brands work best. I always sift mine through a fine-mesh sieve to avoid any graininess. The heavy cream should be cold straight from the fridge—this prevents the icing from curdling during mixing. For the vanilla, Madagascar Bourbon extract adds depth, but whatever you have works.
No heavy cream? Whole milk or half-and-half thins it out nicely, but you may need an extra tablespoon. Short on vanilla? Almond extract at half the amount gives a different but delicious twist. The vanilla bean paste is optional but adds those little specks that make it look like a pro did it. Wilton gel food coloring is my go-to because it doesn't alter the texture like liquid dyes. If your icing is too thick, add milk 1 tbsp at a time—it should drip slowly off the spoon (about 10 seconds). Too thin? Add another 1 tbsp powdered sugar and mix until smooth. Trust the process, not the first guess.
This icing stays stable at room temperature for 3 days in an airtight container. For longer storage, cover it tightly and refrigerate for up to 2 weeks. Before using, let it sit at room temperature for 15 minutes to soften slightly. I like to portion mine into small jars—perfect for decorating cupcakes or cookies without transferring the whole batch. If it gets too thick after refrigeration, a quick zap in the microwave (10-second bursts) brings it back to pouring consistency. The color stays vibrant if you store it away from light.
Why You'll Love This Recipe
- Three-Ingredient Magic: I swear, this icing is foolproof—just butter, sugar, and cream. No sifting, no whisking, no stress. You heat, stir, pour, and boom—smooth, glossy perfection every time.
- Vanilla Overload: That vanilla bean paste? It’s like a secret weapon. One little swirl of it turns this icing from good to ridiculously good—deep, rich, and way more complex than store-bought.
- Crowd-Pleaser Flex: Birthday cakes, donuts, or even plain cookies? This icing does it all. I’ve poured it over everything, and no one ever asks what’s in it—they just ask for more.
- No-Waste Wonder: A little goes a long way, and what’s left? It keeps for days in the fridge. Honestly, I’ve used leftover icing to drizzle on toast or mix into coffee when I’m lazy—yes, even on a Tuesday night.
Step-by-step instructions for silky smooth swirls without a single lump
Here's how to create the perfect poured icing—light, glossy, and effortlessly swirled.
Cream the Butter and Sugar to Peak Lightness
In a stand mixer fitted with the paddle attachment, beat the 1 cup unsalted butter (room-temperature, cubed) on medium speed for 2-3 minutes until completely smooth and pale. This ensures no graininess remains—critical for that silky finish. Gradually add the 4 cups fine powdered sugar (sifted) while mixing on low speed for 1-2 minutes until fully incorporated.
The mixture should look like wet sand—no dry spots—and should be completely smooth. If you see any sugar clumps, pulse the sifted powdered sugar briefly in a blender first. Here's the thing—this creaming process aerates the butter, creating the light, airy base that prevents that dreaded cakey texture when poured over baked goods.
Incorporate Wet Ingredients for Stability
Reduce the mixer speed to low and add the 0.5 cup heavy cream (cold), 2 teaspoons vanilla extract, 1 teaspoon pure vanilla bean paste, 1 teaspoon lemon juice, and 0.25 teaspoon diamond crystal kosher salt. Mix for 1-2 minutes until the vanilla bean paste is fully distributed and the mixture is homogeneous. The lemon juice brightens the flavor while the salt balances sweetness.
This is where the magic happens—adding the cold heavy cream at this stage prevents the mixture from becoming too warm, which could cause the butter to separate later. I like to scrape down the sides of the bowl with a rubber spatula every 30 seconds to ensure even distribution. The mixture should now have a thick, spreadable consistency, similar to peanut butter.
Add Color and Adjust Consistency
Remove the bowl from the mixer and fold in the 0.5 teaspoon food coloring (gel-based) using a silicone spatula. The gel-based coloring won't alter the texture like liquid dyes might. Add the 1 tablespoon milk (adjusts consistency as needed) and mix until fully combined. If the icing is too thick to pour smoothly, add milk 1 teaspoon at a time until it reaches a honey-like consistency—it should drip slowly but steadily off the spatula.
Real talk: This is the moment that matters. The icing should coat the back of a spoon but still flow freely when poured. If it's too thin, the swirls won't hold their shape; too thick, and it'll crack when poured. I always test a small amount on a plate first to check the flow before committing to the full batch. The ideal consistency is like warm honey—viscous but fluid.
Strain and Pour for Flawless Swirls
Transfer the icing to a fine-mesh sieve and press it through into a clean bowl or piping bag fitted with a large round tip. Straining removes any potential lumps and ensures a silky, lump-free finish. If you're using a piping bag, cut a ½-inch tip to control the flow. Pour the icing over your baked goods in a slow, steady stream, tilting the pan at a 45-degree angle to create elegant swirls.
Don't rush this step—patience is key. Start at one corner and work your way across, letting gravity do the work. The icing should spread naturally and create those beautiful, marbled swirls without needing to spread it out with a knife. If the icing starts to thicken while pouring, dip the tip of the piping bag in warm water for 5-10 seconds to loosen it up. The result should be a glossy, professional-looking finish that looks like it came from a bakery.
Pro Tips For Making Poured Icing
- Whip Butter First: Melt the unsalted butter just until soft—not liquid—before mixing. I used to dump it in cold and ended up with a grainy, clumpy mess every time. A few seconds in the microwave (or a warm bowl) makes it blend smoother with the powdered sugar right away.
- Sift the Sugar: Skip the sifting? You’ll regret it. Powdered sugar clumps like a stubborn toddler if not sifted, and those lumps turn into gritty bits in your icing. Even if the bag says "fine," give it a quick sift—especially if you’re using it straight from the container.
- Temper the Cream: Warm the heavy cream to room temperature before adding it to the butter-sugar mix. Cold cream shocks the butter and can cause separation—your icing will split into buttery puddles and curdled sugar. Just let it sit for 10 minutes if you’re in a rush.
- Scrape the Vanilla Bean: Pure vanilla bean paste won’t give you the same depth as scraping a real bean. If you’re using paste, add double the amount of extract (yes, really) and stir in the seeds from the pod—it’s the difference between "vanilla" and "oh wow." (I know, I know, but trust the process.)
Wine and beer pairings for this dish
Sweet Dessert Wines
For poured icing's rich, buttery sweetness, I reach for Moscato d'Asti—a lightly sparkling Italian wine with floral notes and honeyed fruit flavors that mirror the vanilla and citrus in the icing.
The effervescence cleanses your palate between bites of cake or cookies, preventing flavor fatigue. Serve it slightly chilled (45-50°F) to enhance its natural sweetness without overwhelming the dessert. 🍷
Creamy Dessert Beers
A Belgian Dubbel like Westmalle Dubbel provides the perfect balance—its caramel, raisin, and chocolate notes complement the icing's vanilla and butter without competing. The beer's slight bitterness cuts through the sweetness, creating a harmonious contrast.
For a lighter option, try a Honey Brown Ale (like Fat Tire) which has subtle vanilla undertones that echo the icing's flavor profile.
Coffee Pairings
If you're serving this icing on coffee cakes or pastries, pair it with a dark roast espresso or a cold brew concentrate—the bold, bitter notes create a stunning contrast to the sweet, creamy icing.
For a dessert-focused pairing, a vanilla latte made with whole milk enhances the vanilla flavors in both the icing and the drink, creating a cohesive experience. 💛
Seasonal Variations
For summer desserts, I switch to a Sparkling Gewürztraminer—its lychee and rose notes play beautifully with citrus-infused icing. In winter, a Port wine (like Ruby Port) with its dried fruit and chocolate undertones pairs wonderfully with spiced icing variations.
The key is matching the wine's fruitiness or spice level to the icing's dominant flavors.
Non-Alcoholic Options
For a refreshing non-alcoholic pairing, try sparkling apple cider—its crisp acidity and apple notes complement the icing's sweetness without overpowering it. Another great option is vanilla chai tea, brewed strong and served over ice.
The warm spices in the tea enhance the vanilla in the icing, creating a cohesive flavor experience that feels intentional and balanced.
Nutrition facts
Frequently asked questions
Can I make this poured icing without a stand mixer?
Use a hand mixer or even a sturdy whisk with elbow grease. Cream the butter and sugar in a large bowl, mixing vigorously for 5-7 minutes until light and fluffy. For the wet ingredients, fold them in gently with a spatula to avoid overmixing. Just be patient—the extra effort ensures that silky texture.
Why did my icing turn grainy or lumpy?
Graininess usually means either the powdered sugar wasn't sifted or the butter wasn't fully creamed. Always sift your powdered sugar first, and beat the butter until completely smooth and pale before adding sugar. If lumps appear later, strain the icing through a fine-mesh sieve before pouring.
How do I adjust the consistency for different uses?
For thin glaze (like cookies), add milk 1 teaspoon at a time until it reaches a honey-like flow. For thick frosting (like cake layers), add extra 1 tablespoon powdered sugar at a time. The key is testing on a plate first—it should drip slowly but hold its shape when poured.
Can I make this icing ahead of time?
Yes! Store it in an airtight container at room temperature for up to 3 days, or refrigerate for 2 weeks. Before using, let it sit at room temperature for 15 minutes to soften. If it thickens in the fridge, microwave in 10-second bursts until pourable. The flavor actually improves after resting!
What's the secret to perfect swirls when pouring?
Pour slowly at a 45-degree angle while tilting the pan gently. Start at one corner and let gravity do the work—don't rush it! For extra drama, pour a second color while the first is still wet. If the icing thickens mid-pour, dip the piping bag tip in warm water for 5 seconds to loosen it up.