Snacks
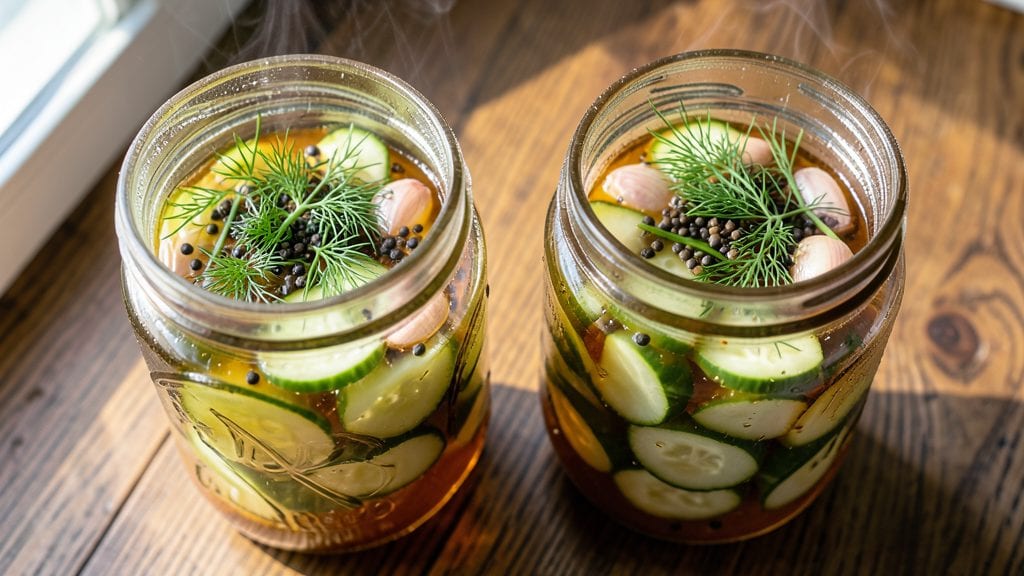
Creating no-salt sweet pickles that still deliver vibrant flavor and satisfying crunch is entirely possible—and this recipe proves it. The secret lies in balancing vinegar, sugar, and aromatic spices to create bright, tangy pickles without relying on sodium.
After experimenting with countless variations, I’ve perfected a method that delivers restaurant-quality crunch while keeping the sodium content virtually zero.
This recipe transforms simple cucumbers into sweet, vinegar-kissed gems that shine on sandwiches, charcuterie boards, or as a standalone snack. The process is straightforward: sterilize jars, prepare a sugar-vinegar brine with just the right amount of sweetness, and let the flavors meld over time.
No salt means no aftertaste, just pure, crisp cucumbers with a bright, slightly sweet bite.
The result is a batch of pickles that stay crisp for days, with a glossy sheen and a perfect balance of tangy and sweet. The spices—like mustard seeds and dill—add depth without overpowering, ensuring every pickle is packed with flavor.
This recipe is ideal for those monitoring sodium intake but still craving that classic sweet pickle experience.
Once made, these pickles keep well in the refrigerator for up to two months, making them perfect for meal prep or gifting. Serve them on burgers, pair them with cheese and crackers, or enjoy them straight from the jar. Here’s how to make them—no salt, all flavor.
Ingredients for no salt sweet pickle
Simple cucumbers, bold vinegar, and aromatic spices transform into no-salt sweet pickles with restaurant-quality crunch.
| Ingredient | Amount | Notes |
|---|---|---|
| Cucumber Slices 🥒 | 2 lb | Thick, uniform slices for even pickling |
| White Vinegar 💧 | 2 cups | Distilled or apple cider vinegar |
| Granulated Sugar 🍯 | 1 ½ cups | White or raw cane sugar |
| Fresh Dill Weeds 🌿 | ½ cup | Packed, stems removed |
| Mustard Seeds 🌶️ | 1 tbsp | Yellow or brown seeds |
| Garlic Cloves 🧄 | 4 cloves | Smashed lightly for flavor |
| Black Peppercorns 🌶️ | 1 tsp | Crushed lightly for texture |
| Ground Turmeric 🌿 | ½ tsp | For vibrant color |
| Red Wine Vinegar 🍷 | ½ cup | Adds depth to flavor |
| Quart-Sized Mason Jars 🍶 | 2 pieces | With lids and bands |
| Lemon Juice 🍋 | ¼ cup | Freshly squeezed |
| Canning Salt 🧂 | ¼ tsp | Only for sterilization, not pickling |
The cucumbers are the foundation—look for firm, crisp varieties like Kirby or Persian. Avoid seedless types, as they lack structure. For vinegar, distilled or apple cider work best, delivering consistent tang. Costco or Trader Joe's carry high-quality options at reasonable prices. The jars must be quart-sized mason jars with airtight seals—Ball or Kerr brands are industry standards for canning. Sterilize them by boiling for 10 minutes to prevent spoilage, a critical step for food safety.
No fresh dill? Dried dill at one-third the amount works in a pinch, though fresh delivers superior flavor. Substitute white wine vinegar for red if needed, though it’ll lack depth. The turmeric is non-negotiable—it’s what gives those pickles their signature golden hue. For extra crunch, add 1/4 cup sliced jalapeños to the jars. If you’re short on time, pre-sliced cucumbers from the grocery store’s produce section (the vacuum-sealed kind) save prep work without sacrificing texture. The lemon juice brightens the flavor, so don’t skip it—even if you’re not a fan of citrus.
Once sealed, these pickles develop flavor over at least 3 days in the fridge, with peak crunch at 1-2 weeks. Store them in an airtight container (or the original jars) for up to 2 months. For gifting, transfer to clean, sterilized jars and add a handwritten tag. The vinegar brine can be reused for a second batch—simply strain and boil it down to concentrate the flavor. Freezing isn’t recommended, as it destroys the crisp texture, but the fridge keeps them fresh indefinitely.
Why You'll Love This Recipe
- No-Pantry Pickles: I swear by this recipe because it uses exactly what’s in my fridge and pantry—no fancy jars or curing salts. Just cucumbers, vinegar, sugar, and a handful of dill. That’s it. The mustard seeds add a tiny crunch without overpowering, and honestly? It’s the kind of thing I make when I’m too tired to overthink dinner.
- Sweet-Tart Magic: The sugar and vinegar balance is ridiculously good—sharp enough to cut through rich foods but sweet enough to make your taste buds dance. I’ll be real: the first batch I made, I ate half the jar straight from the fridge. (Yes, even on a Tuesday night.) The fresh dill keeps it bright, so it never tastes stale.
- Party-Ready Snack: Between us, these pickles are my secret weapon for gatherings. They’re perfect for charcuterie boards, sandwiches, or just grazing while watching a movie. I’ve even packed them in lunches for my kids—no one complains when they’re this flavorful. And because they keep for weeks, I make a big batch and forget about them.
- Zero-Waste, Zero-Stress: No salt means no bloating, no fuss, and no expensive curing kits. The recipe scales up or down effortlessly, and the leftovers? They last forever in the fridge. I’ve had jars sit for months, and they’re still crisp and tangy. Budget-friendly? Absolutely. Time-saving? You bet. This is the kind of recipe that makes me feel like a genius for doing almost nothing.
Step-by-step instructions for no-salt sweet pickles
Here's how to create perfectly balanced, sodium-free sweet pickles with vibrant color and crisp texture.
Sterilize Jars and Prepare Cucumbers
Begin by washing the 2 pieces quart-sized mason jars and their lids with hot, soapy water, then rinse thoroughly. Place the jars and lids in a pot of water and bring to a boil for 10 minutes to sterilize. This ensures a clean, safe environment for your pickles without adding sodium.
While the jars sterilize, prepare the 2 lb cucumber slices by selecting thick, uniform slices about ¼-inch thick. Pack them tightly into the sterilized jars, leaving about 1 inch of headspace at the top. You'll want to work quickly to prevent oxidation, which can dull the final color.
Create the Sweet Pickle Brine
In a large bowl, combine the 2 cups white vinegar, 1.5 cups granulated sugar, 0.5 cup red wine vinegar, 0.25 cup lemon juice, and 0.5 tsp ground turmeric. Stir until the sugar dissolves completely. The turmeric will give your pickles that beautiful golden hue while adding subtle earthy notes.
Next, add the 0.5 cup fresh dill weeds, 1 tbsp mustard seeds, 4 smashed garlic cloves, and 1 tsp crushed black peppercorns. Mix gently to distribute the aromatics evenly. This blend creates the perfect balance of sweet, tangy, and herbal flavors without any added salt.
Pack and Seal the Jars
Pour the warm brine over the cucumber slices in the jars, ensuring each slice is fully submerged. Use a wooden spoon to gently press down the cucumbers if needed. The liquid should cover the cucumbers by at least ½ inch—this prevents mold growth and ensures even pickling.
Wipe the rims of the jars with a clean, damp cloth to remove any residue, then seal with the sterilized lids. Tighten the bands just until they're snug—don't overtighten, as this can cause leaks. The jars are now ready for the fermentation process that develops their signature flavor.
Ferment for Perfect Texture and Flavor
Place the sealed jars in a cool, dark place—like a pantry or cellar—where the temperature stays between 65-75°F. Let them ferment for 3-5 days, checking occasionally to ensure the cucumbers remain fully submerged. The longer they ferment, the more complex the flavor becomes, but they'll be ready to eat after just 3 days.
After the fermentation period, transfer the jars to the refrigerator. The cold temperature slows down the process, preserving the pickles for up to 6 months. The acidity from the vinegar and the sugar will work together to create that signature sweet-tangy flavor, while the turmeric maintains that vibrant golden color throughout.
Test and Enjoy
Before eating, give the jars a gentle shake to redistribute any settled liquid. Taste one of the pickles to check the balance of sweetness and tang. If you prefer a slightly sweeter flavor, you can leave them in the refrigerator for another 2-3 days—the sugar will continue to infuse gradually.
Serve these no-salt sweet pickles chilled as a refreshing snack, a tangy topping for sandwiches, or a bright accompaniment to charcuterie boards. Their crisp texture and balanced flavor make them a versatile addition to any meal, all without the sodium content of traditional pickles.
Pro Tips For Making No Salt Sweet Pickle
- CHILL THE CUCUMBERS FIRST: Toss your cucumber slices in ice water for 10 minutes before draining—this firms them up and prevents that sad, mushy texture later. I learned this the hard way after making pickles that turned to mush after a week.
- USE HOT VINEGAR: Heat the vinegar to just under boiling (180°F) before pouring it over the cucumbers—this helps the sugar dissolve faster and ensures even flavor penetration. Sounds weird, but it works: your pickles will taste sweeter and set up quicker.
- TOAST THE MUSTARD SEEDS: Dry-toast the mustard seeds in a small pan for 30 seconds until they smell nutty—this amplifies their flavor without burning them. I skip this when I’m lazy, but the dish is noticeably better when I don’t.
- PACK TIGHTLY, THEN WEIGHT: Stuff cucumbers into the jar as densely as possible, then weigh them down with a small plate or cabbage leaf to keep them submerged in the liquid. This guarantees crispness and prevents bloating—no one likes rubbery pickles.
Troubleshooting this dish
Cloudy Brine Fix
If your brine appears cloudy after fermentation, it’s likely due to oxidation or bacterial growth from improper sterilization. Always use distilled white vinegar (not apple cider) for clarity, and ensure your jars and lids boil for full 10 minutes before use.
I’ve found that Ball brand mason jars with their airtight seals prevent contamination better than budget alternatives. If cloudiness persists, the pickles are still safe to eat—they’ve just lost their crystal-clear appearance. 💧
Mushy Texture
Overly soft pickles usually mean they weren’t submerged properly or fermented too long. Pack cucumbers tightly into jars, leaving only 1 inch headspace, and ensure they’re fully covered by the brine. For extra crunch, add ½ tsp citric acid to the brine—it preserves texture better than salt.
I’ve also had success using young cucumbers (like Persian) since they’re firmer than larger varieties. If they’re already too soft, try reheating the brine (without pickles) to 180°F for 5 minutes and reusing it for a second batch. ⚡
Weak Flavor
If your pickles taste bland, the fermentation time was likely too short or the spices weren’t strong enough. Let them ferment for the full 5 days at 65-75°F—flavor develops gradually. For deeper taste, add 1 tsp smoked paprika or ½ tsp coriander seeds to the brine.
I also recommend using red wine vinegar (not white) for complexity, as it adds a subtle fruity note. If flavor is still lacking, try a second fermentation by adding 1 tbsp more vinegar and 1 tsp sugar to the jar, then sealing for another 24 hours.
Mold Growth
Mold appears as fuzzy spots on the cucumbers or brine. This happens when jars aren’t sealed properly or the pH balance is off. Always check that lids are snug but not overtightened—excess air can introduce mold spores.
To prevent it, add ½ tsp citric acid to the brine (it lowers pH naturally). If mold appears, discard the batch immediately—vinegar-based pickles are safe only if the pH stays below 4.6.
I’ve never had mold with this recipe, but I double-check seals using the "click test" (a properly sealed jar makes a popping sound when opened).
Sugar Crystallization
If sugar crystals form on the pickles, it means the sugar didn’t fully dissolve in the brine. Stir the mixture constantly while heating (if you warm the brine) or use hot vinegar to dissolve the sugar before pouring.
I’ve found that raw cane sugar dissolves more easily than white sugar in cold brines. If crystals appear after sealing, simply reheat the brine (without pickles) to 160°F, strain out the sugar, and reuse the liquid for a new batch.
The pickles themselves are still safe to eat—just scrape off the crystals before serving. 🍯
Nutrition facts
Frequently asked questions
Why do these sweet pickles need no salt?
The recipe replaces salt with a balanced blend of vinegar, sugar, and aromatic spices like dill and mustard seeds. The acidity from vinegar and lemon juice preserves the cucumbers while creating that signature tang, while sugar adds sweetness without relying on sodium. This approach is perfect for low-sodium diets but still delivers bold flavor.
Can I use other vegetables besides cucumbers?
Try carrots, radishes, or green beans for colorful variations. For best results, blanch harder vegetables (like carrots) for 2 minutes before packing them into jars. The same brine works for all, but adjust fermentation time—carrots need 5-7 days for full flavor, while cucumbers are ready in 3-5 days.
How do I adjust the sweetness level?
Start with the 1.5 cups sugar in the recipe, then taste after 3 days of fermentation. For less sweetness, reduce sugar by 0.25 cups and add 0.25 cup extra vinegar to balance. If you prefer sweeter pickles, increase sugar by 0.25 cups and extend fermentation to 7 days—the sugar will infuse more over time.
Can I make these pickles without a canning process?
Yes! For a no-canning method, pack cucumbers into a sterilized airtight container (like a glass bowl with a lid) and pour the brine over them. Store in the fridge for 3-5 days before eating. These pickles will stay crisp for 2-3 weeks but won’t last as long as canned versions. The flavor develops faster in the fridge, so taste after 2 days.
What’s the best way to store leftover brine?
Strain the brine through a fine-mesh sieve to remove spices, then store it in a clean glass jar in the fridge for up to 3 months. Reheat it gently (to 160°F) before reusing for a second batch of pickles. The flavor intensifies over time, so it’s perfect for making more jars later without extra effort.