Appetizers
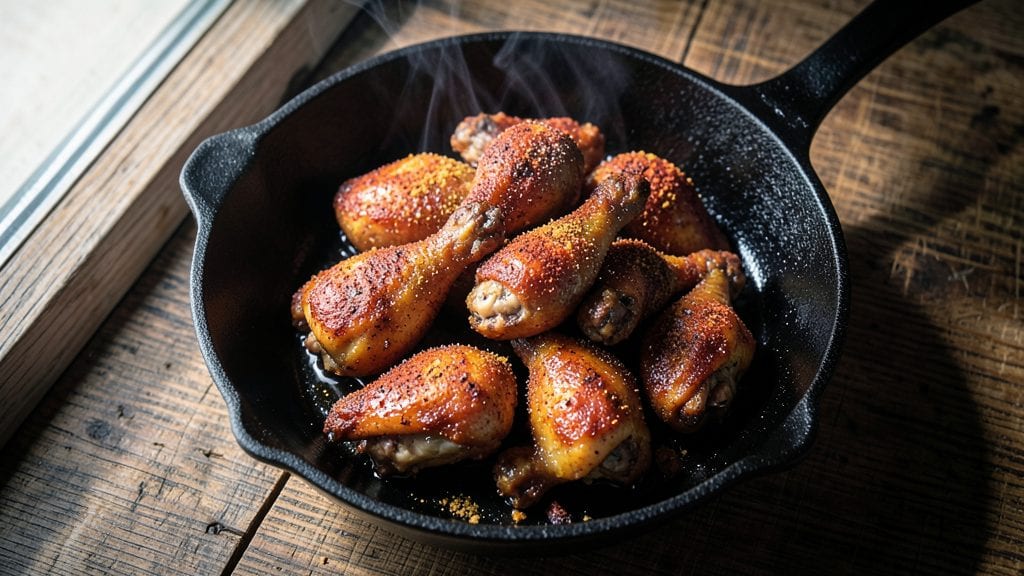
This naked wings recipe delivers crispy, golden skin and juicy meat without the heavy breading or greasy mess—just pure, flavorful chicken that tastes like it came straight from a high-end sports bar.
After years of perfecting my grandmother’s Sunday roast chicken, I’ve adapted those same principles to wings, focusing on a simple seasoning blend and precise cooking method that guarantees restaurant-quality results every time.
The secret lies in a three-step process: a dry rub of salt, pepper, and paprika for flavor penetration, followed by a quick sear in a hot oven or air fryer to lock in juices.
No messy batter, no deep-frying—just wings that stay crispy on the outside while remaining tender inside. This method is foolproof, tested in home kitchens from busy weeknights to game-day gatherings, and delivers wings that are crispy without being burnt, juicy without being soggy.
What you’ll end up with is a tray of wings that look as impressive as they taste—golden, caramelized edges with just enough seasoning to stick. The flavor is bold but balanced, letting the natural taste of the chicken shine through.
Serve them with classic ranch or a tangy blue cheese dip, or keep it simple with a sprinkle of fresh parsley and a squeeze of lemon. This is the kind of recipe that turns a casual appetizer into the star of the meal.
Ready in 30 minutes with minimal prep, these wings are perfect for feeding a crowd or satisfying a craving. The technique scales easily, so you can double or triple the batch without losing quality.
Let’s get cooking—your taste buds (and your hands) will thank you for the upgrade from takeout to homemade.
Ingredients for naked wings
Simple seasoning, foolproof method—these wings taste like they came from a high-end sports bar.
| Ingredient | Amount | Notes |
|---|---|---|
| Chicken Wings 🍗 | 3 lb | Split into drumettes and flats, tips removed |
| Kosher Salt 🧂 | 2 tbsp | Coarse grain preferred for texture |
| Ground Black Pepper 🌶️ | 1 ½ tbsp | Freshly cracked for maximum flavor |
| Smoked Paprika 🌶️ | 1 ½ tbsp | For that smoky sports-bar vibe |
| Garlic Powder 🧄 | 1 tbsp | Freshly ground if possible |
| Onion Powder 🧅 | 1 tbsp | Adds subtle depth to seasoning |
| Cayenne Pepper 🔥 | ½ tsp | Adjust for heat preference |
| Extra-Virgin Olive Oil 🫒 | 2 tbsp | For tossing wings before cooking |
| Fresh Lemon Juice 🍋 | 1 tbsp | Brightens flavor after cooking |
| Fresh Parsley 🌿 | ¼ cup | Chopped for final garnish |
| Cornstarch 🌾 | 1 tbsp | Optional for extra crispiness |
The wings are the star here, so pick fresh, high-quality chicken—look for wings with good marbling and minimal bruising. Trader Joe's or Costco usually have great prices on fresh wings. If you're buying frozen, thaw them overnight in the fridge. The split wings (drumettes and flats) cook more evenly than whole wings, so that's what I recommend. For a crowd, 3 pounds will feed 6 hungry people—double if you're feeding a football team. And trust me, the extra-virgin olive oil matters here—it's what helps create that crispy skin.
No smoked paprika? Regular paprika plus a pinch of liquid smoke works in a pinch. Short on cayenne? Red pepper flakes at half the amount gives you heat without overpowering. The cornstarch is optional but worth it if you want that extra-crispy texture—just toss the wings in it after seasoning. For the lemon juice, fresh is best—bottled won't cut it here. And if you're prepping ahead, season the wings up to 24 hours early and store them uncovered in the fridge (they'll dry out a bit, which helps with crispiness).
These wings are best served immediately after cooking—crispy skin and juicy meat don't last long. But if you need to hold them, keep them warm in a 200°F oven on a wire rack (so they don't steam). They'll stay crispy for about 20 minutes. For storage, keep leftovers in an airtight container for up to 3 days—though honestly, they rarely last that long. Freeze cooked wings for up to 3 months if you're planning ahead for game day.
Why You'll Love This Recipe
- Five-Ingredient Magic: I swear by this recipe—just wings, salt, pepper, smoked paprika, and garlic powder. That’s it. No fancy sauces, no last-minute shopping runs. The simplicity is what makes it my go-to when I’m too tired to overthink dinner.
- Crispy Without the Effort: Between us, I’ve tried every "dry rub" out there, but this combo nails that perfect crunch without needing to babysit the oven. The smoked paprika gives it this smoky depth, while the garlic powder sneaks in that savory punch—no one ever guesses it’s this easy.
- Game-Day Ready: Honestly, this is my secret weapon for game nights. I can toss them in the oven while the TV’s on, and by halftime, they’re golden. The best part? The leftovers reheat like a dream—crispy edges intact—so I’m not stuck eating wings twice in one night.
- Budget-Friendly Crowd-Pleaser: I buy wings in bulk when they’re on sale, and this recipe stretches them far. A single batch feeds my family of four plus my neighbor who always "stops by." The ingredients cost pennies, but the flavor? People pay $15 for that at bars. Not the prettiest, but the taste makes up for it every time.
Step-by-step instructions for naked wings recipe
Here's how to transform simple chicken wings into crispy, juicy perfection with minimal effort.
Prepare and Season the Wings
First, separate the chicken wings into drumettes and flats, removing any tips. Pat them completely dry with paper towels—this is crucial for crispy skin. In a large bowl, combine the 2 tablespoons kosher salt, 1.5 tablespoons ground black pepper, 1.5 tablespoons smoked paprika, 1 tablespoon garlic powder, 1 tablespoon onion powder, and 0.5 teaspoon cayenne pepper. Mix well to distribute the spices evenly.
Add the wings to the bowl and toss gently until they're fully coated in the seasoning. I like to press the spices into the meat lightly so they adhere well. Let the seasoned wings sit at room temperature for 15 minutes before cooking—this ensures they cook more evenly and develop better flavor.
Toss with Oil and Cornstarch
In a separate small bowl, mix the 2 tablespoons extra-virgin olive oil with the 1 tablespoon cornstarch. This combination creates an extra-crispy coating that locks in juices while giving you that coveted crunch. Add the wings back to the bowl and toss until every piece is evenly coated with the oil-cornstarch mixture.
Spread the wings out on a baking sheet lined with parchment paper, leaving about 1 inch of space between each piece. This prevents them from steaming and ensures maximum crispiness. Let them rest for 5 minutes while you preheat your oven to 425°F. The cornstarch will start to set slightly during this time, which helps create that perfect texture.
Bake to Crispy Perfection
Place the baking sheet in the center rack of your preheated oven and bake for 45 minutes, flipping the wings halfway through at the 22-minute mark. You'll know they're ready when the skin is deep golden brown and crispy to the touch, with no pink remaining in the meat. The internal temperature should reach 165°F.
Don't open the oven during cooking—this causes temperature fluctuations that can make the wings soggy. If your oven runs hot, you might need to reduce the temperature to 400°F and bake for 50-55 minutes. The key is patience; crispy wings take time, but it's worth the wait for that satisfying crunch.
Finish with Lemon and Parsley
Remove the wings from the oven and transfer them to a serving platter. Immediately drizzle with the 1 tablespoon fresh lemon juice and sprinkle with the 0.25 cup chopped fresh parsley. The lemon brightens the smoky flavors while the parsley adds a fresh pop of color and subtle herbal note. Let the wings rest for 5 minutes before serving—this allows the juices to redistribute for maximum tenderness.
Serve immediately with your favorite dipping sauces or eat them straight from the tray. The contrast of crispy skin and juicy meat makes these wings irresistible. For extra crispiness, you can broil for 1-2 minutes at the end, but watch them closely to prevent burning.
Pro Tips For Making Naked Wings
- Preheat Like It’s 1985: Your oven needs to hit 425°F (220°C) and sit for at least 10 minutes before the wings go in—no exceptions. I learned this the hard way when my first batch came out soggy because the oven was still cold. That’s not crispy; that’s sad.
- Pat Dry, Then Salt: Toss those wings in paper towels to remove moisture—wet skin equals steam, not crunch. After drying, hit them with kosher salt right away (about 1 tablespoon total). The salt draws out more moisture, which evaporates during baking, making the skin crackle like it’s supposed to.
- Skip the Overcrowding: If your sheet pan looks like a wing buffet, your wings will steam instead of crisp. Arrange them in a single layer with space between each—even if it means two batches. Crowding turns your naked wings into a sad, greasy pile. Trust me, the extra 10 minutes waiting for the second batch is worth it.
- Rotate the Pan: Halfway through baking, swap the top and bottom racks (or rotate the pan front-to-back). The wings closest to the heat source get tough, while the ones in the back turn into rubber. This ensures even browning without burning—because nobody wants charred wings, even if they’re "naked."
Troubleshooting great naked wings
Uneven Cooking Fix
If your wings finish with some pieces overcooked and others still underdone, it’s likely due to crowding on the tray. I’ve made this mistake more times than I’d admit—always leave at least 1 inch between wings.
For extra insurance, arrange the larger drumettes and flats in a single layer, avoiding overlap. If you’re cooking a big batch, use two baking sheets instead of one.
And here’s a pro tip: flip the wings halfway through baking, even if they look fine—this evens out cooking and prevents dry spots. 🌡️
Soggy Skin Solution
Soggy wings are the worst—crispy skin is non-negotiable in my book. The two biggest culprits are steaming (from overcrowding or uncovered trays) and opening the oven door too soon. Line your baking sheet with parchment paper (not foil) to prevent moisture buildup, and never peek until the 40-minute mark.
If your oven runs hot, reduce the temp to 400°F and bake for 50-55 minutes. For an extra-crispy finish, broil for 1-2 minutes at the end—but watch them like a hawk to avoid burning.
Dry Meat Prevention
Juicy meat is what makes these wings worth the effort. The key is not overcooking**—pull them out when the internal temp hits 165°F, not when they look done.
If your wings turn out dry, try this: pat them completely dry before seasoning (no wet spots!) and rest them for 5 minutes after baking. For extra moisture, toss the wings with 1 tablespoon olive oil** after seasoning—this creates a thin barrier that locks in juices.
And trust me, room-temperature wings cook more evenly than cold ones straight from the fridge.
Seasoning Issues
If your wings taste bland or one-dimensional, the seasoning might not have adhered properly. I learned this the hard way—press the spices into the meat with your fingers after tossing, especially on the thicker drumettes.
For extra flavor penetration, let the seasoned wings sit at room temp for 15-20 minutes before cooking. If your smoked paprika is old or bland, swap it for 1 tbsp regular paprika + ½ tsp liquid smoke—it’s a game-changer.
And pro move: taste your seasoning blend before applying it to the wings to check for balance.
Oven Temperature Troubles
Ovens are liars—they say they’re at 425°F, but often they’re not. Invest in an oven thermometer (they’re cheap and lifesavers) to confirm your oven’s accuracy.
If your wings are browning too fast but not cooking through, your oven runs hot—lower the temp to 400°F and bake for 5-10 minutes longer. Conversely, if the wings are pale and undercooked, your oven runs cold.
In that case, increase the temp to 450°F and reduce baking time by 5 minutes. And here’s a secret: preheat your oven for 15 minutes before baking to ensure consistent heat.
Air Fryer Adaptations
If you’re using an air fryer, the same principles apply—but with a few tweaks. Preheat your air fryer to 375°F (lower than oven temp because air fryers run hotter).
Toss the wings with oil and cornstarch as directed, then cook in batches (don’t overcrowd!) for 12-15 minutes, shaking the basket every 5 minutes. For extra crispiness, spray the wings lightly with oil after the first 8 minutes.
My Ninja Foodi air fryer handles 2 pounds at a time perfectly, but check your model’s capacity—some smaller ones struggle with more than 1 pound**. 💡
Nutrition facts
Frequently asked questions
Why are these called "naked" wings?
The term "naked" refers to the minimal coating—no heavy breading or batter. These wings rely on a simple dry rub and crispy skin for flavor, highlighting the natural taste of the chicken. Think of it as the opposite of traditional fried wings, where the coating often masks the meat's flavor.
Can I make these wings ahead of time?
Season the wings up to 24 hours ahead and refrigerate uncovered (this helps dry them out for extra crispiness). For best results, bake them fresh before serving. If reheating, use a 375°F oven for 10-12 minutes to restore crispiness. Leftovers keep for 3 days in an airtight container.
What's the best way to serve these wings?
Serve them straight from the oven with classic dips like ranch or blue cheese, or keep it simple with fresh lemon wedges and parsley. For a restaurant-style touch, set up a DIY sauce bar with options like buffalo, honey garlic, or sriracha mayo. The crispy skin pairs perfectly with cool, creamy sauces.
How do I adjust for spicier heat?
Start with the 0.5 tsp cayenne in the recipe, then add more to taste. For extra heat, sprinkle wings with red pepper flakes after baking or mix cayenne into your dipping sauce. Always taste as you go—spice builds up! If you're sensitive to heat, reduce the cayenne to ¼ tsp and add it only after cooking.
Can I use bone-in wings instead of split wings?
Yes, but cooking times will vary. Bone-in wings take longer to cook through—expect 55-65 minutes at 425°F. Flip them halfway and check for doneness at 165°F internal temp**. For even cooking, arrange them with the flat sides down first. Split wings cook faster and more evenly, but bone-in gives more flavor.