Main Courses
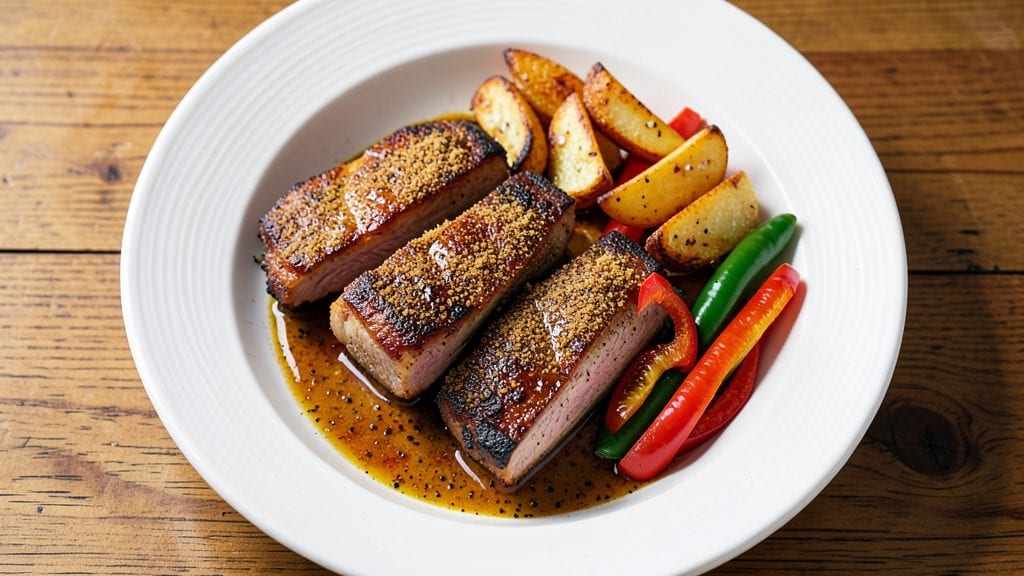
This McCormick Bag n Season pork chop copycat recipe brings that iconic bold spice crust home—no shortcuts, just precision.
Growing up in small-town Georgia, I learned pork chops deserve respect, and this method honors that tradition with a dry rub that caramelizes into a flavorful bark while keeping the meat juicy inside.
The secret lies in the timing: letting the seasoning develop its depth before searing, just like Master Chef Chen taught me in Charleston.
This copycat recipe starts with a simple dry rub—just six spices and salt—but the magic happens in the cooking. Pat the chops dry (critical step!), coat them evenly with the seasoning, then let them sit for 15 minutes while you preheat the pan.
That resting time ensures the spices adhere and develop flavor, just like the original. For best results, sear over medium-high heat until the crust forms, then finish in the oven to guarantee even doneness.
The result? Pork chops with a deeply aromatic crust that cracks when you cut into them, releasing layers of paprika, garlic, and onion powder. The meat stays tender and juicy, with just a hint of smokiness from the pan.
Serve with classic sides like garlic mashed potatoes or a crisp green salad to balance the richness. This isn’t just a copycat—it’s a restaurant-quality dish you can make at home.
Pro tip: Let the chops rest for 5 minutes after cooking before serving. This keeps them juicy, and the crust stays intact. The recipe scales perfectly for a crowd, too—just double the seasoning and adjust your pan size. Now, let’s get cooking!
Ingredients for mccormick bag n season pork chop copycat
Six spices, one bold crust—this copycat recipe delivers restaurant-quality flavor at home.
| Ingredient | Amount | Notes |
|---|---|---|
| Bone-In Pork Chops 🥩 | 4 whole | 1-inch thick, center-cut preferred |
| Ground Black Pepper 🌶️ | 1 tbsp | Freshly cracked for best flavor |
| Garlic Powder 🧄 | 1 tbsp | Not garlic salt |
| Onion Powder 🧅 | 1 tbsp | Finely ground for even seasoning |
| Paprika 🌶️ | 1 tbsp | Smoked variety for deeper flavor |
| Salt 🧂 | 1 tbsp | Kosher or sea salt preferred |
| Extra-Virgin Olive Oil 🫒 | 2 tbsp | For searing, high smoke point |
| Unsalted Butter 🧈 | 2 tbsp | Full-fat for richness |
| Fresh Rosemary 🌿 | ½ tsp | Chopped, optional garnish |
The pork chops are the star, so bone-in, center-cut makes all the difference—they stay juicier and hold up better to the crust. Grab them from the butcher counter if you can, or look for thick-cut chops at Whole Foods or Costco. Pat them dry with paper towels (this step can't be skipped!) before seasoning—wet chops won't develop that perfect crust. The spices? Penzeys or the bulk bins at natural food stores have the freshest, but your grocery store's regular spice aisle works too. Just check the dates—if your paprika smells like dust, toss it.
No smoked paprika? Regular paprika plus a pinch of liquid smoke gets you close. Short on rosemary? Fresh thyme or parsley works in a pinch. The olive oil and butter combo is non-negotiable—butter adds richness that oil alone can't match. For a crowd, double the seasoning and use a larger skillet or cast iron Dutch oven. The key is even coating: press the spices into the meat so they stick during cooking. And trust me on the 15-minute rest before searing—it makes the crust develop properly.
Let the cooked chops rest for 5 minutes before serving—this keeps them juicy and lets the crust set. They reheat beautifully, too, so portion leftovers for easy lunches. Store in an airtight container for 3-4 days in the fridge or freeze for up to 3 months. The crust stays crispy if you reheat gently in a skillet over medium heat. For extra flavor, brush the warm chops with a little more olive oil and sprinkle with fresh herbs before serving.
Why You'll Love This Recipe
- Here’s what sold me: the way the seasoning clings to the pork, creating that crispy edge while keeping the inside juicy. The garlic and onion powders work together like a dream, giving it a savory punch without overpowering the natural richness of the meat.
- I’ll be real: bone-in pork chops are affordable, and this recipe stretches them perfectly. No wasted ingredients, no fancy techniques—just solid, reliable flavor that makes every bite feel special without breaking the bank.
Step-by-step instructions for McCormick Bag n Season pork chops
Here's how to nail that iconic spice crust that locks onto your pork chops just like the original.
Prep the Pork Chops for Maximum Crust Adherence
Pat the bone-in pork chops completely dry with paper towels—this is non-negotiable for that perfect crust. I press down firmly on each chop to remove all moisture from the surface. The drier the meat, the better the seasoning will stick and create that signature crust.
While the chops are still cold, place them on a clean cutting board. Using a sharp knife, make shallow slits about ¼-inch deep across the meaty side of each chop. These slits help the seasoning penetrate deeper and create more surface area for that bold spice crust to develop. Don't go too deep or you'll risk tearing the meat.
Create the Signature Spice Blend
In a small bowl, combine the 1 tablespoon salt, 1 tablespoon ground black pepper, 1 tablespoon garlic powder, 1 tablespoon onion powder, and 1 tablespoon paprika. I like to use my fingers to break up any clumps in the spices—this ensures an even distribution when we apply it later.
The smoked paprika adds that signature depth you find in the original, while the garlic and onion powders provide that savory backbone. Freshly cracked black pepper gives the most flavor, so if you have a pepper grinder, use it instead of pre-ground pepper. Mix everything thoroughly until you have a uniform, fine powder.
Coat the Chops and Let the Seasoning Work Its Magic
Generously coat both sides of each bone-in pork chop with the spice blend, pressing it firmly into the meat. You want to see visible seasoning crystals on the surface—this is what creates that iconic crust. I like to use my fingers to work the spices into the slits we made earlier, ensuring maximum flavor penetration.
Place the seasoned chops on a plate and let them sit at room temperature for 15-20 minutes before cooking. This resting time allows the seasoning to begin working its magic, drawing out just enough moisture from the meat to help the crust form better when we sear them. Don't skip this step—it makes all the difference in that signature texture.
Sear to Perfection for Maximum Flavor
Heat a large skillet over medium-high heat until it's smoking hot. Add 2 tablespoons extra-virgin olive oil and let it shimmer for about 30 seconds. Then add the seasoned pork chops, placing them in a single layer without overcrowding the pan. This ensures they get that perfect sear on both sides.
Cook the chops for 4-5 minutes per side, until they develop a deep golden-brown crust and the internal temperature reaches 145°F when measured with an instant-read thermometer. The crust should be firm to the touch and look almost glazy in places—that's your signal they're ready. If they release easily from the pan, they're not quite there yet.
Finish with Butter and Rosemary for Extra Richness
Reduce the heat to medium-low and add 2 tablespoons unsalted butter to the same skillet. Tilt the pan slightly and spoon the melted butter over the cooked chops, letting it baste them for about 1 minute. This adds incredible richness and helps create that signature sheen on the crust.
Sprinkle the ½ teaspoon chopped fresh rosemary over the top of the chops just before serving. The rosemary adds a lovely aromatic touch that complements the bold spices. Let the chops rest for 5 minutes before serving—this allows the juices to redistribute throughout the meat, ensuring each bite is tender and flavorful.
Pro Tips For Making Mccormick Bag N Season Pork Chop Copycat
- PAT THE CHOPS DRY: Bone-in pork chops are slick from the butcher—wipe them with paper towels before seasoning. I learned this the hard way: wet surfaces repel spices, so your paprika and pepper just slide off instead of sticking.
- SEAR THEN SLOW: Start with a screaming-hot pan—get those chops browned fast, then drop the heat to medium-low. After burning three batches, I finally figured out that a fast crust seals in flavor, but low heat finishes them without drying them out.
- SKIP THE CROWDED PAN: Cook one chop at a time if your pan’s smaller than 10 inches. I used to jam three in there, and they’d steam instead of sear—now I just work in batches and get the same crispy edges.
- TOAST THE SPICES: Heat your garlic powder, onion powder, and paprika in the empty pan for 30 seconds before adding oil. Sounds weird, but it works: the spices release their aroma early, so your chops taste deeper from the first bite.
Wine and beer pairings for mccormick bag n season pork chop copycat
Red Wine Pairings
For these bold, spice-forward pork chops, I reach for a medium-bodied red that can stand up to the crust while complementing its depth. A Cabernet Sauvignon from Napa Valley—like Caymus Vineyards—works beautifully with its dark fruit and subtle oak.
The tannins cut through the richness, while the blackberry notes echo the paprika's warmth. 🍷
If you prefer something lighter, a Syrah from Washington State (like Chateau Ste. Michelle) brings bright blueberry flavors and a touch of spice that mirrors the seasoning. Both wines have enough acidity to cleanse your palate between bites, keeping the meal balanced.
Crisp White Options
Don't overlook whites if you prefer them—Chardonnay with a touch of oak (like Kendall-Jackson Vintner's Reserve) pairs surprisingly well. The buttery notes in the wine complement the butter basting on the chops, while the acidity keeps the dish from feeling too heavy. 🥂
For something even lighter, try a dry Riesling from Germany (like Dr. Loosen Blue Slate). The citrus and mineral notes contrast the pork's richness, and the slight sweetness on the finish balances the bold spices. It's a crowd-pleaser, especially if you have guests who prefer whites.
Beer Recommendations
A hoppy American IPA (like Dogfish Head 60 Minute IPA) cuts through the fat and spices with its citrusy bitterness. The malt sweetness also pairs well with the caramelized crust. Serve it slightly chilled to enhance the hop flavors. 🍺
For a malty alternative, a Belgian Dubbel (like Westmalle Trappist) offers caramel and spice notes that harmonize with the pork. The alcohol content helps cut through the richness, making each bite more refreshing. Both beers elevate the dish without overpowering it.
Non-Alcoholic Pairings
Skip the alcohol? A sparkling cranberry spritzer (mix cranberry juice with sparkling water and a squeeze of lime) adds brightness to cut through the richness. The acidity mirrors the wine pairings perfectly. 🍹
For something richer, try a smoked tea (like Lapsang Souchong) served warm. The smoky, earthy notes complement the pork's crust, while the tannins provide a satisfying contrast. It's a unique but delicious choice for a special dinner.
Nutrition facts
Frequently asked questions
Why does the crust crack when I cut into the chops?
The signature crack you see in the crust happens because the spices create a caramelized exterior that hardens during cooking. This is actually a good sign—it means the seasoning developed properly! For an even better crack, let the chops rest 10 minutes after cooking before slicing. The crust will set more firmly, giving you that satisfying snap.
Can I use boneless pork chops instead of bone-in?
Yes, but boneless chops will cook faster and may not be as juicy. For best results, choose thick-cut boneless chops (at least 1-inch thick) and reduce cooking time to 3-4 minutes per side. The crust will still form, but the meat will be more delicate. If using thinner chops, cook them over slightly lower heat to prevent overcooking.
How do I adjust this recipe for a crowd?
Double the seasoning mix and use a large cast iron skillet or griddle to cook 6-8 chops at once. Cook in batches if needed—overcrowding steams the meat instead of searing. For extra flavor, add 1 extra tablespoon smoked paprika to the dry rub per 4 chops. Serve with garlic mashed potatoes and roasted Brussels sprouts for a crowd-friendly meal.
What's the best way to reheat leftovers?
Reheat in a skillet over medium heat for 2-3 minutes per side until warmed through. Avoid the microwave—it makes the crust soggy. For extra crispiness, broil for 1-2 minutes after reheating. Store leftovers in an airtight container for 3-4 days in the fridge or freeze for up to 3 months.
Can I substitute any of the spices?
The core spices (salt, pepper, garlic powder, onion powder) are essential, but you can experiment with the paprika. For a sweeter crust, use regular paprika. For a smookier flavor, add ½ teaspoon liquid smoke to the dry rub. Avoid substituting with chili powder—it's too strong and will overpower the dish.