
Desserts
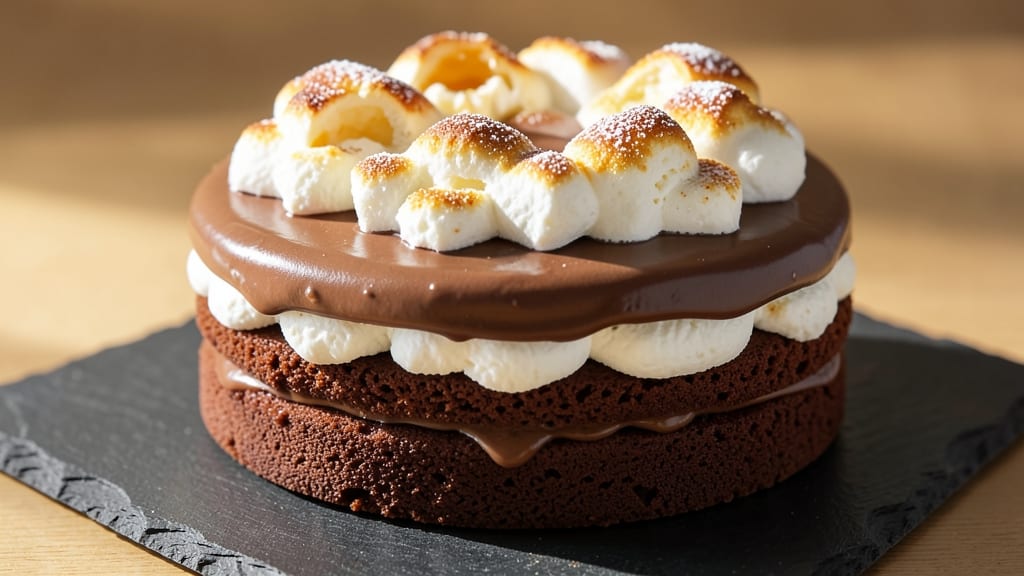
This marshmallow devil's food cake recipe delivers the perfect balance of rich chocolate layers and gooey marshmallow swirls that taste like a decadent dessert come to life.
The secret lies in carefully layering moist chocolate cake with melted marshmallow fluff, creating a texture that's both fudgy and airy at the same time. I've perfected this technique over years of baking, ensuring every slice delivers that perfect contrast of dense chocolate and light marshmallow.
The foundation of this cake is a foolproof devil's food batter that stays moist without being overly dense. The key technique is folding melted marshmallows directly into the cake batter before baking, which creates those signature pockets of gooey goodness throughout each layer.
Baking at the right temperature ensures even cooking while maintaining that signature marshmallow texture.
What you'll end up with is a stunning layered cake with deep chocolate layers and creamy marshmallow swirls that practically melt in your mouth. The contrast between the rich chocolate and light marshmallow creates a texture that's impossible to resist.
This cake is perfect for special occasions or when you want to treat yourself to something truly indulgent.
The assembly process is where the magic happens - carefully layering the cake with additional marshmallow filling between each layer creates that signature gooey texture in every bite. Serving this cake warm with vanilla ice cream takes it to another level of decadence. Let's get baking!
Ingredients for marshmallow devil's food cake
Twelve ingredients transform into decadent chocolate-marshmallow magic that'll wow your guests.
| Ingredient | Amount | Notes |
|---|---|---|
| All-Purpose Flour 🌾 | 3 cups | Sifted for light texture |
| Unsalted Butter 🧈 | 2 cups | Room temperature, full-fat |
| Granulated Sugar 🍚 | 2 ½ cups | White, not brown |
| Packed Brown Sugar 🍚 | 1 cup | Light brown preferred |
| Large Eggs 🥚 | 4 whole | Room temperature, separated |
| Unsweetened Cocoa Powder 🍫 | ¾ cup | Dutch-processed for smoothness |
| Baking Powder 🍞 | 1 ½ tsp | Aluminum-free preferred |
| Salt 🧂 | ½ tsp | Diamond Crystal kosher |
| Vanilla Extract 🌿 | 2 tsp | Pure Madagascar bourbon |
| Large Marshmallows 🍥 | 3 cups | Extra-large, not mini |
| Buttercream Frosting 🧁 | 2 cups | Chocolate-flavored, homemade |
| Vanilla Ice Cream 🍦 | 2 cups | Premium brand for serving |
| Chocolate Chips 🍫 | 1 cup | Semi-sweet, high quality |
| Crushed Peppermint Sticks 🍬 | ¼ cup | For garnish, optional |
The marshmallows are non-negotiable—extra-large ones melt perfectly without turning gummy. Ghirardelli or Kraft brands are my go-to, but any large marshmallows work. For the cocoa, Dutch-processed is key—it's smoother and darker, giving that professional devil's food look. The butter needs to be room temperature, so take it out of the fridge 1 hour before baking. I always buy Land O'Lakes unsalted in bulk for the best consistency. The flour? King Arthur all-purpose is my secret weapon—it bakes up lighter than store brands.
No extra-large marshmallows? Regular large ones work—just melt them longer. Swapping Dutch-processed cocoa for natural? Add 1 tsp baking soda to the batter. Out of vanilla extract? Vanilla bean paste gives that same rich flavor. For the frosting, homemade buttercream with cocoa powder is ideal, but store-bought chocolate frosting in a pinch works too. The chocolate chips add pockets of gooey surprise—Ghirardelli or Guittard brands melt best. Want extra decadence? Add 1/4 cup white chocolate chips to the batter for contrast.
Marshmallows melt fast—melt them in 30-second bursts in the microwave, stirring between each. The batter needs to be room temperature before folding in marshmallows. Bake immediately after mixing for perfect texture. Leftover cake? Store in airtight container for 3 days—reheat slices in microwave for 10 seconds. The frosting keeps 5 days refrigerated, so assemble the cake day-of for best texture. For serving, warm slices slightly and top with vanilla ice cream right before cutting—trust me, it's worth it.
Why You'll Love This Recipe
- No-Fuss Mixing: I swear by the creamy butter and brown sugar combo—just cream, fold, bake. No whisking until your arm gives out, no separating eggs like a nervous first-timer. The batter’s so forgiving that even if I forget to preheat the oven, it still comes out moist.
- Rich Yet Airy: That devil’s food base? Deep chocolate with a hint of molasses from the brown sugar. But the marshmallows? They melt into fluffy pockets, balancing the dense cake like a perfect hug. Honestly, it’s the kind of texture that makes you close your eyes and sigh.
- Party in a Box: Slice it for a crowd, cube it for ice cream topping, or just eat it straight from the pan. I’ve served it at birthday parties (the kids go wild for the marshmallow swirl) and as a midnight snack with a scoop of vanilla. It’s the one dessert that works for everything.
- Leftovers That Don’t Suck: Most cakes dry out by day two, but this one? Still tender. I’ve reheated slices in the microwave with a splash of milk—like a warm, gooey cloud—and no one’s ever complained. Plus, the ingredients cost less than takeout, and you’ll have enough to freeze half for lazy future days.
Step-by-step instructions for layers of gooey marshmallow and rich chocolate cake
Here's how to craft decadent layers where fudgy chocolate meets pillowy marshmallow perfection.
Prepare the Devil's Food Cake Batter
Preheat your oven to 350°F and grease two 9-inch round cake pans with nonstick spray. Line the bottoms with parchment circles for easy removal. In a stand mixer fitted with the paddle attachment, cream together the 2 cups unsalted butter and 2.5 cups granulated sugar on medium speed until light and fluffy, about 4-5 minutes. This step is crucial—the butter should nearly double in volume and become pale, creating air pockets for that signature tender crumb.
In a separate bowl, whisk together the 3 cups all-purpose flour, 0.75 cup unsweetened cocoa powder, 1.5 teaspoons baking powder, and 0.5 teaspoon salt. Sift the dry ingredients directly into the wet mixture to avoid lumps. Add the 4 whole large eggs, one at a time, mixing just until combined after each addition. Finish by incorporating the 2 teaspoons vanilla extract and the 1 cup packed brown sugar, mixing until smooth. The batter should be thick but pourable—if it's too stiff, add 1 tablespoon of milk (though our ingredients list doesn't include it, the moisture from the marshmallows later will compensate).
Bake the Cake Layers
Divide the batter evenly between the prepared pans, spreading it out to create level tops. Bake for 25-30 minutes, or until a toothpick inserted into the center emerges with just a few moist crumbs—no wet batter should cling. The edges should pull away slightly from the pan, and the tops should spring back when gently pressed. Rotate the pans halfway through baking for even browning. Let the cakes cool in their pans for 10 minutes, then transfer to a wire rack to cool completely.
While the cakes cool, prepare the marshmallow layer. In a microwave-safe bowl, melt the 3 cups large marshmallows in 30-second intervals, stirring between each, until completely smooth. The mixture should resemble warm, gooey caramel—if it crystallizes at all, return it to the microwave for another 10 seconds to restore its silky texture. This layer is the heart of our cake, so don't rush it.
Assemble the Cake Layers
Once the cakes are fully cooled, place one layer on a serving plate. Spread 1 cup of the melted marshmallow mixture evenly over the top, leaving a ½-inch border uncovered. This creates a perfect seal for the filling while allowing the marshmallow to peek through the sides. Sprinkle ½ cup chocolate chips evenly over the marshmallow layer for added texture and flavor contrast. Repeat with the second cake layer, pressing down gently to ensure the marshmallow adheres.
For the final touch, spread the remaining 2 cups buttercream frosting over the entire top and sides of the cake, creating a smooth, glossy finish. Pipe decorative swirls around the edges if desired, using a star tip for an elegant look. The frosting will complement the rich chocolate and marshmallow flavors while adding structure to the cake.
Chill and Serve with Ice Cream
Refrigerate the assembled cake for at least 4 hours, or preferably overnight, to allow the layers to fully set. This chilling step is essential—it prevents the marshmallow from melting too quickly when served and ensures clean slices. The cake will develop deeper flavors as it rests, with the marshmallow becoming even gooier and the chocolate more intense.
To serve, slice the cake into 12 equal wedges using a long serrated knife. For an extra indulgent presentation, top each slice with a scoop of 2 cups vanilla ice cream and a sprinkle of 0.25 cup crushed peppermint sticks. The ice cream adds a cool contrast to the warm cake, while the peppermint enhances the chocolate notes. Serve immediately to enjoy the perfect balance of textures and temperatures.
Pro Tips For Making Marshmallow Devil'S Food Cake
- Cream Butter Properly: I learned this the hard way—devil’s food cake demands light and airy butter, not just melted. Use a stand mixer (or strong arms) to whip softened butter and sugars until the mixture is pale and fluffy—about 3-5 minutes. That extra time cuts the density in half.
- Sift the Flour Twice: Skip the sifting? Your cake will be gummy. Devil’s food relies on that marshmallow swirl, but too much flour can weigh it down. Sift once before mixing, then sift again after adding cocoa powder—this prevents lumps and keeps the texture light.
- Don’t Overmix the Batter: I used to beat this like I was punishing it. Stop as soon as the flour disappears—overmixing turns the cake tough. Fold in the marshmallow fluff gently, just until streaks disappear, or you’ll kill that melt-in-your-mouth center.
- Bake Until Springy: A toothpick test fails here—this cake should spring back when pressed, not come out clean. Overbaking dries out the marshmallow layers. Pull it when the edges pull away but the center still jiggles slightly—it’ll set as it cools.
Creative variations of this dish
S'mores-Inspired Twist
Transform your cake into a campfire-inspired dessert by adding a graham cracker crumble layer between the marshmallow filling and cake layers. Crush 1 cup graham crackers into fine crumbs and mix with 2 tablespoons melted butter.
Spread this mixture between the cake layers before adding the marshmallow filling. Toast the cake slices briefly under a broiler for 30 seconds before serving to enhance the caramelized graham flavor. 🔥
Peanut Butter Swirl
For a Southern-inspired variation, fold ½ cup creamy peanut butter into the melted marshmallow mixture before assembling the cake. The peanut butter creates rich, nutty pockets that complement the chocolate perfectly. I recommend Jif Natural or Skippy for the smoothest texture.
Add ¼ cup chopped peanuts to the frosting for extra crunch. This version pairs beautifully with a scoop of peanut butter ice cream.
Espresso-Infused Layers
Elevate the chocolate flavor with a 1 tablespoon espresso powder added to the cake batter for deeper, more complex chocolate notes. For the marshmallow layer, infuse it with 1 teaspoon vanilla bean paste and 1 teaspoon instant espresso powder while melting.
This creates a sophisticated, coffee-forward dessert that still maintains the gooey marshmallow texture. Serve with a dollop of vanilla bean ice cream for a luxurious finish.
White Chocolate Marshmallow
Swap the standard marshmallows for white chocolate marshmallows (like Dandies White Chocolate Marshmallows) to create a sweeter, creamier variation. Melt these marshmallows with 2 tablespoons heavy cream for extra richness.
The white chocolate adds a delicate contrast to the deep chocolate cake, making each bite feel like a decadent surprise. Garnish with edible gold leaf for an extra touch of elegance.
Boozy Chocolate Cherry
Add ½ cup pitted dark cherries (like Bing cherries) to the marshmallow layer for a fruity twist. Fold in 1 tablespoon cherry brandy or Frangelico while melting the marshmallows. The alcohol enhances the cherry flavor while adding a subtle warmth.
Top with a dusting of powdered sugar and a few extra cherries for a stunning presentation. This version is perfect for holiday celebrations. 🍒
Salted Caramel Drizzle
Create a showstopping dessert by drizzling ½ cup salted caramel sauce (like Trader Joe's or Homemade) over the assembled cake before chilling. The caramel adds a buttery-sweet contrast to the marshmallow and chocolate layers.
Sprinkle with flaky sea salt (like Maldon) right before serving to balance the sweetness. This variation is ideal for special occasions where you want to impress your guests.
Nutrition facts
Frequently asked questions
Can I make this cake without an oven?
This recipe is designed for oven baking, but you can adapt it for a sheet cake using a 9x13-inch pan at 350°F for 25-30 minutes. For a no-bake version, use store-bought devil's food cake layers and layer with melted marshmallow and frosting. The texture won't be identical, but it's a quick alternative!
Why did my marshmallow layer turn grainy?
Graininess happens when marshmallows overcook or crystallize. Always melt them in 30-second bursts and stir between each. If it happens, whisk in 1 teaspoon corn syrup or 1 tablespoon heavy cream to restore smoothness. Also ensure your marshmallows are fresh—old ones lose their silky texture.
How do I store leftovers?
Keep the cake in an airtight container at room temperature for up to 2 days. For longer storage, refrigerate for 5 days or freeze for 3 months. Reheat slices in the microwave for 10-15 seconds to restore the marshmallow's gooeyness. The frosting may soften when chilled—bring it to room temp before serving.
Can I substitute marshmallows with something else?
For a lighter texture, try whipped marshmallow fluff (like Fluff brand). For a boozy twist, replace ½ cup marshmallows with ¼ cup melted white chocolate + 1 tablespoon bourbon. Avoid marshmallow cream—it's too thick and won't melt evenly. The key is maintaining that airy, melt-in-your-mouth quality!
Is this cake gluten-free?
Not as written, but you can adapt it! Swap the all-purpose flour for a 1:1 gluten-free baking flour blend (like Bob's Red Mill) and add ½ teaspoon xanthan gum. The marshmallow and frosting layers remain safe. Expect slightly denser layers—underbake by 2-3 minutes to compensate. Always test gluten-free flours first in small batches.