
Desserts
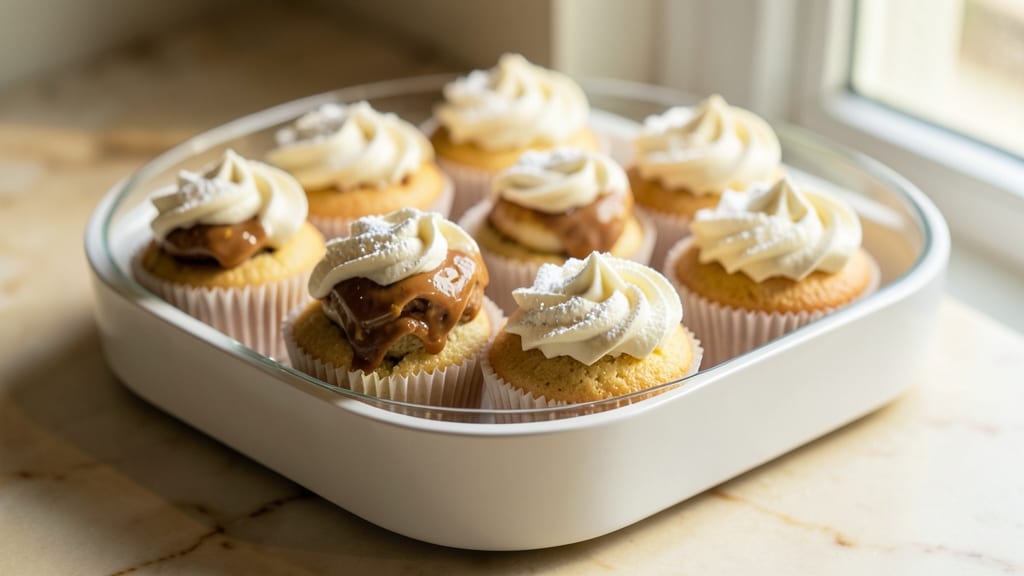
This ice cream cupcake recipe transforms a simple vanilla cake into a decadent dessert experience with layers of frosting and cold ice cream. The secret lies in baking a sturdy, moist cake base that holds up perfectly to the weight of ice cream without crumbling.
I developed this recipe after years of experimenting with textures—balancing cake density, frosting stability, and ice cream creaminess is what makes this dessert truly special.
The process starts with a foolproof vanilla cake batter that bakes into a tender yet sturdy foundation. Once cooled, you'll spread a generous layer of vanilla buttercream, then add a scoop of your favorite ice cream—vanilla works best for that classic flavor, but chocolate or strawberry add exciting variations.
The final touch? A dusting of powdered sugar or a drizzle of chocolate ganache to elevate the presentation.
What you'll end up with is a cupcake that's part cake, part ice cream, and 100% indulgence—creamy, cool, and perfectly balanced in every bite. The cake provides structure while the ice cream adds richness, creating a texture that's both fun and satisfying.
This dessert is perfect for celebrations, date nights, or simply treating yourself after a long week.
Ready in under an hour, this recipe delivers restaurant-quality results with minimal effort. The key is patience—letting the cake cool completely before assembly ensures clean layers and no messy overflow. Whether you're serving a crowd or indulging solo, these ice cream cupcakes are guaranteed to impress.
Ingredients for ice cream cup cake
Twelve ingredients for a dessert that feels like a hug in cupcake form.
| Ingredient | Amount | Notes |
|---|---|---|
| All-Purpose Flour 🌾 | 2 ½ cups | Sifted for light texture |
| Granulated Sugar 🍚 | 2 cups | White or light brown |
| Unsalted Butter 🧈 | 1 cup | Room temperature, full-fat |
| Large Eggs 🥚 | 3 whole | Room temperature for best mixing |
| Vanilla Extract 🍯 | 2 tsp | Pure, high-quality extract |
| Baking Powder 🧂 | 2 tsp | For fluffy cake structure |
| Salt 🧂 | ½ tsp | Fine sea salt preferred |
| Milk 🥛 | ¾ cup | Whole milk for richness |
| Vanilla Ice Cream 🍦 | 2 cups | Store-bought or homemade |
| Vanilla Buttercream Frosting 🍰 | 2 cups | Store-bought or homemade |
| Powdered Sugar 🍚 | ¼ cup | For dusting, plus extra |
| Dark Chocolate Ganache 🍫 | ½ cup | Optional for drizzling |
| Cupcake Liners 📝 | 12 whole | Standard size, parchment or foil |
The cake is the backbone here, so don't cut corners on the flour—King Arthur or Gold Medal are my go-tos for that perfect crumb. Butter? Full-fat, room temperature is non-negotiable—it creates the tender yet sturdy texture that holds up to the ice cream. I grab mine from Whole Foods when I want the best, but regular grocery store brands work fine. For the ice cream, Häagen-Dazs vanilla is my splurge pick, but Breyers or any good-quality brand does the trick. Pro tip: scoop the ice cream right before assembling to keep it cold and creamy.
No vanilla extract? Vanilla bean paste at half the amount works wonders—it's pricier but adds depth. Short on buttercream? Whipped cream with powdered sugar is a decent swap, though it won't hold up as well. The ganache is optional but adds that restaurant-worthy touch—use 70% dark chocolate for the best balance of richness and bitterness. If you're feeling adventurous, swap the vanilla ice cream for chocolate or strawberry—just make sure it's fully thawed but still cold before adding it to the cupcakes. And if you're out of powdered sugar, confectioners' sugar is the same thing, just check for lumps.
This dessert is all about timing—let the cake cool completely before adding the frosting and ice cream, or you'll end up with a messy overflow. Store any extras in the freezer for up to 1 month, but bring them to room temperature before serving. The ganache keeps for 1 week in the fridge, so make it fresh if you're planning to drizzle. For a fun twist, add sprinkles or crushed cookies between the frosting and ice cream layers—kids (and adults) will love it.
Why You'll Love This Recipe
- No Mixer Needed: I swear by this recipe when my hands are full—just cream butter and sugar by hand until light and fluffy (yes, it takes effort, but it’s worth it). The eggs and vanilla blend right in without a trace, so you don’t even need to worry about overmixing.
- Vanilla Buttercream Magic: That first bite of tender cake with the rich, buttery frosting? It’s like dessert hugs you. The vanilla extract isn’t just a hint—it’s the star, making every forkful taste like a nostalgic ice cream cone.
- Party in a Cup: These are my go-to for birthdays, potlucks, or just because. Stack them in a tower for a showstopper, or serve them individually for a crowd—no one will guess how little work they actually took.
- Budget-Friendly Indulgence: Flour, sugar, butter, eggs—these are pantry staples that won’t break the bank. Plus, the frosting uses the same ingredients, so you’re basically making dessert for half the cost of store-bought. Leftovers? They vanish faster than you can say “second helping.”
Step-by-step instructions for ice cream cupcake recipe
Here's how to create these dreamy cupcakes with layers of cake and ice cream—simple steps for a showstopper dessert.
Prepare the Cupcake Liners and Prep Ingredients
Place the 12 whole cupcake liners into your muffin tin, pressing them gently to prevent shifting. I like to add a small scoop of the 2 cups vanilla ice cream to the bottom of each liner—this creates the perfect foundation for the ice cream layer. Freeze these prepared liners for 15 minutes while you mix the batter. The cold liners help the ice cream stay firm during baking.
In a medium bowl, whisk together the 2.5 cups all-purpose flour, 2 tsp baking powder, and 0.5 tsp salt. Sift this mixture once to remove any lumps—this ensures a light, airy texture in your cupcakes. Set aside until ready to use. While you're prepping, let the 1 cup unsalted butter and 3 whole large eggs come to room temperature for smoother mixing.
Mix the Cupcake Batter
In a large mixing bowl, combine the 2 cups granulated sugar and 1 cup unsalted butter. Using an electric mixer, beat on medium speed for 3-4 minutes until the mixture is light and fluffy, with a pale yellow color. This step incorporates air, which gives your cupcakes that classic tender crumb. Scrape down the sides of the bowl with a rubber spatula to ensure even mixing.
Add the 3 whole large eggs, one at a time, mixing well after each addition. Then stir in the 2 tsp vanilla extract and 0.75 cup milk. Mix on low speed until just combined—you should see no streaks of flour remaining. Here's the thing—don't overmix. The batter should be smooth but slightly thick, like heavy pudding. Gently fold in the sifted dry ingredients until just incorporated. The batter will be thick, but that's perfect for these ice cream cupcakes.
Bake the Cupcakes Over Frozen Ice Cream
Preheat your oven to 350°F. Carefully remove the frozen liners from the freezer and place them in the prepared muffin tin. Divide the batter evenly among the liners, filling each about ¾ full. Bake for 12-14 minutes, or until a toothpick inserted into the center comes out clean. The tops should be golden brown but still slightly soft—this prevents the ice cream from melting too quickly.
While the cupcakes bake, let the 2 cups vanilla buttercream frosting come to room temperature. This makes it easier to pipe later. Once the cupcakes are done, let them cool in the pan for 5 minutes, then transfer to a wire rack to cool completely. The key here is patience—if you try to frost them too soon, the ice cream will melt and create a soggy cupcake.
Assemble the Ice Cream Cupcakes
Once the cupcakes are completely cool, use a small serrated knife to slice off the very top of each cupcake—about ¼ inch. This creates a flat surface for the ice cream layer. Place the sliced cupcakes back into their liners and add a scoop of the 2 cups vanilla ice cream on top of each one. Press down gently to create a smooth, even layer. Return the assembled cupcakes to the freezer for 10 minutes to help the ice cream firm up slightly.
Remove the cupcakes from the freezer and pipe the 2 cups vanilla buttercream frosting around the sides, creating a smooth, elegant border. Dust the tops with 0.25 cup powdered sugar for a snowy finish. For an extra touch, drizzle the 0.5 cup dark chocolate ganache over the frosting in a zigzag pattern. The ganache adds a beautiful contrast and a rich chocolate note that complements the vanilla perfectly.
Serve and Enjoy
Serve the ice cream cupcakes immediately after assembly—they're best enjoyed fresh from the freezer. The contrast of the warm cake, cold ice cream, and creamy frosting makes every bite a delight. For a fun presentation, place them on a decorative platter and garnish with fresh berries or a sprinkle of crushed pistachios. These cupcakes are perfect for celebrations, parties, or just treating yourself to something special.
Real talk: If you're making these ahead of time, assemble them without the frosting and store them in the freezer. Frost just before serving to keep everything looking its best. Enjoy your creation—these cupcakes are sure to impress!
Pro Tips For Making Ice Cream Cup Cake
- Cream Butter First: Take 30 seconds to beat the butter and sugar until it’s pale yellow—not just fluffy, but actually lightened in color. I learned this the hard way: skipping this step means your cakes will taste flat and dense, like they’re hiding something. (Yes, even if you’re impatient like me.)
- Room-Temp Eggs Only: Cold eggs? Nope. Pull them out of the fridge 30 minutes before using so they’re just warm to the touch. Cold eggs curdle when they hit warm butter, and your batter will look like it’s fighting itself. Trust me, your cakes will be lighter if you skip the shock.
- Don’t Overmix the Batter: Stop mixing the second the flour disappears—no streaks, no gray spots. Overmixing develops the gluten and turns your tender cupcakes into dense hockey pucks. I used to ignore this, and my cakes ended up tough as boot leather.
- Ice Cream First, Not Last: Scoop the ice cream into the center before baking, not after. The heat will soften it just enough to create that signature gooey middle, and it won’t melt into a sad puddle at the bottom. (Pro move: Use a spoon to make a well in the batter—no need to dig.)
Pro cooking tips for great ice cream cup cake
Cake Texture Mastery
The cake base is your foundation, so aim for a tender yet sturdy texture that won’t crumble under the ice cream. I use King Arthur all-purpose flour for its protein balance—it creates a fine crumb that holds together beautifully.
Whisk the dry ingredients once and sift them once more before folding into the wet mix to avoid gluten development. Overmixing turns cupcakes tough, so stop as soon as the batter comes together like thick pudding. 💫
Ice Cream Stability
Prevent meltdowns by freezing the ice cream layer before baking. Scoop 2 cups vanilla ice cream into the liners and freeze them for 15 minutes—this keeps the ice cream firm during the 350°F bake.
For extra stability, use Häagen-Dazs or Breyers brands, which have higher fat content. If your ice cream starts to melt mid-bake, reduce the oven temp to 325°F for the last 2 minutes to slow heat transfer.
Layering Like a Pro
Slice the ¼-inch top off each cooled cupcake to create a flat surface for the ice cream—this ensures even distribution. Press the ice cream gently with the back of a spoon to remove air bubbles and create a smooth layer.
For a clean border, use a piping bag with a star tip to frost the sides. Chill the assembled cupcakes for 10 minutes before adding the final powdered sugar or ganache to prevent melting. ✨
Frosting Consistency
Buttercream should be cool but pipeable—around 65°F—for clean swirls. If your frosting is too soft, chill it for 15 minutes before piping. For a professional finish, use a Wilton 1M tip to create smooth borders.
Dust with powdered sugar through a fine-mesh sieve for an even, snowy effect. Pro tip: Add 1 tsp corn syrup to your buttercream if it’s too crumbly.
Timing and Temperature
Rush the process, and you’ll end up with a soggy mess. Let cupcakes cool completely before adding frosting and ice cream—this prevents melting. If you’re making these ahead, assemble without frosting and store in the freezer for up to 1 month.
Thaw in the fridge for 30 minutes before serving. For a warm contrast, serve with a side of hot chocolate or caramel sauce for dipping. 🔥
Equipment Essentials
Invest in a high-quality muffin tin (I love Nordic Ware) to ensure even baking. A serrated knife makes slicing the cupcake tops easier, and a piping bag with a small round tip helps create neat frosting borders.
For ganache, use a double boiler to melt the chocolate smoothly—this prevents seizing. A wire rack is a must for cooling cupcakes evenly without steam buildup.
Nutrition facts
Frequently asked questions
Can I use store-bought cake mix for this recipe?
While you can use a boxed mix in a pinch, I recommend making the cake from scratch for the best texture. Store-bought mixes often contain extra moisture or stabilizers that can make the cake too dense to hold up to the ice cream layer. If you must use a mix, choose a high-quality vanilla or white cake mix and reduce the milk by 2 tablespoons to prevent a soggy texture.
How do I prevent the ice cream from melting too quickly?
Freezing the ice cream in the liners for 15 minutes before baking is key. Also, use a high-fat ice cream brand like Häagen-Dazs or Breyers, as they melt slower. If your oven runs hot, reduce the temperature to 325°F for the last 2 minutes of baking. Finally, let the cupcakes cool completely before adding the frosting and ice cream layer—this prevents premature melting.
Can I make these ahead of time?
Assemble the cupcakes without frosting and store them in the freezer for up to 1 month. When ready to serve, thaw them in the fridge for 30 minutes and add the frosting just before serving. This keeps the ice cream from melting and the cake from becoming soggy. For a fun twist, store the frosting separately and pipe it on fresh for a restaurant-worthy look.
What’s the best way to slice the top off the cupcakes?
Use a serrated knife and press down firmly at a slight angle to create a clean, even cut. A ¼-inch slice is ideal for a flat surface that holds the ice cream well. Dip the knife in hot water between cuts to prevent crumbs from sticking. If your knife isn’t sharp, the cake may crumble, making it harder to layer the ice cream neatly.
Can I substitute the buttercream frosting?
Yes, but with caution. Whipped cream with powdered sugar is a quick swap, though it won’t hold up as well. For a sturdier option, try cream cheese frosting or Italian meringue buttercream, both of which have better structure. If using whipped cream, chill the assembled cupcakes for 15 minutes before serving to keep the frosting intact.