
Main Courses
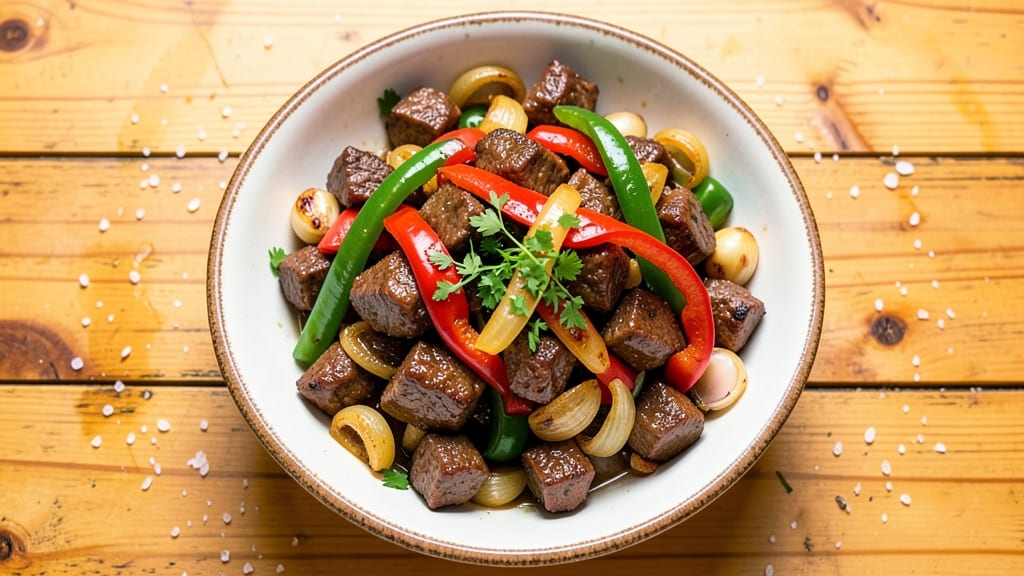
Grandma's old-fashioned pepper steak recipe brings back the comforting flavors of home-cooked meals that taste like love in every bite. The rich, smoky-sweet beef braised with bell peppers and onions creates a dish that's both hearty and nostalgic, perfect for family dinners or special gatherings.
I've perfected this recipe using traditional techniques like slow cooking in cast iron to develop deep, caramelized flavors.
What makes this recipe special is the balance of sweet and savory—bell peppers add natural sweetness while black pepper and Worcestershire sauce bring that classic pepper steak depth. The homestyle gravy ties everything together, making every bite tender and flavorful.
This dish is designed to be made ahead, so the flavors only get better as it sits, just like Grandma used to do.
The result is a dish that's impossible to resist: tender beef slices swimming in a rich, slightly thickened gravy with perfectly softened peppers. Serve it over buttery mashed potatoes or fluffy white rice, and pair it with a cup of strong black coffee to complete the experience.
This recipe is a taste of home, made easier with modern shortcuts while keeping the old-fashioned soul intact.
Whether you're cooking for a crowd or just treating yourself to a comforting meal, this pepper steak delivers restaurant-quality results with a homestyle touch. The cast iron skillet ensures even cooking and maximum flavor, while the slow braising method guarantees tender beef every time.
Let's get cooking and bring back the flavors of yesteryear.
Ingredients for grandma's old fashioned pepper steak
Classic cuts, homestyle flavors—this pepper steak brings Grandma's kitchen to your cast iron skillet.
| Ingredient | Amount | Notes |
|---|---|---|
| Beef Chuck Roast 🥩 | 3 lb | Cut into 1-inch cubes, marbling preferred |
| Yellow Onions 🧅 | 2 whole | Medium size, sliced into half-moons |
| Green Bell Peppers 🍅 | 3 whole | Stripped of seeds, sliced into strips |
| Red Bell Peppers 🍅 | 2 whole | Stripped of seeds, sliced into strips |
| Garlic Cloves 🧄 | 6 cloves | Minced, fresh preferred |
| Worcestershire Sauce 🍶 | 2 tbsp | Classic Lea & Perrins brand recommended |
| Black Peppercorns 🌶️ | 1 tbsp | Freshly cracked, coarse grind |
| Kosher Salt 🧂 | 1 ½ tsp | Diamond Crystal preferred |
| All-Purpose Flour 🌾 | 2 tbsp | For gravy thickening |
| Beef Broth 💧 | 2 cups | Low-sodium, homemade or high-quality |
| Tomato Paste 🍅 | 2 tbsp | Canned, San Marzano preferred |
| Granulated Sugar 🍬 | 1 tbsp | Balances acidity in gravy |
| Unsalted Butter 🧈 | ½ cup | Full-fat, cold for gravy |
| Fresh Thyme Leaves 🌿 | ¼ cup | Or 1 tsp dried thyme |
The beef is the foundation—chuck roast delivers that melt-in-your-mouth tenderness when braised properly. Look for well-marbled cuts at your local butcher or the meat department at Whole Foods or Costco. If pre-cubed isn't available, ask for a 1-inch dice—uniform pieces cook evenly. For the peppers, fresh is non-negotiable—the sweetness develops beautifully during the long cook. I always grab organic bell peppers from the farmers market when in season, but regular grocery store peppers work fine if they're firm and vibrant. The Worcestershire sauce should be the classic Lea & Perrins—it's got that deep, umami backbone this dish needs.
No Worcestershire on hand? A splash of soy sauce plus a pinch of smoked paprika gets you close. Fresh thyme wilting? Dried works at one-third the amount, but fresh imparts that bright, herbal note. The tomato paste can be swapped for crushed tomatoes (use 1/2 cup), though paste gives better thickening power. For the gravy, all-purpose flour is standard, but cornstarch (1 tbsp) works better if you're short on time—just whisk it into cold water first. The beef broth should be low-sodium—you'll be adding plenty of salt later. If you're using bouillon cubes, reduce the salt by half in the recipe.
This dish tastes even better the next day—Grandma's secret was always making it ahead. Store leftovers in the fridge for up to 5 days in an airtight container, or freeze portions for up to 3 months. The gravy thickens as it cools, so add a splash of broth when reheating. For serving, I like to prep mashed potatoes or rice while the steak braises—it's one less thing to do at the end. The cast iron skillet keeps everything warm while you finish plating, just like Grandma's stove always did.
Why You'll Love This Recipe
- No-Chop Nightmare: I swear, this dish only asks for one knife job—slice those onions and peppers into big, rough chunks (no fancy dicing). The beef chuck roast does all the work after that, slow-simmering into tender perfection while you sip your coffee or scroll through memes.
- Garlic Bomb Flavor: That first whiff of garlic and onions caramelizing in the pan? Chef’s kiss. The beef soaks up the sweetness from the bell peppers and the deep, savory punch of the garlic—no fancy sauces needed. It’s the kind of rich, umami taste that makes you groan with happiness.
- Leftovers for Days: Between us, this recipe begs to be made in bulk. The flavors only get better after a night in the fridge, and reheating it? Just a splash of water, 10 minutes in the microwave, and you’ve got dinner solved for three more nights. (Yes, even on a Tuesday.)
- Budget Beef Win: Chuck roast is the unsung hero of affordable meat—cheaper than steaks but just as satisfying when it breaks down into tender shreds. A single roast feeds my whole family, and the peppers stretch every bite with color and crunch. My wallet and my taste buds thank me.
Step-by-step instructions for Grandma's old fashioned pepper steak
Here's how to recreate Grandma's legendary pepper steak with tender beef and rich gravy.
Prepare the Beef and Vegetables
Cut the 3 lb beef chuck roast into 1-inch cubes, keeping any visible marbling intact. This size ensures even cooking without drying out. In a large bowl, combine the beef with the 2 whole yellow onions sliced into half-moons, 3 whole green bell peppers and 2 whole red bell peppers sliced into strips, and the 6 cloves minced garlic. Add the 2 tbsp Worcestershire sauce, 1 tbsp freshly cracked black peppercorns, and 1.5 tsp kosher salt. Toss everything together until the beef is evenly coated.
Let the mixture sit at room temperature for 15 minutes while you prepare your cooking vessel. This brief resting period helps the flavors meld and ensures more even cooking. I always use a heavy Dutch oven for this recipe—the thick base distributes heat evenly and prevents burning.
Sear the Beef and Vegetables
Heat 1 tablespoon of oil in your Dutch oven over medium-high heat until shimmering. Working in batches to avoid overcrowding, sear the beef cubes for 2-3 minutes per side until they develop a deep brown crust. Remove the beef and set it aside on a plate. Repeat with the remaining beef, adding more oil if needed.
In the same pot, add another tablespoon of oil and sear the onion and pepper mixture for 5-6 minutes until softened and slightly caramelized. You'll know it's ready when the onions turn translucent and the peppers release their sweet aroma. Add the minced garlic and cook for an additional 30 seconds until fragrant. This step builds the foundation for the rich, smoky-sweet flavor profile.
Braise the Beef
Return all the beef and vegetables to the Dutch oven. Sprinkle the 2 tbsp all-purpose flour over the top and stir gently to coat everything evenly. Pour in the 2 cups beef broth, scraping up any browned bits from the bottom of the pot. Add the 2 tbsp tomato paste and 1 tbsp granulated sugar, stirring to combine. Bring the mixture to a simmer, then reduce heat to low, cover, and let it braise for 2 hours.
The key to perfect pepper steak is patience. The beef needs this time to become fork-tender while absorbing all those beautiful flavors. Check the liquid level occasionally—if it reduces too much, add a splash of water or broth to keep everything moist. You'll know it's ready when the beef is tender enough to pull apart easily with a fork.
Make the Homestyle Gravy
Once the beef is tender, remove the lid and increase heat to medium. Let the liquid reduce for 5-7 minutes until it thickens slightly. Stir in the 0.25 cup fresh thyme leaves and cook for an additional 2 minutes to infuse the flavor. Remove from heat and let it sit for 5 minutes to allow the thyme to settle.
In a separate saucepan, melt the 0.5 cup unsalted butter over low heat. Slowly whisk in the reduced braising liquid from the Dutch oven, adding it gradually to create a smooth, velvety gravy. The butter adds richness while the thyme provides that classic pepper steak aroma. Strain the gravy through a fine-mesh sieve if you prefer a smoother texture, or leave it slightly chunky for more rustic character.
Serve Family-Style
Spoon the pepper steak mixture onto a serving platter, making sure each serving gets a generous portion of both beef and vegetables. Ladle the homemade gravy over the top and around the sides for dipping. Serve immediately with crusty bread or over buttered egg noodles to soak up every last bit of that delicious sauce.
This dish tastes even better the next day, so plan to make extra—it's always a hit at family gatherings. The combination of tender beef, sweet peppers, and rich gravy makes this a true comfort food classic that never goes out of style. Enjoy it while warm for the ultimate experience!
Pro Tips For Making Grandma'S Old Fashioned Pepper Steak
- SEAR THE ROAST FIRST: Skip the slow start—hit that chuck roast with a screaming-hot pan for 3-4 minutes per side before anything else. I used to toss it in with the peppers and onions right away, and the meat always ended up dry. A deep crust from the sear locks in flavor and moisture when it later braises.
- CHAR THE PEPPERS LOW: After the onions soften, pile the sliced bell peppers on top and cook them covered on low heat for 10 minutes. This makes them melt into the sauce instead of staying crunchy. I learned this the hard way—burnt peppers ruin the whole dish, and undercooked ones feel like eating rubber.
- SALT THE MEAT TWICE: Generously season the chuck roast before searing, then add another pinch of salt when the peppers and onions go in. The first layer gets absorbed into the crust, while the second boosts the sauce. My grandmother swore by this, and she was right: the flavor builds in layers.
- USE GARLIC BUTTER: Toss in 2 tablespoons of softened butter with those minced garlic cloves at the end. It cuts the acidity of the peppers and adds a silky richness that plain oil can’t match. I was skeptical until I tried it—now I never go back.
Make-ahead tips for this recipe
Prep Ahead for Flavor
I always start by prepping the beef and vegetables the night before—this saves 30 minutes of active time on cooking day. Cube the 3 lb beef chuck roast and store it in an airtight container with the sliced onions, peppers, and garlic.
Add the Worcestershire sauce, black pepper, and salt to the container, then refrigerate. The flavors meld beautifully overnight, creating a more cohesive dish. 🌟
Slow Cooker Shortcut
For a hands-off approach, transfer the prepped beef and veggie mixture to a 6-quart slow cooker after searing. Add the flour, broth, tomato paste, and sugar, then cook on LOW for 8 hours or HIGH for 4-5 hours.
The slow cooker's gentle heat mimics traditional braising while letting you focus on other tasks. Just finish with the butter-thickened gravy on the stovetop.
Gravy Prep in Advance
Make the gravy base ahead of time by reducing the braising liquid (without the beef) in the Dutch oven until it thickens to a syrup-like consistency. Store it in a sealed jar in the fridge for up to 3 days.
When ready to serve, simply reheat with the beef and finish with butter and thyme. This keeps your final assembly quick and stress-free.
Freezer-Friendly Method
Assemble the entire pepper steak (including gravy) in your Dutch oven, then cool completely before transferring to freezer-safe containers. This fully cooked version reheats beautifully—just thaw overnight in the fridge, then warm on the stovetop with 1-2 tablespoons of water or broth to restore moisture.
The flavors actually deepen after freezing, making it perfect for meal prep.
Side Dish Prep
While the beef braises, prepare your sides. Cook 2 cups dry white rice in advance and store covered at room temperature. For mashed potatoes, make a double batch and reheat portions in the microwave with a splash of milk.
I also prep a simple green salad with mixed greens, cherry tomatoes, and balsamic vinaigrette—it keeps for 2 days in the fridge.
Reheating for Maximum Flavor
When reheating from the fridge, I warm the pepper steak in the Dutch oven over medium-low heat for 15-20 minutes, stirring occasionally. For frozen portions, thaw first, then reheat with 2 tablespoons of broth to prevent drying.
The key is patience—low heat ensures the beef stays tender rather than tough. Add a sprinkle of fresh thyme at the end for that restaurant-quality aroma. 💪
Nutrition facts
Frequently asked questions
Can I use a different cut of beef for this pepper steak?
While chuck roast is ideal for its marbling and tenderness, you can substitute with 3 lb beef short ribs or chuck shoulder. Avoid lean cuts like sirloin—they won't become tender during braising. If using ribs, trim excess fat first to prevent greasiness in the gravy.
How do I know when the beef is fully tender?
After 2 hours of braising, pierce a beef cube with a fork. If it slides in easily and the juices run clear (not pink), it's done. For extra assurance, check at 1 hour 45 minutes—some cuts may finish faster. Never rush this step or the beef will remain chewy.
What's the best way to store leftovers?
Let the pepper steak cool completely, then store in an airtight container in the fridge for up to 5 days. For freezing, portion into single-serving containers with gravy—it reheats beautifully. Thaw overnight in the fridge before reheating to preserve texture. The gravy may thicken when chilled, so add a splash of broth when warming.
Can I make this recipe in an Instant Pot?
Yes! Sear the beef and veggies first, then transfer everything to the Instant Pot. Add 1.5 cups broth (less than the recipe), cook on HIGH pressure for 35 minutes, then natural release. Finish with the butter-thickened gravy. The pressure cooker cuts time but may need 5-10 extra minutes to reach full tenderness.
Why does my gravy turn out too thin?
This usually happens from over-reducing the braising liquid or not using enough butter. For a richer gravy, melt 0.25 cup butter (instead of 0.5 cup) and whisk in 1 tbsp cornstarch mixed with cold water. Simmer for 2 minutes until thickened. Always strain the gravy through a fine-mesh sieve for a smoother texture.