
Main Courses
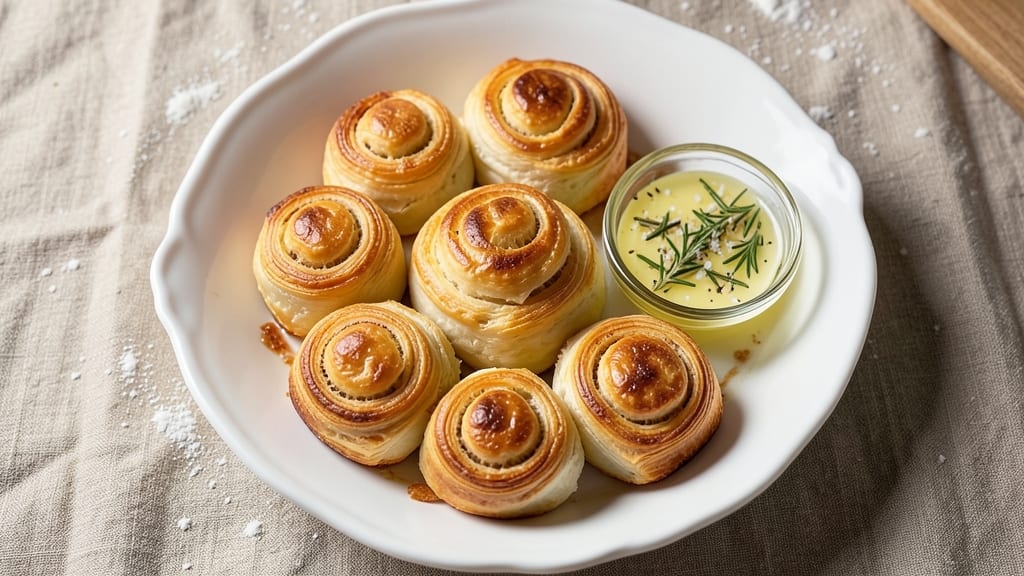
Creating flaky rolls that shatter with every bite is all about precision in layering and timing—something I perfected after years of test kitchen experiments. The secret lies in thin sheets of butter folded into the dough, which melt into delicate pockets during baking.
This recipe delivers restaurant-quality results at home, with a crisp exterior and tender, airy interior that pairs perfectly with soups or stews.
What sets these rolls apart is the foolproof lamination technique, where cold butter prevents melting during kneading while ensuring maximum flakiness. The dough rests twice—once after initial mixing and again after shaping—to relax the gluten and create those signature layers.
With just five simple ingredients and about 2 hours of hands-off time, you’ll have golden, buttery rolls ready for any meal.
By the time they emerge from the oven, your rolls will be golden brown with crisp edges and a delicate, melt-in-your-mouth texture. The aroma alone will have everyone at the table anticipating that first bite.
Whether serving with Sunday gravy or as a side for holiday feasts, these rolls elevate any dish with their professional-quality flakiness.
For extra shine, brush the baked rolls with melted butter while still warm—this simple step adds richness and ensures they stay soft for hours. The key is patience: don’t rush the chilling steps, and resist the urge to overbake.
Trust the process, and you’ll achieve rolls so light they’ll disappear faster than you can say "second helping."
Ingredients for flaky rolls
Five simple ingredients transform into golden, shatteringly flaky rolls with perfect layers.
| Ingredient | Amount | Notes |
|---|---|---|
| All-Purpose Flour 🌾 | 5 cups | Unbleached preferred for best texture |
| Unsalted Butter 🧈 | 1 ½ cups | Cold, cubed for lamination |
| Granulated Sugar 🍚 | 1 tbsp | For subtle sweetness |
| Instant Yeast 🍞 | 2 ½ tsp | Single-use packet recommended |
| Salt 🧂 | 1 tsp | Fine sea salt preferred |
| Warm Water 💧 | 1 ¼ cups | 110°F for optimal yeast activation |
| Large Eggs 🥚 | 1 whole | Room temperature for best mixing |
| Milk 🥛 | 1 tbsp | For brushing dough (optional) |
The butter is non-negotiable—European-style unsalted gives the best flavor and texture. Grab it from Whole Foods or the bakery section of your grocery store, where it stays cold. Look for blocks, not tubs, and keep it firm until you're ready to use it. The flour should be soft white (like King Arthur or Gold Medal), not bread flour—it's lighter and creates that signature tender crumb. If you're in a rush, King Arthur's bread flour works too, but reduce by 1 tbsp. The yeast? Fresh is better, but single-use packets last longer in the fridge.
No European butter? Plugrá or Land O'Lakes unsalted will work in a pinch, but they melt faster during lamination. The milk brush isn't mandatory, but it adds shine and keeps rolls soft longer—whole milk works best for richness. Short on flour? Add 1 tbsp vital wheat gluten to regular flour for better structure. The dough gets sticky during mixing, so have a bowl of flour nearby for wet hands. If your kitchen gets warm, chill the dough longer—it's better to wait than rush.
The butter layers must stay cold. Wrap the dough in plastic and refrigerate for at least 1 hour between folds. For make-ahead, shape rolls and freeze them on a tray before baking—they'll keep for 3 months. Once baked, store in an airtight container at room temperature for 2 days or freeze for up to 6 months. Reheat in a 350°F oven for 5-10 minutes to restore crispness.
Why You'll Love This Recipe
- Butter-Packed Layers: The cold butter sheets between dough folds? That’s the magic—every bite has that snap of flaky perfection. I swear, the first time I got it right, I nearly licked the rolling pin.
- Weeknight Ready: Mix, fold, chill, bake. That’s it. No kneading until your arms scream, no waiting for dough to rise all day. Honestly, I’ve made these after a long shift—just let the yeast do the work while I pour wine.
- Sweet or Savory Flex: Drizzle with honey for breakfast, brush with garlic butter for dinner, or toss in cinnamon sugar for dessert. Same dough, endless possibilities. My kids fight over the leftovers—(yes, even on a Tuesday night).
- Budget Stretch: A stick of butter and a bag of flour go a long way here. No fancy ingredients, just pure, satisfying carbs that fill the house with warmth. Between us, these rolls cost less than takeout but taste like a bakery’s secret.
Step-by-step instructions for flaky rolls
Here's how to create those legendary buttery layers that make every bite irresistible.
Mix the Dough Foundation
In a large mixing bowl, combine the 5 cups all-purpose flour, 1 tbsp granulated sugar, 2.5 tsp instant yeast, and 1 tsp salt. Whisk everything together until evenly distributed—you should see no more than a few small flour clumps remaining. This dry mix is your canvas, and getting it perfectly blended ensures an even rise and consistent texture throughout all 12 rolls.
Create a well in the center of the dry ingredients and pour in the 1.25 cups warm water (about 110°F). Using a wooden spoon or your hands, gradually incorporate the liquid into the dry ingredients until a shaggy dough begins to form. Here's the thing—don't overmix yet. You'll want to reserve some of that flour for later, so stop when the dough pulls away from the sides of the bowl but still feels slightly sticky to the touch.
Knead and Incorporate Cold Butter
Turn the dough out onto a lightly floured surface and begin kneading gently for about 2 minutes. You're not looking to develop gluten here—just enough to bring everything together into a cohesive mass. The dough will feel soft and slightly tacky, which is perfect for our next step.
Cut the 1.5 cups unsalted butter into ½-inch cubes and arrange them on the dough in a single layer. Fold the dough over the butter like you're wrapping a present, sealing the edges tightly. This is where the magic begins—those cold butter cubes will create the delicate layers that make these rolls so flaky. Give the dough a quick 30-second knead to distribute the butter evenly, then flatten it into a 1-inch thick rectangle. Wrap it tightly in plastic wrap and refrigerate for 30 minutes.
Laminate for Maximum Flakiness
Remove the dough from the refrigerator and unwrap it. Using a rolling pin, roll the dough out into a 12x8-inch rectangle—about ¼-inch thick. Fold it into thirds like a letter, with the top third overlapping the bottom third slightly. This creates three distinct layers of dough with butter sandwiched between them. Rotate the dough 90 degrees and repeat the rolling and folding process. Wrap it again and refrigerate for another 30 minutes.
This lamination process is what gives these rolls their signature flakiness. Each fold creates more layers, and the cold butter stays intact until it hits the hot oven, where it melts and creates those air pockets we all love. Real talk: Don't skip the chilling steps between folds—it keeps the butter from melting prematurely and ensures clean layers.
Shape and Proof the Rolls
After the final chill, roll out the dough one more time to 12x8 inches and cut it into 12 equal rectangles—about 2x4 inches each. Gently roll each rectangle into a log, starting from the long end, and place them seam-side down in a greased 9x13-inch baking pan. The rolls should fit snugly but not touch each other. Cover the pan with a clean kitchen towel and let them proof at room temperature for 1 to 1.5 hours, or until they've risen about 50%.
Here's where patience pays off. The rolls should look slightly puffy and feel springy to the touch when pressed gently. If they rise too quickly, they'll collapse in the oven. If they're slow to rise, give them a few more minutes—you're aiming for that perfect balance between airy and structured. Once they've proofed just right, preheat your oven to 375°F.
Bake to Golden Perfection
Brush the tops of the rolls lightly with the 1 tbsp milk (if using) for a subtle sheen and extra tenderness. Bake for 20 to 25 minutes until they're deep golden brown on top and sound hollow when tapped on the bottom. The aroma filling your kitchen at this point? Pure magic.
Let the rolls cool in the pan for 5 minutes before transferring them to a wire rack. They'll be tempting to eat straight from the pan, but waiting just a bit ensures they hold their shape when you serve them. These rolls should have layers so delicate they practically shatter when you pull them apart, with a buttery richness in every bite. Serve warm with honey butter or your favorite jam for the ultimate experience.
Pro Tips For Making Flaky Rolls
- Chill the Butter Properly: I learned this the hard way—when butter is too soft, your rolls turn out dense and greasy instead of flaky. Cut the unsalted butter into small cubes and freeze them for 15 minutes before mixing with flour. This keeps the dough tender enough to fold but firm enough to create those perfect layers.
- Weigh Your Flour: Scooping flour from the bag is a recipe for disaster—your rolls will be inconsistent. Use a kitchen scale for precision, aiming for 350-375g of all-purpose flour. Too much flour makes the dough tough, and too little means it won’t hold its shape when baking.
- Skip Overworking the Dough: I used to knead these rolls like I was punishing the dough, but that’s a surefire way to end up with chewy, not flaky, results. Mix just until the ingredients come together, then do the minimum folds required—overworking develops gluten, which kills the tender texture you’re after.
- Rest the Dough Twice: The first rest (after mixing) lets the gluten relax, and the second (after shaping) ensures even baking. Give the dough a 1-hour rest at room temp before shaping, then let the shaped rolls rise another 45-60 minutes. Rushing this step means unevenly baked, dense rolls—trust me, it’s worth the wait.
Regional styles of this recipe
Southern Biscuit Style
In the South, flaky rolls take on a heartier texture with a touch of baking powder for extra lift. Replace 2.5 tsp instant yeast with 1 tsp baking powder and 1 tsp baking soda for a lighter crumb.
I like to add 1 tbsp cornmeal to the flour for a slightly gritty texture—this is a nod to classic Southern biscuits. Brush the baked rolls with melted butter mixed with a pinch of salt for a savory finish.
These rolls are perfect for soaking up gravy or pairing with fried chicken. 🍗
French Brioche Rolls
For a richer, eggy variation, transform these rolls into brioche-style by adding 2 extra eggs and ¼ cup whole milk to the dough. The extra fat creates a tender, almost cake-like texture.
After shaping, proof the rolls in a 350°F oven with the light off for 20 minutes to encourage a gentle rise before baking at 375°F for 15-20 minutes. Brush with egg wash (1 egg + 1 tbsp water) for a golden, glossy finish.
These rolls are ideal for breakfast with jam or as a side for brunch dishes. 🥖
Italian Focaccia Rolls
Give your flaky rolls an Italian twist by adding 2 tbsp olive oil to the dough and shaping them into a 9x13-inch pan instead of individual rolls. After proofing, dimple the top with your fingers and bake at 400°F for 18-20 minutes until golden.
Finish with a sprinkle of flaky sea salt and fresh rosemary. These work beautifully as a side for pasta dishes or as a base for bruschetta. The olive oil adds a Mediterranean flair that pairs perfectly with tomato-based sauces. 🌿
German Pretzel Rolls
For a savory, pretzel-inspired version, add 1 tbsp baking soda to the dough and shape the rolls into knots. After proofing, boil them in water with 2 tbsp baking soda for 30 seconds before baking at 400°F for 12-15 minutes.
Brush with butter mixed with coarse salt after baking. These rolls have a chewy exterior and soft interior, making them a fantastic match for hearty German dishes like schnitzel or sauerkraut. 🥨
Japanese Melon Pan Rolls
Create a sweet-savory hybrid by shaping the dough into a loaf pan with a melon-like texture. Mix 1 tbsp sugar into the dough and bake at 350°F for 25-30 minutes. For extra flair, press a melon pattern into the top using a fork or a melon pan mold.
These rolls are perfect for breakfast or as a dessert with a dusting of powdered sugar. The subtle sweetness balances beautifully with savory dishes or even on its own. 🍈
Herbed Cheese Rolls
Add depth with ½ cup shredded cheddar and 1 tbsp fresh thyme or rosemary mixed into the dough. Shape the rolls as usual and bake as directed. The cheese melts into the layers, creating a rich, savory flavor that pairs well with soups or as a snack with beer.
For extra indulgence, sprinkle garlic powder on top before baking. These rolls are a crowd-pleaser for game day or holiday gatherings. 🧀
Nutrition facts
Frequently asked questions
Why do my flaky rolls turn out dense instead of light?
Overworking the dough or skipping chilling steps between folds is the most common culprit. The butter needs to stay cold during lamination—if it melts too soon, the layers won't form properly. Also, ensure your yeast is fresh and the water is 110°F (not hotter) to activate it gently. For extra flakiness, fold the dough just 3 times maximum.
Can I make these rolls without a stand mixer?
This recipe works perfectly by hand. After mixing the dough, simply turn it onto a floured surface and knead gently for 2 minutes—just enough to combine. The butter layers are created through folding, not mixing power. A rolling pin and your forearms are all you need for the lamination process.
How do I store leftover flaky rolls?
For short-term storage, keep them in an airtight container at room temperature for 2 days. To revive crispness, reheat in a 350°F oven for 5-10 minutes. For longer storage, freeze shaped (unbaked) rolls on a tray for 3 months or baked rolls for 6 months. Wrap individually in plastic and thaw overnight in the fridge.
What's the best way to test if the dough is ready to bake?
Press gently on the proofed rolls—they should spring back slowly (about 50% rise) and feel slightly firm to the touch. If they spring back quickly, they need more time. For visual confirmation, the rolls should look puffy with slightly rounded tops. Tap the bottom lightly—if it sounds hollow, they're ready for the oven.
Can I substitute butter with something else for flaky texture?
While butter is ideal for flavor and texture, you can use cold shortening or lard in a pinch (though flavor will differ). For a dairy-free option, try coconut oil (solid at room temperature), but expect slightly less flakiness. The key is keeping the fat cold during lamination—never use melted alternatives. Shortening works best for maximum layer separation.