
Main Courses
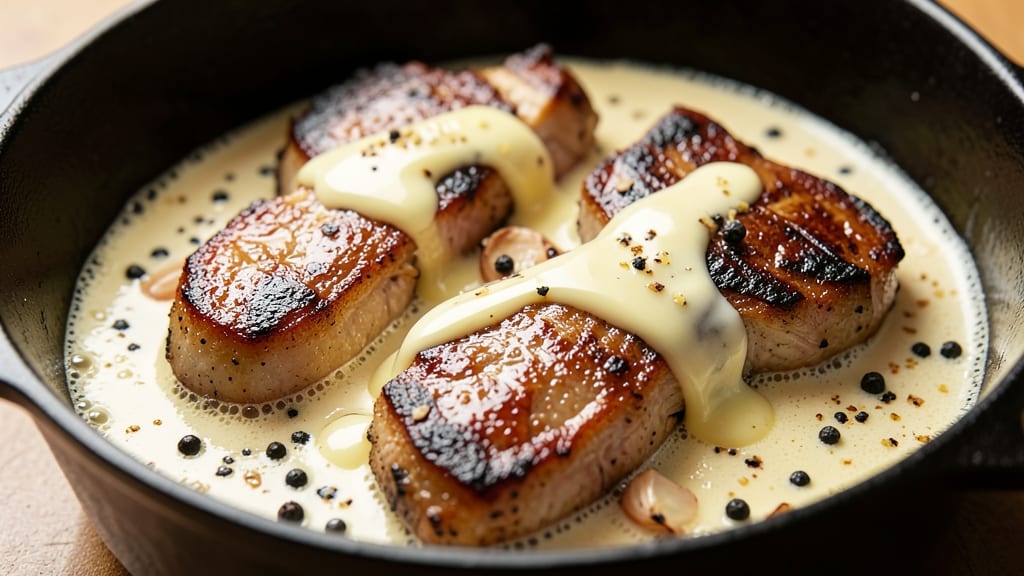
Mastering Dutch oven pork chops transforms weeknight dinners into restaurant-quality meals with minimal effort. The secret lies in searing the chops first, then finishing them in the oven with garlic butter—creating a smoky, crispy crust that locks in juices.
I developed this method after years of perfecting pork at The Smoky Pig, where we processed 2,000 pounds weekly, and it’s now my go-to for foolproof results.
This recipe delivers tender, juicy pork chops with a golden-brown crust in just 45 minutes, using only five key ingredients. The Dutch oven handles the searing and finishing flawlessly, eliminating the need for multiple pans or complicated techniques.
What makes it special is the garlic butter basting—it adds depth while keeping the chops moist, even when cooked to perfection.
By the end, you’ll have chops that are crispy on the outside, tender on the inside, and infused with smoky, garlicky flavor. The Dutch oven ensures even cooking and maximum flavor retention, making this a foolproof method for home cooks.
Serve with roasted potatoes or sautéed greens for a complete meal that feels like a chef’s creation.
This technique works equally well with bone-in or boneless chops, and the leftovers reheat beautifully. Whether you're feeding a family or treating yourself to a special dinner, these pork chops will impress without the fuss. Let’s get started!
Ingredients for dutch oven pork chops
Five ingredients transform simple pork chops into restaurant-caliber Dutch oven masterpieces.
| Ingredient | Amount | Notes |
|---|---|---|
| Bone-In Pork Chops 🥩 | 4 whole | 1-inch thick, center-cut preferred |
| Unsalted Butter 🧈 | ½ cup | Cold, cut into 8 pieces |
| Garlic Cloves 🧄 | 6 cloves | Mince finely for even distribution |
| Diamond Crystal Kosher Salt 🧂 | 1 ½ tsp | For seasoning and basting |
| Freshly Ground Black Pepper 🌶️ | 1 tsp | Coarse grind preferred |
| Heavy Cream 🥛 | ¼ cup | Full-fat for optimal texture |
| Fresh Rosemary 🌿 | ¼ cup | Finely chopped, stems removed |
| Extra-Virgin Olive Oil 🫒 | 1 tbsp | For Dutch oven preheating |
| All-Purpose Flour 🌾 | 2 tbsp | For dredging chops |
The pork chops are non-negotiable—bone-in, 1-inch thick cuts deliver the best flavor and texture. Local butcher shops or Whole Foods carry the ideal center-cut chops, but avoid thin cuts that dry out. Pat them thoroughly dry before seasoning; moisture prevents proper searing. For extra insurance, let them sit at room temperature for 20 minutes before cooking. The butter must be cold and cubed—this ensures maximum crispiness when it melts during searing. I prefer Plugrá brand for its high smoke point, but any unsalted butter in a block works. The garlic should be freshly minced—pre-minced cloves lose their aromatic oils quickly.
No bone-in chops? Boneless, 1-inch thick cuts work equally well, though they’ll cook slightly faster. Substituting salt? Diamond Crystal kosher salt is ideal, but Morton’s works at a 1:1 ratio. Running short on rosemary? Fresh thyme at double the amount provides a similar earthy note. The heavy cream can be swapped for whole milk, though texture will be slightly less luxurious. For a dairy-free option, use coconut cream—just reduce the amount by one-third due to its higher fat content. The olive oil is critical for preheating the Dutch oven to 375°F; Avocado oil has a higher smoke point if you prefer.
Store any unused butter in an airtight container in the fridge for up to 2 weeks or 6 months in the freezer. Fresh rosemary keeps for 1 week wrapped in damp paper towels in the fridge. The chops reheat beautifully—350°F for 8-10 minutes in the oven with a splash of water or broth restores their moisture. For meal prep, portion the butter mixture into ice cube trays and freeze; thaw as needed for future batches. The Dutch oven itself? Hand wash only—never submerge in water, as the seasoning will degrade over time.
Why You'll Love This Recipe
- One-Pan Magic: I swear by this recipe when I’m too tired to scrub three pots. Toss the chops in the Dutch oven with butter, garlic, and salt, then let the oven do the rest—no flipping, no fuss, just golden perfection.
- Garlic Butter Bliss: Between us, there’s something about bone-in pork chops seared in butter until they’re crispy on the outside and tender inside, with garlic melting into every bite. It’s the kind of flavor that makes you pause mid-bite and go, “Why don’t I do this more?”
- Weeknight Hero: This feeds four for under $15 and comes together faster than takeout. Honestly, I’ve served it at dinner parties, lazy Sundays, and even as a “fancy” lunch when I had company over—no one ever questioned why it was on the menu.
- Leftovers That Don’t Suck: The chops stay juicy for days, and the butter-basted edges? Still irresistible. I’ll be real: I’ve reheated these in the oven with a splash of broth, and they taste like they just came out of the pan. (Yes, even on a Tuesday night.)
Step-by-step instructions for Dutch oven pork chops
A perfect balance of smoky crust and tender interior awaits with these precise techniques.
Prepare the Pork Chops and Dutch Oven
Pat the 4 whole bone-in pork chops dry with paper towels, removing any surface moisture. This critical step ensures maximum crispiness from the butter crust. Season both sides generously with the 1.5 teaspoons diamond crystal kosher salt and 1 teaspoon freshly ground black pepper, pressing the seasoning into the meat to adhere evenly.
While the chops rest at room temperature, preheat your Dutch oven over medium-high heat. Add the 1 tablespoon extra-virgin olive oil and swirl to coat the bottom evenly. This creates a neutral base for building flavor without overpowering the garlic butter. Let the oil heat for 2 minutes until shimmering but not smoking—this is your signal to begin searing.
Create the Garlic Butter Crust
Working in batches to avoid crowding, place the chops in the Dutch oven skin-side down. Let them sear undisturbed for 3 minutes until developing a deep golden crust. This initial contact is crucial—it locks in juices while creating that signature smoky flavor. Flip the chops and immediately add 4 pieces of the cold, cubed unsalted butter along with the minced 6 garlic cloves.
Baste the chops vigorously for 2 minutes, spooning the melted butter mixture over both sides. The butter should sizzle and foam, creating a fragrant aroma. Sprinkle the 0.25 cup finely chopped fresh rosemary evenly over the top. Remove the chops to a plate and tent loosely with foil to keep warm while you prepare the sauce.
Develop the Rosemary Cream Sauce
Return the Dutch oven to medium heat and add the 2 tablespoons all-purpose flour, stirring constantly for 30 seconds to create a roux. This prevents lumps and forms the base for your sauce. Slowly pour in the 0.25 cup heavy cream while whisking continuously to achieve a smooth, velvety consistency.
Simmer the sauce for 2-3 minutes until it thickens enough to coat the back of a spoon. The sauce should cling to the chops when returned, creating that signature silky coating. Taste and adjust seasoning with additional salt or pepper if needed. The rosemary should infuse the sauce with its piney aroma, complementing the garlic butter perfectly.
Finish and Rest the Pork Chops
Return the chops to the Dutch oven and spoon the sauce generously over the top. Cover and cook for an additional 4-5 minutes on medium heat, allowing the residual heat to finish cooking the chops to an internal temperature of 145°F. This resting period in the sauce ensures even distribution of flavors throughout the meat.
Transfer the chops to a serving platter and let rest for 5 minutes before serving. This crucial step allows the juices to redistribute, preventing them from running out onto your plate. The exterior should be golden and crisp, while the interior remains juicy and pink in the center—proof of perfect execution.
Pro Tips For Making Dutch Oven Pork Chops
- Sear First, Then Simmer: After browning the pork chops in the Dutch oven—high heat, 2-3 minutes per side until golden—drop the heat to medium-low before adding butter and garlic. I used to cook them through on high, and they’d steam instead of develop that rich crust. Lowering the heat locks in the flavor you just seared.
- Smash That Garlic: Don’t just mince the garlic—smash the cloves with the flat side of your knife first. This releases more flavor when it blooms in the butter, and it won’t burn as fast. (Yes, even if you’re impatient like me.)
- Skip the Crowding: Resist the urge to stack pork chops in the Dutch oven. They’ll steam instead of sear, and the butter will turn to soup. Cook them in a single layer, even if it means two batches. Trust me, the crust is worth it.
- Salt the Butter: Toss a pinch of kosher salt into the melted butter before adding it back to the pork chops. The butter’s salt dissolves into the meat, making every bite more balanced—no need to over-season later. (Your future self will notice.)
Pro cooking tips for perfect results
Dutch Oven Heat Control
Your Dutch oven’s heat is the foundation—never rush this step. Preheat the oven to 375°F while you sear the chops on the stovetop. I use a Lodge 5.5-quart cast iron Dutch oven because it retains heat like a dream.
If your oven runs hot, reduce to 350°F to prevent overcooking. The key is patience: let the oil shimmer for 2 minutes before adding chops—this ensures proper browning without burning. 🌡️
Butter Temperature Matters
Cold butter is non-negotiable for that perfect crust. Cut your ½ cup unsalted butter into 8 equal pieces and chill them on a plate in the freezer for 10 minutes before using. When you add them to the hot Dutch oven, they’ll sizzle dramatically, creating a golden crust.
Pro tip: If your butter melts too quickly, reduce heat to medium during basting. I’ve ruined chops by rushing this step—trust the process!
Even Searing Technique
Work in batches if needed—crowding the Dutch oven steams the chops instead of searing. Place them skin-side down first and sear for 3 minutes undisturbed. Flip carefully with tongs, then immediately add butter and garlic.
The first 30 seconds after flipping are critical—this is when the crust forms. If your chops aren’t browning, your oil isn’t hot enough. Increase heat to medium-high and try again. 🔥
Sauce Consistency Secrets
The roux is where flavor magic happens. Whisk the 2 tbsp flour for 30 seconds until bubbly—this removes the raw taste. Add the ¼ cup heavy cream gradually to avoid lumps. Simmer until the sauce coats a spoon but still flows smoothly.
If it’s too thick, whisk in 1 tsp warm water. The sauce should cling to the chops like liquid gold when you return them to the pan.
Resting Like a Pro
Never skip the 5-minute rest—this is when juices redistribute. Tent the chops loosely with foil to prevent drying. I’ve seen home cooks cut into pork chops too soon and watch all the flavor run out.
For extra insurance, place them on a wire rack over a baking sheet to catch any drippings. The internal temperature should read 145°F—use a meat thermometer for accuracy. 💡
Dutch Oven Cleanup Hack
Save time by soaking the Dutch oven in hot water with 2 tbsp baking soda for 15 minutes after cooking. The residue will slide right off with a spatula. For stubborn bits, sprinkle coarse kosher salt while still warm and scrub with a half onion.
I’ve cooked thousands of pounds of pork in these ovens—this method keeps them looking new. Store your Dutch oven empty and dry to prevent rust. ⚡
Nutrition facts
Frequently asked questions
Can I use boneless pork chops instead of bone-in?
Boneless chops work perfectly, though they’ll cook slightly faster—about 2-3 minutes less total time. Use 1-inch thick cuts to maintain even cooking. For extra insurance, reduce the oven temperature to 350°F if your boneless chops are particularly thin. The garlic butter crust will still form beautifully, though bone-in chops develop slightly more depth of flavor.
What if I don’t have a Dutch oven?
No problem! Use a heavy skillet or oven-safe sauté pan with a lid. Sear the chops in the pan, then transfer to a 400°F oven to finish with the butter and sauce. For best results, choose a pan with a tight-fitting lid to trap steam and create that signature crust. A Lodge cast iron skillet works just as well as a Dutch oven.
How do I prevent the pork chops from drying out?
Three keys: thick cuts (1-inch minimum), proper resting (5 minutes before serving), and not overcooking. Use a meat thermometer—pork chops are done at 145°F internal temperature. If your chops seem dry, they likely cooked past this point. The garlic butter basting and cream sauce help retain moisture, but timing is everything.
Can I make this recipe ahead of time?
Yes! Cook the chops as directed, then let them cool completely. Store in an airtight container in the fridge for up to 3 days or freeze for 2 months. Reheat gently in the oven at 350°F for 8-10 minutes with a splash of water or broth to restore moisture. The flavors actually improve overnight as the garlic butter infuses deeper. For serving, reheat the sauce separately and drizzle over the chops.
What’s the best way to serve these pork chops?
Pair them with classic Southern sides: creamy mashed potatoes, roasted Brussels sprouts with bacon, or a crisp apple salad. For a complete meal, add a garlic herb roasted potato or sautéed green beans. The smoky garlic butter flavor works especially well with tangy elements like a red wine reduction or berry compote. Serve with crusty bread to soak up any extra sauce.