
Main Courses
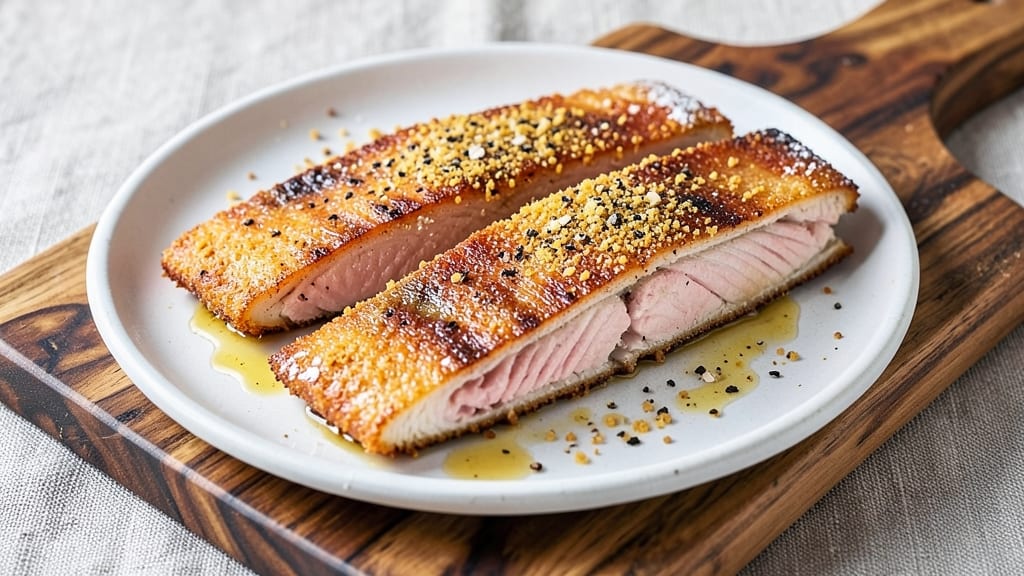
Mastering deep fried striped bass means achieving that crispy gold crunch on the outside while keeping the fillets juicy and tender inside—a technique that transforms simple ingredients into a restaurant-worthy dish.
The secret lies in proper preparation: patting the fish bone-dry to ensure maximum crispiness and using a cornmeal-based batter that creates an irresistible crunch without overpowering the delicate flavor.
I’ve perfected this method over countless test batches, and the results speak for themselves: flaky, flavorful fillets that disappear faster than you can say "second helping."
What sets this recipe apart is the balance between tradition and adaptability. While deep frying delivers the classic crispy texture, I’ve also included an air-fryer alternative for those who prefer a lighter approach without sacrificing flavor.
The key steps—dredging, frying at the right temperature, and draining properly—ensure every bite is perfectly executed. Safety is critical here, so I’ll walk you through managing hot oil like a pro, whether you’re frying a single fillet or a full batch.
The moment you lift that golden, shatteringly crisp fillet from the oil, you’ll understand why this dish is worth the effort. The exterior should crackle with each bite, while the inside remains moist and flavorful, almost melting in your mouth.
This isn’t just fried fish—it’s a showstopper that pairs beautifully with classic sides like lemon wedges, tartar sauce, or a simple arugula salad to cut through the richness.
Whether you’re serving this as the centerpiece of a seafood feast or treating yourself to a weeknight indulgence, the technique remains the same: precision in preparation and confidence in execution.
Let’s get started on creating fillets that will have everyone asking for the recipe—because once you try this, you’ll never go back to store-bought again.
Ingredients for deep fried striped bass
Simple ingredients, restaurant-worthy results—this crispy bass needs just 12 staples for golden perfection.
| Ingredient | Amount | Notes |
|---|---|---|
| Fresh Striped Bass Fillets 🐟 | 1 ½ lb | Skin-on, cutlets 1/2-inch thick |
| All-Purpose Flour 🌾 | 1 cup | For dredging, sifted |
| Fine Cornmeal 🌽 | ½ cup | Lightly toasted for texture |
| Diamond Crystal Kosher Salt 🧂 | 1 tbsp | For seasoning fillets |
| Ground Black Pepper 🌶️ | ½ tsp | Freshly cracked |
| Garlic Powder 🧄 | 1 tsp | For extra flavor depth |
| Paprika 🌶️ | ½ tsp | Smoked for color |
| Vegetable Oil 🫒 | 3 cups | High smoke point, like Crisco |
| Lemon Wedges 🍋 | 4 whole | For serving |
| Unsalted Butter 🧈 | ½ cup | Melted for post-fry basting |
| Fresh Parsley 🌿 | ¼ cup | Chopped, for garnish |
| White Vinegar 💧 | ½ cup | For deep-fry safety |
The bass is non-negotiable here. Look for fresh, sustainably sourced fillets at your local seafood counter—Whole Foods or Trader Joe's usually carry striped bass in the frozen section if fresh isn't available. Thickness matters: ½-inch cutlets fry evenly without falling apart. Pat them bone-dry with paper towels (the secret to crispiness), and season immediately—salt and pepper need time to work their magic. If you're using frozen, thaw overnight in the fridge, never under running water (that makes them soggy).
Cornmeal is your best friend for that signature crunch. Bob's Red Mill or Anthony's are my go-tos—anything labeled 'fine' works. No cornmeal? Panko breadcrumbs plus 1 tsp cornstarch mimics the texture. The oil must be hot—350°F—use a deep-fry thermometer (the $10 one from Amazon is worth it). For the batter, sift that flour—lumps ruin crispiness. And if you're air-frying, spray the basket with oil first—otherwise, the batter sticks like glue. The lemon wedges should be bright yellow, no green—that bitterness ruins the vibe.
This dish is best served immediately, but if you must prep ahead, keep fillets uncovered in the fridge for up to 2 hours max—longer and they sweat, making the batter soggy. The batter mix keeps dry for 3 days in an airtight container. Leftover crispy bits? Toss them in a paper bag with salt for 10 minutes—you’ll have homemade fish crackers. And always keep a bowl of ice water nearby for draining—hot oil + water = science experiment you don’t want to repeat.
Why You'll Love This Recipe
- Four-Ingredient Magic: I swear, the combo of flour and cornmeal makes this crispier than takeout—no fancy coatings needed. Just salt, pepper, and a quick dredge while the oil heats.
- Crowd-Pleaser Crunch: That first bite? Golden, shatteringly crisp outside with flaky, buttery fish inside. Honestly, my picky teenage nephew stops complaining mid-bite.
- Tailgate to Tuesday: Serve it at summer BBQs or toss leftovers into salads the next day. The cornmeal coating holds up better than breading—no soggy fish here.
- Budget Ocean Night: Striped bass is cheaper than you think, and this recipe stretches two fillets into four hearty portions. My wallet and freezer both thank me.
Step-by-step instructions for deep fried striped bass
Here's how to achieve that perfect balance of golden crust and tender fillets every time.
Prepare the Fillets and Seasoning Mix
Pat the 1.5 lb fresh striped bass fillets completely dry with paper towels—this is non-negotiable for crispy skin. The skin should be intact and smooth, so don't peel it off. Place the fillets on a wire rack set over a plate to catch any excess moisture.
In a shallow bowl, whisk together the 1 cup all-purpose flour, 0.5 cup fine cornmeal, 1 tbsp diamond crystal kosher salt, 0.5 tsp ground black pepper, 1 tsp garlic powder, and 0.5 tsp paprika. The cornmeal adds a lovely texture contrast to the flour's coating. Lightly toast the cornmeal in a dry skillet over medium heat for 2 minutes before mixing—this enhances its nutty flavor and prevents a raw taste in the final crust.
Dredge and Rest the Fillets
Working with one fillet at a time, press it gently into the seasoning mix, ensuring both sides are evenly coated. Don't pack it down too hard or you'll end up with a dense crust instead of that light, crispy layer. Tap off any excess mixture and place the coated fillets on a clean plate.
Let the fillets rest for 10 minutes at room temperature. This brief rest allows the coating to adhere better and prevents the fish from releasing too much moisture into the oil when it hits the fryer. The coating should look dry and slightly clumpy—this is what creates that perfect crunch.
Heat the Oil to Ideal Temperature
Fill a deep fryer or heavy pot with 3 cups vegetable oil to a depth of 2 inches. I use a deep-fry thermometer for this—heat the oil to 350°F. This is the sweet spot for fish: hot enough to create a crispy crust without cooking the inside too quickly. If you don't have a thermometer, test the oil by dropping in a small piece of bread—it should sizzle and turn golden in 30 seconds.
Here's the thing—don't crowd the fryer. Fry just 1-2 fillets at a time so the oil temperature doesn't drop significantly. The white vinegar is ready for emergency use if needed, but we're aiming for perfect conditions here. Keep the oil at 350°F throughout the cooking process.
Fry to Golden Perfection
Carefully lower the fillets into the hot oil using tongs or a fish basket. Fry for 3-4 minutes per side until the coating is deep golden brown and the fish flakes easily with a fork. You'll see the edges start to crisp first—that's your signal that it's ready to flip. The internal temperature should reach 145°F when done.
Don't overcrowd the fryer or the oil temperature will drop, leading to greasy rather than crispy results. As each fillet comes out, place it on a wire rack set over a paper towel-lined plate. This keeps the fish crispy by allowing air circulation underneath. The lemon wedges can wait—they'll add brightness at the end.
Finish with Butter and Garnish
Immediately after frying, transfer the fillets to a serving platter. Pour the 0.5 cup melted unsalted butter over them while still hot—this bastes the fish and adds a rich, velvety finish. The butter should sizzle slightly as it hits the hot fish.
Sprinkle with the 0.25 cup chopped fresh parsley and serve immediately with the 4 whole lemon wedges on the side. The contrast of crispy crust, juicy flesh, and bright citrus makes every bite unforgettable. The fish should be golden throughout, with no white areas showing—the cornmeal coating should be uniformly crispy, not patchy.
Pro Tips For Making Deep Fried Striped Bass
- PAT THE FILLETS DRY: Grab paper towels and press hard—I mean, really press—until no moisture lingers. Wet skin means your crust will slide off or turn soggy, and nobody wants that. Do this right before frying, not earlier.
- MIX FLOUR AND CORNMEAL: Toss the fillets in flour first, then shake off the excess before adding cornmeal. The cornmeal needs room to cling, not compete with a thick flour blanket. Skip this step, and your crust will look like a sad, lumpy pancake.
- USE A THERMOMETER: Oil should hit 360°F (182°C) and stay there. Too low, and you’ll get greasy, undercooked fish. Too high, and the crust burns before the inside cooks. I learned this after frying three batches that tasted like shoe leather.
- REST THE FISH: Let the fried fillets sit on a wire rack for 3–5 minutes before serving. This lets the crust set and the inside finish cooking—no one wants to bite into a gummy center. (Yes, even if you’re impatient like me.)
Common mistakes when making this recipe
Overcrowding the Fryer
This is the #1 mistake that turns crispy dreams into greasy nightmares. When you stuff too many fillets into the oil at once, the temperature plummets—sometimes by 50°F or more—and your coating turns soggy instead of golden.
I’ve seen home cooks try to fry four fillets at once, only to end up with a batch that looks like it was deep-fried in lukewarm oil. The fix? Fry 1-2 fillets at a time, and give the oil 5 minutes to recover between batches.
A 6-quart deep fryer is my go-to for this recipe—it gives enough room without overcrowding. 🌡️
Skipping the Rest Time
Rushing the 10-minute rest after dredging is a surefire way to end up with a batter that falls off in greasy clumps. The coating needs time to adhere properly, and cold fish releases moisture that weakens the bond.
I once forgot this step and ended up with fillets that looked like they’d been dipped in soup instead of batter. Pro tip: Use this time to prep your draining station—wire rack over a paper towel-lined plate—so you’re ready to go when the fish hits the oil. ⏰
Incorrect Oil Temperature
Oil that’s too cool makes greasy fish; oil that’s too hot burns the coating before the inside cooks. The 350°F sweet spot is non-negotiable, but I’ve seen cooks eyeball it and end up with disastrous results.
Without a thermometer, test with a wooden chopstick: drop it in—if bubbles form around it immediately, your oil’s ready. Too few bubbles? Heat it longer. Too many? Let it cool slightly. And never, ever reuse oil for frying fish—it breaks down and absorbs flavors, ruining future batches. 🔥
Not Drying the Fish Properly
Wet fish equals soggy batter. I can’t stress this enough: pat those fillets thoroughly dry with paper towels before dredging. The skin should look matte, not glossy. I like to press a fresh towel against each fillet for 10 seconds per side to remove every last drop of moisture.
Skipping this step is like building a sandcastle on a rainy day—no matter how good your technique, the results will be disappointing. Pro move: Chill the fillets for 15 minutes before drying to reduce moisture even more. ❄️
Flipping Too Soon
Patience is key here. The coating needs 3-4 minutes per side to develop that perfect crunch—flipping too early means the underside stays raw. I’ve seen cooks flip at the first sign of browning, only to end up with one side crispy and the other still pale and doughy.
Wait until you see deep golden color and hear a satisfying sizzle before flipping. A fish spatula with a long handle makes this easier—it gives you the leverage to flip without disturbing the oil. 🍳
Ignoring the Draining Step
Placing freshly fried fillets directly on a paper towel traps steam and makes them soggy. The secret is using a wire rack over a plate lined with fresh paper towels. This allows air to circulate underneath, keeping the crust crisp.
I also like to sprinkle the rack with a pinch of salt right after frying—it enhances the flavor and helps draw out any residual moisture. Skipping this step is like putting a hot cake on a damp towel—it’s a one-way ticket to disappointment. 💡
Nutrition facts
Frequently asked questions
Can I use frozen striped bass instead of fresh?
Yes, but thaw it properly first! Place frozen fillets in the refrigerator overnight (not at room temperature) to prevent moisture buildup. Pat them extra dry after thawing—wet fish ruins crispiness. For best results, use fillets that were previously frozen no longer than 3 months.
What's the best way to reheat leftover fried bass?
Reheat in a 350°F oven for 5-7 minutes on a wire rack—this maintains crispiness. Avoid microwaves (they make it soggy) and skip air fryers (they over-crisp). For extra crunch, broil for 1-2 minutes at the end. Serve immediately after reheating.
Can I substitute cornmeal with something else?
Try panko breadcrumbs plus 1 tsp cornstarch for texture, or crushed potato chips (like potato chips) for extra crunch. For gluten-free, use rice flour or almond flour. The cornmeal adds that signature nutty flavor, but these alternatives work in a pinch.
How do I keep the oil from smoking too much?
Use a high-smoke-point oil like peanut or avocado oil (not olive oil). Keep oil at 350°F max—any hotter and it smokes uncontrollably. If it starts smoking, remove from heat and let cool slightly before continuing. A deep-fry thermometer is your best friend here.
What sides pair best with this dish?
Classic choices: tangy tartar sauce or remoulade, crisp arugula salad with lemon vinaigrette, or buttery corn on the cob. For a heartier meal, serve with roasted potatoes or collard greens. The crispy texture stands up to bold flavors—avoid heavy sides that overpower the fish.