
Main Courses
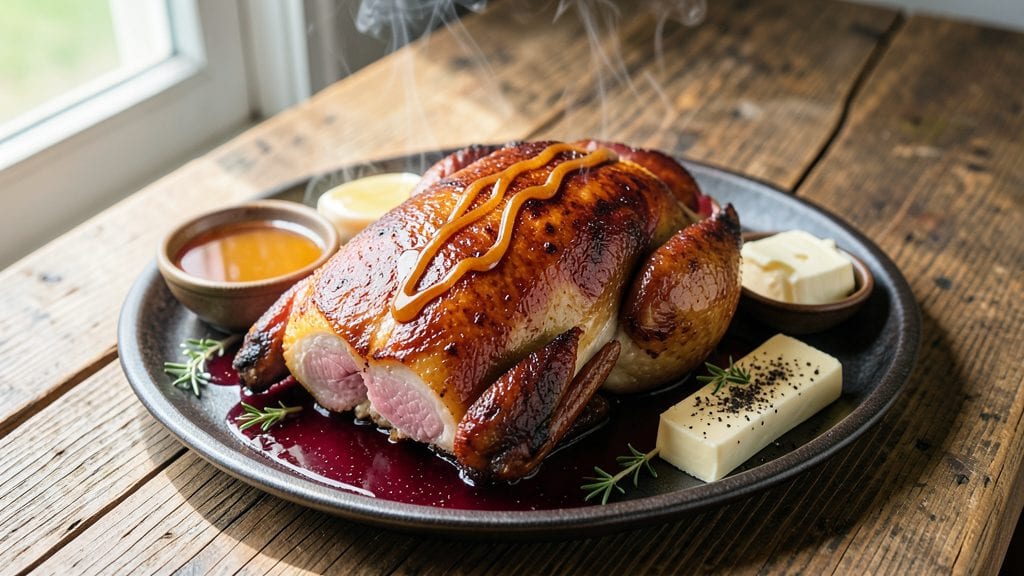
Mastering Danish roast duck transforms a simple dinner into a showstopping centerpiece with its signature crispy skin and juicy meat—the kind that makes every bite worth the effort.
The secret lies in precise technique: starting the duck skin-side down in a cold pan, then gradually increasing heat to render fat while keeping the meat tender.
This method ensures that golden, shatteringly crisp skin forms without drying out the interior, a balance that takes practice but delivers restaurant-quality results every time.
The traditional Danish approach focuses on simplicity: just salt, pepper, and time. However, I’ve added a modern twist with a pan sauce that captures all the rendered duck fat, creating a rich, glossy reduction with just a splash of port and a touch of honey.
This sauce elevates the dish from ordinary to extraordinary, cutting through the richness of the meat with a perfect balance of sweet and savory. The process may seem intimidating at first, but once you’ve nailed the timing and temperature, it becomes a foolproof technique.
What you’ll end up with is a juicy, perfectly cooked duck with skin so crisp it crackles with every bite, served alongside a glossy pan sauce that ties the entire meal together.
The duck’s natural fat renders slowly, basting the meat as it roasts, while the sauce—made from the same fat—adds depth and complexity. This dish is elegant enough for a special occasion but simple enough for a weeknight dinner, making it a versatile addition to any cook’s repertoire.
For a complete Danish experience, pair the duck with Danish potatoes—crispy on the outside, tender inside—or a side of red cabbage braised with apples and spices.
The combination of textures and flavors creates a meal that’s both comforting and impressive. Let’s get started on this classic dish with a modern twist.
Ingredients for danish roast duck
The foundation of restaurant-quality Danish roast duck lies in these eleven ingredients.
| Ingredient | Amount | Notes |
|---|---|---|
| Whole Duck 🦆 | 5 lb | Fresh, skin-on preferred |
| Diamond Crystal Kosher Salt 🧂 | 1 ½ tbsp | Coarse grain for crispy skin |
| Freshly Ground Black Pepper 🌶️ | 1 tsp | Cracked peppercorns preferred |
| Dry Red Port Wine 🍷 | ½ cup | Ruby Port for depth of flavor |
| Local Honey 🍯 | 1 tbsp | Wildflower preferred for floral notes |
| Unsalted Butter 🧈 | 2 tbsp | European-style for higher fat content |
| Fresh Thyme Sprigs 🌿 | 2 whole | Stems removed for garnish |
| Shallots 🧅 | 2 whole | Minced for pan sauce |
| Garlic Cloves 🧄 | 4 cloves | Peeled, smashed for sauce |
| Fresh Parsley 🌿 | ¼ cup | Chopped for garnish |
| Granulated Sugar 🍚 | 1 tsp | Balances acidity in sauce |
The duck is the star, so source a 5-pound fresh duck from a specialty butcher like D'Artagnan or your local high-end grocer—avoid frozen unless absolutely necessary. Look for even fat distribution and bright pink skin, not yellowed or discolored. The coarse Diamond Crystal kosher salt is non-negotiable for achieving that signature crisp; its larger granules create better texture than table salt. For the port, Ruby Port adds depth without overpowering, while local honey should be liquid at room temperature—if it's crystallized, warm it gently. Thyme and parsley should be vibrant green, not wilted, as they contribute both flavor and presentation.
No Ruby Port? Dry sherry or even a good red wine reduction works in a pinch, though the flavor profile will shift slightly. Substituting honey with maple syrup maintains sweetness but lacks floral complexity. For the shallots, yellow onions in a bind will do, though they're slightly sharper. The butter must be unsalted—adding salt here would disrupt the sauce's balance. If you can't find European-style butter, high-fat American butter (86% fat content) is the next best option. The sugar is optional but recommended for brightening the sauce—omit if you prefer a more traditional reduction.
Store the duck in its original packaging in the coldest part of your fridge for up to 3 days before roasting. The port and honey can be mixed ahead and refrigerated for 1 week, while the fresh herbs should be wrapped in damp paper towels and stored in a sealed container for 5 days. The rendered duck fat from roasting can be stored in a sealed jar in the refrigerator for 3 months—use it for future pan sauces or roasting vegetables. For a complete Danish spread, prepare the potatoes and red cabbage sides simultaneously, as they share similar cooking times.
Why You'll Love This Recipe
- Foolproof Roast: I swear, the salt and pepper crust locks in flavor without needing to baste or fuss. Just rub, roast, and let the duck do the work—no thermometer drama, no guesswork.
- Port-Honey Magic: That red port wine glaze? It’s like someone poured liquid caramel into the pan. The honey balances the richness, and the crust gets this glossy, crackly perfection that tastes like a fancy dinner.
- Leftovers for Days: Roast a duck once, eat it three ways. Shred the meat for sandwiches, crisp the skin for salads, or toss it into pasta—it’s the ultimate lazy dinner ingredient that still feels special.
- Weeknight Feast: Honestly, this is my go-to for when friends drop by unannounced. One pan, minimal cleanup, and zero stress. The duck’s natural fat renders into crispy skin while you sip wine and pretend you’re a chef.
Step-by-step instructions for Danish roast duck
Master the art of achieving perfect crispy skin and tender, juicy meat with this precise method.
Prepare the Duck for Optimal Crispiness
Begin by removing the duck from the refrigerator and letting it sit at room temperature for 30 minutes. This ensures even cooking throughout. Pat the duck completely dry with paper towels, both inside and out, focusing on the skin. Moisture is the enemy of crispy skin—every drop must be removed. Using your fingers, gently loosen the skin over the breast meat to create a pocket.
Season the duck generously with 1.5 tablespoons of Diamond Crystal Kosher Salt and 1 teaspoon of Freshly Ground Black Pepper, rubbing it all over the skin and into the cavity. The coarse salt will help render fat and create that signature crispy texture. Insert the 2 whole Fresh Thyme Sprigs into the cavity, along with 1 tablespoon of Local Honey and 1 teaspoon of Granulated Sugar. The honey will caramelize during roasting, adding depth of flavor, while the sugar balances the acidity of the port wine later.
Roast the Duck to Golden Perfection
Preheat your oven to 375°F. Place the duck breast-side up on a rack set inside a roasting pan. The rack elevates the duck, allowing hot air to circulate underneath and render the fat evenly. Roast for 1 hour and 45 minutes, or until the skin is deep golden brown and the internal temperature at the thickest part of the thigh reaches 165°F. Do not baste the duck—this disrupts the skin's ability to crisp.
Here's the thing—if the skin starts browning too quickly, tent it loosely with aluminum foil to prevent burning while still allowing the fat to render. The duck is done when the skin is crisp enough to crackle under your fingers and the juices run clear when pierced with a meat thermometer. Remove the duck from the oven and transfer it to a cutting board, tenting it loosely with foil to rest for 20 minutes. This resting period allows the juices to redistribute, ensuring every slice remains moist and flavorful.
Render the Fat and Build the Pan Sauce
While the duck rests, place the roasting pan on the stovetop over medium heat. Carefully pour off all but 2 tablespoons of the rendered duck fat from the pan—you’ll need this for the sauce. Add the 2 whole Shallots, 4 cloves Garlic Cloves, and 2 whole Fresh Thyme Sprigs to the pan. Sauté for 3-4 minutes until the shallots soften and the garlic becomes fragrant. Avoid burning them—this will make the sauce bitter.
Deglaze the pan by adding the 0.5 cup of Dry Red Port Wine, scraping up all the browned bits from the bottom with a wooden spoon. Simmer for 5 minutes until the liquid reduces by half. Stir in the 2 tablespoons of Unsalted Butter, allowing it to melt and create a silky texture. The sauce should coat the back of a spoon and have a glossy sheen. If it thickens too much, whisk in 1-2 tablespoons of the reserved duck fat to loosen it.
Carve and Serve with Pan Sauce
Once the duck has rested, remove the thyme sprigs from the cavity and discard them. Using a sharp carving knife, slice the duck into ½-inch thick portions, cutting through the skin and meat at a slight angle for elegant presentation. Serve the duck immediately, drizzling the pan sauce generously over the top. Garnish with 0.25 cup of Fresh Parsley, chopped finely for a pop of color and freshness.
The result should be a duck with skin so crisp it crackles, meat so tender it falls apart with a gentle pull, and a sauce rich with the depth of port wine and the savory notes of rendered duck fat. Each bite delivers the perfect balance of textures and flavors—crispy, juicy, and deeply aromatic. Serve with roasted potatoes or a simple green salad to complement the dish.
Pro Tips For Making Danish Roast Duck
- TRY THE ICE WATER TRICK: Pat the duck dry, then plunge it in ice water for 10 minutes before roasting—this tightens the skin so it crisps properly instead of turning rubbery. I used to skip this, and my duck always ended up greasy and sad.
- SALT THE CAVITY WELL: Pack the duck’s cavity with 2 tablespoons of kosher salt and pepper before stuffing with anything else—it seasons the meat from the inside out. After burning one duck by overstuffing, I learned to keep it simple: just salt, maybe an orange peel if you’re feeling fancy.
- BASTE WITH PORT, NOT JUICE: Save the red port wine for basting after the duck’s skin starts to render fat—around 45 minutes in. Pour it in slowly while tilting the pan to coat the skin; the alcohol burns off first, leaving behind a sticky, caramelized crust. Ditch the store-bought pan juices—this is where the magic happens.
- HONEY LAST, NOT FIRST: Brush the honey on only during the final 10 minutes of roasting, when the skin is already golden. Too early, and it burns into bitter syrup; too late, and it won’t caramelize. Trust me, your duck will taste like a bakery, not a science experiment.
Creative variations of this recipe
Modern Glaze Twist
Swap the traditional pan sauce for a honey-mustard glaze that adds a tangy contrast. After roasting, mix ¼ cup local honey, 2 tablespoons Dijon mustard, and 1 tablespoon apple cider vinegar in a small saucepan.
Simmer for 3 minutes until slightly thickened, then brush generously over the duck before serving. This glaze cuts through the richness while keeping the dish authentically Danish. 🍯
Herb-Infused Butter
For an elevated presentation, prepare a herb-infused butter to serve alongside the duck. Mix ½ cup softened unsalted butter with 1 tablespoon chopped fresh thyme, 1 tablespoon chopped fresh rosemary, 1 minced garlic clove, and a pinch of salt.
Shape into a log, chill for 1 hour, and slice to melt over the duck at the table. The butter adds a luxurious finish without overpowering the dish. 🧈
Spiced Orange Variation
Brighten the dish with zesty orange notes by adding 1 tablespoon grated orange zest and 2 tablespoons fresh orange juice to the pan sauce. The citrus pairs beautifully with the duck's natural richness, adding a refreshing twist.
For extra flair, garnish with thin orange slices before serving. This variation works especially well for spring or summer dinners. 🍊
Smoked Paprika Crust
For a smoky depth, rub the duck skin with a mix of 1 teaspoon smoked paprika and ½ teaspoon cayenne pepper before roasting. The spices caramelize beautifully, creating a crispy, aromatic crust that adds warmth to the dish.
This variation is perfect for those who love bold, slightly spicy flavors. 🌶️
Danish Potato Upgrade
Transform traditional Danish potatoes into crispy potato wedges by cutting them into wedges and roasting at 425°F for 30-35 minutes until golden. Toss with 1 tablespoon olive oil, ½ teaspoon smoked paprika, and a pinch of salt before roasting.
Serve alongside the duck for a crispy, flavorful side that complements the main course. 🥔
Red Wine Reduction
Replace the port with a bold red wine reduction for a richer, more complex sauce. Deglaze the pan with ½ cup dry red wine (like Cabernet Sauvignon) instead of port, then reduce by half before adding the butter.
The wine's tannins add depth, making the sauce even more sophisticated. This variation elevates the dish for special occasions. 🍷
Nutrition facts
Frequently asked questions
Why does the duck need to rest before slicing?
Resting the duck for 20 minutes after roasting lets the juices redistribute throughout the meat. If you slice too soon, the juices will spill out, leaving you with dry, tough slices. This step is especially critical for duck, which can dry out quickly if not handled properly.
Can I use a smaller duck and adjust the cooking time?
For a 4-pound duck, reduce the roasting time to 1 hour and 20 minutes and check the internal temperature at 165°F in the thigh. Smaller ducks cook faster, but always use a meat thermometer to avoid undercooking. The skin may crisp slightly sooner, so watch closely in the last 10 minutes.
What’s the best way to store leftover duck?
Cool the duck to room temperature, then wrap it tightly in plastic wrap and refrigerate for up to 3 days. For longer storage, freeze the duck in an airtight container for 2-3 months. Reheat gently in the oven at 325°F until warmed through—never microwave, as it can make the skin soggy.
How do I prevent the duck from sticking to the pan?
Pat the duck completely dry before seasoning—even a little moisture will prevent crispy skin. Use a rack in the roasting pan to allow air circulation, and avoid moving the duck once it’s in the oven. If needed, tent with foil to prevent over-browning while the skin crisps.
Can I make the pan sauce ahead of time?
No, the pan sauce relies on the rendered duck fat and caramelized bits from the roasting pan. However, you can prep the aromatics (shallots, garlic, thyme) ahead and store them in the fridge. Assemble the sauce fresh after roasting for the best flavor.