
Desserts
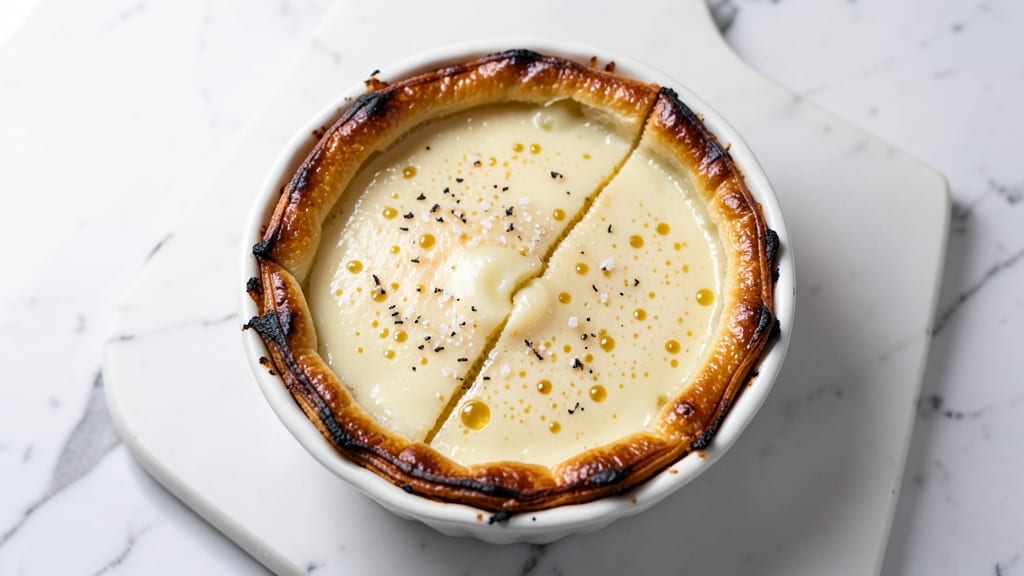
This classic egg tart recipe delivers the perfect balance of flaky pastry and silky custard that makes every bite irresistible. After years of perfecting the technique, I’ve cracked the code for achieving that signature golden crust and smooth custard heart that melts in your mouth.
The secret lies in a precise ratio of butter to flour and a gentle steaming method that ensures tender results.
The recipe begins with a simple yet foolproof tart shell made from just five ingredients—flour, butter, sugar, eggs, and a pinch of salt. The key is working quickly to prevent the dough from warming up, which keeps those layers beautifully flaky.
Once baked to a delicate golden brown, the shells are ready to hold the custard filling that makes egg tarts legendary.
What sets this recipe apart is the custard itself—a velvety blend of eggs, sugar, and milk that steams to perfection inside the shells. The result is a dessert that’s both elegant and comforting, with a texture that’s impossible to resist.
Whether you’re serving them at a brunch spread or enjoying them as an afternoon treat, these egg tarts are guaranteed to impress.
For those looking to experiment, variations like chocolate or matcha custard add exciting twists while keeping the classic structure intact. Let’s get started on creating these timeless treats that taste like a piece of home.
Ingredients for classic egg tart
Five simple ingredients create the perfect flaky shell. Four key components make the custard silky smooth.
| Ingredient | Amount | Notes |
|---|---|---|
| All-Purpose Flour 🌾 | 2 ½ cups | Sifted for flaky texture |
| Cold Unsalted Butter 🧈 | 1 lb | Cut into 1-inch cubes |
| Granulated Sugar 🍚 | ¼ cup | Fine grain preferred |
| Large Eggs 🥚 | 2 whole | Room temperature |
| Fine Sea Salt 🧂 | ¼ tsp | Kosher preferred |
| Whole Milk 🥛 | 1 ½ cups | Full-fat for richness |
| Granulated Sugar 🍚 | ¾ cup | For custard filling |
| Large Egg Yolks 🥚 | 4 whole | Separated from whites |
| Vanilla Extract 🌸 | 1 tsp | Pure vanilla preferred |
| All-Purpose Flour 🌾 | 2 tbsp | For dusting tart shells |
| Cornstarch 🌾 | 1 tbsp | For smooth custard |
The butter-to-flour ratio is critical—cold butter cubes are non-negotiable for that signature flaky texture. European-style butter (like Plugrá or Land O'Lakes European Style) has higher fat content, which yields better results. If using regular butter, make sure it's unsalted—the salt content can vary wildly between brands. Sift the flour before mixing to eliminate lumps, and work quickly to keep everything cold. The dough should resemble coarse crumbs with pea-sized butter pieces—overworking it will develop the gluten and ruin the flakiness.
For the custard, full-fat milk is essential—low-fat versions won't create that luxurious texture. The cornstarch acts as a thickener, but don't skip it; it's what gives the custard its signature sheen. If you're out of vanilla extract, vanilla bean paste works beautifully, or a splash of vanilla sugar in a pinch. For those avoiding gluten, almond flour can replace up to half the all-purpose flour in the shell, though the texture will differ slightly. Always use room-temperature eggs—they emulsify better and create a smoother custard.
Store the baked tart shells at room temperature in an airtight container for up to 3 days, but they're best enjoyed fresh. The custard mixture can be prepared ahead and kept in the fridge for 24 hours before steaming. Once assembled, egg tarts keep for 3 days refrigerated or 3 months frozen. For reheating, microwave for 15-20 seconds or bake at 350°F (175°C) for 5-7 minutes to restore crispness.
Why You'll Love This Recipe
- No-Fuss Pastry: I swear by this crust—just flour, butter, and sugar. No rolling pins, no stress. You can mix it by hand in 5 minutes while the coffee brews.
- Golden Crust, Creamy Core: That first bite? Crispy, buttery edges hugging a custard so rich it makes store-bought versions taste like a sad afterthought. The sugar in the dough caramelizes just enough to give it this addictive contrast.
- Breakfast or Snack: Honestly, these disappear faster than I can say "second helping." Serve them warm with breakfast or pack a batch for lunch—still perfect cold the next day. (Yes, even on a Tuesday night.)
- Budget-Friendly Staples: Flour, butter, eggs—ingredients you already have. No specialty items, no last-minute grocery runs. And they reheat beautifully, so leftovers become a free dessert. My wallet thanks me weekly.
Step-by-step instructions for classic egg tarts
Here's the method for achieving that signature flaky shell and velvety custard filling every time.
Prepare the Tart Dough for Flaky Layers
In a large mixing bowl, combine the 2.5 cups all-purpose flour and 0.25 tsp fine sea salt. Cut in the 1 lb cold unsalted butter using a pastry cutter or your fingers until the mixture resembles coarse crumbs with pea-sized butter pieces. This cold butter creates steam during baking, which is essential for those signature flaky layers.
Add the 0.25 cup granulated sugar and mix gently until just combined. The sugar will help create a slight sweetness in the shell that balances the rich custard. Press the dough into a disk, wrap it tightly in plastic wrap, and refrigerate for at least 1 hour. This resting period allows the gluten to relax, preventing tough shells when rolled out later.
Roll and Cut the Dough for Perfect Tart Shells
On a lightly floured surface, roll out the chilled dough to about 1/8-inch thickness. Use a 3-inch round cutter to cut out circles for the tart shells, pressing gently but firmly to ensure clean edges. I like to use a glass as a guide for perfectly round tarts. You should get about 12 shells from this dough.
Place the cut dough circles onto a parchment-lined baking sheet and prick each one all over with a fork to prevent puffing during baking. Dust the shells lightly with the 2 tbsp all-purpose flour reserved for this purpose, focusing on the edges. This flour helps create a crisp barrier between the shell and the custard, preventing sogginess. Preheat your oven to 375°F while you prepare the custard filling.
Bake the Shells Until Golden
Bake the tart shells for 12-15 minutes until they're light golden brown at the edges. They should be firm to the touch but not fully cooked through—they'll finish baking when filled. Remove them from the oven and let cool slightly for 5 minutes before filling. This brief cooling period prevents the custard from cooking too quickly and becoming rubbery.
Here's the thing—don't overbake the shells. You want them to hold their shape but still have a slight softness to them. If they look fully baked and crisp, they'll absorb too much of the custard mixture and lose their delicate texture. The shells should be just firm enough to support the custard without becoming brittle.
Make the Silky Custard Filling
In a medium saucepan, whisk together the 4 whole large egg yolks, 0.75 cup granulated sugar, 1.5 cups whole milk, 1 tsp vanilla extract, and 1 tbsp cornstarch. The cornstarch acts as a natural thickener to create that signature smooth texture. Place the saucepan over medium-low heat and cook, stirring constantly with a wooden spoon or silicone spatula.
Continue cooking until the mixture thickens enough to coat the back of the spoon—this should take about 5-7 minutes. The custard should reach 170°F on an instant-read thermometer. Immediately remove from heat and let cool for 10 minutes to prevent the egg yolks from scrambling when added to the hot shells. This cooling step is crucial for maintaining that silky, jiggly texture in the finished tart.
Assemble and Bake to Perfection
Carefully fill each cooled tart shell with about 2 tablespoons of the warm custard mixture. The custard should be just warm to the touch—if it's too hot, it'll cook too quickly and become grainy. Place the filled tarts on a baking sheet and bake at 350°F for 12-15 minutes, until the custard is set but still slightly jiggly in the center.
Let the tarts cool completely before serving—this allows the custard to fully set and develop its signature texture. The contrast between the crisp, flaky shell and the smooth, custardy center is what makes these egg tarts so irresistible. Serve warm for the best experience, as the custard will be at its most velvety consistency.
Pro Tips For Making Classic Egg Tart
- Chill the Butter Properly: I learned this the hard way—when butter gets too soft, the crust turns out greasy instead of flaky. Pop those butter cubes in the freezer for 15 minutes before cutting, then work fast with a sharp knife. Cold butter = layers that actually separate.
- Salt the Water Like You Mean It: Skip the half-hearted pinch—this isn’t just flavor, it’s texture. Use 1 tablespoon of fine sea salt per quart of water for the egg custard. It prevents the eggs from curdling and gives that signature slight saltiness that balances the sweetness. (Yes, even if you’re making just one tart.)
- Bake Until the Center Jiggles: The custard should look set but still wobble slightly when you shake the pan. Overbaking turns it rubbery, and underbaking leaves it runny. Pull it out when the edges are golden and the center has a gentle tremble—about 12-15 minutes at 350°F, depending on your oven.
- Use Room-Temp Eggs for Smooth Filling: Cold eggs from the fridge create lumpy custard. Let them sit in warm water for 5 minutes before whisking, or just leave them on the counter for 30 minutes. The filling will be silky, not streaky, and the tarts will have that perfect, cloud-like texture. (I know, it feels like waiting forever—but trust me.)
Common mistakes when making your classic egg tart
Overbaking Shells
I’ve seen this happen more times than I can count—shells that turn crispy and hard instead of delicate and flaky. The key is baking them just until they’re light golden brown at the edges, about 12-15 minutes at 375°F.
Overbaking causes the shells to absorb too much moisture from the custard, leaving you with a dry, unappetizing texture. Always check for doneness by pressing gently—they should hold their shape but still feel slightly soft to the touch. 🌟
Skipping the Resting Time
Rushing the 1-hour dough rest is a common mistake that leads to tough, chewy shells. This resting period allows the gluten to relax, which is essential for achieving that signature flaky texture. If you’re short on time, chill the dough for at least 30 minutes—just don’t skip it entirely.
The same goes for the custard: letting it cool for 10 minutes before filling prevents the eggs from scrambling and ensures a smooth, silky finish.
Using Warm Butter
Cold butter is non-negotiable for flaky layers. If you accidentally use warm butter, the dough will develop gluten instead of creating steam during baking. To fix this, place your butter in the freezer for 10-15 minutes before cutting it into the flour.
I’ve also had success using frozen butter cubes straight from the fridge—just make sure they’re still firm but not rock-hard. The goal is to keep everything as cold as possible until the dough hits the oven. ❄️
Overfilling the Shells
Stuffing the shells with too much custard causes spills and uneven baking. Use about 2 tablespoons of custard per shell—just enough to create that classic dome shape. If your custard is too thick, thin it slightly with a splash of milk before filling.
Overfilling also leads to soggy shells, as the custard will leak out during baking. Trust the process: less is more for that perfect custard heart.
Steaming Instead of Baking
While some recipes call for steaming egg tarts, baking is the traditional method for achieving that crisp, flaky shell. If you steam the filled tarts, the shells will turn out soft and gummy rather than golden and delicate.
For the best results, stick to baking the shells first, then filling and baking again at a lower temperature (350°F) to set the custard gently. This two-step process is what gives classic egg tarts their signature texture.
Ignoring the Custard Temp
The custard must reach 170°F but shouldn’t boil—this is where many home bakers go wrong. If it’s too hot, the eggs will scramble when added to the shells, resulting in a grainy, unappetizing texture.
Use a thermometer to monitor the temperature, and remove the custard from heat as soon as it coats the back of a spoon. Let it cool for 10 minutes before filling to ensure a silky, jiggly finish. 💡
Nutrition facts
Frequently asked questions
Why do some egg tart shells turn out puffy instead of flat?
Puffy shells happen when the dough isn't properly chilled before rolling or when it's pricked too aggressively. Always use cold butter and keep the dough refrigerated for at least 1 hour before shaping. Prick gently with a fork—just enough to prevent puffing without tearing the dough. The shells should be about 1/8-inch thick for that classic delicate texture.
Can I make egg tarts without a round cutter?
Use a glass, cup, or even a cookie cutter to create perfectly shaped shells. For rustic tarts, cut freehand with kitchen scissors or a knife. Just keep the edges clean and consistent—uneven edges can make filling tricky. A 3-inch diameter works best for standard-sized tarts that hold 2 tablespoons of custard each.
What's the best way to store leftover egg tarts?
Store filled egg tarts in an airtight container at room temperature for up to 3 days, or refrigerate for 5 days. For longer storage, freeze them for 3 months. To reheat, microwave for 10-15 seconds or bake at 350°F for 5 minutes to restore crispness. The custard stays best when kept at room temperature for short periods.
Can I substitute butter in the tart shell?
Traditional recipes use butter for its flavor and flakiness, but you can substitute with shortening or lard for a neutral taste. For a dairy-free option, use coconut oil (solid at room temperature) or vegetable shortening, but expect slightly different texture. The key is keeping the fat cold—never warm or melted.
How do I fix custard that's too thick or too thin?
If your custard is too thick, whisk in 1 teaspoon of milk at a time until smooth. For runny custard, cook it longer over low heat while stirring constantly. The ideal consistency coats the back of a spoon but isn't fully set. Always use cornstarch (or arrowroot powder) as a thickener—it prevents graininess. A thermometer helps ensure it reaches 170°F without boiling.