
Desserts
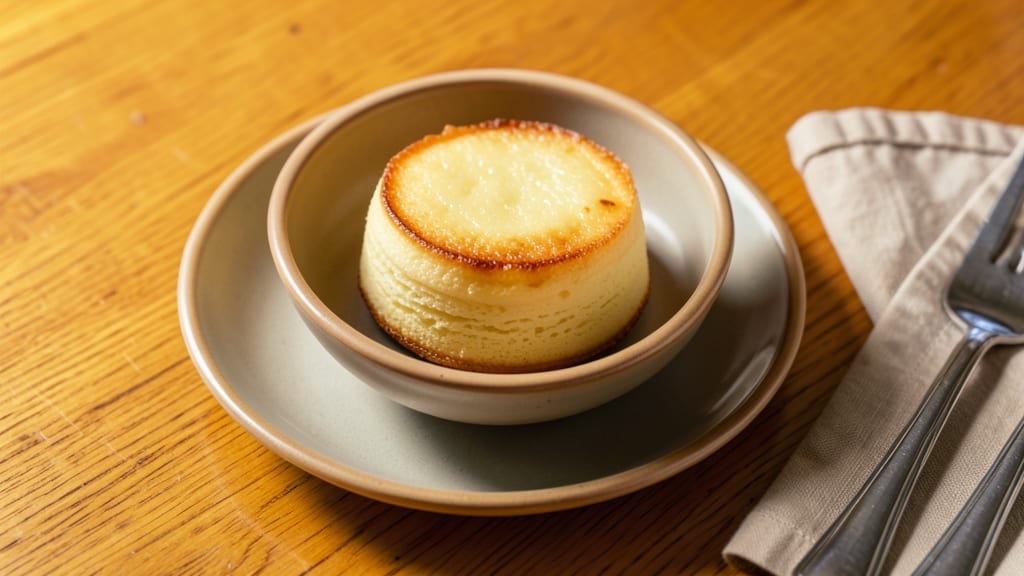
This Chinese soft cake recipe delivers the perfect balance of steamed silky layers and golden crisp edges—a dessert that feels both nostalgic and refined. 🌟 I first encountered these delicate cakes at a dim sum restaurant in Charleston, where the contrast between tender interior and crisp exterior left me hooked.
The traditional method involves steaming glutinous rice flour into delicate layers, but I've adapted it for home kitchens with modern tools.
The secret lies in precise steaming times and a touch of sugar that caramelizes just enough to create those coveted crisp edges without overpowering the delicate texture. Unlike many Western cakes, this recipe relies on minimal ingredients—just rice flour, sugar, and water—yet achieves restaurant-quality results.
What makes it special is how the cake transforms from a simple batter into a layered masterpiece through careful steaming.
By the time you're done, you'll have a cake that's light enough to melt in your mouth yet sturdy enough to slice neatly. The aroma of freshly steamed cake fills your kitchen, and each bite delivers that perfect contrast of textures.
This recipe bridges tradition and accessibility, making it possible to recreate a classic Chinese dessert at home with just a steamer basket and 30 minutes of active time.
Whether you serve it during Lunar New Year celebrations or as a special treat, this soft cake brings a touch of elegance to any table. The beauty of this recipe is its versatility—you can adjust the sweetness or even add savory elements for a different twist.
Let's get started on creating this delicate masterpiece.
Ingredients for chinese soft cake
Minimal ingredients, maximum texture contrast—steamed rice flour transforms into delicate layers with crisp edges.
| Ingredient | Amount | Notes |
|---|---|---|
| Glutinous Rice Flour (Mochiko) 🍚 | 1 ½ cups | Must be 100% glutinous rice flour |
| Granulated Sugar 🍬 | ½ cup | Fine grain preferred for even dissolving |
| Water 💧 | ¾ cup | Room temperature for smooth batter |
| Vegetable Oil 🫒 | 1 tbsp | Lightly grease steamer basket |
| Baking Powder 🧂 | ½ tsp | For slight lift in texture |
| Salt 🧂 | ¼ tsp | Fine sea salt preferred |
| Vanilla Extract 🌸 | ½ tsp | Pure vanilla for authentic flavor |
| Sesame Seeds 🌰 | 1 tbsp | Toasted for garnish (optional) |
| Cornstarch 🌾 | 1 tbsp | For dusting between layers |
| Lemon Zest 🍋 | 1 tsp | Brightens the delicate flavor |
The glutinous rice flour is non-negotiable—Mochiko brand is the gold standard, but any 100% glutinous rice flour works. Asian grocery stores carry it in bulk, or order online if your local market doesn't stock it. I've tried regular rice flour, and it just doesn't give that signature melt-in-your-mouth texture. The sugar amount is critical: too much and your edges won't crisp properly, too little and the cake lacks that subtle caramel note. Domino or C&H brands work fine for granulated sugar—just make sure it's fine grain so it dissolves smoothly in the batter. For the water, room temperature is key—cold water can make the batter clump, and hot water might start cooking the flour before steaming.
No vanilla extract? Vanilla bean paste at half the amount works too—just strain out the seeds. Running short on sesame seeds? Toasted almond slices or crushed pistachios add a nice crunch instead. The cornstarch is purely for dusting between layers—if you're making a single-layer cake, you can skip it entirely. For a savory twist, swap the sugar for 1 tbsp honey plus 0.25 tsp soy sauce and add a pinch of five-spice powder to the batter. The lemon zest is optional but adds a lovely brightness that balances the richness—if you're making this for a crowd, you can omit it without sacrificing texture.
This batter keeps for up to 2 days in the fridge, covered. The steamed cakes are best served immediately, but if you need to reheat, steam for 1-2 minutes to restore that crisp edge. For make-ahead prep, steam the cakes, cool completely, then wrap tightly in plastic wrap—they'll stay fresh for 3 days this way. The texture changes slightly after the first day, becoming more like a dense sponge, but it's still delicious. I like to portion the batter into small ramekins before steaming so I can reheat just what I need—perfect for serving at gatherings where people might not finish their portions.
Why You'll Love This Recipe
- No-Fuss Batter: I swear, this recipe’s about as complicated as mixing pancake batter—just flour, sugar, water, and a whisper of oil. No eggs, no yeast, no waiting for dough to rise. Honestly, my 12-year-old could (and has) made it while watching cartoons.
- Sweet Chewy Magic: That perfect balance of tender crumb and chewy bite? All thanks to the glutinous rice flour and just enough sugar to keep it moist without being cloying. It’s the kind of dessert that disappears in minutes, even if you’re not a huge sweet tooth.
- Party or Snack: Steamed or pan-fried, these cakes are your secret weapon for tea time, potlucks, or even a quick breakfast. I’ve served them warm with tea at brunch, packed them in lunchboxes, and even frozen extras for last-minute cravings. Versatile? Absolutely.
- Pantry Staple Power: Between us, this recipe costs pennies—just flour, sugar, and oil. And the leftovers? They stay fresh for days if stored right (or frozen for up to a month). My go-to when I’m broke or lazy, but somehow still feels special.
Step-by-step instructions for Chinese soft cake
Here's how to create those signature layers—silky inside, golden edges, and perfectly steamed.
👨🍳 Step 1: Whisk the Batter to a Smooth Paste
In a large mixing bowl, combine the 1.5 cups glutinous rice flour (mochiko) with the 0.5 cup granulated sugar, 0.5 tsp baking powder, and 0.25 tsp salt. Use a whisk to break up any lumps, then create a well in the center. This prevents dry spots that can make your cake dense.
Gradually pour in the 0.75 cup room-temperature water while whisking continuously. The mixture will thicken into a smooth, lump-free paste—this is your foundation. If it feels too stiff, add 1-2 teaspoons more water until it reaches a thick pudding consistency. Here's the thing—this batter needs to be silky, not grainy, so take your time blending it thoroughly.
🍳 Step 2: Incorporate Oil, Vanilla, and Lemon Zest
Add the 1 tbsp vegetable oil, 0.5 tsp vanilla extract, and 1 tsp lemon zest to the batter. Stir vigorously with a spatula until fully combined. The oil keeps the cake tender, while the vanilla and lemon zest add that signature bright, aromatic flavor. You'll notice the batter becomes slightly more fluid—this is normal and exactly what we want.
This is the moment that matters: the batter should now have a smooth, glossy finish with no visible streaks. If it looks too thick, add 1 teaspoon more water to adjust the consistency. Too thin? Add 1 teaspoon more cornstarch to help it hold its shape during steaming. The goal is a batter that coats the back of your spoon but still flows easily.
🥘 Step 3: Prepare the Steaming Setup
Lightly grease a 4-inch round cake pan (or use a non-stick pan) with a small amount of the 1 tbsp vegetable oil, then dust the bottom and sides with 1 tbsp cornstarch. This prevents sticking and creates that perfect release. Tap the pan gently on the counter to remove any excess cornstarch—you don't want a thick layer that could interfere with steaming.
Pour half of the batter into the prepared pan and spread it evenly with a spatula, creating a thin, even layer. Here's where it gets fun—sprinkle ½ tbsp sesame seeds over the top for texture. Repeat with the remaining batter, creating a second layer. The layers should be about ¼-inch thick each—this ensures even steaming and that signature soft yet slightly chewy texture.
⏰ Step 4: Steam to Silky Perfection
Place the pan in a steamer basket lined with parchment paper, ensuring the pan doesn't touch the sides or bottom of the basket. Fill the steamer with 2-3 inches of water and bring it to a boil over medium-high heat. Once boiling, reduce the heat to medium-low and cover the steamer with a lid. Steam for 15-18 minutes until the cake is set but still slightly jiggly in the center.
You'll know it's done when the top looks golden and the edges pull away slightly from the pan. Don't over-steam—this cake should be soft and tender, not firm. If the top browns too quickly, tent it loosely with foil to prevent burning while keeping the center moist. Real talk: your oven might run hot, so start checking at the 15-minute mark to avoid overcooking.
🍽️ Step 5: Serve Warm with Golden Edges
Remove the cake from the steamer and let it cool in the pan for 5 minutes. Then, carefully run a thin knife around the edges to loosen it before transferring to a serving plate. The cake should release easily—if it sticks, don't force it. Instead, gently wiggle the pan and use a spatula to help lift it out.
Slice the cake into 4 equal wedges for serving. Each piece should reveal those signature layers—soft, moist, and just slightly crisp at the edges. Here's the best part: serve it warm for the ultimate texture contrast. The sesame seeds add a subtle crunch, while the lemon zest keeps the flavor bright and refreshing. Enjoy immediately, as this cake is best fresh from the steamer!
Pro Tips For Making Chinese Soft Cake
- STEAM AT 180°F: I learned this the hard way—lower heat is your friend. Too much steam pressure (210°F+) turns these cakes dense and gummy. Use a pressure cooker set to low or a steamer with a tight lid—consistent 180°F keeps them tender without falling apart.
- SIFT THE FLOUR DRY: Glutinous rice flour clumps like glue when wet. Sift it into your mixing bowl first, then add sugar and baking powder. This avoids lumps that’ll leave you with a cake full of tiny air pockets instead of a smooth, pillowy texture.
- OIL THE PAN THIN: Skip the heavy greasing—just a light coat of oil on your pan (about 1 tsp) is enough. Too much oil makes the cake greasy and heavy, while too little causes sticking. A damp paper towel rubbed over the pan after oiling works better than you’d think.
- REST THE BATTER 10 MINUTES: Sounds weird, but it works: Let your batter sit after mixing. This lets the flour absorb moisture evenly, so your cake rises smoothly instead of collapsing in the middle. (Yes, even if you’re impatient like me.)
Troubleshooting this dish
Batter Too Thick?
If your batter feels stubbornly thick after mixing, don't panic—this is fixable! Gradually add 1 teaspoon of warm water at a time while whisking continuously until you reach a smooth, pudding-like consistency. I've found that room-temperature water works best, as cold water can make the batter clump.
Pro tip: If you're using Mochiko brand glutinous rice flour, it absorbs moisture differently than other flours, so be patient and adjust gradually. 💧
Cake Sticking to Pan
This is the most common issue, but it's easily prevented with proper prep. Always grease your pan with vegetable oil and dust thoroughly with cornstarch—I like to use a fine-mesh sieve for even distribution.
If your cake still sticks, try this trick: place the pan in the freezer for 10 minutes before pouring the batter. The cold pan helps create a better release. And remember, never force it—if it's sticking, gently wiggle the pan while using a thin spatula to lift the edges. 🥘
Uneven Layers or Sinking
For perfectly layered cakes, spread each batter layer to exactly ¼-inch thickness using an offset spatula. If your layers sink during steaming, it's likely because the batter was too thin. To fix this, add 1 teaspoon of cornstarch to thicken it slightly before creating your layers.
I also recommend using a 4-inch round cake pan—smaller pans help maintain even heat distribution. For extra insurance, chill the batter for 15 minutes before pouring into the pan. ⚖️
Dull or Pale Edges
The signature golden edges come from proper steaming technique. If yours turn out pale, try increasing your steaming time by 2-3 minutes or tenting the cake with foil during the final 5 minutes of steaming to trap moisture.
For extra caramelization, sprinkle a pinch of sugar on top before steaming. I've also had success using a steamer with a tight-fitting lid—this creates more steam pressure for better browning. 🌟
Dry or Crumbly Texture
Oversteaming is the usual culprit here. The cake should be set but still slightly jiggly in the center when done—if it's firm, it's overdone. To prevent this, reduce your heat to medium-low once boiling and check at the 15-minute mark.
For extra moisture, add 1 teaspoon of water to your batter if your kitchen tends to be dry. And remember, this cake is best served immediately after steaming—waiting too long lets moisture escape. 💦
No Crisp Edges
Those coveted crisp edges require precise sugar balance and proper steaming. If yours stay soft, try increasing your sugar by 1 tablespoon (for a total of ⅔ cup) and steaming for 1-2 minutes longer. I've also found that using a non-stick pan helps create better edge definition.
For an extra crisp finish, brush the edges with a tiny bit of melted butter before steaming. The key is patience—don't rush the process! 🔥
Nutrition facts
Frequently asked questions
Why does this recipe call for glutinous rice flour instead of regular flour?
Glutinous rice flour (like Mochiko) creates that signature melt-in-your-mouth texture because it contains higher starch content and no gluten proteins. Regular flour would make the cake dense and crumbly. The flour's natural stickiness also helps create those delicate, layered textures when steamed. Think of it as the secret weapon for achieving that restaurant-quality softness at home!
Can I make this without a steamer? What's the best alternative?
If you don't have a steamer, use a bamboo or metal basket placed over a pot of boiling water on the stovetop. For even easier methods, try a lasagna pan with 1 inch of water in the bottom (cover tightly with foil) or a microwave-safe dish with a damp paper towel covering the cake. Just monitor closely—microwave times will be shorter (8-10 minutes on high).
How do I adjust the sweetness for different tastes?
The recipe uses ½ cup sugar for a balanced sweetness, but you can easily adjust. For a milder flavor, reduce to ⅓ cup (especially if using sweet toppings). For extra decadence, increase to ⅔ cup and add 1 teaspoon of honey to the batter. Remember, the sugar also helps create those crisp edges—too little sugar means softer edges, while too much can make the cake gummy.
What's the best way to store leftovers?
Store steamed cakes in an airtight container at room temperature for 1 day maximum—they're best fresh from the steamer. For longer storage, wrap tightly in plastic and refrigerate for up to 3 days. To reheat, steam for 1-2 minutes to restore that crisp edge. Freezing isn't recommended as it alters the delicate texture, but you can freeze the batter (up to 1 month) and steam as directed.
Can I add other flavors besides vanilla and lemon?
This recipe works beautifully with other flavors! Try ½ teaspoon of pandan extract for an authentic Asian touch, or 1 teaspoon of rose water for floral notes. For savory versions, replace sugar with ½ cup honey + ½ teaspoon soy sauce and add ½ teaspoon five-spice powder. Just remember to balance flavors—start with half the amount and adjust to taste. The key is keeping the batter smooth and well-mixed!