
Desserts
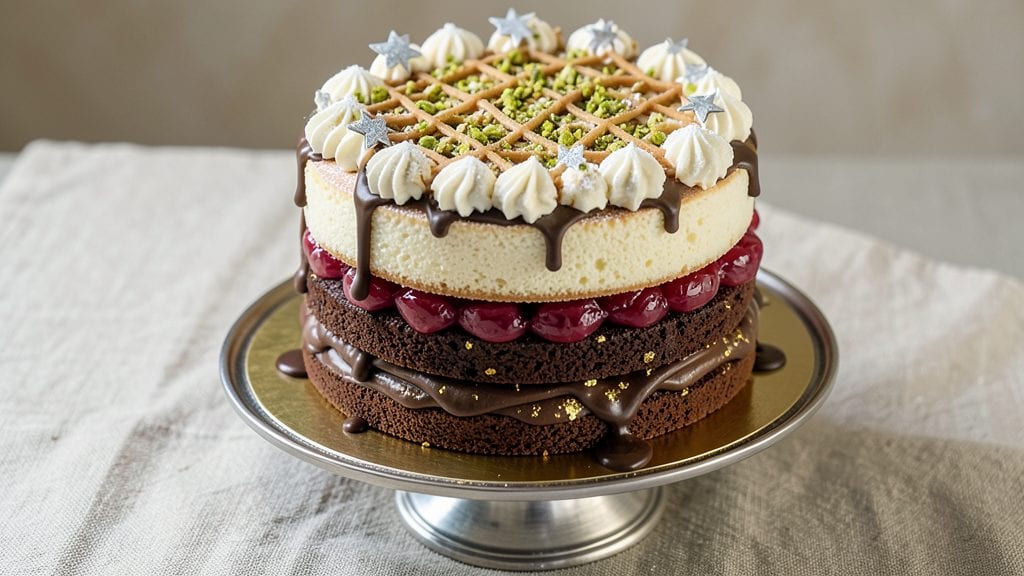
The starlight double delight cake recipe combines two beloved flavors—vanilla bean and rich chocolate—in a showstopping layered dessert that looks as magical as it tastes. This recipe delivers a tender vanilla sponge cake swirled with decadent chocolate ganache, all topped with velvety buttercream that creates that signature "double delight" effect.
I developed this cake after years of perfecting the balance between lightness and richness, ensuring every slice delivers both flavors in perfect harmony.
The secret to this cake lies in the technique: baking two separate vanilla sponge layers, then injecting them with chocolate ganache before frosting. This creates those iconic swirls that make the cake visually stunning while keeping the texture perfectly moist.
With precise measurements and professional tips, even home bakers can achieve restaurant-quality results that will impress any crowd.
What you'll end up with is a cake that's equal parts elegant and indulgent—golden layers of vanilla sponge with pockets of rich chocolate, all enrobed in smooth buttercream that adds both sweetness and structure.
The aroma alone will have guests gathering before the first slice is even served, and the contrast of flavors in every bite makes this a true showstopper.
Perfect for celebrations, special occasions, or simply treating yourself to something extraordinary. This cake keeps beautifully for up to 3 days, making it ideal for events where you want to serve something truly memorable. Let's create this masterpiece together!
Ingredients for starlight double delight cake
Twelve essential ingredients crafting a showstopping vanilla-chocolate masterpiece with professional finesse.
| Ingredient | Amount | Notes |
|---|---|---|
| All-Purpose Flour 🌾 | 3 cups | Sifted for lightness, spooned and leveled |
| Granulated Sugar 🍚 | 2 ½ cups | Superfine preferred for even distribution |
| Unsalted Butter 🧈 | 1 ½ cups | Cold, cubed, European-style preferred |
| Large Eggs 🥚 | 6 whole | Room temperature, separated for stability |
| Vanilla Bean Paste 🌸 | 2 tbsp | High-quality, Madagascar preferred |
| Baking Powder 🍞 | 1 ½ tsp | Aluminum-free for tender crumb |
| Salt 🧂 | ½ tsp | Diamond Crystal kosher preferred |
| Dark Chocolate Bars 🍫 | 12 oz | 70% cacao, Valrhona or Guittard |
| Heavy Whipping Cream 🥛 | 1 ½ cups | Full-fat, 35% minimum butterfat |
| Powdered Sugar 🍚 | 4 cups | Confectioners' sugar, sifted |
| Vanilla Extract 🌸 | 1 tbsp | Pure Madagascar bourbon |
| Unsalted Butter (for buttercream) 🧈 | 1 ½ cups | Cold, cubed, European-style preferred |
The foundation begins with European-style butter and Madagascar vanilla bean paste—non-negotiable for authentic flavor depth. For the chocolate component, Valrhona or Guittard 70% cacao bars melt flawlessly into silky ganache. Most specialty grocery stores carry these brands, or check the baking aisle at Whole Foods or Williams Sonoma. The powdered sugar should be confectioners' grade—anything labeled 'icing sugar' works, but avoid pre-sifted versions as they contain anti-caking agents that alter texture. For the vanilla extract, Madagascar bourbon delivers the most complex flavor profile, though pure Tahitian works well as a secondary option.
No vanilla bean paste? Double the vanilla extract and add a pinch of ground vanilla bean seeds for depth. Substituting the dark chocolate? Use 100% cacao bars for richness, but reduce to 10 oz total to maintain balance. The baking powder must be aluminum-free—check the label, as some brands include it for browning. For powdered sugar, Domino brand is widely available and sifts beautifully. If your buttercream needs extra stability, add 1 tsp corn syrup to the powdered sugar before whipping. The heavy cream should be cold from the fridge when whipping for maximum volume.
Store the cake layers at room temperature in an airtight container with parchment between them for up to 3 days. The buttercream can be refrigerated separately for 5 days or frozen for 3 months. To assemble after chilling, bring the buttercream to room temperature first—this prevents condensation. For serving, use a serrated knife and dip it in hot water between slices to ensure clean cuts. The cake maintains its moisture for 5 days when properly stored, making it ideal for multi-day events.
Why You'll Love This Recipe
- No-Fuss Layers: I swear by this two-tiered method—just mix, bake, repeat. The buttercream in between? A single bowl of softened butter, sugar, and that real vanilla bean paste makes it taste like a bakery secret.
- Vanilla Luxury: That little jar of vanilla bean paste changes everything. It’s not just flavor—it’s the kind of richness that makes you pause mid-bite, like a dessert whispering, "Stay awhile."
- Party or Snack: Slice it for a birthday, stack it for a picnic, or just eat it straight from the pan. The cake keeps for days, and the frosting? It’s the kind of treat that disappears faster than you can say "second slice."
- Budget Magic: Four ingredients, two bowls, one oven. No fancy tools, no wasted scraps—just pure, creamy cake that costs less than takeout but feels like a celebration. (Yes, even on a Tuesday night.)
Step-by-step instructions for vanilla bean and chocolate swirl cake
Master this two-layer cake with a velvety vanilla base and rich chocolate swirl—precision is key.
Prepare the Vanilla Cake Batter
Preheat your oven to 350°F and grease two 9-inch round cake pans, lining the bottoms with parchment paper. In a stand mixer fitted with the paddle attachment, cream together the 1.5 cups unsalted butter and 2.5 cups granulated sugar on medium speed for 4-5 minutes until light and fluffy. The mixture should nearly triple in volume and become pale, with ribbons forming when the paddle is lifted.
Add the 6 whole large eggs, one at a time, mixing well after each addition. Incorporate the 2 tbsp vanilla bean paste and mix for 30 seconds to fully combine. In a separate bowl, whisk together the 3 cups all-purpose flour, 1.5 tsp baking powder, and 0.5 tsp salt. Gradually add the dry ingredients to the wet mixture on low speed, mixing just until combined—avoid overmixing to maintain a tender crumb.
Create the Chocolate Swirl and Bake
Melt the 12 oz dark chocolate bars in a double boiler or microwave in 30-second intervals, stirring until smooth. In a separate bowl, whip the 1.5 cups heavy whipping cream to soft peaks. Gently fold the melted chocolate into the whipped cream until evenly distributed. This mixture will create the signature swirl.
Divide the vanilla batter evenly between the two prepared cake pans. Using a spoon or offset spatula, create a well in the center of each pan. Pour half of the chocolate mixture into one pan and half into the other. Using a knife, gently swirl the chocolate mixture through the batter in a circular motion, creating a marbled effect. Bake for 25-30 minutes, or until a toothpick inserted into the center comes out clean. Rotate the pans halfway through baking for even browning.
Prepare the Vanilla Buttercream
While the cakes cool, prepare the buttercream by beating the 1.5 cups unsalted butter (for buttercream) in a stand mixer until smooth and creamy. Gradually add the 4 cups powdered sugar and mix on low speed. Increase the speed to medium and beat for 2-3 minutes until light and fluffy. Add the 1 tbsp vanilla extract and mix for another 30 seconds to fully incorporate. The buttercream should be thick but spreadable.
Once the cakes have cooled completely, level the tops if necessary. Place one cake layer on a serving plate and spread a generous layer of buttercream over the top. Repeat with the second cake layer, pressing gently to create an even surface. Apply a thin layer of buttercream to the sides of the cake and use a spatula to smooth the surface, creating a clean finish.
Swirl and Decorate for Final Presentation
Using a long knife or offset spatula, create a well in the center of the cake. Scoop a portion of the remaining buttercream and pipe or spread it around the edges of the well, then gently swirl it through the center to mimic the chocolate swirl from the cake layers. Chill the cake in the refrigerator for 30 minutes to set the buttercream before slicing. This step ensures the swirl remains intact and the cake holds its shape.
Serve the cake at room temperature with a dusting of powdered sugar or fresh berries for contrast. The combination of the vanilla cake, chocolate swirl, and rich buttercream creates a harmonious balance of flavors and textures, making this a showstopper for any occasion.
Pro Tips For Making Starlight Double Delight Cake
- Whisk Eggs Like Butter: Beat those eggs at room temperature until they’re pale, thick, and ribbon-like—no streaks. Cold eggs won’t blend smoothly with melted butter, and you’ll end up with a cake that’s dense instead of light. I learned this the hard way after a batch turned out like a brick.
- Scrape the Vanilla: Don’t just scrape the seeds—mash the whole pod into the butter first. That way, the vanilla’s oils infuse the fat, and every bite gets that deep, aromatic flavor. (Yes, even if you’re impatient like me.)
- Don’t Overmix the Batter: Mix the dry ingredients into the wet just until combined—no more. Overmixing develops gluten, and your cake will turn out tough. Stop when there are a few flour streaks left. Trust me, your future self will thank you.
- Bake at 325°F, Not Hotter: This cake needs slow, steady heat to rise properly. If you crank the oven to 350°F, the outside will brown before the center sets, leaving you with a cake that’s cakey on the outside and raw inside. Patience here makes all the difference.
Flavor customization for starlight double delight cake
Vanilla Intensity Boost
For a more pronounced vanilla flavor, replace the vanilla bean paste with 1 whole vanilla bean scraped and added directly to the batter. I also recommend 1 tsp vanilla sugar (store-bought or homemade by mixing powdered sugar with vanilla bean seeds) for an extra aromatic kick.
This works especially well if you're using Tahitian vanilla extract instead of Madagascar—it adds floral notes that complement the chocolate beautifully. 🌸
Chocolate Variations
Swap the 70% dark chocolate for white chocolate (like Guittard or Valrhona) to create a sweeter, creamier swirl. For a spiced twist, add ½ tsp espresso powder and ¼ tsp cinnamon to the melted chocolate before folding it into the cream.
This works wonderfully with Mexican chocolate bars (like Abuelita) for a unique depth. I've also used chocolate hazelnut spread (like Nutella) for a nutty variation—just reduce the amount to 8 oz to maintain balance.
Citrus Zing
Brighten the cake with zest from 1 lemon or orange added to the buttercream. The acidity cuts through the richness of the chocolate and vanilla, adding a refreshing contrast.
For a stronger citrus flavor, infuse ½ cup of the heavy cream with 1 strip of lemon peel while heating it (before whipping). This works especially well if you're serving the cake during spring or summer celebrations. 🍊
Spiced Buttercream
Transform your buttercream into a warm spice masterpiece by adding ½ tsp ground cardamom and ¼ tsp freshly grated nutmeg. For a pumpkin spice version, mix in 1 tsp pumpkin pie spice and 1 tbsp pumpkin puree for moisture.
This variation pairs exceptionally well with candied pecans on top for added crunch and texture. I often use this version for fall weddings or Thanksgiving desserts.
Fruit Infusions
Add ½ cup of raspberry or blackberry jam to the chocolate mixture before swirling for a fruity twist. For a tropical version, replace the vanilla bean paste with 1 tbsp coconut extract and add ½ cup toasted coconut flakes to the buttercream.
These fruit-infused variations work beautifully with passionfruit curd drizzled on top for an elegant presentation. The acidity from the fruits balances the sweetness perfectly. 🍓
Nutty Enhancements
Fold ½ cup chopped toasted walnuts or pecans into the buttercream for added texture and flavor. For a more decadent version, add 2 oz chopped dark chocolate to the buttercream and warm it slightly to create a ganache-like texture.
This works especially well with sea salt flakes sprinkled on top for a sophisticated finish. I recommend toasting the nuts in brown butter before adding them for extra depth of flavor.
Nutrition facts
Frequently asked questions
Can I make this cake in a single layer instead of two?
The two-layer design creates the signature swirl effect that makes this cake visually stunning. However, you can bake it as a single 10-inch layer if preferred—just increase the baking time to 35-40 minutes and adjust the buttercream quantity accordingly. The flavor will be identical, but the presentation will differ.
How do I prevent the chocolate swirl from sinking into the cake?
Chill the batter for 15-20 minutes before baking to help stabilize the swirl. Also, use a spoon or offset spatula to gently create the well in the center of the batter—don’t overmix. If the chocolate still sinks, reduce the amount to 10 oz and add 1 tbsp cornstarch to the melted chocolate mixture for thicker consistency.
What’s the best way to store leftovers?
Wrap the cake tightly in plastic wrap, then place it in an airtight container with parchment between layers. It stays fresh for 3 days at room temperature or 5 days refrigerated. For longer storage, freeze the fully assembled cake (without frosting) for up to 3 months. Thaw overnight in the fridge before frosting.
Can I substitute vanilla bean paste with vanilla extract?
Yes! Use 2 tbsp vanilla extract instead, but for deeper flavor, add 1 tsp vanilla sugar (powdered sugar + vanilla bean seeds). Tahitian vanilla extract adds floral notes, while Madagascar vanilla is more classic. For extra richness, scrape seeds from 1 vanilla bean directly into the batter.
Why did my buttercream turn grainy?
Grainy buttercream usually means the powdered sugar wasn’t sifted or the butter wasn’t softened enough. Always sift the sugar and use room-temperature butter. If it happens, mix in 1 tsp milk or cream to dissolve the grains. For extra stability, chill the buttercream for 10 minutes before using.