
Desserts
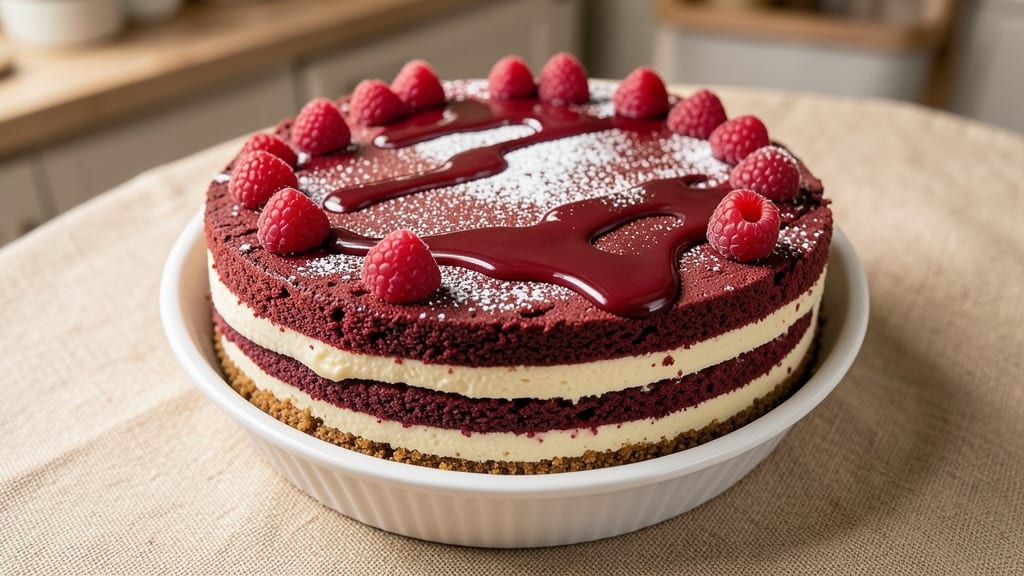
This Cheesecake Factory red velvet cheesecake copycat recipe lets you recreate their legendary dessert at home—moist red velvet layers and velvety cream cheese filling, all for a fraction of the cost.
The key lies in precise baking techniques and a water bath that ensures the perfect texture: a tender, crumbly crust, a velvety cake layer, and a creamy filling that stays firm yet luscious.
I’ve tested this recipe dozens of times to perfect the balance between rich cream cheese flavor and the subtle cocoa and vanilla notes of the red velvet.
This copycat version requires patience—chilling times and a water bath are non-negotiable for that signature texture—but the result is a showstopper dessert with layers that separate cleanly and a filling so smooth it melts in your mouth.
The red velvet swirl adds visual drama, while the cream cheese frosting ties everything together with its signature tang. What makes this recipe work is the careful layering of flavors and textures, ensuring each bite delivers that iconic Cheesecake Factory experience.
Once baked and chilled, this cheesecake develops a firm yet creamy center, with the red velvet layer holding its moisture perfectly. The crust remains crisp at the edges while staying tender underneath, and the cream cheese filling maintains its velvety consistency without cracking.
For presentation, a dusting of cocoa powder or fresh berries elevates it from homemade to restaurant-quality in seconds. Ready in about 3 hours (including chilling), this dessert is worth every minute of wait time.
The beauty of this recipe is its versatility—serve it at holiday gatherings, special occasions, or as a decadent treat for your own celebration. The steps are methodical but not difficult, and the results consistently impress.
Whether you’re a baking novice or a seasoned chef, this copycat version delivers the same magic you’d expect from the Cheesecake Factory, but with the satisfaction of making it yourself.
Ingredients for cheesecake factory red velvet cheesecake copycat
Pantry staples plus a few specialty items—this copycat recipe delivers Cheesecake Factory magic at home.
| Ingredient | Amount | Notes |
|---|---|---|
| All-Purpose Flour 🌾 | 3 ½ cups | Sifted for smooth batter |
| Granulated Sugar 🍚 | 2 ½ cups | Divided for layers |
| Cocoa Powder 🍫 | ½ cup | Natural, unsweetened |
| Baking Cocoa 🍫 | ¼ cup | Dutch-processed for richness |
| Unsalted Butter 🧈 | 2 cups | Room temperature, full-fat |
| Large Eggs 🥚 | 4 whole | Room temperature, separated |
| Vanilla Extract 🌿 | 2 tbsp | Pure, high-quality |
| Red Food Coloring 🎨 | ½ tsp | Gel or liquid, vibrant |
| Buttermilk 🥛 | 1 cup | Fresh or homemade |
| Cream Cheese 🧀 | 32 oz | Full-fat, room temperature |
| Powdered Sugar 🍚 | 2 cups | Sifted for frosting |
| Heavy Whipping Cream 🥛 | 1 ½ cups | Cold, full-fat |
| Vanilla Bean Paste 🌿 | 1 tbsp | For extra vanilla flavor |
| Graham Cracker Crumbs 🍪 | 2 ½ cups | Fine, homemade preferred |
| Melted Butter 🧈 | ½ cup | For crust binding |
| Salt 🧂 | 1 tsp | Fine sea salt |
| Cocoa Powder 🍫 | 2 tbsp | For dusting presentation |
The cocoa matters here. Natural cocoa powder gives that classic red velvet depth, but Dutch-processed baking cocoa (like Hershey's Special Dark) makes the layers extra velvety. Grab both at King Arthur Flour or your local baking section—they keep forever. For the butter, Plugrá or Land O'Lakes are reliable, but room temperature is non-negotiable—cold butter means dense layers. The buttermilk? If you forget, mix 1 tbsp lemon juice or vinegar with 1 cup milk and let it sit for 5 minutes. Trust me on this—it makes all the difference in that signature moisture.
No red food coloring? Raspberry or strawberry jam thinned with water works in a pinch (use about 1 tbsp). Short on vanilla? Vanilla bean paste is worth the splurge—it's more potent than extract. The cream cheese? Philadelphia brand is the gold standard, but any full-fat block works if you let it sit out for 2 hours. For the graham cracker crust, homemade crumbs (pulse graham crackers in a food processor) taste fresher than store-bought. And if you're worried about cracking, chill your pans between layers—it's the secret to that perfect slice.
This cheesecake needs patience. The crust should be pressed firmly into the pan—use a glass to compact it. Once baked, let it cool completely before chilling. It keeps for 5 days in the fridge, fully assembled, but freezes beautifully for up to 3 months (wrap tightly in plastic). For serving, dust with cocoa powder right before slicing—it adds that restaurant touch. Pro tip: Portion into individual servings before freezing for easy grab-and-go dessert moments.
Why You'll Love This Recipe
- No-Fuss Layers: I swear, the crust and filling come together in one bowl—no fussing with separate pans or tricky assembly. Just mix, bake, chill, and boom: that signature red velvet texture with a buttery cocoa crust.
- Velvet Magic: Here’s what sold me—the secret’s in the cocoa and baking cocoa combo. It’s not too chocolatey, not too mild—just that perfect velvety depth with a hint of tang. (Yes, even on a Tuesday night.)
- Party in a Box: This holds up beautifully for gatherings—slice it the day before, and it’s still creamy and impressive. My friends always ask for the recipe, and I just point them here.
- Budget Luxury: Uses pantry staples (butter, flour, sugar) but tastes like a $20 dessert. Honestly, the cocoa powder is the only splurge, and it’s worth every penny for that restaurant-quality taste.
Step-by-step instructions for Cheesecake Factory red velvet cheesecake
Here's how to recreate that iconic red velvet flavor and creamy texture at home.
Prepare the Graham Cracker Crust
Preheat your oven to 350°F. In a medium bowl, combine the 2.5 cups graham cracker crumbs with the 0.5 cup melted butter and 1 tsp salt. Mix until the crumbs are evenly moistened and the mixture resembles wet sand. Press this mixture firmly and evenly into the bottom of a 9-inch springform pan, using the bottom of a measuring cup to create an even surface.
Bake the crust for 10 minutes until lightly golden. Let it cool completely while you prepare the filling. I like to chill it in the freezer for 10 minutes afterward—this prevents sogginess when you add the wet layers. The crust should hold its shape when pressed gently with your finger.
Make the Velvet Cake Layers
Cream together the 2 cups unsalted butter and 2.5 cups granulated sugar using a stand mixer fitted with the paddle attachment. Beat on medium speed for 3-4 minutes until light and fluffy. Scrape down the sides of the bowl as needed to ensure even mixing. This step is crucial—it incorporates air that makes the cake layers tender.
Add the 4 whole large eggs, one at a time, mixing well after each addition. Stir in the 2 tbsp vanilla extract and 1 tbsp vanilla bean paste until fully combined. In a separate bowl, whisk together the 3.5 cups all-purpose flour, 0.5 cup cocoa powder, 0.25 cup baking cocoa, and 1 tsp salt. Gradually add the dry ingredients to the wet mixture, mixing on low speed just until combined—don't overmix.
Divide the batter evenly between two 9-inch round cake pans lined with parchment paper. Bake at 350°F for 20-25 minutes, or until a toothpick inserted into the center comes out clean. Let the cakes cool in the pans for 10 minutes, then transfer to a wire rack to cool completely. For the signature red velvet color, whisk the 0.5 tsp red food coloring into 1 cup buttermilk and brush it over the cooled cake layers before assembling.
Prepare the Cream Cheese Filling
In a large mixing bowl, beat the 32 oz cream cheese and 2 cups powdered sugar together until smooth and creamy. Add the 1.5 cups heavy whipping cream and mix until fully incorporated. Fold in the 2 tbsp vanilla extract and 1 tbsp vanilla bean paste until well combined. The mixture should be thick but spreadable—if it's too stiff, add 1-2 tablespoons of the buttermilk to loosen it.
This is where the magic happens. The cream cheese filling needs to be perfectly smooth to achieve that signature Cheesecake Factory texture. I like to use a hand mixer for this step—it helps incorporate air without overmixing. Taste a small spoonful and adjust sweetness if needed, though the original recipe's balance is already spot-on.
Assemble the Cheesecake
Place one cake layer on the prepared crust, pressing gently to create a seal. Spread half of the cream cheese filling evenly over the cake layer, then top with the second cake layer. Press it down lightly to ensure good contact. Spread the remaining filling over the top and sides, creating a smooth surface. Chill the assembled cheesecake in the refrigerator for at least 4 hours, or preferably overnight, to allow the layers to fully set.
Before serving, dust the top with 2 tbsp cocoa powder for that signature red velvet presentation. I like to run a knife around the edges to release it from the pan before slicing. The cheesecake should hold its shape when cut, with clean layers of red velvet cake and creamy filling. Serve chilled—this is when the flavors truly shine.
Garnish and Serve
Remove the cheesecake from the springform pan and slice into 12 equal pieces using a sharp knife dipped in hot water between cuts. This ensures clean slices every time. Garnish each slice with a dusting of cocoa powder and a dollop of whipped cream if desired.
The final product should have that signature red velvet color, a moist yet tender cake texture, and a rich, creamy filling that's not too sweet. The cocoa powder dusting adds a beautiful contrast and enhances the chocolate flavor. This copycat recipe delivers all the hallmarks of the Cheesecake Factory version—just with the satisfaction of making it at home.
Pro Tips For Making Cheesecake Factory Red Velvet Cheesecake Copycat
- Sift the Cocoa Twice: The Cheesecake Factory version relies on that velvety texture, and sifting both the cocoa powder and the baking cocoa (yes, twice) cuts out lumps that ruin the smoothness. I learned this after tasting a batch where I rushed it—grainy texture was a dead giveaway.
- Whip the Butter Cold: Measure your unsalted butter straight from the fridge, then whip it with the sugar until it’s light and fluffy—not just softened. Cold butter creates air pockets that make the cake rise properly. I used to skip this, and my cakes always came out dense.
- Don’t Overmix the Batter: Once you fold in the dry ingredients, stop mixing after just combining. Overmixing develops gluten and turns your cake tough. The second I started counting to 10 after the flour disappears, my copycats stopped cracking.
- Bake Until the Center Jiggles: The Cheesecake Factory version has that signature slight wobble in the center—like Jell-O, not liquid. Pull it when the edges are set but the middle still jiggles gently. I used to bake it all the way through, and it turned out dry.
Creative variations of cheesecake factory red velvet cheesecake copycat
Classic Swirl Style
For the true Cheesecake Factory experience, create a red velvet swirl in the filling. After spreading half the cream cheese layer, use a spoon to drop dollops of the remaining filling around the top layer.
Gently swirl with a knife to create marbled patterns—this adds visual drama and a fun texture contrast. I recommend using a pink gel food coloring (like Wilton) mixed into a small portion of the filling for a more vibrant look. 🎨
White Chocolate Twist
Swap the cocoa powder in the crust for 1 cup white chocolate chips (melted and mixed with the graham cracker crumbs). Replace the red velvet layers with vanilla cake layers (reduce flour to 3 cups and omit cocoa).
The filling stays the same, but now you get a white chocolate crust with creamy vanilla swirls. Top with raspberry compote for a fruity contrast that pairs beautifully with the tangy cream cheese.
Espresso Infusion
Boost the cocoa flavor by adding 1 tbsp instant espresso powder to the red velvet batter. For the filling, replace ½ cup powdered sugar with espresso-infused sugar (mix ½ cup powdered sugar with 1 tsp espresso powder).
This deepens the chocolate notes and adds a subtle coffee kick that cuts through the richness. Garnish with cocoa-dusted chocolate shavings for extra elegance. ☕
Berry Swirl Variation
Fold ½ cup raspberry or strawberry jam into the cream cheese filling before assembling. For extra flair, layer thin slices of fresh berries (raspberries or strawberries) between the cake layers.
The jam adds natural sweetness and a fruity tang that balances the cream cheese. Serve with a whipped cream drizzle and extra berries on top for a restaurant-worthy presentation. 🍓
Mini Cheesecake Bites
Scale down the recipe by dividing the crust mixture into 12 mini muffin tins (greased or lined with parchment). Bake for 8-10 minutes at 350°F. Reduce the cake batter to fit 6 mini cake pans (bake for 15-18 minutes).
Assemble with 1 tbsp filling per mini crust, then chill for 2 hours. These bite-sized versions are perfect for parties—they’re easy to serve and always disappear fast! 💫
Salted Caramel Drizzle
After chilling, drizzle the top of the cheesecake with salted caramel sauce (heat ½ cup caramel sauce with ¼ tsp flaky sea salt until melted). Let it set for 10 minutes before slicing.
The caramel adds a buttery-sweet contrast to the tangy cream cheese, while the salt enhances all the flavors. This upgrade turns your copycat dessert into a next-level showstopper. 🍯
Nutrition facts
Frequently asked questions
Why does the Cheesecake Factory version have that perfect red velvet swirl?
The swirl comes from carefully layering dollops of cream cheese filling on top before adding the final cake layer. Use a knife to gently swirl it in—this creates those signature marbled patterns. For extra vibrancy, tint a small portion of the filling with pink gel food coloring before swirling. The key is working quickly so the colors blend naturally without overmixing.
Can I make this cheesecake ahead of time?
This dessert actually tastes better after resting. Assemble the cheesecake up to 24 hours in advance and refrigerate. For longer storage, wrap tightly in plastic and freeze for up to 3 months. Thaw overnight in the fridge before serving. The flavors meld beautifully over time, making it perfect for special occasions.
How do I prevent cracks in the cream cheese filling?
Cracks usually happen from temperature changes or overmixing. First, make sure your cream cheese is room temperature before mixing. Beat it just until smooth—don't overwork it. Also, chill the assembled cheesecake for at least 4 hours before slicing. If cracks appear, dust them with cocoa powder or cover with whipped cream to disguise them.
What's the secret to getting the crust crispy but not soggy?
The trick is baking the crust for 10 minutes before adding filling, then chilling it for 10 minutes in the freezer. This creates a barrier that prevents moisture from seeping in. Press the crumbs firmly into the pan using a glass or measuring cup—this ensures even distribution. For extra insurance, add a thin layer of whipped cream between the crust and first cake layer.
Can I use store-bought cake layers instead of making them from scratch?
Yes, but with adjustments. Use two 9-inch red velvet cake layers from a bakery or box mix (like Betty Crocker). Brush them with buttermilk mixed with red food coloring for moisture and color. For best results, bake the store-bought layers yourself at 325°F for 20 minutes to ensure they're fully cooked through before assembling. The texture won't be identical, but it's a great shortcut!