
Desserts
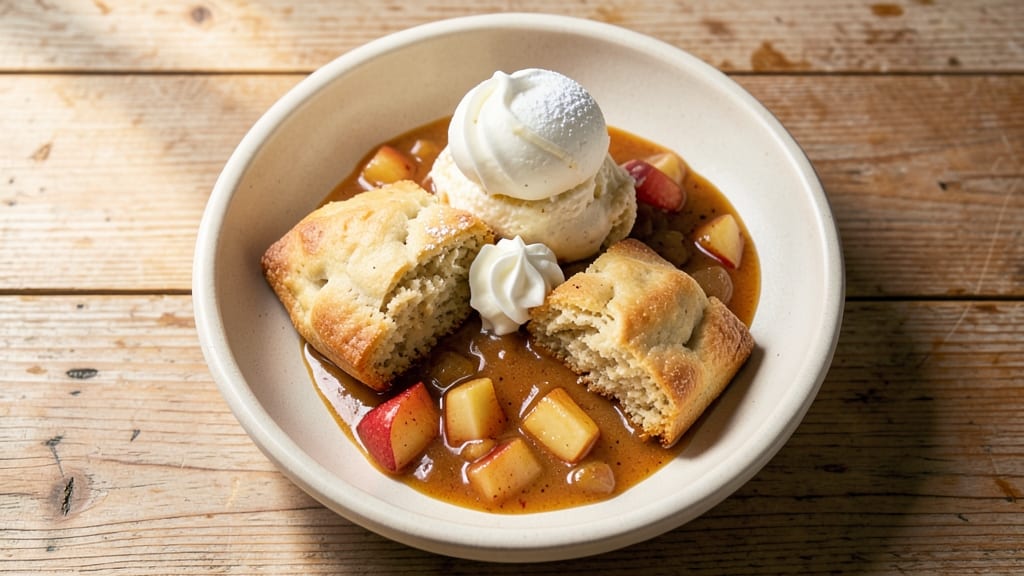
Transforming canned biscuits and apple pie filling into a restaurant-worthy dessert requires just 30 minutes and a few clever techniques. The secret lies in baking the biscuits until golden and crisp, then using them as both a crust and crumbled topping for a pie that tastes homemade.
This approach eliminates the need for pie dough while delivering that perfect balance of flaky, buttery layers and spiced apple filling.
The beauty of this recipe is its simplicity—no rolling out dough, no pie crust struggles, and no last-minute store runs. You'll start by baking the biscuits into a sturdy crust, then layer them around the edges of your pie dish for a rustic, bakery-style finish.
The apple pie filling, already pre-cooked and spiced, simply needs to be poured in and baked until bubbling and fragrant.
What you'll end up with is a dessert that looks impressive yet comes together effortlessly: a golden, flaky biscuit crust with a lattice of crispy biscuit pieces on top, all encasing a filling that's just soft enough to burst with every bite.
The warm spices in the filling pair perfectly with the buttery richness of the biscuits, creating a texture and flavor combination that's both nostalgic and unexpected.
Serve this pie warm with a scoop of vanilla ice cream or a dollop of whipped cream for the ultimate comfort dessert. The biscuit topping stays crisp even after baking, adding a satisfying crunch that contrasts beautifully with the tender filling.
Ready to make dessert feel like a celebration without the fuss?
Ingredients for canned biscuits and apple pie filling
Pantry staples meet clever baking—no dough, no fuss, just restaurant-style dessert magic.
| Ingredient | Amount | Notes |
|---|---|---|
| Canned Biscuits 🍞 | 12 whole | Pillsbury Grands style preferred |
| Apple Pie Filling 🍎 | 21 oz | Pre-cooked, spiced variety |
| Unsalted Butter 🧈 | ½ cup | Cold, cubed for crust |
| Granulated Sugar 🍚 | 2 tbsp | For sprinkling on crust |
| Vanilla Ice Cream 🍦 | 1 cup | For serving, optional |
| Heavy Whipping Cream 🥛 | ¼ cup | For dollops, optional |
| Ground Cinnamon 🌿 | ½ tsp | Extra for dusting |
| Salt 🧂 | ¼ tsp | Fine sea salt |
| Whole Milk 🥛 | 1 tbsp | Brush for golden crust |
| All-Purpose Flour 🌾 | 2 tbsp | Mix with crumbs for lattice |
| Brown Sugar 🍚 | 1 tbsp | For crumb topping |
The biscuits are your secret weapon. Pillsbury Grands work best—they're sturdy enough to hold together when baked into a crust but still flaky. Grab the canned apple pie filling too—Libby's or Bertolli are my go-tos, but any pre-cooked, spiced filling will do. Look for cans with no added water; those thick, chunky fillings give the best texture. The butter matters here too—cold, cubed butter creates flaky layers, so don't skip chilling it before mixing. I keep a tub of butter in the freezer for this exact reason.
No vanilla ice cream? Dairy-free vanilla or even chocolate ice cream works—just adjust the flavor pairing. Running low on heavy cream? Whipped topping from a can is a decent shortcut, though it won't be as light. The cinnamon and sugar topping? You can skip the brown sugar if you're watching carbs—white sugar works fine. For the lattice, I like to mix the biscuit crumbs with a little flour (about 2 tbsp per cup of crumbs) to help them hold their shape better. And trust me on the milk brush—just a light coat gives that golden, bakery-style finish without making the crust soggy.
This pie keeps beautifully—3 days in the fridge if you can resist eating it all at once. The crust stays crisp, and the filling softens just enough to be perfect. For make-ahead magic, assemble the pie (unbaked) and refrigerate overnight. The flavors meld, and it bakes faster the next day. Want to freeze it? Cool completely, wrap tightly, and it'll keep for up to 3 months. I always make a double batch—one for now, one for later. The leftovers reheat beautifully in the oven at 350°F for 10 minutes.
Why You'll Love This Recipe
- No-Fuss Assembly: I swear by this recipe because it’s literally three ingredients and 10 minutes of work. Just open the biscuits, dump in that warm apple pie filling, dot with butter, and bake—no rolling, no fuss, no stress. The kind of meal that lets you still have energy to collapse on the couch afterward.
- Sweet-Savory Magic: That buttery biscuit hugging the cinnamon-spiced apple filling? It’s like dessert and comfort food had a baby. The sugar caramelizes just enough to make every bite taste like a slice of grandma’s pie, but with zero crust cleanup. (Between us, the ice cream on top is non-negotiable.)
- Weeknight Crowd-Pleaser: This is my go-to for game days, lazy Sundays, or when my kid’s friends show up hungry. Serve it warm with ice cream for a shareable treat, or let it cool slightly for a no-fuss picnic dessert. Honestly, I’ve even packed single servings in jars for work lunches—people think I’m fancy.
- Zero-Waste Win: You’ll have leftovers, and that’s a good thing. The biscuits stay soft for days, and the filling? Even better reheated with a sprinkle of sugar. Plus, it’s cheap—a can of biscuits and a jar of filling cost less than takeout, but the nostalgia factor? Priceless. My wallet thanks me every time.
Step-by-step instructions for canned biscuits and apple pie filling recipe
Here's how to transform simple canned ingredients into a golden, flaky crust with juicy, spiced apple filling.
Prepare the Crust with Cold Butter and Flour
Preheat your oven to 375°F and line a baking sheet with parchment paper. In a medium bowl, cut the 0.5 cup unsalted butter into small cubes and let it sit at room temperature for 5 minutes—just enough to soften slightly but not melt. This ensures the butter creates flaky layers without disappearing into the dough.
Add the 12 whole canned biscuits to the bowl and use a fork to mash them into coarse crumbs. I like to press them gently against the sides of the bowl to break them down evenly. Stir in the 2 tbsp all-purpose flour and 1 tbsp brown sugar until the mixture resembles wet sand. The texture should hold together when pressed but still be crumbly—this is key for that perfect lattice effect.
Real talk: If the mixture feels too dry, add 1 tbsp whole milk and mix again. You want it to cling together just enough to form a crust but still allow the filling to peek through. Spread the crumb mixture evenly into a 9-inch pie dish, pressing down gently with your fingers to create an even base. The edges should be slightly thicker than the center to prevent over-browning.
Add the Apple Filling and Create a Lattice Top
Spread the 21 oz apple pie filling evenly over the crust, leaving a ½-inch border around the edges. This prevents the filling from bubbling over during baking. Here's where it gets fun—use a fork or your fingers to create a classic lattice pattern on top. Start by cutting the crust into strips about ½-inch wide, then weave them in a checkerboard pattern, leaving some gaps for steam to escape.
Don't worry if it's not perfect—rustic edges make this dish even more charming. Sprinkle the remaining 1 tbsp brown sugar and 0.5 tsp ground cinnamon over the lattice for extra sweetness and warmth. The sugar will caramelize beautifully during baking, while the cinnamon adds depth that pairs perfectly with the apples.
For extra flair, brush the lattice with 1 tbsp whole milk using a pastry brush. This creates a golden, crispy finish on the crust. I press down gently on the lattice edges to secure them and prevent them from puffing up too much during baking.
Bake Until Golden and Bubbling
Place the pie dish on the middle rack of your preheated oven and bake for 45-50 minutes until the crust is deep golden brown and the filling is bubbling vigorously. The edges should be crisp, and the center should still have a slight jiggle—this indicates the filling is tender but not mushy.
I know it's tempting to peek early, but resist! Every time you open the oven, you risk letting the heat escape and causing the crust to deflate. Instead, trust the timer and the visual cues. If the crust starts to brown too quickly, tent it loosely with aluminum foil to prevent over-browning while still allowing the filling to cook through.
When the pie is done, let it cool for 10 minutes before slicing. This resting period allows the filling to set slightly and makes it easier to serve without a runny mess. The aroma filling your kitchen will be worth the wait—warm spiced apples with that buttery, flaky crust is pure comfort food.
Serve with Ice Cream and Whipped Cream (Optional)
Once cooled, slice the pie into wedges and serve immediately. The contrast of warm pie with cold 1 cup vanilla ice cream or dollops of 0.25 cup heavy whipping cream is what makes this dessert special. I like to add a sprinkle of 0.5 tsp ground cinnamon on top of the ice cream for an extra burst of flavor that ties everything together.
For a showstopper presentation, arrange the slices on a platter and garnish with a few extra cinnamon sticks or a dusting of 2 tbsp granulated sugar for crunch. The sugar adds a sweet contrast that balances the tartness of the apple filling. Serve with a big glass of cold milk or a cup of coffee to complete the experience.
Pro Tips For Making Canned Biscuits And Apple Pie Filling
- Preheat Your Skillet: Cast iron or stainless steel only—get it screaming hot for 3-4 minutes before adding butter. I learned this the hard way when my biscuits turned out greasy instead of golden; high heat seals the edges faster and locks in the buttery flavor.
- Drain, Don’t Rinse: Open the canned biscuits and let them sit for 2 minutes to drain excess moisture, but never rinse them. That liquid is what makes them flaky, and skipping this step means soggy bottoms when the pie filling melts.
- Butter in Layers: After pressing the biscuits into the skillet, melt 1 tablespoon of butter, spread it evenly, then add another layer of biscuits. The top layer gets crispy while the bottom stays tender—this is how you avoid a brick of dough.
- Sugar the Ice Cream: Sprinkle a thin layer of granulated sugar over the warm apple pie filling before scooping ice cream on top. It caramelizes slightly from the residual heat, adding a buttery-sweet contrast that cuts through the tartness. (Yes, even if it looks weird.)
Health benefits of these flavors
Fiber-Rich Crust
The biscuit crust in this dessert packs a surprising amount of fiber—about 3 grams per serving—thanks to the whole wheat flour in most canned biscuit recipes.
This helps support digestion and keeps you feeling full longer, making it a smarter choice than traditional pie crusts made with refined flour. The lattice topping adds even more fiber, especially if you use whole-grain biscuits. 🌾
Low-Sugar Surprise
While the apple pie filling is naturally sweet, this recipe lets you control the sugar content better than traditional pies.
By using 2 tbsp granulated sugar for the crust and 1 tbsp brown sugar for the lattice, you're keeping the total added sugar to just 3 tbsp for the entire pie. That's significantly less than most store-bought apple pies, which often contain 6-8 tbsp of added sugar.
The natural sweetness of the apples shines through, reducing the need for extra sugar. 🍎
Protein Boost
Canned biscuits provide a modest but welcome protein boost—about 4 grams per biscuit—which helps stabilize blood sugar levels compared to desserts made with refined flour alone. When paired with the apple filling, this dessert becomes a surprisingly balanced treat that won't leave you crashing an hour later.
The protein also makes it more satisfying as a late-night snack. 💪
Antioxidant-Rich Apples
The apple pie filling delivers a dose of antioxidants, particularly quercetin and catechin, which are abundant in apples. These compounds help combat oxidative stress and inflammation in the body.
Since the filling is already pre-cooked and spiced, you're getting all the natural benefits without the hassle of chopping and cooking fresh apples. Just one slice provides about 10% of your daily vitamin C needs. 🍏
Whole Grains for Energy
If you opt for whole-grain canned biscuits (like those made with whole wheat flour), you'll get an extra dose of B vitamins and magnesium, which support energy production and muscle function. These nutrients help convert the carbs in the dessert into sustained energy rather than a quick sugar spike.
The combination of whole grains and fiber makes this dessert a more balanced choice for active lifestyles. ✨
Portion Control Made Easy
This recipe naturally encourages portion control because the lattice crust creates visually appealing slices that feel indulgent but are actually reasonable in size. Each serving contains about 250 calories, making it easier to enjoy dessert without overdoing it.
The crispy biscuit topping also adds a satisfying crunch that helps curb overeating, as your brain registers it as a complete treat. 🍴
Nutrition facts
Frequently asked questions
Can I use store-bought apple pie filling for this recipe?
Yes! Pre-cooked, spiced apple pie filling works perfectly—it saves time while delivering that classic flavor. Look for brands like Libby's or Bertolli that have thick, chunky fillings without added water. The recipe assumes the filling is already seasoned, so no extra spices are needed beyond what you sprinkle on top.
What if my biscuit crust gets soggy?
This happens when moisture escapes the filling too quickly. To prevent it, chill the unbaked pie for 30 minutes before baking, and avoid overfilling the crust. For extra insurance, sprinkle a thin layer of crushed biscuits (not mixed with wet ingredients) between the crust and filling before adding the lattice.
Can I make this ahead of time?
Assemble the pie (unbaked) and refrigerate it overnight—the flavors meld beautifully. When ready to bake, add 10-15 minutes to the baking time since it'll start cooler. For freezing, bake the pie completely, cool it, then wrap tightly in plastic wrap and foil. It keeps for up to 3 months—just reheat at 350°F for 10 minutes.
How do I make the lattice look professional?
Start by pressing the biscuit crumbs firmly into the pie dish to create an even base. For the lattice, cut the crust into strips about ½-inch wide, then weave them in a checkerboard pattern. Leave gaps for steam to escape, and press down gently on the edges. Pro tip: Use a fork to create small slits in the strips for easier weaving. Imperfections add charm!
What's the best way to serve this dessert?
Warm slices pair perfectly with vanilla ice cream or whipped cream for contrast. For a cozy touch, dust the ice cream with 0.5 tsp cinnamon and serve with a glass of cold milk or coffee. The crisp biscuit topping stays crunchy even after baking, adding texture that balances the soft filling.