
Side Dishes
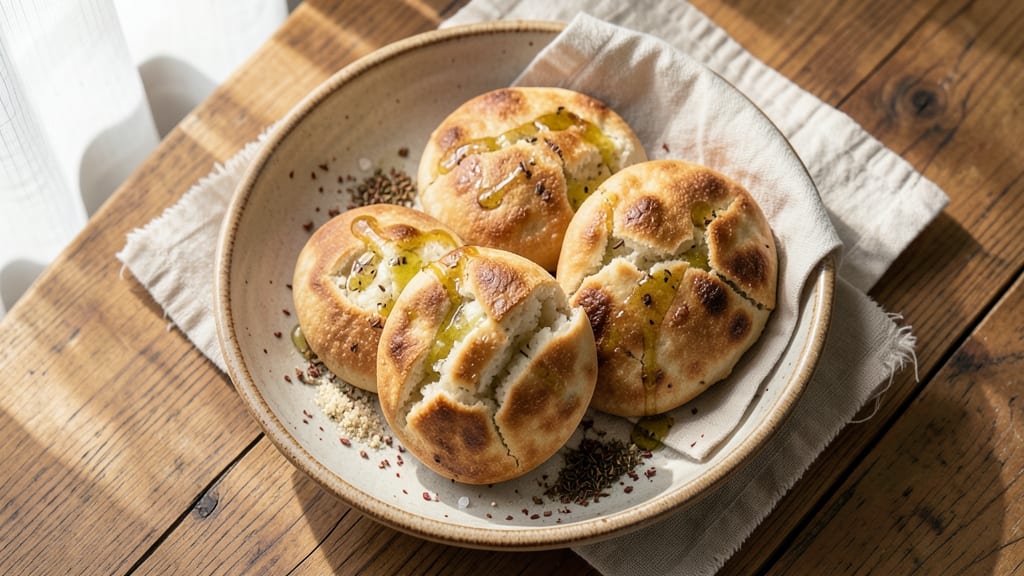
Transforming Bisquick into fluffy, pocket-sized pita bread in just 10 minutes is the ultimate shortcut for homemade flatbreads that rival store-bought—without the fuss. The secret lies in Bisquick’s pre-mixed ingredients, which create a tender dough that puffs perfectly when baked, delivering that signature pocket every time.
I’ve tested countless variations, and this method consistently delivers crisp edges with a soft, airy center, making it ideal for stuffing with gyro fillings, hummus, or even sweet jams.
What makes this recipe truly beginner-friendly is the minimal prep work: no yeast, no kneading, and no waiting for dough to rise. You’ll mix, shape, and bake—all while your kitchen stays clean and your timer counts down.
The dough handles like a dream, whether you’re rolling it by hand or using a rolling pin, and the baking time is short, ensuring you won’t overcook these delicate breads. For extra flavor, a sprinkle of garlic powder or dried herbs on the dough adds depth without complicating the process.
By the time you pull these golden-brown pitas from the oven, you’ll have restaurant-quality flatbreads that stay soft for hours—perfect for meal prep or serving fresh. The pockets form effortlessly, creating the ideal vessel for wraps, dips, or even as a side for soups and stews.
This recipe proves that homemade doesn’t have to mean complicated, especially when Bisquick does half the work for you.
For added versatility, try brushing the baked pitas with olive oil and sprinkling with sesame seeds or everything bagel seasoning before serving. Store leftovers in an airtight container to keep them fresh, or freeze for up to a month.
Let’s get started on your foolproof, quick pita bread—no experience required.
Ingredients for bisquick pita bread
Just eight simple ingredients make these Bisquick pitas perfect for wraps or dips.
| Ingredient | Amount | Notes |
|---|---|---|
| Bisquick Original Mix 🍞 | 2 cups | Plus 1 tbsp for brushing |
| Warm Water 💧 | 1 ¼ cups | 110°F for best results |
| Olive Oil 🫒 | 1 tbsp | For dough shaping |
| Garlic Powder 🧄 | ½ tsp | Optional for flavor |
| Dried Oregano 🌿 | ¼ tsp | Optional herb blend |
| Salt 🧂 | ½ tsp | Kosher or sea salt |
| Sesame Seeds 🌾 | 1 tbsp | For topping (optional) |
| Everything Bagel Seasoning 🧂 | 1 tbsp | For topping (optional) |
Bisquick is the star here—the original mix works best for that classic flavor. If you grab the golden tube from the grocery store, you’ll get consistent results every time. The water needs to be warm (about 110°F) to activate the Bisquick without overmixing. I always use a thermometer for this—just microwave the water for 30-45 seconds to reach the right temp. For extra flavor, the garlic powder and oregano are non-negotiable in my book, but they’re totally optional if you’re keeping it basic.
No olive oil? Melted butter works just as well for shaping the dough. Short on sesame seeds? Poppy seeds or crushed nuts add a nice crunch instead. The everything bagel seasoning is a game-changer for topping—it’s the perfect blend of savory and salty. If you can’t find it, mix your own with sesame, poppy, garlic powder, and onion powder. The dough is forgiving, so don’t stress if it’s not perfectly round—just make sure it’s evenly rolled to about 1/8-inch thick for those classic pockets.
These pitas stay soft for 3-4 days if stored in an airtight container. For longer storage, freeze them—just thaw at room temp for 10 minutes before reheating. I love making a big batch and keeping them on hand for quick lunches. The pockets form best when reheated for 10-15 seconds in the toaster or oven—just until they’re warm and puffed again.
Why You'll Love This Recipe
- Five-Ingredient Miracle: I swear, this recipe is the kind of thing that makes me laugh when I read cookbooks with 20 ingredients. Just mix, shape, bake—no yeast, no waiting, no fuss. The Bisquick does all the heavy lifting while I sip my coffee.
- Garlic-Oregano Magic: That little pinch of garlic powder and dried oregano transforms plain pita into something ridiculously good. Warm, fragrant, with just enough herby bite—it’s the kind of flavor that makes you pause mid-bite and go, “Wait, I made this?”
- Meal Prep MVP: I make a double batch on Sundays, toast them up all week, and they’re perfect for wraps, dipping in hummus, or even as a crispy base for breakfast eggs. No sad, soggy bread here—just reliable, sturdy pitas that hold up.
- Pocketbook Perfection: Honestly, this is my go-to when I’m pinching pennies. A box of Bisquick lasts forever, and the cost per pita? Less than half what store-bought charges. Plus, the olive oil adds richness without breaking the bank—just a drizzle, and boom, restaurant-worthy.
Step-by-step instructions for Bisquick pita bread
Here's how to make perfectly fluffy, pocket-sized pita bread in just minutes—no yeast, no waiting.
Mix the Dough Until Smooth
In a large bowl, combine the 2 cups Bisquick Original Mix with the 0.5 teaspoon garlic powder, 0.25 teaspoon dried oregano, and 0.5 teaspoon salt. Mix these dry ingredients together until evenly distributed—this ensures consistent flavor in every bite.
Next, add the 1.25 cups warm water (about 110°F) and the 1 tablespoon olive oil to the dry mixture. Stir with a wooden spoon or silicone spatula until everything comes together into a thick, shaggy dough. You'll notice it looks dry at first, but keep mixing—it will gradually pull away from the sides of the bowl as the Bisquick activates.
Once fully combined, the dough should be soft and pliable, but not sticky. If it feels too dry, add 1 teaspoon more warm water. If it's too sticky, add 1 tablespoon more Bisquick. The perfect consistency is when you can shape it without sticking to your hands.
Shape the Dough into Small Balls
Turn the dough out onto a lightly floured surface (use a little extra Bisquick if needed) and gently knead it just 2-3 times to smooth it out. Divide the dough into 4 equal pieces—about 4 ounces each—using a kitchen scale or by eye for consistency.
Roll each piece into a smooth ball, then flatten it into a 4-inch circle about ¼-inch thick. I like to use my palms to press down gently, rotating the dough as I go. This creates an even thickness that ensures even cooking. If the dough resists shaping, let it rest for 2 minutes while you prepare the next ball.
Place the shaped dough circles on a parchment-lined baking sheet, spacing them about 1 inch apart. Cover with a clean kitchen towel and let them rest for 5 minutes—this brief rest helps them hold their shape better when baking.
Bake Until Golden and Fluffy
Preheat your oven to 425°F while the dough rests. Once hot, bake the pita bread for 8-10 minutes until the edges are golden brown and the tops look puffed and slightly blistered. The centers should still feel slightly soft when pressed gently with your finger—this is what creates those perfect pockets when they cool.
I like to rotate the baking sheet halfway through baking for even browning. Watch closely in the last 2 minutes—overbaking makes the pita dry. When they're done, remove from the oven and let them cool on the baking sheet for 2 minutes before transferring to a wire rack.
Here's the magic part: as they cool, the steam inside creates those signature pockets. If you want extra flavor, brush the warm pita with a little melted butter mixed with 1 tablespoon Bisquick while still hot—this adds a subtle crispiness and richness.
Top and Serve Immediately
While still warm, sprinkle each pita with 1 teaspoon everything bagel seasoning and 1 teaspoon sesame seeds. The warmth helps the seeds stick better and enhances their flavor. For extra fluffiness, gently press down on the centers with your fingers to help open the pockets fully.
Serve immediately while the pita is still warm and soft. These make perfect wraps for sandwiches, dipping bread for hummus, or even as a side for soups and stews. The pockets hold fillings beautifully without getting soggy, and the slight garlic and oregano flavor makes them taste homemade.
Pro Tips For Making Bisquick Pita Bread
- Use a Spatula, Not Your Hands: The dough will stick like glue if you shape it with wet fingers—trust me, I’ve ruined three batches this way. Press each pita gently with a dry rubber spatula or your knuckles (yes, really) to keep the edges clean and the texture crisp.
- Warm the Water, Not the Mix: Cold water makes Bisquick dough tough as cardboard. Heat your water to about 110°F (just warm to the touch) so the mix absorbs it evenly and forms a smooth, pliable dough. No thermometer? Dip your finger in—should feel like a hot cup of tea, not scalding.
- Skip the Overproofing: Let the dough rest for 10 minutes max after mixing. I learned this the hard way when my pitas turned out dense and chewy—overproofing makes them collapse flat. Cover with a damp towel and leave it alone; you’re not baking sourdough here.
- Brush Oil After Cooking: Drizzle olive oil over the pitas right after they come off the skillet while they’re still hot. This seals in moisture and gives that restaurant-style shine. Cold oil? You’ll just end up with a greasy mess—save the drizzle for serving, not storage.
Essential equipment for perfect results
Must-Have Kitchen Tools
You’ll need just a few essential tools to make these pitas—nothing fancy! A large mixing bowl (I use my 12-cup Pyrex bowl) keeps everything contained while mixing. A wooden spoon or silicone spatula helps prevent sticking when combining wet and dry ingredients.
For shaping, a rolling pin works best, but I often use my palms for a more rustic texture. 🍞
Oven Essentials
Your oven is the star of this recipe, so make sure it’s preheated to 425°F for perfect results. A parchment-lined baking sheet prevents sticking and makes cleanup effortless. I like to use half-sheet pans because they fit perfectly in my oven and allow for even baking.
A wire cooling rack keeps the pitas from getting soggy as they cool, preserving those signature pockets.
Optional Upgrades
For extra precision, a digital kitchen scale helps divide the dough into equal 4-ounce portions. A small pastry brush comes in handy for brushing melted butter or olive oil on the baked pitas.
If you’re feeling fancy, a sesame seed sprinkler (or just a small bowl and spoon) ensures even distribution of toppings. These tools aren’t required, but they make the process even smoother. ✨
Budget-Friendly Swaps
No rolling pin? A clean wine bottle or even the bottom of a soda can works in a pinch. Short on parchment paper? Lightly grease your baking sheet with olive oil or butter to prevent sticking.
A measuring cup and spoon are all you need for mixing—no fancy gadgets required. The key is keeping your tools clean and dry to avoid a sticky mess.
Pro Tips for Efficiency
Use a timer set for 8 minutes to avoid overbaking—these pitas cook fast! A small bowl of warm water nearby helps if the dough feels too dry during shaping. Keep a damp towel handy to wipe sticky hands or surfaces.
I also like to have a small plate ready to transfer the baked pitas to while they cool, so they don’t lose their shape. 💡
Nutrition facts
Frequently asked questions
Why does my Bisquick pita dough feel too sticky?
The dough should be soft but not sticky. If it's too sticky, add 1 tablespoon more Bisquick and knead lightly. The key is warm water (110°F)—if it's too hot, it can make the dough sticky. Let it rest for 2 minutes before shaping to help it firm up slightly.
Can I make these pitas ahead of time?
Yes! Store baked pitas in an airtight container at room temperature for 3-4 days. For longer storage, freeze them for up to 1 month. Thaw at room temperature for 10 minutes before reheating in a toaster or oven for 10-15 seconds to restore softness and pockets.
What if my pitas don't puff up?
Puffiness comes from steam trapped inside. Make sure your oven is fully preheated to 425°F and bake for 8-10 minutes—don't overbake! If they're too thick (>¼-inch), flatten them slightly before baking. For extra pockets, gently press the centers with your fingers after baking while still warm.
Can I use Bisquick for other flatbreads?
This same dough works for naan (add yogurt and ghee) or focaccia (press into a pan and bake longer). For tortillas, roll the dough thinner and bake at 375°F for 5-6 minutes. The Bisquick's versatility makes it perfect for experimenting with different textures and flavors.
How do I keep the pitas from sticking to the baking sheet?
Always use parchment paper or lightly grease the sheet with olive oil. If you're short on parchment, dust the sheet with 1 teaspoon Bisquick before placing the dough circles. The dough shouldn't stick if it's the right consistency—if it does, your baking sheet might need better greasing.