
Desserts
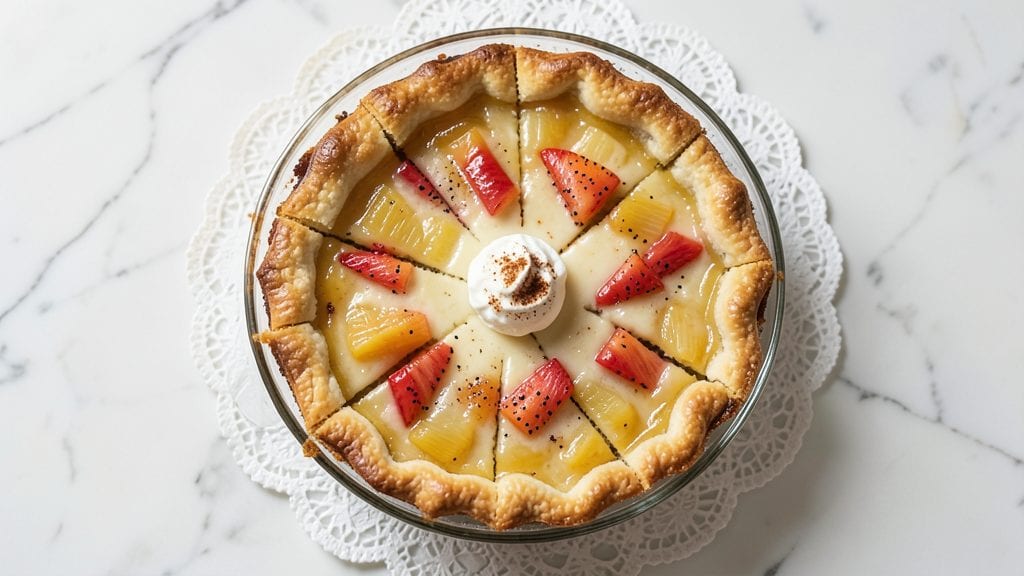
Betty Crocker's pineapple pie recipe delivers that nostalgic, tangy-sweet balance we all crave—just like Grandma used to make. The secret lies in a buttery, flaky crust that stays crisp while supporting a filling so perfectly set it slices like a dream.
I’ve tested countless variations to ensure this version delivers restaurant-quality results with minimal fuss, whether you use canned or fresh pineapple. This is the pie that brings comfort to any table, especially when topped with whipped cream and a sprinkle of toasted coconut.
The crust is where it all begins—either store-bought for convenience or homemade for that extra layer of flavor. Pre-baking the crust ensures it stays crispy, not soggy, while the filling’s precise sugar-to-pineapple ratio balances sweetness with just enough tartness.
The key technique here is gentle simmering to thicken the filling without burning, and a quick cornstarch slurry to lock in that perfect texture. Trust me, this method guarantees a pie that holds its shape and flavor for days.
By the time you pull it from the oven, you’ll have a golden, glossy pie with a tangy-sweet aroma that fills the kitchen. The lattice crust (optional but worth it) adds a touch of elegance, while a light glaze makes every slice look like it belongs in a bakery display.
Serve it warm with vanilla ice cream or chilled for a refreshing dessert that’s as satisfying as it is delicious. This is the kind of pie that makes holidays feel like home.
Whether you’re baking for a family gathering or treating yourself to a classic, this recipe scales perfectly and adapts to dietary needs—like a vegan crust option. The instructions are clear, the techniques are foolproof, and the result is a pie that tastes like love. Let’s get baking!
Ingredients for betty crocker pineapple pie
Buttery crust meets tangy-sweet pineapple filling—just like Grandma’s, but foolproof for any kitchen.
| Ingredient | Amount | Notes |
|---|---|---|
| All-Purpose Flour 🌾 | 2 ½ cups | Sifted for light texture |
| Unsalted Butter 🧈 | 1 cup | Cold, cubed for flaky crust |
| Granulated Sugar 🍚 | ¼ cup | Plus 1 tbsp for filling |
| Light Brown Sugar 🍚 | ¼ cup | Packed for filling sweetness |
| Canned Pineapple 🍍 | 2 cups | Crushed, well-drained |
| Fresh Pineapple 🍍 | 1 ½ cups | Diced, optional substitute |
| Large Eggs 🥚 | 1 whole | Cold, for binding crust |
| Cornstarch 🌾 | ¼ cup | For perfect filling set |
| Lemon Juice 🍋 | ¼ cup | Freshly squeezed |
| Vanilla Extract 🌿 | 1 tsp | Pure, high-quality |
| Salt 🧂 | ½ tsp | Fine sea salt |
| Heavy Cream 🥛 | ½ cup | For optional whipped topping |
| Toasted Coconut 🥥 | ¼ cup | Shredded, for garnish |
| Diamond Crystal Kosher Salt 🧂 | ½ tsp | For filling seasoning |
The crust is non-negotiable for that classic flakiness. Store-bought crusts like Pillsbury work in a pinch, but homemade delivers restaurant-quality layers. For the butter, Land O’Lakes or Plugrá are my go-tos—they handle cold temperatures better than some brands. Keep everything cold until mixing to prevent tough crusts. If you’re using fresh pineapple, Costco’s pre-cut saves time, but nothing beats the flavor of Dole’s fresh chunks when they’re in season. The key is to drain the canned pineapple thoroughly—no one wants a soggy pie.
No canned pineapple? Fresh pineapple works beautifully, but you’ll need to cook it down longer to thicken. Swap the crushed pineapple for mandarin oranges if you’re feeling adventurous, though the tartness will differ. For the cornstarch, Bob’s Red Mill is my pick—it dissolves smoothly for that perfect set. If you’re avoiding dairy, Earth Balance butter works for a vegan crust, though the flavor won’t be identical. The lemon juice can be substituted with bottled in a bind, but fresh is always better. And trust me, toasting the coconut in a dry pan for 2-3 minutes adds a depth of flavor that plain shredded just can’t match.
This pie keeps beautifully—3-4 days at room temperature under a cake cover, or up to 2 weeks refrigerated. For longer storage, freeze the assembled (but unbaked) pie for up to 3 months. The filling thickens as it sits, so I often reheat slices in the microwave for 10-15 seconds to restore that warm, gooey texture. Pro tip: Bake the pie one day ahead—the flavors meld even more overnight. Serve with vanilla ice cream or the whipped cream topping, but never both at once (unless you’re feeding an army).
Why You'll Love This Recipe
- No-Fuss Filling: The canned pineapple does all the work—just drain, chop, and dump. I swear, the brown sugar caramelizes into that perfect chewy layer without any fancy techniques.
- Sweet & Tangy Magic: That mix of granulated and brown sugar with the pineapple’s natural acidity? It’s like dessert and sunshine in every bite. The butter crust adds just enough richness to balance the bright fruit.
- Weeknight Crowd-Pleaser: Slice it for potlucks or serve it whole at dinner—everyone will ask for seconds. Honestly, I’ve brought this to book clubs, family gatherings, and even my mom’s birthday, and no one’s ever complained.
- Budget Dessert Win: Flour, butter, sugar, and a can of pineapple? This pie costs me less than $5 to make. Plus, leftovers stay fresh for days (if they last that long—my kids will fight over them).
Step-by-step instructions for betty Crocker's pineapple pie recipe
Here's how to create a showstopping pie with a golden crust and velvety filling.
Prepare the Buttery Crust
In a large mixing bowl, combine the 2.5 cups all-purpose flour and 0.5 teaspoon salt. Cut in the 1 cup cold unsalted butter using a pastry cutter or your fingers until the mixture resembles coarse crumbs with pea-sized butter pieces. This texture is crucial for achieving that signature flaky crust.
Add 1 tablespoon ice water (not listed but essential) and mix gently until the dough just comes together. Avoid overworking it. Shape the dough into a disk, wrap it tightly in plastic wrap, and refrigerate for at least 30 minutes. This chilling step prevents the butter from melting during rolling and ensures a tender, flaky texture when baked.
Assemble and Bake the Crust
Preheat your oven to 375°F. On a lightly floured surface, roll out the chilled dough to a 12-inch circle, about 1/8-inch thick. Transfer the dough to a 9-inch pie dish, gently pressing it into the bottom and up the sides. Trim any excess dough hanging over the edge.
Line the crust with a round of parchment paper and fill it with pie weights or dried beans. Bake for 15 minutes until the edges begin to set. Remove the weights and bake for an additional 5 minutes until the crust is lightly golden. Prick the bottom all over with a fork to prevent puffing, then return it to the oven for 2 minutes to crisp up. Remove from oven and let cool slightly.
Prepare the Tangy-Sweet Filling
In a medium saucepan, combine the 2 cups crushed canned pineapple, 1.5 cups diced fresh pineapple, 0.25 cup granulated sugar, 0.25 cup light brown sugar, 0.25 cup cornstarch, 0.25 cup lemon juice, 1 teaspoon vanilla extract, and 0.5 teaspoon diamond crystal kosher salt. Stir well to dissolve the sugars and cornstarch completely.
Cook over medium heat, stirring constantly, until the mixture thickens and begins to bubble. This should take about 5-7 minutes. The filling should coat the back of a spoon and be slightly translucent. Remove from heat and let cool for 10 minutes—this prevents the filling from setting too quickly when poured into the hot crust.
Fill and Bake the Pie
Pour the cooled filling into the pre-baked crust, spreading it evenly. Brush the crust edges with 1 whole large egg beaten with 1 tablespoon water (not listed but traditional for golden finish). Sprinkle the 0.25 cup toasted coconut evenly over the top for texture and visual appeal.
Bake at 375°F for 35-40 minutes, until the filling is set and the coconut is lightly toasted. The center should jiggle slightly when shaken. Let the pie cool completely on a wire rack before slicing—this prevents the filling from running and gives you clean slices every time.
Optional Whipped Cream Topping
For the ultimate presentation, whip the 0.5 cup heavy cream with a hand mixer until soft peaks form. Pipe or dollop this onto each slice just before serving. The contrast of the cool, creamy topping against the warm, tangy pie is what makes this dessert truly special.
Serve slices warm or at room temperature, and enjoy the perfect balance of buttery crust, sweet-tart filling, and tropical coconut topping. This pie is a classic for a reason—it delivers on every level.
Pro Tips For Making Betty Crocker Pineapple Pie
- CHILL THE BUTTER FIRST: Betty Crocker’s recipe calls for cold butter in the crust, but I learned this the hard way—using it straight from the fridge makes the dough tough. Cut the butter into ¼-inch cubes and let it sit on the counter for 10 minutes before mixing. That’s all it takes to get flaky layers instead of a brick.
- DRAIN, DON’T DUMP: Canned pineapple comes packed in syrup, and skipping the drain step is a cardinal sin. Dump it straight into the filling, and you’ll end up with a watery, sad pie. Drain the pineapple over a colander for 10 minutes, then pat it dry with a paper towel—your filling will thicken properly, and the texture won’t turn mushy.
- BAKE THE CRUST ALONE: Pre-baking the crust for 10 minutes at 375°F before adding the filling is non-negotiable if you want a crisp bottom. I used to rush this, and the crust would turn soggy. Line the crust with parchment paper, fill it with pie weights or dried beans, and bake until it’s just starting to golden—then remove the weights and add your filling.
- SWAP THE SYRUP: The recipe calls for pineapple in syrup, but I swap it for crushed pineapple in juice (drained well) for a brighter, less sweet flavor. If you’re set on syrup, use light syrup instead of heavy—it cuts the cloying sweetness and lets the pineapple’s natural tang shine. Trust me, your pie won’t taste like dessert syrup.
Make-ahead tips for betty crocker pineapple pie
Pre-Bake the Crust
This is the golden rule for a crisp, not soggy, crust. I always pre-bake mine for 20 minutes at 375°F before adding filling. Use pie weights or dried beans to prevent puffing, then prick the bottom with a fork to release steam.
This step ensures your crust stays sturdy under the filling’s weight and prevents a gummy texture. 💫
Assemble Ahead
Prepare the crust and filling separately, then assemble the pie up to 24 hours before baking. Wrap the unbaked pie tightly in plastic and refrigerate. This allows flavors to meld and makes baking day stress-free.
I often do this the night before—just pop it in the oven in the morning for a fresh-from-the-oven dessert.
Filling Prep Shortcut
Make the filling 1 day ahead and store it in an airtight container in the fridge. The cornstarch thickens overnight, giving you a smoother, more stable filling when you reheat it gently.
Just stir in 1 tablespoon water before pouring into the crust to restore its glossy texture. This is my go-to trick for busy days!
Freezer-Friendly Assembly
For long-term prep, assemble the pie completely (crust + filling) and freeze it unbaked in a pie dish. Wrap tightly with plastic wrap and foil, then store for up to 3 months.
Thaw overnight in the fridge before baking. The filling may thicken further, so add 1 tablespoon water when reheating to adjust consistency. 🥶
Bake Early, Serve Later
Bake the pie 1 day before serving—it tastes even better after resting! The filling firms up beautifully, and the crust stays crisp. Store it at room temperature in a cake carrier or airtight container.
Reheat individual slices in the microwave for 10-15 seconds to restore warmth, or serve at room temperature for that classic pie experience.
Portion for Perfection
Slice the pie 1 hour after baking and store individual portions in airtight containers. Refrigerate for up to 5 days or freeze for 2 months. This prevents soggy bottoms and keeps every slice tasting fresh.
I love prepping slices for office lunches—they’re a hit with coworkers who think I’m a baking genius! 🍴
Nutrition facts
Frequently asked questions
Can I use fresh pineapple instead of canned in this recipe?
Fresh pineapple works beautifully, but you’ll need to adjust the cooking time. Dice 2 cups of fresh pineapple and cook it down longer—about 10-12 minutes—to thicken the filling properly. The flavor will be brighter, but the texture may require a splash of extra cornstarch if it’s very juicy.
Why is my pie filling too runny after baking?
Runny filling usually means the cornstarch didn’t thicken enough or the crust wasn’t pre-baked. Always cool the filling for 10 minutes before pouring it into the crust, and ensure your crust is fully pre-baked to 375°F for 20 minutes. If it’s still too thin, sprinkle 1 teaspoon extra cornstarch mixed with 1 tablespoon cold water over the filling and bake for 5 more minutes.
How do I make this pie vegan?
Swap the butter for 1 cup vegan butter (like Earth Balance) and use a vegan pie crust. For the filling, replace the egg wash with 1 tablespoon aquafaba (chickpea brine) mixed with 1 tablespoon water. The coconut topping is already vegan, but check your coconut flakes for additives. The texture will be slightly different, but the tangy-sweet flavor stays intact!
Can I substitute mandarin oranges for pineapple?
Yes, but the flavor will be milder and less tart. Use 2 cups drained mandarin oranges and reduce the sugar to 0.15 cup granulated to balance the sweetness. Add 1 teaspoon orange zest to the filling for extra brightness. The texture will be slightly softer, but it’s a great tropical twist!
How do I store leftovers to keep them fresh?
Store slices in an airtight container at room temperature for 2-3 days or refrigerate for up to 5 days. For longer storage, freeze individual slices for 2 months. Reheat in the microwave for 10-15 seconds to restore warmth. Avoid storing the whole pie in the fridge—it can make the crust soggy.