
Main Courses
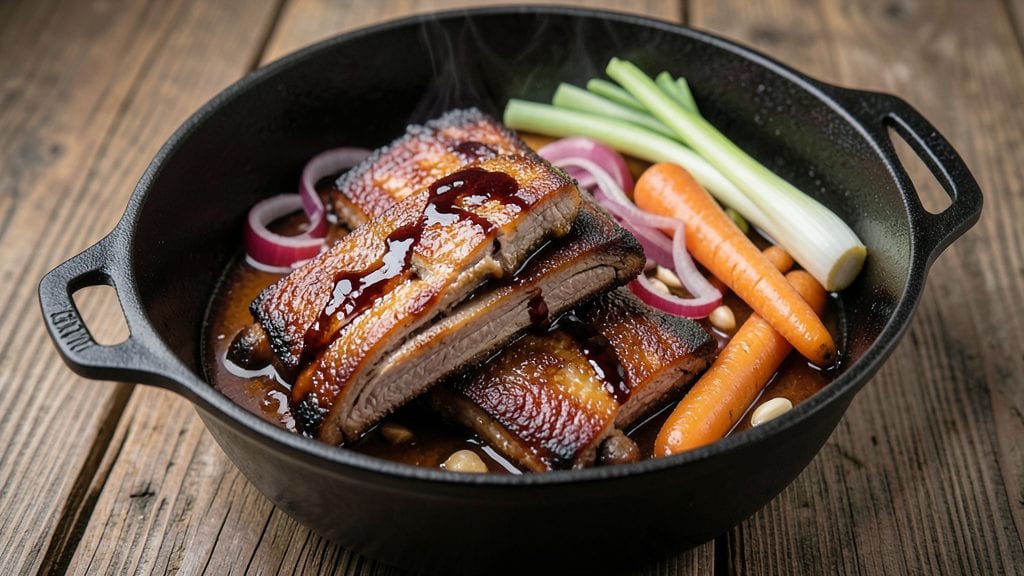
The best braised ribs recipe transforms tough cuts into melt-in-your-mouth perfection using a foolproof one-pot method that delivers restaurant-quality tenderness without hours of babysitting.
This technique combines traditional slow braising with modern efficiency—whether you use a Dutch oven, slow cooker, or Instant Pot—to create ribs so tender they fall apart at the touch.
The secret lies in the balance of acidity, sweetness, and slow cooking, which breaks down collagen into rich, velvety sauce that clings to every bite.
What sets this recipe apart is its versatility: you can achieve fall-off-the-bone richness in as little as 3 hours (or overnight for deeper flavor), using pantry staples like red wine, beer, or even broth for customization.
The marinade infuses the meat with bold flavors while tenderizing it, and the braising liquid reduces into a glossy, aromatic sauce that elevates every component. This method works equally well for baby back ribs or spare ribs, ensuring consistent results every time.
The final result is ribs that are juicy, caramelized, and bursting with flavor, served with their own luscious braising liquid for dipping or basting. The edges develop a deep mahogany hue, while the meat remains so tender it practically dissolves.
Whether you're feeding a crowd or treating yourself to a special meal, this recipe delivers professional-level satisfaction with minimal effort. Ready to master braised ribs?
For added convenience, I’ll include variations for different cooking methods, ensuring you can adapt this recipe to your preferred technique—whether you’re using a stovetop, oven, or pressure cooker.
The key is patience and precision, but the payoff is worth every minute. Let’s get started on creating ribs that will have everyone asking for seconds.
Ingredients for best braised ribs
Six pounds of ribs meet twelve aromatic ingredients for restaurant-quality braising that delivers melt-in-your-mouth perfection.
| Ingredient | Amount | Notes |
|---|---|---|
| Pork Ribs (Baby Back or Spare) 🍖 | 4 lb | Bone-in, cut into 2-inch sections |
| Yellow Onion 🧅 | 1 whole | Sliced into 1/2-inch rounds |
| Carrots 🥕 | 4 whole | Cut into 2-inch chunks |
| Celery Stalks 🥬 | 3 whole | Cut into 2-inch pieces |
| Garlic Cloves 🧄 | 6 cloves | Smashed, not minced |
| Dry Red Wine 🍷 | 1 cup | Bold variety like Cabernet Sauvignon |
| Beer (Dark Ale or Stout) 🍺 | 1 cup | Optional, enhances depth |
| Chicken or Beef Broth 💧 | 2 cups | Low-sodium preferred |
| Tomato Paste 🍅 | 2 tbsp | High-quality, no added salt |
| Apple Cider Vinegar 🍎 | 2 tbsp | Balances sweetness |
| Brown Sugar 🍚 | ½ cup | Light or dark variety |
| Dijon Mustard 🌿 | 1 tbsp | Adds tangy depth |
| Fresh Thyme 🌿 | 2 sprigs | Or 1 tsp dried thyme |
| Fresh Rosemary 🌿 | 1 sprig | For aromatic complexity |
| Salt 🧂 | 1 ½ tsp | Diamond Crystal preferred |
| Black Peppercorns 🌶️ | 1 tsp | Freshly cracked |
| Olive Oil 🫒 | 2 tbsp | Extra-virgin for searing |
The ribs are the foundation, so prioritize quality cuts with good marbling. Butcher shops often carry superior options compared to grocery stores, and Costco or Whole Foods offer reliable selections. Baby back ribs cook faster but yield less meat per pound, while spare ribs deliver richer flavor and more volume. Trim excess fat but leave the membrane intact—it renders beautifully during braising. For the wine, Cabernet Sauvignon or Merlot from a reputable producer adds depth without overpowering, while the beer should be a dark ale or stout for malty complexity. The broth should be low-sodium to avoid over-salting the final dish, and Pacific Foods or Kettle & Fire brands excel in flavor.
No red wine? Substitute with additional broth and 1 tbsp balsamic vinegar for acidity. Beer optional but recommended—Guinness or a dark IPA work well. For the tomato paste, Centrale or Barilla brands offer superior quality, but any high-quality paste will suffice. The apple cider vinegar can be swapped for white vinegar in a pinch, though it lacks the fruity nuance. Brown sugar substitutes include honey or maple syrup, but adjust cooking time as they caramelize differently. Fresh herbs can be replaced with dried at one-third the quantity, though the aroma won't be identical. The mustard adds depth—Dijon is non-negotiable for this recipe, as American yellow mustard lacks the necessary tang.
This braise develops deeper flavor with time, so plan ahead. The ribs can be refrigerated overnight in the marinade for maximum tenderness, or frozen for up to 3 months before cooking. Once braised, leftovers keep for 5 days in the fridge, though the sauce thickens beautifully after the first day. For meal prep, portion the ribs and sauce separately—reheat the sauce alone first, then add the ribs to prevent drying. The sauce can be reduced further for a thicker consistency, or thinned with a splash of water if needed. Always store in airtight containers to preserve moisture and aroma.
Why You'll Love This Recipe
- One-Pot Magic: I swear by this method—just toss ribs, veggies, and spices into a Dutch oven, cover it, and walk away. No flipping, no fussing, no second-guessing. The onions caramelize right into the sauce while you’re doing whatever else life throws at you.
- Deep Umami Bomb: That slow simmer? Pure flavor gold. The garlic cloves turn into fragrant paste, the carrots and celery melt into the meat, and the ribs? They soak up every last bit of that rich, savory broth. Honestly, the first bite makes me close my eyes—it’s that good.
- Leftovers for Days: Between us, this recipe begs for seconds. The ribs stay tender for at least 4 days in the fridge, and the sauce only gets better. I freeze portions too—perfect for lazy Sundays or when I need a quick, restaurant-quality meal without the effort.
- Budget-Friendly Feast: You’re getting a whole rack of ribs for the price of takeout, plus veggies that stretch the meal into a full spread. The carrots and celery add bulk without breaking the bank, and spare ribs? They’re the cheaper cousin of baby backs, but just as satisfying. My wallet and my family thank me every time.
Step-by-step instructions for braised ribs with perfect fall-off-the-bone tenderness
This method delivers restaurant-quality braised ribs using only one pot, where slow cooking transforms tough cuts into melt-in-your-mouth perfection.
Sear the Ribs for Deep Flavor and Color
Heat a heavy Dutch oven over medium-high heat until hot. Add the 2 tablespoons olive oil and swirl to coat the bottom evenly. Working in batches if needed, place the 4 pounds pork ribs bone-side down in the pot. Press down gently with a metal spatula to ensure even contact—this prevents curling and ensures maximum browning.
Sear undisturbed for 5-6 minutes until the ribs develop a deep golden brown crust. You'll see the fat begin to render out and the edges crisp slightly. Flip the ribs and sear the meaty side for another 4-5 minutes, again pressing down to maintain contact. Remove the ribs and set aside on a plate—they'll continue cooking in the braising liquid later.
Build the Aromatic Base with Vegetables and Herbs
In the same Dutch oven, add the sliced 1 whole yellow onion, cut 4 whole carrots, and cut 3 whole celery stalks. Cook over medium heat for 8-10 minutes, stirring occasionally, until the vegetables soften and begin to caramelize at the edges. This process develops their natural sweetness and forms the flavor foundation.
Add the 6 smashed garlic cloves, 2 sprigs fresh thyme, and 1 sprig fresh rosemary to the pot. Stir for 30 seconds until fragrant—you should smell the garlic's pungency and the herbs' earthy aroma. This is where the magic begins, as these aromatics infuse the braising liquid with complex flavor.
Deglaze and Combine All Braising Components
Pour in the 1 cup dry red wine, scraping up all the browned bits from the bottom of the pot with a wooden spoon. This deglazing step captures all the caramelized flavors that would otherwise stick to the pan. Let the wine simmer for 2-3 minutes until reduced by half, concentrating its intensity.
Add the 1 cup beer (dark ale or stout), 2 cups chicken or beef broth, 2 tablespoons tomato paste, 2 tablespoons apple cider vinegar, 0.5 cup brown sugar, and 1 tablespoon Dijon mustard. Stir well to combine all ingredients into a cohesive braising liquid. The vinegar and mustard will balance the sweetness while the tomato paste adds depth.
Braise Until Fork-Tender Perfection
Return the seared ribs to the Dutch oven, bone-side up, and bring the liquid to a gentle simmer. The liquid should cover about two-thirds of the ribs. Cover the pot tightly with a lid and transfer to a preheated 300°F oven. Braise for 2.5 to 3 hours, depending on the cut—spare ribs may need the full time while baby back ribs might be ready slightly sooner.
Check for doneness by inserting a fork into the meatiest part of a rib. If it slides in easily and the meat pulls apart with minimal resistance, the ribs are ready. If not, continue braising for another 30-45 minutes. The ribs should be fork-tender with a rich, caramelized sauce coating them.
Finish with Seasoning and Resting
Remove the ribs from the oven and discard the thyme and rosemary sprigs. Increase the oven temperature to 400°F and return the ribs to the Dutch oven. Cover and let them crisp in the hot oven for 10-15 minutes. This final step creates a beautiful caramelized crust while concentrating the flavors.
Transfer the ribs to a serving platter and let them rest for 10 minutes before serving. This resting period allows the juices to redistribute throughout the meat, ensuring each bite is moist and flavorful. Serve with the reduced braising sauce spooned over the top and the tender vegetables from the pot.
Pro Tips For Making Best Braised Ribs
- Sear the Ribs First: I learned this the hard way—skipping the sear means flavor hiding in plain sight. Get that Dutch oven screaming hot, pat the ribs bone-dry, and let them hit the oil for 3-4 minutes per side until deep brown. That crust locks in moisture and builds the foundation for the braise.
- Cut Onions Like a Pro: No, you don’t need matchsticks. Rough-chop the yellow onion into ½-inch chunks—big enough to stay intact but small enough to soften fast. Smaller pieces turn to mush; bigger ones stay stubborn. (Yes, even if you’re impatient like me.)
- Don’t Crowd the Pot: After searing, resist the urge to dump everything in at once. Layer ribs in a single layer first, then add veggies in a loose pile. Crowding steams instead of braises, and you’ll end up with soggy carrots and celery instead of tender, caramelized edges.
- Use a Splash of Liquid: Sounds weird, but it works: After searing, deglaze that Dutch oven with ½ cup of the braising liquid before adding ribs. Scrape up every browned bit—those bits are pure flavor. (Your future self will thank you.)
Storing and reheating your best braised ribs
Refrigerator Storage
Store braised ribs in an airtight container with their sauce for up to 5 days in the refrigerator. The sauce thickens beautifully after the first day, so reheat it separately to prevent drying out the ribs.
I always use glass Pyrex containers with snap-on lids—they preserve moisture and flavors better than plastic. Let the ribs cool completely before storing to prevent condensation, which can make the meat soggy. 💫
Freezer Storage
For longer storage, freeze braised ribs in a single layer on a tray before transferring to a freezer-safe bag or container. This prevents ice crystals from forming and ruining the texture.
Label with the date and freeze for up to 3 months. Thaw overnight in the fridge before reheating—never microwave directly from frozen, as this can create uneven cooking. 🧊
Reheating Stovetop
My preferred method is stovetop reheating, which maintains the best texture. Pour the ribs and sauce into a heavy-bottomed pot, add ¼ cup broth or water, and simmer over medium-low heat for 10-15 minutes.
Stir occasionally to prevent sticking and add more liquid if the sauce becomes too thick. Taste and adjust seasonings—they often need a pinch of salt after reheating. 🔥
Oven Reheating
For a crispier finish, reheat ribs in a 400°F oven for 15-20 minutes on a baking sheet lined with parchment paper. Pour the sauce into a small saucepan and reduce it over medium heat while the ribs warm.
This method works well for serving directly from the oven, especially when entertaining guests. 🍽️
Microwave Shortcut
When short on time, reheat ribs in the microwave using 50% power for 3-4 minutes, stirring halfway. Cover with a damp paper towel to retain moisture. Add a splash of broth or water if the sauce looks dry.
This method is quick but less ideal for texture—reserve it for leftovers you plan to eat immediately. ⏰
Sauce Separation Fix
If the sauce separates after storage, whisk in 1 tablespoon cornstarch mixed with 1 tablespoon water and simmer for 2-3 minutes until thickened. For extra richness, stir in 1 teaspoon butter or a splash of beer to restore depth. This trick works wonders for restoring the sauce’s velvety consistency. 💡
Nutrition facts
Frequently asked questions about braised ribs
What's the difference between baby back and spare ribs for braising?
Baby back ribs come from the top of the ribcage and cook faster (2.5 hours), while spare ribs from the belly take longer (3 hours) but offer more meat per pound. Baby backs have a leaner profile, while spares have more fat and connective tissue—ideal for braising. For this recipe, either works, but spare ribs develop deeper flavor.
Can I make braised ribs in a slow cooker or Instant Pot?
For a slow cooker, sear the ribs first, then add all ingredients and cook on low for 8 hours or high for 5-6 hours. For an Instant Pot, use the high-pressure setting for 45 minutes followed by a 10-minute natural release. The Instant Pot version finishes with a quick oven crisp at 400°F for 10 minutes.
Why do my braised ribs turn out dry?
Overcooking or skipping the resting period causes dryness. Braise until fork-tender (2.5-3 hours), then rest for 10 minutes before serving. The sauce should cover about two-thirds of the ribs—if it evaporates too quickly, add a splash of broth. Never cook uncovered, as this concentrates heat and dries the meat.
What's the best way to serve braised ribs?
Serve with the reduced braising sauce spooned over the top, alongside crusty bread to soak up the flavor. The tender vegetables from the pot make a perfect side, or pair with mashed potatoes and roasted Brussels sprouts. For extra richness, drizzle with a touch of balsamic glaze or crumbled blue cheese.
Can I use beef ribs instead of pork?
Yes, but adjust cooking time and liquid. Beef ribs require 1-2 extra hours of braising and may need more liquid (add ½ cup broth if needed). The flavor profile changes—beef ribs develop a deeper, meatier taste. For pork ribs, stick to the original timing for perfect tenderness.