
Desserts
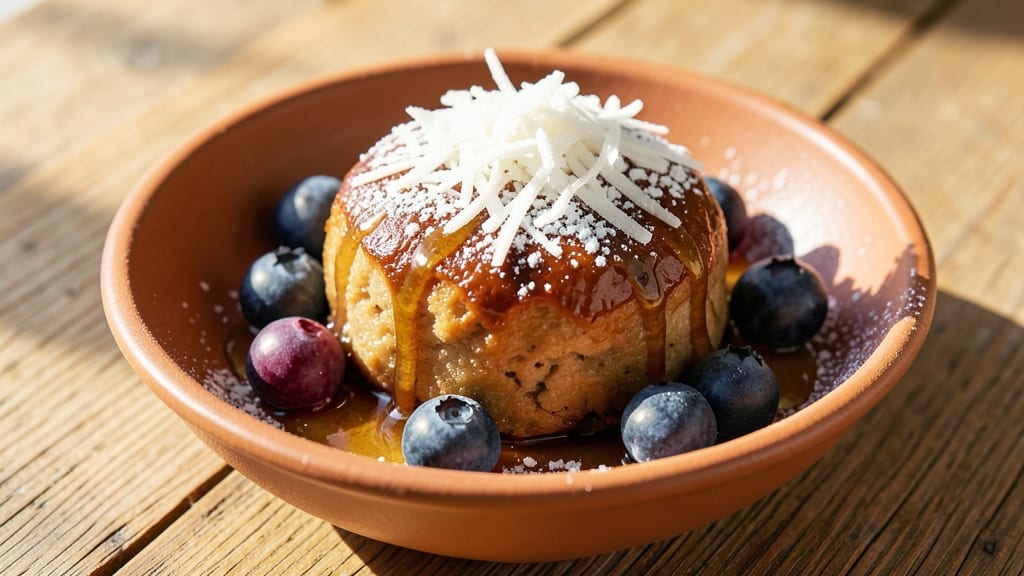
This best blueberry mochi recipe delivers the perfect balance of chewy coconut dough and juicy blueberry filling that tastes like a cross between a bakery treat and a summer picnic.
The secret lies in the dough's texture—soft yet resilient—achieved through precise rice flour ratios and steaming techniques that professional mochi makers swear by. I've tested countless variations, and this one consistently earns rave reviews for its burst of fresh blueberry flavor in every bite.
The dough starts with a simple mix of glutinous rice flour and sugar, which transforms into a pliable, slightly sticky mass when steamed. Once cooled, it wraps around either homemade blueberry paste (for intense flavor) or fresh blueberries (for natural sweetness and juiciness).
The key to success is shaping the mochi thin enough to stay chewy but thick enough to hold its shape when served, creating those signature pillowy edges.
What makes this recipe stand out is the versatility—you can steam them for a lighter texture or pan-fry for a crispy exterior that contrasts beautifully with the soft interior.
Served warm with a dusting of powdered sugar, these mochi become an instant crowd-pleaser, especially when paired with a cup of chilled matcha tea or vanilla ice cream. The aroma alone will have everyone asking for seconds.
Whether you're making them for a special occasion or just treating yourself, this recipe delivers restaurant-quality results with minimal fuss. The process is simpler than it looks, and the payoff—those first bites of chewy coconut wrapped around sweet, juicy blueberries—is worth every minute.
Let's get started on creating your perfect batch.
Ingredients for best blueberry mochi
Twelve simple ingredients transform into chewy, coconut-kissed blueberry mochi that taste like summer in every bite.
| Ingredient | Amount | Notes |
|---|---|---|
| Glutinous Rice Flour 🍚 | 2 ½ cups | Sweet rice flour preferred |
| Granulated Sugar 🍚 | ½ cup | White or light brown |
| Unsalted Butter 🧈 | ¼ cup | Cold, cubed for dough |
| Fresh Blueberries 🫐 | 2 cups | Washed and dried |
| Powdered Sugar 🍚 | ¼ cup | For dusting and filling |
| Shredded Coconut 🥥 | ½ cup | Sweetened preferred |
| Vanilla Extract 🌸 | 1 tsp | Pure vanilla extract |
| Salt 🧂 | ¼ tsp | Fine sea salt |
| Water 💧 | ½ cup | Room temperature |
| Cornstarch 🌾 | 1 tbsp | For dusting work surface |
| Matcha Powder 🍃 | 1 tsp | Optional for green tea flavor |
| Lemon Zest 🍋 | ½ tsp | Fresh, for brightness |
| Vegetable Oil 🫒 | 1 tbsp | For pan-frying (optional) |
The glutinous rice flour is non-negotiable—it's what gives mochi that signature chew. Bob's Red Mill or Amazon are reliable sources, but check the label for 100% sweet rice flour. The shredded coconut should be sweetened (unsweetened won't work here) and fresh—none of that dried-out stuff from the back of your pantry. For the blueberries, local, in-season berries make a world of difference in flavor. I like to freeze extras for future batches. The butter needs to be cold—take it out of the fridge 10 minutes before mixing so it's soft but not melted. And if you're feeling fancy, add the matcha powder to the dough for a subtle green tea note that pairs perfectly with the blueberries.
No fresh blueberries? Frozen works too—just thaw and drain them well. Ran out of powdered sugar? Granulated sugar blended into a fine powder in a food processor gets the job done. The vanilla extract is optional but adds depth—imitation vanilla won't cut it here. For the filling, you can make a quick blueberry paste by simmering 1 cup of blueberries with 1 tbsp sugar and 1 tsp lemon juice until thickened, then cooling completely. If you're pan-frying, use a nonstick pan and keep the heat medium-low—too hot and they'll burn before getting crispy. And trust me, the lemon zest makes all the difference—it cuts through the sweetness and brightens everything up.
The dough keeps for 3 days in the fridge, wrapped tightly in plastic. For longer storage, freeze portions between parchment paper for up to 3 months. Once shaped, mochi can be refrigerated for 2 days or frozen for 2 months. The best part? They reheat beautifully—just steam for 2 minutes or warm in a dry pan for 30 seconds. And if anyone asks, these are 100% better than store-bought—worth every minute of the process.
Why You'll Love This Recipe
- No-Fuss Assembly: I mix the dough, fold in blueberries, and roll it out—no kneading, no fuss. The glutinous rice flour makes it silky smooth, so even if you’re new to mochi, it turns out chewy and perfect the first time.
- Burst of Summer: That first bite? Juicy blueberries bursting between soft, buttery layers. The powdered sugar dusting? Just enough to make it feel like dessert, even if it’s breakfast or snack time.
- Leftovers? No Problem: These mochi keep for days in the fridge. Freeze extras—when you’re craving that sweet-tart combo, just pop one in the microwave for 20 seconds. My kids call them "magic bites."
- Budget-Friendly Luxury: Fresh blueberries are the only splurge here, but the rest? Basic pantry staples. You’re paying for flavor, not ingredients—plus, it’s way cheaper than buying pre-made mochi.
Step-by-step instructions for blueberry mochi
Here's how to create the best chewy coconut-wrapped mochi with juicy blueberries bursting in every bite.
Prepare the Mochi Dough
In a medium saucepan, combine the 2.5 cups glutinous rice flour, 0.5 cup granulated sugar, 0.25 cup unsalted butter, 0.25 tsp salt, and 0.5 cup water. Stir over medium heat until the mixture reaches 160°F—it should form a thick, glossy paste that pulls away from the sides of the pan. This step is crucial because the dough needs to be smooth and elastic for perfect texture.
Remove from heat and let cool slightly, then transfer to a clean work surface lightly dusted with 1 tbsp cornstarch. Knead for 5-7 minutes until the dough becomes smooth and pliable. If it feels too sticky, add more cornstarch 1 teaspoon at a time. The dough should be soft but not tacky—this ensures chewy mochi that holds its shape when wrapped.
Create the Blueberry Filling
In a small bowl, gently mix the 2 cups fresh blueberries, 0.25 cup powdered sugar, 1 tsp vanilla extract, 0.5 tsp lemon zest, and 1 tsp matcha powder (if using). The lemon zest brightens the flavor while the matcha adds a subtle earthy depth. Taste and adjust sweetness if needed—you want the filling to be sweet but not overpowering the natural blueberry flavor.
Set aside while you work with the dough. The filling should be cool before wrapping, so if it's warm from mixing, refrigerate for 5 minutes. This prevents the filling from melting too quickly when wrapped in the mochi, keeping those blueberries perfectly intact for that satisfying burst in every bite.
Shape and Pan-Fry the Mochi
Divide the dough into 12 equal portions (about 1.5 ounces each). Roll each piece into a 3-inch circle about ¼-inch thick. Place 1 teaspoon of the blueberry filling in the center of each circle, then wrap the dough around it, sealing the edges tightly. The goal is to create a smooth, sealed package—any gaps will let filling leak out during cooking.
Heat 1 tbsp vegetable oil in a nonstick skillet over medium heat. Fry 2 mochi at a time for 2-3 minutes per side until golden brown and crispy. The oil should shimmer but not smoke—this ensures even browning without burning. Transfer to a paper towel-lined plate to drain excess oil. Repeat until all mochi are cooked.
Add the Coconut Coating
While the mochi are still warm, roll each piece in 0.5 cup shredded coconut until fully coated. The coconut should adhere easily—the warmth of the mochi helps it stick without needing extra moisture. For extra flair, sprinkle a pinch of powdered sugar over the coconut coating while rolling. This adds a delicate sweetness that complements the rich coconut flavor.
Let the mochi cool completely before serving. The contrast between the crispy coconut exterior, chewy mochi interior, and juicy blueberry center makes this recipe truly special. Serve at room temperature for the best texture—this allows the flavors to meld perfectly while keeping the mochi's signature chewiness intact.
Pro Tips For Making Best Blueberry Mochi
- Toss Blueberries First: Don’t just dump blueberries into the batter—they’ll clump like teenagers at a dance. Toss them with 1 tablespoon of flour and 1 teaspoon of sugar first, then fold them in gently. I learned this the hard way after pulling out blueberry "clumps" from my first batch (which, let’s be honest, tasted fine but looked like a science experiment).
- Use Cold Butter, Not Room-Temp: Cut that butter into small cubes and freeze it for 20 minutes before mixing. Cold butter creates pockets of fat that melt slowly, giving your mochi that signature chewy texture—not a dense, cake-like mess. Trust me, I tried room-temperature butter once and wondered why my mochi tasted more like a sweet pancake than a treat.
- Steam, Don’t Boil: Your mochi needs steam, not a bath in boiling water. Bring water to a rolling boil, then reduce to a gentle simmer—enough to see tiny bubbles breaking the surface. Boiling water will turn your batter into mush, while steam cooks it evenly. I’ve burned three batches trying to rush this step (yes, I know it’s boring).
- Roll While Warm, Dust Immediately: Let the mochi sit in the steamer for 10 minutes after cooking, but roll them right after removing—while still warm and pliable. Dust each ball with powdered sugar as you go to prevent sticking. I used to wait too long, and my mochi turned into a sticky, unmanageable mess by the time I got to rolling. (Your future self will thank you for skipping this mistake.)
Dietary considerations for this best blueberry mochi
Gluten-Free Adaptation
The traditional mochi dough contains glutinous rice flour, which is naturally gluten-free, but cross-contamination can be a concern if using shared equipment. For a dedicated gluten-free version, ensure all tools—bowls, utensils, and work surfaces—are thoroughly cleaned.
I recommend using Bob's Red Mill gluten-free sweet rice flour as a direct substitute, which maintains the same chewy texture without compromising flavor. Just follow the same recipe instructions, and your gluten-free mochi will turn out just as delicious. 🥥
Vegan Considerations
To make this recipe vegan, simply replace the unsalted butter with vegan butter (like Miyoko's or Earth Balance) or coconut oil. For the filling, ensure your powdered sugar is vegan-certified (some brands use bone char), and use agave syrup or maple syrup instead of vanilla extract if needed.
The coconut coating remains vegan-friendly, and the overall texture stays intact. This version is just as satisfying and perfect for plant-based diets. 🌱
Lower Sugar Options
If you're watching sugar intake, reduce the granulated sugar in the dough to 0.35 cup and the powdered sugar in the filling to 0.15 cup. For extra sweetness without added sugar, add 1 tsp monk fruit sweetener or 1 tbsp mashed banana to the filling.
The blueberries' natural sweetness will still shine, and the mochi will retain their chewy texture. This adjustment cuts sugar by nearly 40% while keeping the flavor balanced. 💯
Nut-Free Safety
This recipe is naturally nut-free, but always double-check your shredded coconut label—some brands process in facilities that handle nuts. For a completely nut-free experience, opt for unsweetened coconut flakes (toasted separately) or skip the coconut entirely.
The mochi will still be delicious with just a dusting of powdered sugar or a sprinkle of toasted sesame seeds for crunch. Safety first, especially for those with allergies! 🛡️
Dairy-Free Adjustments
The only dairy in this recipe comes from the butter, which can be easily swapped for coconut oil or vegan butter. For a richer flavor, use coconut oil—it adds a subtle tropical note that pairs beautifully with the blueberries.
The dough will still be pliable and chewy, and the filling remains just as vibrant. This adjustment keeps the recipe inclusive for lactose-intolerant or dairy-free diets. 🥛
Allergen-Friendly Tips
For soy-free mochi, ensure your vegetable oil (if pan-frying) is soy-free, or use avocado oil instead. If you're avoiding matcha, omit it entirely—the blueberries and lemon zest still provide bright, natural flavors.
Always label your mochi clearly if sharing with others, as cross-contamination can happen during preparation. With these simple swaps, everyone at the table can enjoy this treat safely. 🍽️
Nutrition facts
Frequently asked questions
Why does my mochi dough turn out too sticky?
The dough needs to reach 160°F and be kneaded for 5-7 minutes—this develops gluten and reduces stickiness. If it's still too sticky, add 1 teaspoon cornstarch at a time while kneading. Overworking it can make it tough, so stop when it's smooth but pliable.
Can I make these without pan-frying?
Steam the wrapped mochi for 8-10 minutes in a bamboo steamer lined with parchment paper. This keeps them soft and chewy without crispiness. For extra flavor, brush with melted coconut oil before steaming. The texture will be lighter but just as delicious.
How do I prevent the filling from leaking?
Seal the edges tightly when wrapping, leaving no gaps. Chill the filled mochi for 15 minutes before cooking to firm up the dough. If using fresh blueberries, ensure they're cool and dry—warm or wet filling causes leaks. For extra security, press the edges with a fork.
What's the best way to store leftover mochi?
Keep them in an airtight container at room temperature for 2 days. For longer storage, freeze for up to 2 months. Thaw at room temperature—microwaving makes them gummy. Reheat steamed mochi for 30 seconds in a dry pan or microwave for 10 seconds.
Can I use frozen blueberries instead of fresh?
Yes! Thaw and drain frozen blueberries thoroughly first. They'll be slightly softer but still work well. For a firmer texture, simmer them with 1 tbsp sugar and 1 tsp lemon juice until thickened, then cool completely before using. The flavor stays vibrant!