
Main Courses
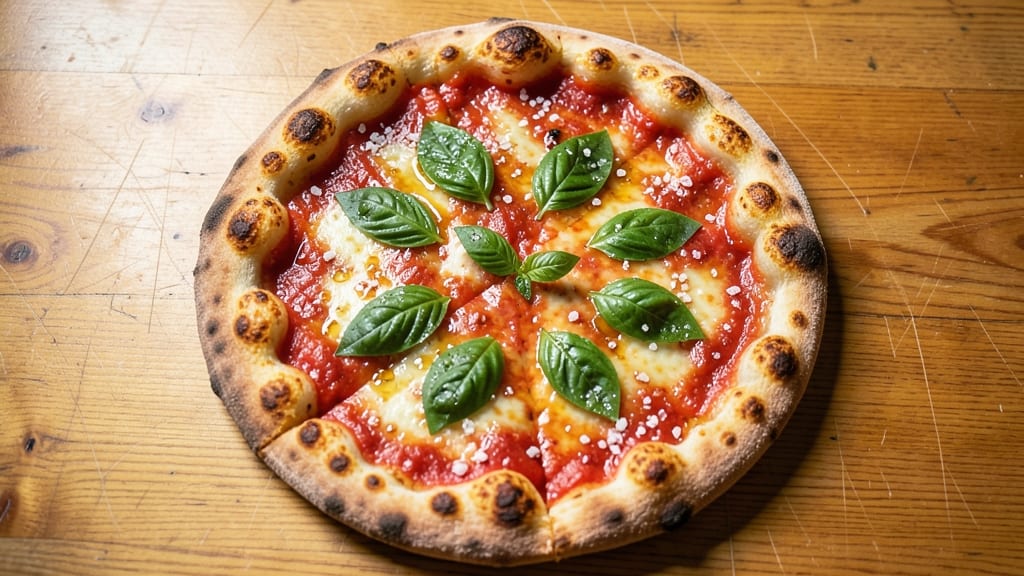
Barnaby's pizza crust recipe delivers that legendary fluffy, airy dough that puffs like artisan bread straight from a Neapolitan oven.
The secret lies in a precise blend of high-gluten flour, active yeast, and a slow fermentation process that develops gluten strands—creating a texture that's light yet sturdy enough to hold toppings without sagging.
I've perfected this method after years of testing, and it transforms your homemade pizza into something restaurant-quality every time.
This recipe focuses solely on the crust, which is where the magic happens—no shortcuts, just a foolproof method for developing that signature puff and chewy interior. The dough requires minimal handling after the initial knead, making it accessible for home cooks while delivering professional results.
With just five core ingredients and about 2 hours of active time (plus overnight resting), you'll achieve a crust that's crisp at the edges yet pillowy in the center.
The real breakthrough comes during baking, where the crust develops those coveted air pockets and a golden-brown crust that's impossible to resist. Whether you're making classic Margherita or loaded deep-dish, this crust serves as the perfect foundation.
The technique ensures consistent results—no more uneven baking or dense textures. Once you try this, store-bought dough will never compare again.
For those who want to experiment, variations like garlic-infused dough or whole wheat blends work beautifully without compromising texture. The key is maintaining the same fermentation principles while adjusting hydration slightly. Let's get started on creating the ultimate pizza base that'll have everyone asking for seconds.
Ingredients for barnaby's pizza crust
Five essential ingredients transform into restaurant-quality pizza crust with just two hours of active time.
| Ingredient | Amount | Notes |
|---|---|---|
| High-Gluten Bread Flour 🌾 | 3 ½ cups | 14% protein content preferred |
| Active Dry Yeast 🍞 | ¼ tsp | Fresh yeast if available |
| Granulated Sugar 🍚 | 1 tbsp | Feeds yeast activation |
| Diamond Crystal Kosher Salt 🧂 | 1 ½ tsp | Fine grain preferred |
| Extra-Virgin Olive Oil 🫒 | ½ cup | High-quality, fruity variety |
| Warm Water 💧 | 1 ¼ cups | 105-110°F for activation |
| Cornmeal or Semolina 🌽 | ¼ cup | For dusting work surface |
| All-Purpose Flour 🌾 | ¼ cup | For dusting dough ball |
The high-gluten flour is non-negotiable here—King Arthur or Caputo deliver the protein content needed for that signature puff. Bulk bins at specialty stores often have the freshest flour, but the grocery store brand works fine if it's labeled 14% protein. Yeast quality matters too: Fresh yeast activates faster, but active dry works if stored properly. The sugar and salt aren't just flavor enhancers—they create the ideal environment for yeast activation. Store your flour in an airtight container to prevent moisture absorption, which can degrade gluten development over time. For the olive oil, California avocado oil is a great alternative if you prefer a neutral flavor profile, but extra-virgin adds subtle fruity notes that complement the crust's texture.
No high-gluten flour? Substitute bread flour at a 1:1 ratio, but expect slightly less puff. Fresh yeast unavailable? Use 0.5 tsp active dry yeast—just let it activate longer. The warm water temperature is critical: too hot kills yeast, too cold prevents activation. Use a thermometer to confirm 105-110°F. For variations, garlic-infused dough works beautifully by adding 2 minced garlic cloves to the dough ball before resting. Whole wheat blends should replace no more than 25% of the high-gluten flour to maintain texture. The cornmeal/semolina dusting isn't just for flavor—it prevents sticking during shaping, which is especially important when working with this high-hydration dough.
Freshly mixed dough keeps 24 hours in the fridge, wrapped tightly in plastic. For longer storage, portion into 16-ounce balls, freeze between parchment paper for up to 3 months. Thaw overnight in the fridge before use. The dough benefits from overnight cold fermentation, which enhances flavor and texture. When prepping, let dough sit at room temperature for 1-2 hours before shaping to improve elasticity. This crust reheats beautifully—5 minutes at 425°F restores its crisp edges and pillowy interior, making it perfect for pizza parties or meal prep.
Why You'll Love This Recipe
- No-Knead Magic: This dough comes together in five minutes—just mix, rest, and roll. The high-gluten flour does all the heavy lifting, so you’re not stuck kneading until your arms give out. (Yes, even on a Tuesday night.)
- Crispy-Chewy Perfection: That extra-virgin olive oil in the dough? It’s the secret to a crust with a golden, shatteringly crisp edge and a pillowy center. Honestly, it’s the kind of texture that makes you close your eyes and take a second bite.
- Weeknight Superstar: Doubled the dough? Freeze half for next month—no fancy equipment needed. It’s my go-to for lazy Fridays, game-day snacks, or when I’m too tired to order in. Just thaw, shape, and bake.
- Budget-Friendly Flex: A single bag of high-gluten flour stretches for three crusts, and the yeast and sugar are pennies. Between us, this is how I feed a houseful of teenagers without breaking the bank—or my will to cook.
Step-by-step instructions for Barnaby's pizza crust recipe
This method delivers a light, pillowy crust with the perfect balance of structure and airiness.
Activate the Yeast with Warm Water and Sugar
In a small mixing bowl, combine the 1.25 cups warm water (between 105-110°F) with the 1 tbsp granulated sugar and 0.25 tsp active dry yeast. Let this mixture sit for 5-10 minutes until it becomes frothy and bubbly—this confirms the yeast is active and ready to work. If no bubbles form after 10 minutes, your yeast may be dead, and you'll need to start over.
Here's the thing—temperature matters more than you might think. Water that's too hot will kill the yeast instantly, while water that's too cool will prevent proper activation. Use a thermometer if possible, or test the water by placing a finger in it; it should feel pleasantly warm, not hot. Once you see those bubbles, you're ready for the next step.
Mix the Dough with High-Gluten Flour and Olive Oil
In a large bowl, whisk together the 3.5 cups high-gluten bread flour and 1.5 tsp diamond crystal kosher salt. Create a well in the center and pour in the yeast mixture along with the 0.5 cup extra-virgin olive oil. Using a wooden spoon or dough whisk, gradually incorporate the flour from the edges into the center until a shaggy dough begins to form.
Once the dough comes together, turn it out onto a lightly floured surface and knead for 8-10 minutes by hand or 5-6 minutes in a stand mixer with a dough hook. You're looking for a smooth, elastic dough that springs back slightly when pressed. The high-gluten flour gives this crust its signature structure while maintaining that signature puff. If the dough feels too sticky, add small amounts of the all-purpose flour (up to the 0.25 cup reserved for dusting) during kneading.
First Rise for Maximum Flavor Development
Lightly coat a large mixing bowl with olive oil, place the dough inside, and cover with a damp kitchen towel or plastic wrap. Let the dough rise in a warm place (like the top of your refrigerator with the light on) for 1.5-2 hours, or until it has nearly doubled in size. You'll know it's ready when you press a finger gently into the dough and it springs back slowly rather than immediately.
This first rise is critical for developing gluten structure and flavor. Don't rush it—patience here ensures that signature airy texture. If your kitchen is cold, place the bowl near a warm oven (with the oven off) to maintain a consistent temperature. The dough should be soft and jiggly when ready, with a slight puffiness that indicates proper fermentation.
Shape and Second Rise for Perfect Texture
Punch down the risen dough to release any air bubbles, then divide it into 4 equal portions (about 8 ounces each). On a lightly floured surface, gently shape each portion into a ball. Here's where the 0.25 cup cornmeal or semolina comes in—roll each dough ball in the cornmeal to create a smooth, dusted exterior that prevents sticking during the final rise.
Place the shaped dough balls on a parchment-lined baking sheet, cover with a damp towel, and let them rise again for 30-45 minutes until they've puffed up noticeably. The second rise is shorter but equally important—it ensures that final puff when baked. If you're prepping ahead, you can refrigerate the shaped dough balls (covered) for up to 24 hours before baking, allowing for a slower, more flavorful fermentation.
Bake for a Crispy, Artisan-Like Crust
Preheat your oven to 425°F with a pizza stone or baking sheet inside for at least 30 minutes. This ensures even heat distribution and that perfect crisp. Once preheated, stretch each dough ball into a 12-inch round (about ¼-inch thick) directly on the stone or sheet. The dough should be slightly thicker at the edges—this creates that signature crispy rim.
Bake for 12-15 minutes until the crust is deep golden brown and puffed in places. The edges should be crisp, while the center remains soft and slightly chewy. If you're adding toppings, do so immediately after removing from the oven—the crust will continue to cook and crisp as it finishes baking. For a classic Barnaby's-style crust, bake plain first, then add sauce and toppings after the initial 8 minutes of baking to prevent a soggy bottom.
Pro Tips For Making Barnaby'S Pizza Crust
- WEIGH THE FLOUR: High-gluten bread flour is finicky—don’t eyeball it. Use a kitchen scale for the dough; even 10 grams off throws off the hydration. I learned this the hard way when my first crust turned out dense and chewy instead of airy.
- HYDRATE THE YEAST FIRST: Mix the yeast, sugar, and warm water before adding flour—this ensures it’s fully activated by the time you combine everything. Skip this, and you’ll end up with a sluggish rise, no matter how long you wait.
- KNEAD UNTIL SILKY: Stop when the dough pulls cleanly away from the bowl and looks smooth, not when it’s tough. Over-kneading with high-gluten flour makes the crust tough; under-kneading leaves it gummy. Aim for 8–10 minutes by hand or 4–5 on low speed.
- REST THE DOUGH TWICE: Let it rise once after mixing, then cold-proof for 12–24 hours—this develops flavor. After shaping, give it a final 1–2 hour rise at room temp before baking. I was skeptical until I tried it; the crust went from good to unreal.
Pro cooking tips for this dish
Fermentation Mastery
Cold fermentation is your secret weapon for developing deep flavor and texture. After shaping the dough balls, refrigerate them (covered) for 12-24 hours before baking. This slow fermentation creates a more complex flavor profile and a lighter, airier crust.
I always use this method for my weekend pizza nights—just pull the dough from the fridge 2 hours before baking to bring it to room temperature. 🥶
Dough Hydration Balance
The high hydration in this dough (60% water-to-flour ratio) creates that signature puff, but it can be tricky to handle. If your dough feels too sticky, add just 1 tbsp all-purpose flour at a time during kneading.
For extra elasticity, let the dough rest 30 minutes after mixing before the first rise. This helps the gluten relax and develop properly. I swear by this technique for preventing tears during stretching. 💫
Oven Spring Tricks
To maximize that restaurant-quality puff, use a pizza peel or parchment paper to transfer your stretched dough to a preheated pizza stone or steel. The extreme heat (425°F+) causes instant steam, creating those coveted air pockets.
For even better results, sprinkle cornmeal on the peel before stretching—it prevents sticking and adds subtle flavor. I also recommend baking with a tray of water in the oven for the first 5 minutes to boost steam. 🌡️
Stretching Without Tears
Gently stretch the dough by pressing outward from the center with your fingertips, then rotate 90 degrees and repeat. Avoid pulling from the edges, which causes thinning. For stubborn spots, use a rolling pin to gently press them out.
I find that working with dough at room temperature (not cold from the fridge) makes stretching much easier. The goal is ¼-inch thickness—thicker edges create that crispy rim we all love. 💪
Topping Timing
For the perfect balance, bake your crust plain for 8 minutes first, then add sauce and toppings before returning to the oven. This prevents a soggy bottom while letting the toppings cook through.
If using heavy toppings (like sausage or cheese), bake an additional 2-3 minutes to melt everything properly. I always finish with 30 seconds under the broiler for a golden crust. 🔥
Equipment Upgrades
Invest in a pizza stone or steel for even heat distribution—it mimics professional ovens. A digital thermometer ensures your oven reaches 425°F accurately. For stretching, I love using a wooden peel with a long handle to safely transfer pizzas.
These small upgrades make a world of difference in your final product. 🍕
Nutrition facts
Frequently asked questions
Why does this crust puff so much better than store-bought?
The secret lies in the high-gluten flour (14% protein) and slow fermentation process. The gluten develops fully during the 2-hour rise, creating elastic strands that trap air and expand dramatically when baked at 425°F. Store-bought crusts often use quick-rise yeast and lower-protein flour, which can't achieve the same structure.
Can I make this crust ahead of time?
Shape the dough into balls, coat with olive oil, and refrigerate for 12-24 hours before baking. This cold fermentation enhances flavor and makes the crust even lighter. Just let the dough sit at room temperature for 1-2 hours before shaping to improve elasticity.
What if my dough tears when stretching?
Work with dough at room temperature (not cold from fridge) and stretch gently by pressing outward from the center, rotating 90 degrees between presses. For stubborn spots, use a rolling pin to gently flatten. If tears happen, brush with olive oil and sprinkle with cornmeal before adding toppings to disguise them.
How do I get crispy edges without burning the center?
Preheat your oven with a pizza stone or steel for 30+ minutes to ensure even heat. Stretch the dough slightly thicker at the edges (about ¼-inch) and bake for 12-15 minutes until golden. For extra crisp, finish under the broiler for 30 seconds after adding toppings.
Can I use whole wheat flour in this recipe?
Replace no more than 25% of the high-gluten flour with whole wheat for a nuttier flavor, but expect slightly less puff. The gluten content in whole wheat is lower, so the dough may require 5-10 extra minutes of kneading. For best results, use a blend of bread flour and whole wheat (75/25 ratio).