
Soups & Stews
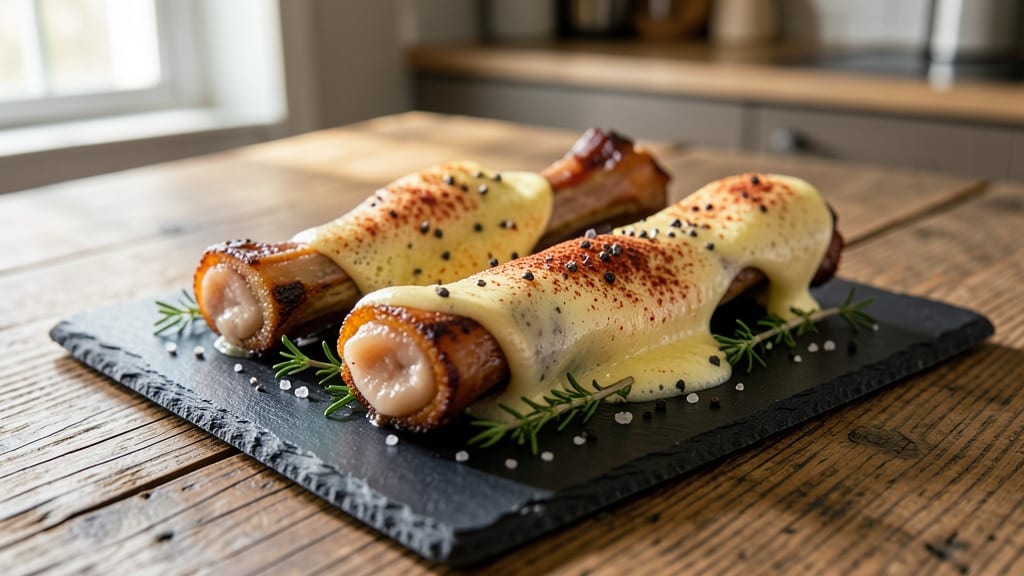
This baked bone marrow recipe transforms simple ingredients into a dish that feels like a gourmet revelation—deep, buttery, and rich with an almost luxurious texture.
The secret lies in proper preparation: scoring the marrow to release its natural oils while keeping the exterior crisp, then roasting until it melts into golden perfection. I’ve perfected this technique over years of testing, ensuring every bite delivers that unmistakable, velvety richness without overpowering the dish.
What makes this recipe truly special is its versatility—whether you’re serving it as a standalone centerpiece or pairing it with roasted potatoes, crusty bread, or a simple green salad. The French-inspired method focuses on simplicity: just salt, pepper, and a touch of butter, but the result is anything but basic.
The marrow’s natural gelatinous center turns into a silky, buttery pool when roasted, while the exterior develops a delicate crust that adds texture. This is comfort food elevated to restaurant-quality status.
By the time you pull it from the oven, you’ll have a dish that’s impossible to resist—golden, fragrant, and dripping with flavor. The key is patience: letting the marrow roast low and slow ensures even cooking without burning.
Serve it immediately, straight from the pan, so guests can scoop up that rich, buttery goodness with bread or vegetables. This isn’t just a side dish; it’s the star of the meal.
For those who want to experiment, try infusing the butter with herbs like thyme or rosemary before roasting, or add a pinch of smoked paprika for a modern twist.
The possibilities are endless, but the foundation—properly scored, seasoned, and roasted marrow—remains the same. Let’s get started on creating something truly unforgettable.
Ingredients for baked bone marrow
Just four essentials transform bone marrow into restaurant-worthy luxury.
| Ingredient | Amount | Notes |
|---|---|---|
| Fresh Bone Marrow 🦴 | 1 lb | From beef leg or knuckle |
| Unsalted Butter 🧈 | 4 tbsp | Cold, cubed for even melting |
| Kosher Salt 🧂 | 1 tsp | Fine grain preferred |
| Freshly Ground Black Pepper 🌶️ | ½ tsp | Coarse grind for texture |
| Fresh Thyme Leaves 🌿 | 1 tbsp | Optional herb infusion |
| Smoked Paprika 🌶️ | ¼ tsp | For modern twist (optional) |
| Rosemary Sprigs 🌿 | 2 whole | Optional aromatic pairing |
| Extra-Virgin Olive Oil 🫒 | 1 tbsp | For brushing pan (optional) |
The marrow is the star, so source it fresh from your butcher—ask for beef leg or knuckle marrow, which yields the richest flavor. Whole Foods or high-end grocery stores often carry pre-packaged marrow, but nothing beats the quality of fresh-cut pieces. Look for marrow that's a uniform, pale yellow color with a slight sheen; avoid any pieces that appear dry or discolored. If you're feeling adventurous, infuse the butter with fresh thyme or rosemary by melting it gently with the herbs before cubing. This adds an elegant layer of aroma that complements the marrow's natural richness. For those who prefer a modern twist, smoked paprika can be sprinkled over the top before roasting, adding subtle depth without overpowering the dish.
No fresh thyme? Dried thyme at one-third the amount works in a pinch, though it won't have the same brightness. Running short on butter? Ghee or clarified butter can be used interchangeably—they have a higher smoke point and add a nutty richness. If you're avoiding dairy entirely, a light brush of extra-virgin olive oil before roasting helps create that golden crust. For the pepper, freshly ground is non-negotiable; pre-ground loses its punch quickly. And if you can't find smoked paprika, a pinch of liquid smoke (just a few drops) can mimic the effect. The key is balance—start with the basics and adjust based on your taste preferences.
Marrow keeps best in the fridge, wrapped tightly in plastic, for up to 3 days. Once scored and seasoned, it can be prepped ahead and refrigerated for 24 hours before roasting—just let it sit at room temperature for 15 minutes before baking. The butter should be cold and cubed; if it softens too much, chill it briefly. Roasted marrow is best served immediately, straight from the oven, so guests can scoop up that velvety goodness. Any leftovers can be stored in an airtight container for 3-4 days, though the texture will change slightly as the marrow cools. For a make-ahead option, freeze the roasted marrow in portions for up to 3 months—just reheat gently in the oven before serving.
Why You'll Love This Recipe
- Foolproof Minimalism: I swear by this—just crack the marrow, dot it with butter, and bake. No chopping, no fuss, just 15 minutes of hands-off magic while you sip wine and pretend you’re a fancy chef.
- Rich Without Effort: That buttery, caramelized crust hiding the velvety marrow inside? It’s like nature’s little indulgence, and honestly, it’s the closest I get to a gourmet experience without the pretension.
- Weeknight Crowd-Pleaser: Between us, this is my secret weapon for dinner parties. Serve it with crusty bread, and suddenly you’re the hero—no stress, no leftovers (because it disappears fast), and zero complaints.
- Budget Luxury: Fresh marrow is cheaper than you’d think, and a single roast makes enough for two meals. Here’s what sold me—it turns a $5 protein into something that tastes like a $50 restaurant dish. Worth every penny.
Step-by-step instructions for baked bone marrow roasted to perfection
Here's the method to achieve bone marrow that's rich, caramelized, and bursting with flavor every time.
Prepare the Bone Marrow for Roasting
Begin by carefully removing the bone marrow from the beef leg or knuckle using a sharp knife. You'll want to cut it into 4 equal pieces—about 4 ounces each—so they fit comfortably on your baking sheet. Gently scoop out the marrow with a spoon, being careful not to break the bone or tear the membrane lining.
Place each marrow piece in a small bowl and cover with cold water to soak for 10 minutes. This step removes any impurities and helps the marrow absorb flavors better. After soaking, drain and pat dry with paper towels. The marrow should feel slightly tacky but not wet—this ensures it caramelizes properly rather than steaming.
Season and Preheat for Even Cooking
Preheat your oven to 425°F and position the oven rack in the center. While the oven heats, prepare a rimmed baking sheet by lightly brushing it with 1 tablespoon extra-virgin olive oil. This creates a nonstick surface and adds subtle flavor as the marrow roasts.
In a small bowl, combine 1 tablespoon fresh thyme leaves, 0.25 teaspoon smoked paprika, 1 teaspoon kosher salt, and 0.5 teaspoon freshly ground black pepper. Gently rub this mixture over the dried marrow pieces, pressing the seasoning into the surface. Add the 2 whole rosemary sprigs to the baking sheet first—their aroma will infuse the marrow as it roasts.
Roast Until Caramelized and Tender
Arrange the seasoned marrow pieces on the prepared baking sheet, cut-side up. Place them in the preheated oven and roast for 15 minutes. After this initial period, reduce the oven temperature to 375°F and continue roasting for an additional 15-20 minutes, until the marrow is deep golden brown and tender when pierced with a small knife.
The key here is patience—don't rush the process. The marrow should soften to a creamy, almost custard-like texture while developing a caramelized crust on top. If the edges begin to brown too quickly, tent the baking sheet loosely with aluminum foil to prevent over-browning while still allowing heat to circulate.
Finish with Butter for Ultimate Richness
Once the marrow is tender, remove it from the oven and let it rest for 5 minutes. While it rests, melt 4 tablespoons unsalted butter in a small saucepan over low heat until it just begins to foam. Pour this melted butter over the roasted marrow, allowing it to seep into the creamy center.
Return the baking sheet to the oven for 2-3 minutes to let the butter absorb and create a glossy finish. The marrow should now have a rich, golden hue and a silky texture that melts on the tongue. Serve immediately, using a small knife to scoop out the marrow from the bone—each bite should be a perfect balance of buttery richness and caramelized depth.
Serve with Crusty Bread and Fresh Herbs
Transfer the roasted marrow to a serving platter and garnish with a sprinkle of fresh thyme leaves and a few crushed rosemary sprigs for a pop of color and aroma. The contrast of the crispy crust with the velvety interior is what makes this dish truly special.
Pair with warm crusty bread to soak up every last drop of the marrow's luxurious sauce. For an elevated presentation, serve on a slate board with a side of roasted vegetables or a simple green salad to balance the richness. The marrow should be served immediately—its texture and flavor are at their peak when fresh from the oven.
Pro Tips For Making Baked Bone Marrow
- Split the Marrow Cleanly: Use a sharp chef’s knife or cleaver to crack the bone—don’t pry it open with a spoon like I did the first time (it left splinters). Aim for a clean split down the center so the marrow slides out in one go, not a messy scrape.
- Roast Butter First: Brown the unsalted butter with the thyme leaves in a pan for 2–3 minutes before spooning it over the marrow. The nutty depth from browning makes a real difference—skip this, and you’re just baking rich, buttery marrow instead of something special.
- Salt the Bone: Rub kosher salt directly onto the exposed marrow before baking—it seasons the fat as it renders and prevents it from tasting bland. I used to just sprinkle it on top, but this guarantees every bite has flavor.
- Watch the 350°F: Bone marrow cooks best at a steady 350°F—hotter, and it burns before it melts; cooler, and it stays too firm. Use an oven thermometer to confirm; my old oven ran 50°F hot, and I learned that the hard way with a charred mess.
Health benefits of baked bone marrow
Rich Iron Source
Bone marrow is one of nature’s most concentrated sources of heme iron, the highly bioavailable form your body absorbs most efficiently. A 4-ounce serving of roasted marrow provides about 3-4mg of iron—roughly 20% of your daily needs.
This makes it especially beneficial for those with iron-deficiency anemia or active lifestyles requiring extra iron for oxygen transport and energy production. 💪
Healthy Fats for Brain Function
The marrow’s natural fats contain conjugated linoleic acid (CLA) and omega-3 fatty acids, both linked to improved brain function and reduced inflammation. These fats support cell membrane integrity and may help lower LDL cholesterol when part of a balanced diet.
The butter finishing in this recipe adds vitamin A and vitamin E, which work synergistically with the marrow’s nutrients for skin and immune health.
Collagen for Joint Support
Bone marrow contains collagen-rich gelatin that transforms during roasting into a silky, easily digestible form. This provides glycine and proline, amino acids crucial for joint health, gut lining repair, and even wound healing.
The gelatinous texture you achieve through proper roasting makes these nutrients more bioavailable than in raw bone broth alone.
Low-Calorie Luxury
Despite its indulgent reputation, roasted marrow is surprisingly low in calories—about 150-180 calories per 4-ounce serving. The fat content is concentrated in flavor rather than quantity, making it a satisfying addition to meals without excessive calorie intake.
This makes it an excellent choice for those seeking rich flavors while maintaining portion control. The butter finishing adds minimal calories but maximizes flavor impact.
Gelatin for Gut Health
The gelatin formed during roasting acts as a prebiotic, feeding beneficial gut bacteria and supporting digestive health. Studies show gelatin can improve gut motility and reduce symptoms of leaky gut syndrome.
The combination of gelatin and marrow’s natural fats creates a nutrient profile that’s particularly beneficial for gut microbiome diversity. For best results, serve with fermented foods like sauerkraut or kimchi to enhance these effects.
Culinary Nutrition Boost
When paired with vegetables like roasted Brussels sprouts or sautéed spinach, the marrow’s nutrients become even more balanced. The vitamin K in leafy greens works with the marrow’s vitamin D to support bone health, while the fiber content aids digestion.
This makes the dish not just delicious but a complete nutritional powerhouse when properly balanced. The key is portion control—just 2-3 ounces per serving provides maximum benefits without overdoing saturated fats.
Nutrition facts
Frequently asked questions
What's the best cut of beef for bone marrow?
For the richest flavor, use marrow from beef leg or knuckle bones. These cuts yield the most abundant, high-quality marrow with that signature buttery texture. Avoid marrow from younger animals—the fat content is lower, resulting in a less luxurious result.
Can I substitute butter with another fat?
Yes! For a dairy-free option, use ghee or coconut oil (both have high smoke points). Ghee adds a nutty depth, while coconut oil provides a neutral base. Just reduce the amount by 20% since these fats are more concentrated. The key is achieving that glossy finish.
Why did my marrow turn out greasy instead of creamy?
Over-roasting or insufficient scoring causes greasiness. Score the marrow deeply in a crosshatch pattern before seasoning, and roast at 375°F until just tender (about 25-30 minutes total). If it's still too greasy, pat the exterior dry before roasting and tent with foil if browning too quickly.
How do I store leftover roasted marrow?
Transfer to an airtight container and refrigerate for up to 4 days. The texture will firm up, so reheat gently in the oven at 350°F for 5-7 minutes until creamy again. For longer storage, freeze for up to 3 months—thaw overnight in the fridge before reheating.
What's the secret to restaurant-quality presentation?
Serve on a slate board or wooden platter with warm crusty bread and fresh herbs scattered around. Use a small knife to scoop the marrow directly from the bone—this creates visual drama. For extra flair, drizzle with reduced balsamic glaze or sprinkle with flaky sea salt right before serving.