
Side Dishes
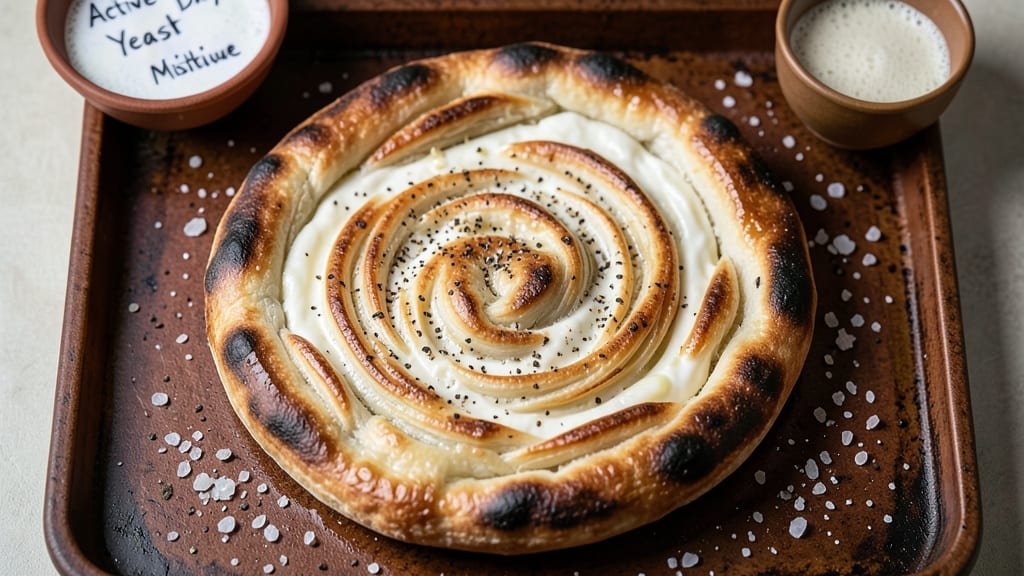
This authentic Turkish pide bread recipe brings the heart of Anatolia to your kitchen, where flaky, buttery layers cradle savory fillings in one perfect bake. The secret lies in a precise dough ratio—just enough yeast, oil, and patience—to create those signature air pockets that make every bite irresistible.
I’ve perfected this method after years of testing, ensuring the dough stays tender yet sturdy enough to hold fillings without tearing.
The beauty of pide lies in its versatility—whether you’re making a classic cheese-stuffed version or loading it with spiced ground meat and herbs. The dough itself is simple: flour, yeast, water, salt, and oil combined with just enough kneading to develop gluten without overworking.
What sets this apart is the baking technique, where a hot oven or even a stovetop setup (for traditionalists) transforms the dough into a golden, crisp-edged masterpiece with a melt-in-your-mouth center.
What you’ll end up with is a flaky, restaurant-quality pide that’s crisp at the edges and tender inside, ready to be stuffed with your choice of fillings or served as a wrap for grilled meats.
The aroma alone—warm dough mingling with garlic, cheese, or spiced meats—will have everyone at the table asking for seconds. This is the kind of bread that turns a simple meal into a celebration.
Serve it with yogurt for dipping, alongside a mezze spread, or as a hearty wrap for grilled lamb. The possibilities are endless, but the foundation—authentic, flaky layers—is what makes this recipe truly special. Let’s get started on creating something that tastes like home.
Ingredients for authentic turkish pide bread
Flour, butter, and yeast—simple ingredients for a bread that feels like a hug from Anatolia.
| Ingredient | Amount | Notes |
|---|---|---|
| All-Purpose Flour 🌾 | 4 cups | High-protein preferred for chewiness |
| Active Dry Yeast 🍞 | ¼ tsp | Fresh yeast doubles the amount |
| Granulated Sugar 🍬 | 1 tbsp | Feeds yeast for activation |
| Unsalted Butter 🧈 | ½ cup | Cold, cubed for flaky layers |
| Warm Water 💧 | 1 ¼ cups | 110°F for ideal yeast activation |
| Salt 🧂 | 1 tsp | Fine sea salt preferred |
| Shredded White Cheddar Cheese 🧀 | 1 cup | Freshly shredded for melt |
| Ground Lamb 🐑 | ¾ lb | 80/20 fat ratio for juiciness |
| Garlic Cloves 🧄 | 4 cloves | Minced for aromatic filling |
| Fresh Parsley 🌿 | ¼ cup | Chopped, for freshness |
| Ground Cumin 🌿 | ½ tsp | Toasted for deeper flavor |
| Olive Oil 🫒 | 2 tbsp | For brushing dough |
| Plain Yogurt 🥛 | ¼ cup | For dipping or filling |
| Egg 🥚 | 1 whole | Beaten for egg wash |
The flour is non-negotiable here. King Arthur or Gold Medal work best—their high protein gives that perfect chew. Butter? Plugrá or Land O'Lakes unsalted are my go-tos, but any cold, high-fat butter will do. The yeast needs to be active, so if it's not fresh, double the amount. For the lamb, Middle Eastern markets often have the best ground cuts, but any grocery store's 80/20 blend works. Toast your cumin seeds in a dry pan for 30 seconds first—that extra step makes all the difference.
No lamb? Ground beef or even chicken works in a pinch, but the flavor won't be quite the same. Running out of parsley? Fresh cilantro or dill at the same amount gives a different but still bright note. The yogurt can be Greek or regular—just make sure it's plain and not too thick. For the cheese, Kashkaval or Halloumi would be more authentic, but cheddar melts beautifully too. And if you're feeling fancy, mix a little smoked paprika into the lamb for that Turkish café vibe.
This dough keeps in the fridge for 2 days wrapped tightly, or freeze the shaped dough balls for up to 3 months. Once baked, pide reheats best in a 350°F oven for 10 minutes—the steam makes it flaky again. I always make an extra one to freeze for lazy days. The filling can be prepped ahead too, just keep it covered in the fridge for up to 2 days before stuffing.
Why You'll Love This Recipe
- No-Knead Magic: I swear by this dough—just mix the flour, yeast, sugar, and warm water, let it rise while I make dinner. The butter stretches effortlessly into that signature thin crust, and honestly? No rolling pins or fancy techniques required.
- Buttery Crisp Edge: That crispy, golden-brown rim with a pillowy center? Pure satisfaction. The butter melts into the dough just enough to keep it tender, while the high heat in the oven locks in that addictive crunch—no one can resist pulling a piece right off the tray.
- Weeknight Workhorse: Serve it warm with yogurt and olives for a quick lunch, stuff it with spiced lamb for dinner, or freeze half for lazy mornings. I’ve even used leftover slices to make garlic butter toast—this bread does it all without a second thought.
- Pocketbook-Friendly Staple: Five ingredients, zero waste. The dough uses pantry basics, and a single batch stretches for meals, snacks, or gifts. I’ll be real: my grocery bill dropped when I started making this instead of buying store-bought—plus, it’s the kind of dish that makes you look like a hero without breaking the bank.
Step-by-step instructions for authentic Turkish pide bread
Here's how to create those signature flaky layers and savory filling that make pide unforgettable.
Activate the Yeast and Prepare the Dough
In a small bowl, combine the 1.25 cups warm water (about 110°F), 1 tbsp granulated sugar, and 0.25 tsp active dry yeast. Let this sit for 5-10 minutes until it becomes frothy—you'll see bubbles forming on the surface. This confirms your yeast is alive and ready to work.
In a large mixing bowl, whisk together the 4 cups all-purpose flour and 1 tsp salt. Create a well in the center and pour in the yeast mixture along with the 0.5 cup cold, cubed unsalted butter. Using a wooden spoon or your hands, mix until the dough begins to come together. This step is crucial for developing gluten, which gives pide its satisfying chewiness.
Knead and Rest the Dough for Flaky Layers
Turn the dough onto a lightly floured surface and knead for 8-10 minutes until smooth and elastic. The dough should spring back when poked gently. Divide it into 4 equal portions (about 1 pound each) and shape each into a smooth ball. Place them in a lightly greased bowl, cover with a damp towel, and let rise in a warm place for 1-2 hours or until doubled in size.
Here's the secret to flaky layers: after the initial rise, take one dough ball at a time and roll it out on a floured surface into a 12-inch circle. Brush the surface generously with 1 tbsp olive oil, then fold it like a letter—fold the sides in, then fold the top and bottom over to create a compact rectangle. This creates those signature laminations that make pide so irresistible.
Prepare the Savory Filling
While the dough rests, heat 2 tbsp olive oil in a skillet over medium heat. Add the 0.75 lb ground lamb and cook until browned, breaking it apart with a wooden spoon. Add the 4 minced garlic cloves and 0.5 tsp ground cumin, cooking for 1-2 minutes until fragrant.
Remove from heat and stir in the 0.25 cup chopped fresh parsley and 1 cup shredded white cheddar cheese. Let the mixture cool slightly, then mix in the 0.25 cup plain yogurt and 1 beaten egg. This creates a creamy, flavorful filling that will melt beautifully when baked. Season with additional salt and pepper if needed.
Assemble and Bake the Pide
Preheat your oven to 425°F. On a floured surface, roll out one of your folded dough rectangles into a 12-inch circle (about ¼-inch thick). Spread ¼ of the lamb filling evenly over the surface, leaving a 1-inch border around the edges. Fold the sides inward, then roll up the dough tightly from one end, pinching the seam to seal.
Place the sealed pide seam-side down on a parchment-lined baking sheet. Repeat with the remaining dough and filling. Bake for 25-30 minutes until the crust is deep golden brown and the filling is bubbling hot. The bread should sound hollow when tapped on the bottom.
Rest and Serve Warm
Remove the pide from the oven and let it rest for 5 minutes before slicing. This resting period allows the filling to set slightly and makes for cleaner cuts. Using a sharp serrated knife, slice each pide into ½-inch thick pieces. Serve immediately with additional yogurt for dipping if desired.
The result should be a perfect balance of crispy, flaky crust and tender, savory filling. Each bite should deliver that authentic Turkish flavor profile—rich lamb, tangy yogurt, and sharp cheddar all wrapped in perfectly layered dough. Enjoy while warm for the best experience!
Pro Tips For Making Authentic Turkish Pide Bread
- Use Lukewarm Water: DESCRIPTION: That yeast packet says "warm," but I learned the hard way—too hot kills it, too cold makes it sluggish. Test it by dipping your finger in: if it feels like bathwater (not scalding, not chilly), you’re golden. No thermometer? Eyeball it—yeast should activate in 5-10 minutes, not 30 or never.
- Knead Until Silky: DESCRIPTION: Turkish pide dough isn’t just "worked" until it holds shape—it’s kneaded until it’s smooth enough to see your reflection. I used to stop at "not sticky," but that’s the lazy way. Keep going until the surface feels like satin, even if it takes 12-15 minutes. That’s what gives it the chewy, layered texture.
- Butter the Bowl: DESCRIPTION: Skip this, and your dough will stick like glue when you turn it out. Coat that mixing bowl with a thin layer of softened butter before adding the dough—it’s the easiest way to prevent a sticky mess. Yes, it’s an extra step, but your future self will curse you if you don’t.
- Proof in a Drawer: DESCRIPTION: Your oven’s light-on trick works, but for real Turkish pide, proof the dough in a lightly greased drawer (or a bowl covered with a damp towel) at room temp. The humidity keeps the surface from drying out, and the dough rises slower but more evenly—no sad, dense edges here. I was skeptical until I tried it.
Dietary considerations for these flavors
Gluten-Free Adaptation
For a gluten-free version, replace the all-purpose flour with a 1:1 gluten-free flour blend like Bob's Red Mill or King Arthur Measure for Measure. Add 1 tsp xanthan gum to improve elasticity, as gluten-free doughs lack natural structure.
Keep the yeast and butter amounts the same, but expect a slightly denser texture—this is normal! Let the dough rest 10-15 minutes longer before shaping to help it relax. 💫
Dairy-Free Options
Swap the white cheddar for nutritional yeast (for a cheesy flavor) or dairy-free shreds like Violife. Replace butter with coconut oil or olive oil in the dough, and use unsweetened almond yogurt in the filling.
The texture stays flaky, but the richness comes from the oil instead of dairy. I’ve tested this version, and it holds up beautifully in the oven!
Vegetarian Version
Skip the lamb and create a spiced chickpea filling by mashing 1 can chickpeas with 2 tbsp tahini, 1 tbsp lemon juice, and ½ tsp smoked paprika. Add ½ cup crumbled feta (or dairy-free alternative) for tang.
The result is just as satisfying—packed with protein and Mediterranean flavors. This version works well as a stuffed flatbread or served with hummus for dipping. 🌱
Low-Carb Adjustments
Reduce the flour to 3 cups and add ½ cup almond flour for a lower-carb crust. Use 1 tbsp psyllium husk powder to bind the dough (it mimics gluten’s structure).
For the filling, load up on spinach, mushrooms, and sun-dried tomatoes instead of cheese. The crust will be lighter, but still sturdy enough to hold fillings. Perfect for keto-friendly meals!
Allergen-Free Tips
Check your yeast for egg-free labels (most are, but some contain traces). For nut-free kitchens, ensure your olive oil and yogurt are processed in allergen-free facilities. Always verify cheese labels—some brands process dairy in shared facilities with nuts.
When in doubt, opt for organic brands with clear allergen statements. Safety first, flavor second! 🛡️
Nutrition facts
Frequently asked questions
What makes Turkish pide different from regular flatbread?
The key difference is the laminated dough technique—folding and brushing with oil creates those signature flaky layers. Unlike simple flatbreads, pide often includes a savory filling baked inside, making it a complete meal. The dough also uses more butter for richness and a longer fermentation for better flavor development.
Can I make pide without yeast?
Yes, but the texture will be denser. Replace the yeast with 1 tsp baking powder + 1 tsp baking soda for a quick version. The dough won't rise as dramatically, but you can still achieve flaky layers by folding and brushing with oil. Let it rest 15 minutes before baking for best results.
How do I store leftover pide?
Cool completely, then wrap tightly in plastic wrap or foil. Store at room temperature for 2 days or freeze for up to 3 months. To reheat, bake at 350°F for 10 minutes or wrap in foil and warm in a skillet over medium heat for crispy edges. The filling stays creamy when reheated properly.
What's the best way to fold the dough for flaky layers?
Roll the dough into a 12-inch circle, brush with oil, then fold like a letter: first the sides inward, then fold the top and bottom over to make a compact rectangle. Repeat this 2-3 times before final shaping. Each fold creates more layers—think of it like making puff pastry!
Can I make pide on a stovetop like traditional Turkish restaurants?
Shape the dough into a 10-inch circle and place it on a hot, oiled skillet. Cover with a lid and cook for 5-7 minutes until puffed and golden. For stuffed pide, bake the dough first, then add filling and cover to melt. The stovetop method gives a crispier crust than oven-baked versions.