
Main Courses
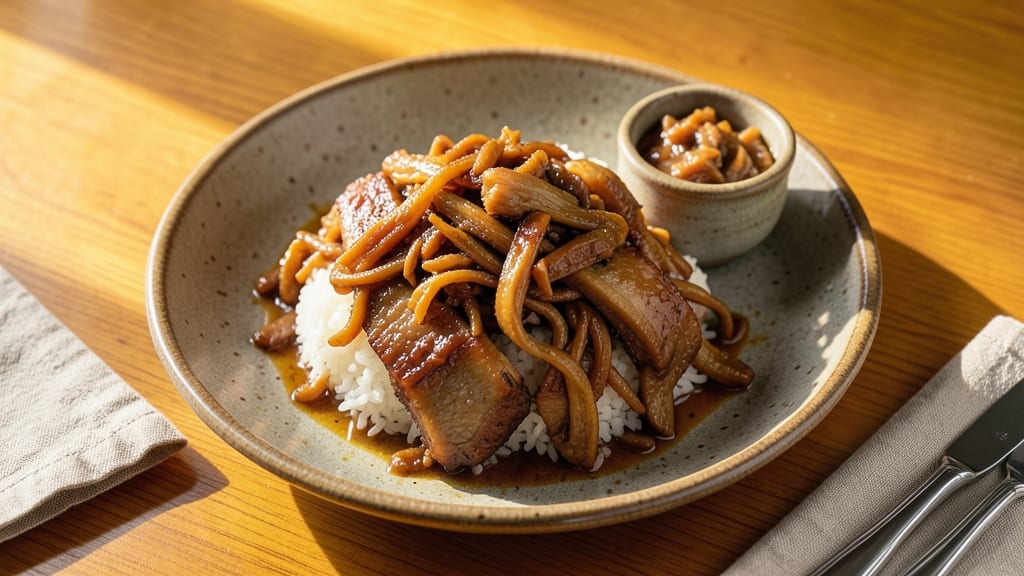
This Asian braised pork belly recipe transforms tough cuts into melt-in-your-mouth tenderness with a rich, caramelized sauce that clings to every bite.
Growing up in small-town Georgia, I learned pork’s potential from my grandmother’s cast iron pot, but it was Master Chef Chen who taught me how to coax its fat into liquid gold.
The secret lies in slow cooking—letting the collagen dissolve until the meat practically falls apart while building layers of umami in the sauce.
What makes this technique professional is the balance: a foolproof method that delivers restaurant-quality results at home without requiring specialized equipment. You’ll need just a heavy pot, basic pantry ingredients, and patience—about 3 hours of hands-off braising time.
The sauce starts with soy, ginger, and garlic, then deepens as the pork’s natural fat renders into a glossy, aromatic reduction. Every spoonful carries the essence of traditional Chinese braising, where fat becomes flavor.
The result is pork belly so tender it shreds easily, swimming in a sauce that’s silky from rendered fat and complex from slow caramelization. Serve it over steamed jasmine rice with quick-pickled vegetables for contrast, or let guests tear into it straight from the pot.
This dish proves that with time and technique, even the fattest cuts become the most rewarding centerpiece of your table.
For those who want to elevate it further, finish with a sprinkle of toasted sesame seeds or a drizzle of chili oil. The leftovers keep beautifully for days, making this an ideal recipe for meal prep or hosting. Let’s get cooking—your taste buds will thank you.
Ingredients for asian braised pork belly
Just 15 ingredients transform tough pork belly into restaurant-quality melt-in-your-mouth perfection.
| Ingredient | Amount | Notes |
|---|---|---|
| Pork Belly 🥓 | 2 lb | Skin-on, cut into 1-inch cubes |
| Dark Soy Sauce 🍶 | ½ cup | High-quality, like Kikkoman |
| Light Soy Sauce 🍶 | ¼ cup | For balance, use Diamond Crystal |
| Fresh Ginger 🧄 | ¼ cup | Finely minced, peeled |
| Garlic Cloves 🧄 | 8 cloves | Peeled, smashed for aroma |
| Brown Sugar 🍯 | ¼ cup | Light or dark, packed |
| Shaoxing Wine 🍷 | ¼ cup | Substitute dry sherry if unavailable |
| Sesame Oil 🫒 | 1 tbsp | Toasted, for finishing |
| Green Onions 🧅 | ¼ cup | Sliced, white and green parts |
| Water 💧 | 1 cup | Or substitute with pork broth |
| Cornstarch 🌾 | 1 tbsp | For sauce thickening |
| Star Anise 🌟 | 2 whole | Optional, for depth |
| Cinnamon Stick 🌿 | 1 whole | Optional aromatic |
| Salt 🧂 | 1 ½ tsp | Diamond Crystal kosher |
| Black Peppercorns 🌶️ | ½ tsp | Cracked, for subtle heat |
The pork belly is non-negotiable here—skin-on is key for that signature crisp. Grab it from Whole Foods or your local butcher if possible; they’ll cut it into perfect 1-inch cubes for even cooking. Costco sells it pre-cut, which saves time. Look for cuts with good marbling—fat pockets are what render into that silky sauce. If you can’t find Shaoxing wine, dry sherry or Mirin work in a pinch, but the flavor won’t be identical. The soy sauces? Kikkoman dark and light are my go-tos, but any good-quality brands will do.
No fresh ginger? Ginger paste works—just use half the amount. Star anise and cinnamon are optional but add incredible depth; skip them if you’re in a hurry. The cornstarch is your secret weapon for that glossy, restaurant-worthy sauce—don’t substitute with flour. For the garlic, smash the cloves with the side of your knife instead of mincing; this releases more flavor. Brown sugar caramelizes beautifully in the braising liquid, so use light or dark—your call. If you’re prepping ahead, marinate the pork overnight in soy, ginger, garlic, and a splash of wine for extra tenderness.
This dish tastes even better the next day—make extra. Store leftovers in the fridge for 5 days or freeze for 3 months. The sauce thickens as it cools, so add a splash of water when reheating. For serving, I always toast sesame seeds in a dry pan until golden and sprinkle them over the top right before eating. The pork belly keeps its crispy skin if you brown it well before braising—don’t skip this step, even if it adds 10 minutes.
Why You'll Love This Recipe
- Foolproof First-Timer: I’ll admit, I burned my first batch—ginger was too aggressive, pork belly tougher than expected. But once I let it simmer low and slow, the fat rendered perfectly, and even my skeptical roommate licked the pan.
- Umami Bomb Combo: That dark soy sauce? It’s the secret weapon—deep, sticky, caramelized into the meat while light soy keeps it bright. Add the garlic and ginger, and you’ve got layers of flavor that make store-bought braises look sad.
- Leftover Luxury: I make a double batch on Sundays because reheating this is chef’s kiss—the pork belly stays tender, the sauce clings like a hug. Pack it for lunches or serve it cold in rice bowls when you’re too tired to cook.
- Budget Feast: Pork belly stretches farther than you’d think, especially when braised until fall-apart tender. A single slab feeds four, and the soy-ginger sauce turns scraps into next-day stir-fry magic. My wallet and my taste buds thank me.
Step-by-step instructions for braised pork belly with Asian flavors
Here's how to transform tender pork belly into melt-in-your-mouth perfection with a velvety sauce.
Prepare the Pork Belly for Maximum Flavor
Begin by cutting the 2 lb pork belly into 1-inch cubes, leaving the skin on. This size ensures even cooking while preserving that signature crispy exterior. Pat each cube dry with paper towels - removing excess moisture prevents steaming and guarantees a crispy skin later.
In a small bowl, combine the 1.5 tsp salt, 0.5 tsp cracked black peppercorns, 0.25 cup finely minced fresh ginger, and 8 smashed garlic cloves. Rub this mixture all over the pork belly cubes, pressing it into the meat so it penetrates. The ginger and garlic will infuse deep flavor while the salt helps tenderize the meat. Let the seasoned pork belly sit at room temperature for 30 minutes before cooking - this ensures even cooking throughout.
Render the Fat and Build the Aromatic Base
Heat a heavy-bottomed Dutch oven over medium heat (no oil needed - the pork belly's fat will render out). Working in batches if needed, add the pork belly cubes and cook undisturbed for 5-6 minutes until the fat begins to render and the meat develops a golden crust. This initial searing locks in juices and creates foundational flavor.
Once the pork belly is golden on one side, gently flip the pieces and continue cooking for another 3-4 minutes. Remove the pork belly and set it aside temporarily. In the same pot, add the 2 whole star anise and 1 whole cinnamon stick, letting them toast for 1 minute until fragrant. This step builds the aromatic base that will infuse through the entire dish.
Create the Signature Sauce
Pour in the 0.25 cup Shaoxing wine and scrape up any browned bits from the bottom of the pot - these contain concentrated flavor. Add the 0.5 cup dark soy sauce, 0.25 cup light soy sauce, and 0.25 cup brown sugar, stirring to combine. The dark soy sauce will give depth of color while the light soy sauce balances with saltiness.
Return the pork belly to the pot along with the 1 cup water. Bring everything to a gentle simmer, then reduce heat to low. Cover partially (leave a small gap) and let it cook for 1 hour 15 minutes. The pork belly should be fork-tender with the fat rendered into the sauce. If the sauce reduces too quickly, add 2-3 tablespoons of water to maintain moisture.
Thicken and Finish the Braise
In a small bowl, whisk together the 1 tbsp cornstarch with 2 tablespoons of the braising liquid to create a slurry. This will help thicken the sauce to perfect consistency. Stir the slurry into the pot and simmer for 3-5 minutes until the sauce coats the back of a spoon and has thickened slightly.
Remove the star anise and cinnamon stick at this point - they've done their job infusing flavor. Stir in the 1 tbsp toasted sesame oil and 0.25 cup sliced green onions, letting the sesame oil bloom for 30 seconds before removing from heat. The sesame oil adds nutty depth while the green onions provide fresh contrast. Taste and adjust seasoning if needed - you may need a touch more soy sauce or sugar to balance flavors.
Rest and Serve with Confidence
Let the braised pork belly rest for 10 minutes before serving. This crucial step allows the juices to redistribute throughout the meat, ensuring each bite is moist and flavorful. The pork belly should be fork-tender with the fat beautifully rendered into the glossy sauce.
Serve the pork belly hot, spooning generous amounts of that rich sauce over each portion. The contrast of crispy skin against tender meat, paired with the complex, umami-packed sauce, makes this dish unforgettable. Pair it with steamed jasmine rice to soak up every last drop of that luxurious sauce.
Pro Tips For Making Asian Braised Pork Belly
- CRISP THE BELLY FIRST: Toss the pork belly in cornstarch before searing—just 2 tablespoons rubbed all over. I learned this the hard way after making mushy pork belly; the starch creates a dry, golden crust that holds up through braising. Skip this, and you’ll end up with greasy, underwhelming bites.
- USE GINGER JUICE, NOT SLICES: After grating fresh ginger, squeeze out the juice—about 1 tablespoon—before adding it to the braising liquid. Thin slices burn and turn bitter, but the juice adds bright, aromatic depth without overpowering. (Yes, even if you’re impatient like me.)
- LOW AND SLOW AFTER SEARING: After the initial sear, drop the heat to actual low—think 275°F (135°C), not simmering. I used to rush it, and the pork turned tough. Cover tightly and let it cook for 2.5–3 hours, checking occasionally. The sauce will thicken naturally, and the meat will fall apart.
- SALT THE PORK TWICE: Salt the pork belly first thing (generously, about 1.5 teaspoons per pound) and again after searing. The first salt breaks down the meat fibers, and the second ensures seasoning penetrates. I was skeptical until I tried it—the flavor is richer, and the texture is more tender. (Your future self will thank you.)
Essential equipment for perfect results
Heavy-Duty Dutch Oven
The Dutch oven is my non-negotiable choice for braising pork belly—its thick walls and tight lid distribute heat evenly, preventing hot spots that can dry out the meat. I use a Le Creuset 5.5-quart in my kitchen, but any heavy enameled cast iron (like Lodge 5.5-quart) will work.
The lid should fit snugly to trap steam while allowing a tiny gap for moisture to escape during the 1 hour 15 minutes braising time. If you don’t own one, a deep, heavy pot with a tight-fitting lid is your next best option. 🔥
Instant-Read Thermometer
While pork belly is forgiving, an instant-read thermometer ensures you nail the perfect doneness. I recommend the ThermoWorks Thermapen ONE—it’s fast, accurate, and reads up to 400°F.
Insert the probe into the thickest piece of pork belly; it’s ready when it hits 203°F (or when it shreds easily with two forks). Without one, you’re guessing, and that’s how you end up with meat that’s either tough or mushy.
Pro tip: Test the thickest piece—this is where collagen breaks down last.
Tongs for Browning
Good tongs make all the difference when browning pork belly. I use OXO Good Grips—they’re sturdy, have a comfortable grip, and won’t slip when flipping 1-inch cubes in hot fat.
The goal is to sear each side until golden (5-6 minutes per batch), so tongs that grip securely prevent spills and ensure even browning. Avoid flimsy utensils; they’ll drop cubes into the fat, leading to uneven cooking.
A spatula can help too, but tongs are my go-to for this step.
Whisk for Sauce Thickening
A whisk is essential for creating the cornstarch slurry that thickens the sauce to perfection. I prefer a stainless steel whisk (like Cuisipro) because it won’t rust and handles cornstarch’s gritty texture better than plastic.
Whisk the 1 tbsp cornstarch with 2 tbsp braising liquid until fully dissolved—this prevents lumps that can ruin the sauce’s silky texture. Stir the slurry into the pot over medium-low heat until the sauce coats the back of a spoon (3-5 minutes). No whisk?
A fork works, but it’s messier.
Measuring Spoons & Scale
Precision matters with soy sauces, brown sugar, and cornstarch—use stainless steel measuring spoons (like OXO’s) for accuracy. For the pork belly, a kitchen scale ensures you buy the exact 2 lb needed.
I weigh my pork belly before cutting to avoid surprises; 1 lb per person is generous, but pork belly is rich, so leftovers are a bonus. If you’re scaling up, maintain the 1:1 ratio of pork to braising liquid (1 cup water per 2 lbs pork).
A gram scale is ideal for consistency, but a pound-based scale works too.
Optional: Smoker or Grill
For an extra layer of depth, finish the pork belly on a smoker or grill after braising. I use my Traeger Pellet Grill set to 225°F for 15-20 minutes to crisp the skin further. If you don’t have one, a broiler works in a pinch—just watch closely to avoid burning.
This step isn’t required, but it adds a smoky char that elevates the dish, especially if you’re serving it at a gathering. A chimney starter (like Char-Griller) can help if you’re smoking for the first time.
Nutrition facts
Frequently asked questions
Can I use boneless pork belly for this recipe?
While boneless pork belly will work, it won't deliver the same restaurant-quality results. The fat and skin are what create that signature crispy exterior and rich sauce. If you must use boneless, look for well-marbled cuts and increase the braising liquid by 2 tablespoons to compensate for the reduced fat content. The texture will be slightly less luxurious, but still delicious.
How do I prevent the pork belly from becoming too dry?
Never skip the resting period after braising - let it sit for 10 minutes before serving. This allows juices to redistribute. Also, maintain a gentle simmer rather than a rolling boil, and add 2-3 tablespoons of water if the sauce reduces too quickly. Using a Dutch oven with a tight-fitting lid helps trap moisture. The pork should be fork-tender, not dry.
What's the difference between this recipe and Chinese red-braised pork?
This recipe focuses on the pork belly's natural fat rendering into the sauce, creating a silky texture. Chinese red-braised pork typically uses leaner cuts (like pork shoulder) and relies more on sugar and vinegar for color and tang. Our version uses soy sauces, Shaoxing wine, and aromatic spices for depth, while maintaining the pork belly's luxurious fat content. The result is richer and more decadent.
Can I make this recipe in an Instant Pot?
Yes, but with adjustments. Sear the pork belly first in a skillet, then transfer to the Instant Pot with all ingredients except cornstarch. Cook on high pressure for 30 minutes, then quick-release. Thicken the sauce separately with cornstarch slurry. The texture will be slightly different - more tender than crispy - but still delicious. The sauce may need more reduction time after pressure cooking.
How far ahead can I prepare this dish?
This recipe actually tastes better the next day! Store leftovers in the fridge for up to 5 days or freeze for 3 months. The flavors deepen as the fat continues to render. When reheating, add a splash of water or broth to prevent drying. For serving, you can crisp the skin again by broiling for 3-5 minutes before plating.