
Main Courses
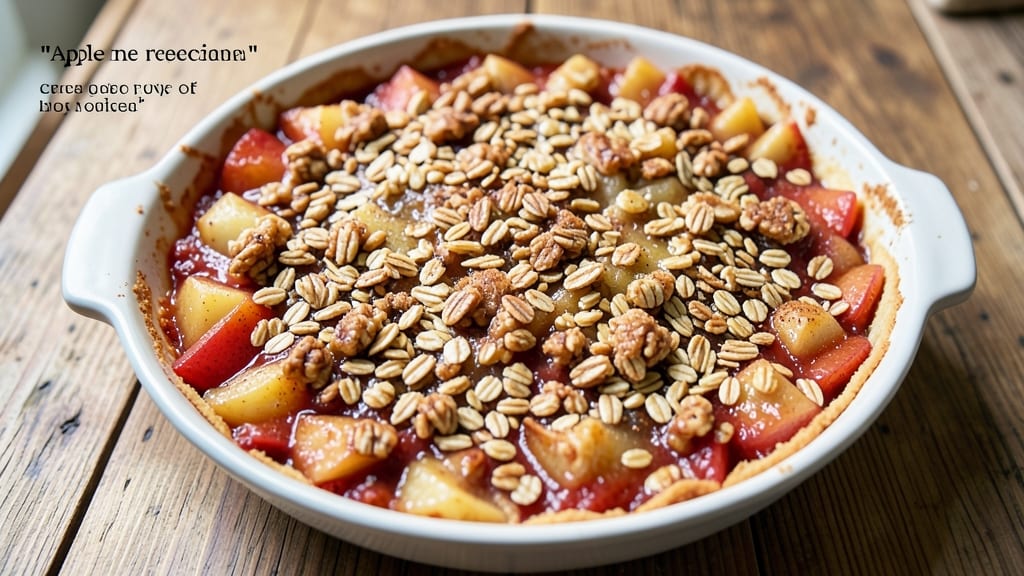
This apple crisp recipe with canned apples and oats proves you don’t need fresh fruit to create a dessert that tastes like autumn in a skillet. The secret lies in the warm cinnamon-spiced filling and buttery oat topping that bakes to golden perfection—no peeling, coring, or browning required.
I developed this version after realizing canned apples work just as well as fresh, cutting prep time from 30 minutes to under 10 while delivering the same comforting results.
The beauty of this recipe is its simplicity: canned apples provide consistent texture and flavor without the mess, while rolled oats create a crispy topping that’s foolproof when baked at the right temperature.
The spices—cinnamon, nutmeg, and a touch of vanilla—transform the filling into something rich and aromatic, while brown sugar adds depth that caramelizes beautifully. What you end up with is a dessert that’s warm, spiced, and satisfying, perfect for serving with vanilla ice cream or whipped cream.
This apple crisp delivers restaurant-quality texture with minimal effort—crispy on top, tender yet slightly firm in the middle, and a filling that’s just sweet enough to balance the spice. The canned apples hold their shape while absorbing the spices, creating pockets of flavor in every bite.
Best of all, it’s a dessert that feels special without requiring advanced techniques or expensive ingredients.
Serve it warm straight from the oven, or let it cool slightly for easier slicing. The contrast of warm crisp with cold ice cream makes every bite unforgettable. Ready to make dessert effortless? Let’s get baking.
Ingredients for apple crisp recipe with canned apples and oats
Canned apples and simple pantry staples create this foolproof apple crisp with restaurant-style texture.
| Ingredient | Amount | Notes |
|---|---|---|
| Canned Apple Pie Filling 🍎 | 2 cans | Unsweetened, 29 oz each |
| Rolled Oats 🌾 | 2 cups | Old-fashioned, not quick |
| Light Brown Sugar 🍚 | 1 cup | Packed firmly |
| Unsalted Butter 🧈 | ¾ cup | Cold, cubed for topping |
| Ground Cinnamon 🌶️ | 2 tbsp | Freshly ground preferred |
| Ground Nutmeg 🌿 | ½ tsp | Freshly grated for warmth |
| Vanilla Extract 🍯 | 1 tsp | Pure vanilla preferred |
| Salt 🧂 | ½ tsp | Fine sea salt |
| All-Purpose Flour 🌾 | ½ cup | For crispiness |
| Granulated Sugar 🍚 | ¼ cup | For extra crunch |
| Vanilla Ice Cream 🍦 | 1 ½ cups | For serving (optional) |
The canned apple pie filling is the star here—opt for unsweetened varieties like Libby’s or Mott’s to control sweetness. Bulk bins at grocery stores often carry oats cheaper than pre-packaged, and Bob’s Red Mill rolled oats are my go-to for that perfect crunch. Brown sugar adds depth, so pack it firmly into the measuring cup for accuracy. For the spices, Penzeys or McCormick ground cinnamon and nutmeg stay potent longer than store-brand options. The vanilla extract should be pure, not imitation—Nielsen-Massey is a reliable choice. Cold butter is key for a crispy topping, so pull it straight from the fridge and cut it into chunks.
No rolled oats? Quick oats or crushed graham crackers work in a pinch, though texture will differ. Substitute maple syrup for half the brown sugar if you prefer less sweetness. Cinnamon sticks can replace ground cinnamon—just crush 2 sticks for the same amount. For a nutty twist, fold 0.5 cup chopped pecans into the topping. If your canned filling is too sweet, reduce the granulated sugar in the topping to 0.125 cup. The vanilla ice cream is optional but recommended—Breyer’s or Ben & Jerry’s work perfectly for that classic contrast.
Store leftovers in an airtight container for up to 4 days in the fridge, though it’s best enjoyed fresh. For longer storage, freeze portions for up to 3 months—reheat in the oven at 350°F for 10 minutes to restore crispiness. This crisp reheats beautifully, making it ideal for meal prep dessert or quick after-dinner treats. Double the recipe for a crowd—it’s always a hit at gatherings, and the extra effort pays off with warm, spiced bites that feel like home.
Why You'll Love This Recipe
- No Pantry Haul Needed: I keep a can of apple pie filling in my cabinet just for this—no chopping, no peeling, no fuss. Three ingredients (plus butter and cinnamon) and you’ve got dessert ready to bake while you’re still deciding what to watch on TV.
- Caramelized Cinnamon Magic: That brown sugar and butter topping? It turns golden and crunchy, but the real star is the spiced filling melting underneath. Honestly, the first bite makes me forget I didn’t use fresh apples—it’s that good.
- Weeknight Warmth in Minutes: Twenty minutes in the oven, zero effort. Serve it warm with vanilla ice cream when you’re too tired to cook, or let it cool for a grab-and-go breakfast the next morning. (Yes, even on a Tuesday night.)
- Budget-Friendly Indulgence: A single can of filling and a bag of oats stretch to four servings—perfect for feeding a crowd without breaking the bank. My daughter picks out the crispy bits first, but still asks for seconds. Not the prettiest, but the taste makes up for it.
Instructions for apple crisp with canned apples and oats
This method delivers a perfectly balanced crisp with tender fruit filling and a golden, crunchy oat topping.
Prepare the Filling
Drain the 2 cans of canned apple pie filling completely, pressing gently on the fruit to remove excess liquid. Transfer the drained filling to a 9x13-inch baking dish and spread it evenly. The filling should be about ¼-inch thick throughout the dish.
In a small bowl, whisk together 1 teaspoon vanilla extract and ½ teaspoon salt. Pour this mixture over the apple filling and stir gently to combine. This step enhances the flavor and balances the sweetness of the apples. The filling is now ready to be topped.
Make the Oat Crisp Topping
In a large bowl, combine 2 cups rolled oats, 1 cup packed light brown sugar, 2 tablespoons ground cinnamon, ½ teaspoon ground nutmeg, ½ cup all-purpose flour, and ¼ cup granulated sugar. Mix these dry ingredients thoroughly with a wooden spoon until evenly distributed.
Cut ¾ cup unsalted butter into small cubes and add them to the dry mixture. Use your fingers or a pastry cutter to work the butter into the oats until the mixture resembles coarse crumbs with pea-sized butter pieces still visible. This texture ensures a crispy topping with pockets of buttery flavor.
Assemble and Bake
Sprinkle the oat mixture evenly over the apple filling in the baking dish, pressing down gently with your fingers or the back of a spoon. This ensures good contact between the topping and filling, creating a cohesive dessert. The topping should be evenly distributed with no bare spots.
Bake in a preheated 375°F oven for 30-35 minutes, until the topping is deep golden brown and the filling is bubbling at the edges. The center should still have a slight jiggle when the dish is gently shaken. If the topping browns too quickly, tent it loosely with aluminum foil to prevent over-browning.
Serve Warm with Ice Cream
Remove the crisp from the oven and let it cool for 10-15 minutes before serving. This resting period allows the filling to set slightly and makes the crisp easier to cut. The warm filling will contrast beautifully with the crispy topping.
Serve warm slices topped with 1.5 cups vanilla ice cream on the side. The contrast between the warm spiced apples and the cool ice cream creates the perfect balance of textures and temperatures. Each bite should deliver tender apples, crunchy oat topping, and creamy ice cream in every forkful.
Pro Tips For Making Apple Crisp Recipe With Canned Apples And Oats
- Preheat Twice: Run your oven at 375°F for 10 minutes before baking, then turn it off for 5 minutes. The residual heat melts the butter in the topping evenly—no more dry, crumbly patches or soupy bottoms. (Yes, it feels weird, but it works.)
- Toast the Oats: Spread rolled oats on a dry skillet over medium heat for 3-4 minutes until they smell nutty and deepen in color. This adds texture and prevents the topping from turning into mush. I learned this the hard way after a soggy batch.
- Skip the Stirring: Once you mix the topping, dump it straight onto the apples without spreading it out. Uneven thickness means some spots crisp while others stay doughy—let the heat do the work instead of trying to "fix" it.
- Butter First: Cut the cold butter into the oat-sugar mix until it’s pea-sized, not crumbly. Warm butter melts too fast, leaving you with a clumpy mess. Use your fingers—it’s faster and more precise than a fork. (Your future self will thank you.)
Pro cooking tips for this dish
Preheat Perfectly
Always preheat your oven to 375°F for at least 15 minutes before baking. I use an oven thermometer to confirm accuracy—many home ovens run 25°F hotter or colder than set. Place your 9x13-inch baking dish in the oven while preheating to ensure even heat distribution when it's time to bake.
This step prevents cold spots that can make your topping uneven. 🔥
Butter Texture Matters
Cold butter is non-negotiable for that perfect crispy topping. Cut your ¾ cup unsalted butter into ½-inch cubes and keep it chilled until ready to mix. When you work the butter into the oat mixture, leave some pea-sized pieces—this creates pockets of melted butter that bake into crispy, flavorful pockets.
I like to use Plugrá butter for its high fat content, which ensures extra crunch. 🧈
Drain Apples Thoroughly
Don’t skip pressing the drained canned apples with a spoon—this removes excess liquid that can make your filling soggy. I use a rubber spatula to gently press the fruit against the side of the can before transferring it to the baking dish.
This step is especially important if you’re using pre-cooked canned filling, which can sometimes be watery. A well-drained filling ensures your crisp holds its shape and texture. 🍎
Even Topping Distribution
Sprinkle the oat mixture evenly over the filling, then press down gently with the back of a spoon. This ensures the topping makes full contact with the filling, creating a cohesive dessert rather than separate layers.
I like to use a light touch—just enough pressure to flatten the topping slightly without compacting it too much. Uneven pressing can lead to some areas being overly crispy while others remain soft. ✨
Watch for Golden Brown
The topping is done when it reaches a deep golden brown color, not just light tan. If it browns too quickly, tent loosely with aluminum foil to prevent burning while allowing the filling to cook through.
I check the crisp at 25 minutes and adjust the oven rack position if needed—sometimes the top rack gets too hot. The filling should be bubbling at the edges but still slightly jiggly in the center. 🌟
Rest Before Serving
Let your crisp rest for 10-15 minutes before slicing—this allows the filling to set and makes it easier to cut cleanly. The warm filling will continue to thicken slightly during this time, creating that perfect balance of tender and firm.
I always serve it warm, straight from the oven, with a scoop of vanilla ice cream. The contrast of temperatures is what makes this dessert truly magical. 💫
Nutrition facts
Frequently asked questions
Can I use any type of canned apples for this recipe?
For best results, stick with unsweetened canned apple pie filling—these provide the right balance of sweetness and texture. Sweetened varieties will make your crisp overly sugary, while apple sauce (even thick-cut) lacks the chunky texture needed for that perfect bite. The filling should be labeled "pie filling," not "apple sauce" or "applesauce."
Why does my oat topping turn out crumbly instead of crispy?
The secret is cold butter and proper mixing. Work the butter into the oats until you have pea-sized pieces remaining—this creates steam during baking for that golden crunch. Overmixing turns the topping into fine crumbs. Also, don't skip the 10-15 minute rest before serving—this lets the filling set while the topping firms up.
Can I make this apple crisp ahead of time?
This dessert actually tastes better the next day. Store leftovers in an airtight container for up to 4 days in the fridge. To reheat, bake at 350°F for 10-15 minutes until the topping is crispy again. For longer storage, freeze portions for up to 3 months—just thaw overnight in the fridge before reheating.
What's the best way to adjust this recipe for dietary restrictions?
For a gluten-free version, swap the all-purpose flour for ½ cup gluten-free 1:1 baking flour. For lower sugar, reduce the brown sugar to ½ cup and add 1 teaspoon maple syrup to the filling. Vegan? Use vegetable shortening instead of butter and ensure your vanilla extract is alcohol-free. Always check labels on canned apples for hidden additives.
How do I know when the crisp is fully cooked?
The topping should be deep golden brown with a few spots of caramelization, while the filling should be bubbling at the edges. Gently shake the pan—the center should still jiggle slightly (about 20 minutes of internal movement). If unsure, check at 25 minutes—underbaking is better than overcooking, as you can always bake it longer if needed.