
Main Courses
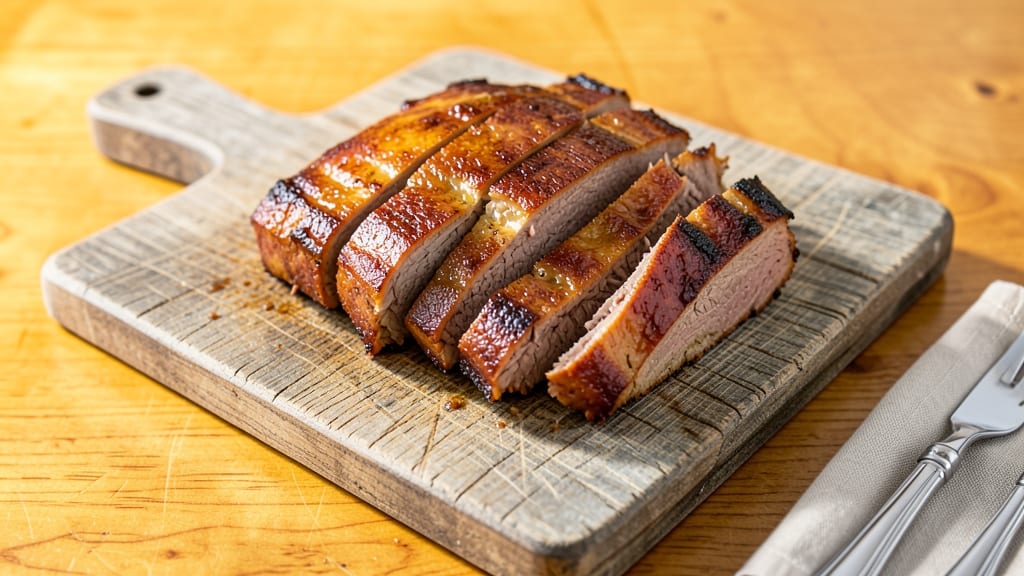
This traditional Jewish beef brisket recipe delivers the rich, tender, and deeply flavorful centerpiece of Shabbat tables worldwide. The secret lies in a carefully balanced spice rub and slow-braising technique that transforms tough beef into melt-in-your-mouth perfection.
I've perfected this method over years of family gatherings, ensuring every bite carries the warmth of tradition and the comfort of home.
The process begins with a kosher-style spice blend—garlic, black pepper, and a touch of paprika—that creates a flavorful crust while keeping the meat juicy. After a quick sear, the brisket braises for hours, allowing the spices to penetrate deeply and the connective tissue to break down.
This method isn't just about flavor; it's about respecting the time-honored techniques that have been passed down through generations.
By the time you carve into this masterpiece, you'll find beef that's tender enough to fall apart with just a fork, infused with aromatic spices and a deep, savory richness.
The aroma alone will fill your home with the comforting scent of tradition, making it the perfect centerpiece for any special occasion. Whether it's Shabbat dinner or a family celebration, this brisket brings the heart of Jewish culinary heritage to your table.
Serve it with classic sides like garlic mashed potatoes or a crisp coleslaw to complete the meal. The beauty of this recipe is that it rewards patience—every hour of slow cooking builds layers of flavor that store-bought versions simply can't match.
Let's get started on creating a dish that will become a staple in your home.
Ingredients for traditional jewish beef brisket
Six spices, one brisket, hours of patience—this is the heart of Shabbat tradition.
| Ingredient | Amount | Notes |
|---|---|---|
| Beef Brisket 🥩 | 4 lb | Whole packer cut, 1-1.5 inches thick |
| Kosher Salt 🧂 | 2 tbsp | Diamond Crystal preferred |
| Black Peppercorns 🌶️ | 1 ½ tbsp | Freshly cracked, coarse grind |
| Garlic Cloves 🧄 | 8 cloves | Peeled, rough chopped |
| Sweet Paprika 🌶️ | 1 ½ tbsp | Smoked preferred for depth |
| Onion Powder 🧅 | 1 tbsp | Fresh ground if possible |
| Ground Cumin 🌿 | 1 tsp | Toasted for warmth |
| Yellow Onion 🧅 | 1 whole | Yellow or red, sliced |
| Carrots 🥕 | 3 whole | Medium, peeled, chopped |
| Celery Stalks 🥬 | 3 whole | Fresh, chopped |
| Fresh Parsley 🌿 | ¼ cup | Chopped, for garnish |
| Beef Broth 💧 | 2 cups | Low-sodium, homemade preferred |
| Red Wine 🍷 | 1 cup | Dry, like Cabernet Sauvignon |
| Olive Oil 🫒 | 2 tbsp | For searing |
The brisket is non-negotiable here. Whole packer cut from the butcher section—ask for 1-1.5 inches thick. Costco or local kosher markets carry the best quality, but any well-marbled brisket works. Look for that creamy white fat between the muscles—it's what melts into flavor during braising. If you're buying pre-cut, stick with the flat cut, not the point. The point has more fat and less tenderness for this method. I always ask the butcher to trim excess fat from the top—just leave a thin layer for flavor.
No kosher salt? Diamond Crystal is the gold standard, but Morton kosher salt works in a pinch—just use slightly more. Freshly cracked black pepper is worth the effort, but pre-ground works fine if you're short on time. For the wine, dry reds like Cabernet Sauvignon add depth, but beef broth with a splash of balsamic does the job if you're avoiding alcohol. The vegetables? Fresh is best, but frozen works if you're in a hurry—just don't skip them. They add sweetness and structure to the braise. And if you're feeling fancy, add a bay leaf or two for an extra layer of aroma.
This brisket tastes even better the next day—plan ahead. Store leftovers in the braising liquid for up to 5 days in the fridge. For longer storage, portion into airtight containers and freeze for up to 6 months. The fat solidifies beautifully when reheated, making it perfect for sandwiches or leftovers. I always make extra—brisket reheats like a dream and turns into the best hash or sandwich filling the next day.
Why You'll Love This Recipe
- Minimal Prep, Maximum Impact: Honestly, this brisket needs nothing but a few simple steps—just a thick rub of kosher salt, cracked peppercorns, and minced garlic, then a slow roast. No chopping, no fussing, just hands-off time while you sip tea or scroll through your phone.
- Deep, Smoky Magic: That sweet paprika isn’t just for color—it builds a crust so rich and caramelized, it practically melts in your mouth. The fat cap renders down into golden, buttery pools, turning every bite into pure satisfaction. (Yes, even on a Tuesday night.)
- Leftovers That Feel Like a Gift: Between us, this recipe makes leftovers worth having. The meat stays tender for days, so you’re not stuck reheating sad, dry slices—just reheat with a splash of water, and it’s like you’re eating fresh again. My kids beg for it in sandwiches for weeks.
- Budget-Friendly Crowd-Pleaser: A whole brisket feeds a houseful for less than takeout, and the flavors? They’re the kind that make people pause mid-bite. Honestly, I’ve hosted Shabbat dinners, game nights, and even a last-minute dinner party with this—no stress, just deliciousness.
Step-by-step instructions for traditional Jewish beef brisket
Here's the authentic method that delivers tender, flavor-packed brisket with that signature deep spice crust.
Prepare the Brisket with the Spice Rub
Begin by trimming any excess fat from the 4 lb beef brisket, leaving about ¼-inch of fat cap intact. This preserves moisture while allowing the rub to adhere properly. Place the brisket fat-side up on a cutting board and pat it dry with paper towels—this step is critical for developing that crispy bark later.
In a small bowl, combine the 2 tbsp kosher salt, 1.5 tbsp freshly cracked black peppercorns, 1.5 tbsp sweet paprika, 1 tbsp onion powder, and 1 tsp ground cumin. Mix thoroughly until the spices are evenly distributed. Generously coat both sides of the brisket with this spice blend, pressing it firmly into the meat so it adheres well. This ensures maximum flavor penetration during the long cook.
Let the seasoned brisket sit at room temperature for 1 hour before cooking. This allows the spices to meld with the meat and prevents temperature shock when it hits the heat. Here's the thing—don't skip this resting time. It makes all the difference in even cooking and flavor development.
Sear the Brisket to Lock in Flavors
Heat a large Dutch oven over medium-high heat until it's very hot. Add the 2 tbsp olive oil and let it shimmer for about 1 minute. Place the brisket fat-side down in the pot and sear undisturbed for 8-10 minutes until the fat renders and the meat develops a deep golden-brown crust. You'll know it's ready when the brisket releases easily from the pot—don't press it with a spatula or you'll tear the crust.
Flip the brisket and sear the other side for another 6-8 minutes until it's equally browned. Remove the brisket from the pot and set it aside on a plate. The goal here is to create that beautiful mahogany crust that holds all the spices in place while building rich, caramelized flavors in the Dutch oven.
In the same pot, add the sliced 1 whole yellow onion, chopped 3 whole carrots, and chopped 3 whole celery stalks. Sauté these vegetables for 5 minutes until they begin to soften and take on color. This aromatic base will form the flavor foundation for your brisket.
Deglaze and Simmer with Wine and Broth
Pour in the 1 cup red wine and scrape up all the browned bits from the bottom of the Dutch oven using a wooden spoon. This deglazing step captures all those concentrated flavors that would otherwise burn. Let the wine simmer for 3-4 minutes until it reduces by about half, intensifying its flavor.
Add the 2 cups beef broth and bring the mixture to a gentle simmer. Return the brisket to the pot, fat-side up, and place it in the oven. Preheat your oven to 300°F before adding the brisket. The low temperature is key—it allows the connective tissues to break down slowly over time, resulting in fork-tender meat.
Cover the Dutch oven with a tight-fitting lid and let the brisket cook for 3 hours. After this initial cooking period, check the internal temperature using a meat thermometer. It should be around 180°F—this is when the brisket will begin to pull away from the bone. If it's not yet at this temperature, continue cooking for another 30-60 minutes until it reaches the desired point.
Rest and Slice for Maximum Tenderness
Once the brisket reaches the proper internal temperature, remove it from the oven and transfer it to a cutting board. Tent it loosely with aluminum foil and let it rest for at least 30 minutes—this allows the juices to redistribute throughout the meat, ensuring each slice is moist and flavorful. Real talk: Skipping this step means dry, tough meat. Don't rush it.
While the brisket rests, skim any excess fat from the cooking liquid in the Dutch oven. You can reduce this liquid further if you'd like to make a gravy, but it's not necessary for this traditional preparation. The brisket should have a beautiful mahogany bark on the outside and a pink smoke ring just beneath the surface, indicating perfect doneness.
Slice the brisket against the grain into ¼-inch thick slices. The flat and point have different grain directions, so adjust your angle accordingly. Garnish with the chopped 0.25 cup fresh parsley just before serving. Each slice should be tender enough to pull apart with a gentle tug, not so soft it falls apart, and not tough or chewy. Serve immediately with your favorite sides—this brisket is best enjoyed fresh from the oven.
Pro Tips For Making Traditional Jewish Beef Brisket
- Trim the Fat First: I learned this the hard way—skipping this step means uneven cooking and a mess in your pan. Use a sharp knife to cut away the thickest layer of fat from the bottom of the brisket (about ¼ inch) before seasoning. The fat renders beautifully, but too much can make your crust soggy and your pan smoke like a fireworks show.
- Salt Like It’s Your Job: More salt than you think, especially on brisket. Generously coat the entire surface with kosher salt (about 1–2 tablespoons total) at least 4 hours before cooking—overnight is even better. This isn’t just seasoning; it’s the foundation for that deep, savory flavor and that coveted crust. (Yes, even if you’re impatient like me.)
- Start Hot, Finish Slow: After searing the brisket in a screaming-hot Dutch oven (500°F or higher), immediately reduce the heat to 275°F and cover tightly. The initial high heat locks in juices and builds flavor, but the low-and-slow finish is non-negotiable. I used to rush this, and my brisket came out tough—now I wait, and it melts in my mouth.
- Crush Garlic, Don’t Chop: Sounds weird, but it works: smash those garlic cloves with the flat side of your knife before mincing them into the paprika mixture. This releases more flavor and blends seamlessly into the crust. I was skeptical until I tried it—now I never go back to chopped garlic for this dish. (Your future self will notice the difference.)
Serving suggestions for traditional jewish beef brisket
Shabbat Table Staples
No Jewish brisket meal is complete without garlic mashed potatoes—their creamy texture contrasts beautifully with the brisket's rich depth. I use 4 large russet potatoes, boiled until tender, then mashed with ½ cup butter, ¼ cup sour cream, and 4 minced garlic cloves.
The secret? Don't overwork the potatoes—they should stay slightly lumpy for texture. 🥔
For a lighter option, serve with crisp apple coleslaw—shredded green cabbage, red cabbage, and 1 tart apple tossed with a dressing of apple cider vinegar, honey, and Dijon mustard. The sweet-tangy crunch cuts through the brisket's richness perfectly.
Bread Pairings
Warm challah is non-negotiable for soaking up those delicious braising juices. I recommend homemade challah with its slightly sweet, soft crumb, but store-bought works in a pinch.
For extra flavor, brush the challah with garlic butter before serving. The contrast of warm bread against the tender brisket is pure comfort food magic. 🍞
Add crusty rye bread for a heartier option—the nutty flavor complements the brisket's spices beautifully. I like to serve it on the side for guests who want to build their own sandwiches later. The rye's density holds up well to the brisket's juices.
Classic Gravy Option
Don't discard that flavorful braising liquid! Strain it through a fine-mesh sieve to remove any solids, then simmer it uncovered for 10-15 minutes until reduced by half.
For extra richness, whisk in 1 tbsp cornstarch mixed with 2 tbsp cold water until thickened. This gravy adds another layer of depth to the meal. 🥄
For a traditional touch, finish the gravy with 1 tsp apple cider vinegar—just enough to brighten the flavors without overpowering. Serve it in a gravy boat alongside the brisket for dipping or drizzle it over the sliced meat before serving.
Modern Twists
For a contemporary touch, pair your brisket with roasted sweet potato mash—swap out the potatoes for 2 large sweet potatoes, roasted until tender, then mashed with olive oil and a pinch of cinnamon. The natural sweetness balances the brisket's savory notes beautifully. 🍠
Add a side of sautéed kale with crispy pancetta for a vegetarian-friendly option. The salty, crispy pancetta adds a satisfying contrast to the tender brisket. Toss the kale with lemon zest and toasted pine nuts for extra brightness.
Leftovers Reinvented
Turn leftover brisket into brisket hash the next day—slice the brisket and sauté it with diced potatoes, onions, and peppers until crispy. Top with a fried egg for a hearty breakfast. This is my go-to way to use up leftovers without waste. 🍳
For sandwiches, pile toasted rye bread with brisket slices, Swiss cheese, and spicy mustard. Add a side of pickled vegetables for acidity that cuts through the richness. These sandwiches keep well for 3-4 days in the fridge.
Nutrition facts
Frequently asked questions
What's the secret to making brisket tender like in traditional Jewish cooking?
The key is low-and-slow cooking at 300°F for at least 3 hours until it reaches 180°F internally. This breaks down collagen in the connective tissue, transforming tough meat into melt-in-your-mouth perfection. The long rest (30 minutes) afterward is equally crucial—it lets juices redistribute so every slice stays moist.
Can I use a different cut of beef instead of brisket?
Brisket is ideal for this method because of its fat content and connective tissue, but you could try chuck roast or short ribs in a pinch. Just adjust cooking time—chuck roast may need 4-5 hours to tenderize properly. Never use lean cuts like sirloin; they won't develop the same rich texture. For authentic results, stick with brisket if possible.
Why does my brisket turn out dry even after slow cooking?
Dry brisket usually means one of three things: overcooking past 205°F, not resting long enough, or skipping the fat cap. Always remove brisket when it hits 195-205°F—it'll carry over to perfect doneness. The 30-minute rest is non-negotiable, and leaving ¼-inch fat helps insulate moisture. Pro tip: Use a meat thermometer to avoid guessing.
How far ahead can I prepare this brisket for Shabbat?
This brisket actually tastes better the next day! Cook it completely on Friday, then refrigerate in its braising liquid. Reheat gently in the oven (325°F for 30-45 minutes) until warmed through. The flavors deepen overnight, and reheating preserves all that tenderness. For Shabbat, this means less work on the holiday and more time for family.
What's the difference between this recipe and Texas-style smoked brisket?
Texas-style focuses on smoke infusion (often oak or hickory) and a dry rub, while this Jewish method uses braising liquid (wine + broth) and a moist spice crust. Texas brisket is typically cooked to 203°F for "fork-tender" texture, whereas we aim for 180-195°F for a more velvety finish. Both are delicious—choose based on whether you prefer smoky bark (Texas) or spice-infused tenderness (Jewish).