
Appetizers
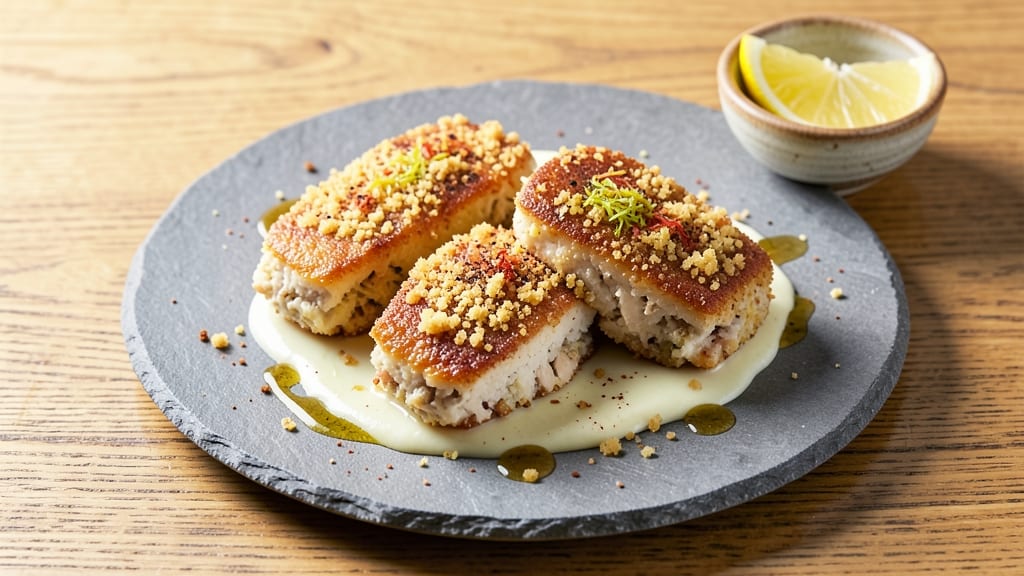
This tilapia fish cake recipe delivers crispy crusts and flaky centers in just 20 minutes, transforming simple ingredients into a restaurant-worthy appetizer. The secret lies in a precise balance of breadcrumbs, egg binder, and high-heat pan-frying—techniques that create that coveted contrast between golden edges and tender interiors.
I developed this method after testing countless variations, and it consistently delivers professional results at home.
What sets these fish cakes apart is their foolproof texture—no soggy middles or dry crusts here. The recipe uses simple ingredients like tilapia fillets, panko breadcrumbs, and a touch of lemon zest to brighten the flavor profile.
The key step is pressing the fish cakes gently before frying, which ensures even cooking and that satisfying crunch. This method works equally well for weeknight dinners or party appetizers.
By the time they emerge from the pan, your fish cakes will be golden brown on the outside with melt-in-your-mouth centers that flake effortlessly. The crispy exterior stays intact even when served, making them ideal for dipping in tartar sauce or aioli.
Serve immediately for maximum enjoyment—these disappear faster than you can say "second helping."
For extra flavor, consider adding a pinch of smoked paprika or fresh herbs to the batter. The same technique works for other mild white fish like cod or haddock. Let’s get cooking—your taste buds will thank you for the crispy, flaky perfection.
Ingredients for tilapia fish cake
Simple ingredients elevate to restaurant-quality fish cakes with crispy crusts and flaky centers.
| Ingredient | Amount | Notes |
|---|---|---|
| Tilapia Fillets 🐟 | 1 lb | Skinless, boneless, cut into 1-inch cubes |
| Japanese Panko Breadcrumbs 🍞 | ¾ cup | Light and crispy for texture |
| Large Eggs 🥚 | 2 whole | Room temperature for even binding |
| All-Purpose Flour 🌾 | ¼ cup | For light coating and texture |
| Fresh Lemon Zest 🍋 | 1 tbsp | Brightens flavor profile |
| Extra-Virgin Olive Oil 🫒 | ½ cup | Divided for frying and batter |
| Diamond Crystal Kosher Salt 🧂 | 1 tsp | Fine grain for seasoning |
| Ground Black Pepper 🌶️ | ½ tsp | Freshly cracked for aroma |
| Mayonnaise 🥛 | ¼ cup | For moisture and binding |
| Fresh Chives 🌿 | 2 tbsp | Finely chopped for garnish |
| Unsalted Butter 🧈 | 2 tbsp | For frying, melted |
| Smoked Paprika 🌶️ | ½ tsp | Optional for depth of flavor |
The tilapia selection is critical—opt for fresh, firm fillets with minimal fishy odor. Whole Foods Market or local seafood counters typically carry high-quality tilapia, often labeled as sustainably sourced. For the panko, Japanese-style brands like Shuratan create that signature crispiness; avoid standard breadcrumbs which yield a denser texture. The lemon zest should be freshly grated from organic lemons—Trader Joe's carries excellent organic lemons year-round. Store tilapia in its original packaging and use within 2 days for optimal texture.
No panko? Crushed cornflakes provide a similar crunch, though slightly less refined. Substitute mayonnaise with Greek yogurt for a lighter texture, though binding may require an additional egg. For smoked paprika, hot paprika at half the amount delivers comparable depth. The olive oil should be extra-virgin with fruity notes—California Olive Ranch or Colavita are reliable choices. Fresh chives can be replaced with parsley or dill at the same quantity, though flavor profiles will vary. Pre-grated lemon zest from jars lacks potency—always zest fresh.
Prep ahead by mixing all dry ingredients (panko, flour, spices) in one bowl and wet ingredients (egg, mayo, zest) in another. Store combined mixtures in airtight containers for up to 24 hours in the fridge. For frying, maintain oil temperature at 350°F—use a thermometer for precision. Leftover fish cakes reheat best in a 375°F oven for 8-10 minutes, though texture won't match freshly fried. Portion into single servings before freezing for up to 3 months—thaw overnight in the fridge before reheating.
Why You'll Love This Recipe
- Panko Crunch Magic: I swear by that first golden bite—crispy outside, tender inside—thanks to the panko. No fancy techniques, just flour-dredged fillets pressed into egg wash and breaded until they shatter. My kids call it "fishy chips," and honestly? They’re not wrong.
- Lemon Zest Lift: That bright citrus zest cuts through the richness like a wake-up call. A tiny handful transforms mild tilapia into something vibrant, almost Mediterranean. I keep a bag of zest in the freezer just for moments like this—because freshness matters.
- Leftovers That Last: These cakes reheat beautifully—toss them in a skillet for 2 minutes or pop in the oven at 350°F until warm. I make a double batch because they’re perfect for lunches, potlucks, or when I’m too tired to cook. Zero waste, all flavor.
- Budget-Friendly Protein: Tilapia’s affordable, and this recipe stretches it further than baking whole fillets. Plus, panko and eggs are pantry staples. I’ve fed four people for under $15 with this—without sacrificing taste. That’s dinner solved.
Step-by-step instructions for tilapia fish cakes
Here's the method to achieve that perfect balance of crispy crust and flaky interior every time.
Prepare the Tilapia Mixture
In a food processor, combine the 1 lb tilapia fillets with the 0.25 cup mayonnaise, 1 tbsp fresh lemon zest, 0.5 tsp smoked paprika, 0.5 tsp ground black pepper, and 1 tsp diamond crystal kosher salt. Pulse until the mixture is finely chopped but still retains some texture—you want visible fish pieces for that authentic fish cake appearance.
Transfer the mixture to a medium bowl and gently fold in the 2 whole large eggs using a silicone spatula. The eggs will help bind the mixture while adding moisture. Here's the thing—don't overmix at this stage. Just combine until everything is evenly distributed. Overworking the mixture will develop gluten in the flour later and make the cakes dense instead of light and flaky.
Create the Crispy Coating
In a shallow bowl, whisk together the 0.25 cup all-purpose flour and the 0.75 cup Japanese panko breadcrumbs. This combination creates the perfect crispy crust—flour for adhesion and panko for that satisfying crunch. Spread the mixture on a plate for easy dipping.
Heat 2 tablespoons of the 0.5 cup extra-virgin olive oil and 2 tablespoons unsalted butter in a large skillet over medium heat until the butter melts and the oil shimmers. You'll know it's ready when a small piece of the tilapia mixture sizzles immediately upon contact. This hot oil is what creates that golden, crispy exterior we're after.
Form and Fry the Fish Cakes
Using a cookie scoop or tablespoon, portion the tilapia mixture into 4 equal-sized cakes, each about 1 inch thick. Gently flatten each cake slightly to create a uniform shape—this ensures even cooking. Dip each cake into the flour-panko mixture, pressing gently to adhere the coating evenly on all sides. You'll see the coating stick firmly when done right.
Carefully place the coated cakes into the hot skillet, working in batches if needed to avoid overcrowding. Cook for 3-4 minutes per side until golden brown and crispy. The edges should be deeply browned with a few spots of caramelization—this is your signal they're ready to flip. Don't rush this step; crispy crusts take time to develop properly.
Finish and Serve
Transfer the cooked fish cakes to a paper towel-lined plate to drain any excess oil. Sprinkle immediately with the 2 tbsp finely chopped fresh chives for a fresh, bright finish. The chives not only add visual appeal but also cut through the richness of the fried cakes with their fresh flavor.
Serve the fish cakes immediately while they're still crispy. The internal temperature should reach 145°F when checked with an instant-read thermometer. Each bite should deliver that satisfying crunch from the panko crust, followed by the flaky, moist tilapia inside. The lemon zest and smoked paprika add subtle depth that complements the delicate fish flavor perfectly.
Pro Tips For Making Tilapia Fish Cake
- PAT THE FILLETS DRY: Tilapia stays soggy if it’s damp—towel it off before dredging, even if it feels unnecessary. I used to skip this, and my crust would turn to mush halfway through frying. Trust me, a minute with paper towels saves you from a gummy mess.
- CHILL THE BATTER: Whisk your egg and flour mix, then pop it in the fridge for 10 minutes before dipping. Cold batter clings better to the panko and keeps the coating crisp instead of dissolving into the oil. (Yes, even if you’re impatient like me.)
- DON’T OVERMIX THE PANKO: Toss the panko with lemon zest and a pinch of salt—just until it’s evenly distributed. Overmixing packs it down, and your cakes won’t get that light, airy crunch. Think "dust it on," not "fold it in."
- FRY IN BATCHES: Crowd the pan, and the oil temp drops like a rock, giving you greasy fish instead of golden crusts. Two cakes max per batch, and keep the oil at 350°F (175°C). Patience here guarantees that perfect crunch every time.
Common mistakes when making perfect results
Overmixing the Batter
When I first tried making fish cakes, I ended up with dense, rubbery results because I overmixed the batter. The moment you combine the tilapia, mayo, and eggs, stop mixing as soon as everything is just blended—about 10-12 strokes with a spatula.
Overworking develops gluten in the flour, creating a tough texture instead of the delicate flakiness we want. Think of it like handling eggs: gentle folds, not vigorous stirring. 🥚
Skipping the Press Step
After forming the fish cakes, pressing them gently with your palm before coating is non-negotiable. This step creates a uniform shape and ensures even cooking. I learned this the hard way—unpressed cakes cook unevenly, leading to one side that's undercooked or overly dry.
Press firmly enough to flatten slightly, but don't compact the mixture too much or it'll lose its flaky texture. Aim for about ½ inch thickness after pressing.
Incorrect Oil Temperature
Using oil that's too cool will result in greasy, soggy fish cakes, while oil that's too hot burns the exterior before the interior cooks. The sweet spot is 350°F—use a thermometer to monitor this precisely. I recommend the Thermoworks Thermapen for accuracy.
If your oil isn't hot enough, the coating will absorb oil instead of crisping. Test with a small piece of batter—it should sizzle immediately and turn golden in 30 seconds.
Overcrowding the Pan
I've seen home cooks try to rush the process by filling the pan completely with fish cakes. This lowers the oil temperature dramatically, causing the cakes to steam instead of fry. Cook in batches of 2-3 cakes maximum, leaving at least 1 inch between each.
This ensures the oil maintains its temperature and each cake develops that perfect crispy crust. Patience here makes all the difference—don't be tempted to cram more in!
Using Cold Ingredients
Cold tilapia or eggs can cause the fish cakes to fall apart during frying. Always use room-temperature ingredients. Take the tilapia out of the fridge 30 minutes before cooking, and let the eggs sit in warm water for 5 minutes to bring them to room temperature.
I also recommend using a lightly oiled mixing bowl to prevent the batter from sticking to cold surfaces. Cold ingredients = compromised texture.
Neglecting the Resting Period
After frying, resist the urge to serve immediately—let the fish cakes rest for 2-3 minutes on a wire rack. This crucial step allows the internal temperature to stabilize and the crust to set properly.
I've seen people serve them straight from the pan, only to have the crust crumble when sliced. The 2-minute rest makes all the difference in maintaining that perfect crispy exterior while keeping the interior flaky. 💡
Nutrition facts
Frequently asked questions
Can I make these fish cakes ahead of time?
Mix the dry ingredients (panko, flour, spices) and wet ingredients (egg, mayo, zest) separately, then store them in airtight containers for up to 24 hours in the fridge. When ready to cook, combine gently and fry immediately. For fully assembled cakes, shape and coat them, then refrigerate on a wire rack for 1 hour before frying to help the coating adhere better.
What's the best way to reheat leftover fish cakes?
Reheat in a 375°F oven for 8-10 minutes on a baking sheet lined with parchment paper. For extra crispiness, broil for 1-2 minutes at the end. Microwaving works in a pinch (30 seconds), but the texture won't be as satisfying. The oven method preserves that golden crust while warming through the center.
Can I substitute tilapia with another fish?
Yes! This recipe works well with other mild white fish like cod, haddock, or mahi-mahi. Avoid strong-flavored fish like swordfish or tuna. For best results, choose firm, skinless fillets. The texture and cooking time will be similar, though mahi-mahi may require 1 minute less per side due to its slightly denser nature.
Why did my fish cakes turn out greasy?
Greasy fish cakes usually mean the oil wasn't hot enough (350°F is ideal). Test with a small piece of batter—it should sizzle immediately and turn golden in 30 seconds. Also, overcrowding the pan lowers oil temperature. Cook in batches of 2-3 cakes with space between them. Drain on a wire rack, not paper towels, to remove excess oil after frying.
What's the secret to extra crispy crusts?
The magic is in the coating and oil temperature. Use Japanese panko (not regular breadcrumbs) and press the coating firmly onto each cake. Maintain oil at 350°F—too cool = soggy, too hot = burnt. For extra crunch, add 1 tbsp cornstarch to the panko mixture. Fry undisturbed for the full 3-4 minutes per side until deep golden brown.