
Main Courses
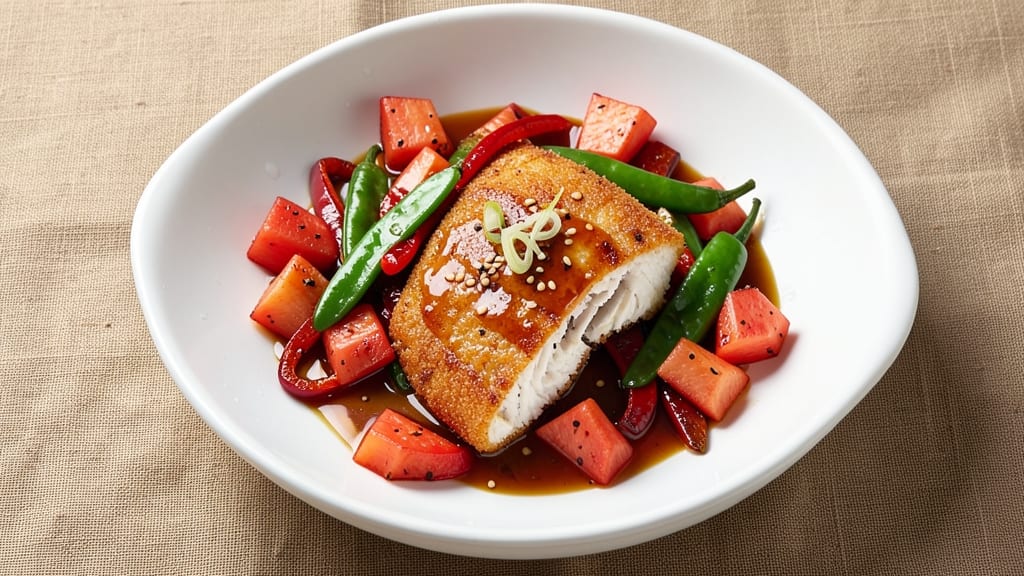
This crispy battered tilapia with tangy pineapple glaze delivers restaurant-quality results you can make at home—juicy fish with a golden, crunchy crust and a bright, sweet-sour sauce that balances perfectly.
The secret lies in a simple cornstarch batter that stays crispy even after frying, paired with a sauce that simmers down to just the right balance of sweetness and acidity.
I developed this recipe after years of testing different glazes, and this version consistently delivers the best texture and flavor combination.
The process is straightforward but requires attention to timing to achieve that perfect crispy exterior while keeping the fish tender inside.
You'll start with a light batter made from cornstarch and a touch of flour, then fry the tilapia until golden brown before tossing it in a sauce that's equal parts sweet pineapple and tangy vinegar.
The sauce reduces slightly to coat the fish evenly, creating a glossy finish that's impossible to resist.
What you'll end up with is a dish that's crispy on the outside, tender on the inside, and coated in a vibrant sauce that's both sweet and tangy. The pineapple glaze adds a tropical brightness that pairs beautifully with the rich, buttery fish.
This recipe serves four and comes together in about 30 minutes, making it ideal for a weeknight dinner that feels special.
Serve it over steamed jasmine rice or with a side of steamed vegetables to round out the meal. The crispy texture holds up well even when reheated, so it's perfect for meal prep or leftovers. Let's get started on this foolproof recipe that will become a family favorite.
Ingredients for sweet and sour tilapia
Four fresh ingredients deliver that perfect crispy-tender texture and vibrant sauce everyone loves.
| Ingredient | Amount | Notes |
|---|---|---|
| Fresh Tilapia Fillets 🐟 | 1 ½ lb | Skinless, boneless, 4 pieces |
| Cornstarch 🌾 | ¾ cup | Light and fine for crispiness |
| All-Purpose Flour 🌾 | ¼ cup | For batter lightness |
| Large Eggs 🥚 | 2 whole | Room temperature for even coating |
| Vegetable Oil 🫒 | 2 cups | For deep frying (high smoke point) |
| Fresh Pineapple Chunks 🍍 | 1 cup | Fresh or canned (no syrup) |
| Rice Vinegar 🍶 | ⅓ cup | White or seasoned variety |
| Granulated Sugar 🍚 | ½ cup | White or brown for caramel notes |
| Low-Sodium Soy Sauce 🥢 | ¼ cup | For umami depth |
| Garlic Cloves 🧄 | 4 cloves | Minced for sauce aroma |
| Fresh Ginger 🌿 | 1 tbsp | Grated, for zesty kick |
| Red Bell Pepper 🌶️ | ½ cup | Diced, for sauce color |
| Salt 🧂 | 1 tsp | Kosher or sea salt |
| Black Pepper 🌶️ | ½ tsp | Freshly ground preferred |
| Cornstarch Slurry 🌾 | 1 tbsp | Mix with 2 tbsp water |
The tilapia is your star—look for fresh, firm fillets at the seafood counter, not frozen blocks. Whole Foods or Trader Joe's often have pre-cut fillets that save time. If buying whole, ask for the fillets to be cut for you. The batter's secret is cornstarch over flour—it creates that restaurant-style crunch without getting gummy. For the sauce, fresh pineapple is ideal (the canned stuff works in a pinch), but drain it well if using canned. The rice vinegar adds that signature tang—Kikkoman is my go-to, but any good brand works.
No fresh pineapple? Canned in juice, not syrup, is your best bet. Short on cornstarch? Arrowroot powder works 1:1, but it's pricier. The sauce can handle a little less sugar if you prefer it tangier—start with 0.33 cup and adjust to taste. For extra umami, swap half the soy sauce for fish sauce. The ginger and garlic are non-negotiable though—they're what make this sauce sing. If you're frying, keep the oil at 350°F—hotter and it burns, colder and it gets greasy. A deep fry thermometer is worth the investment for perfect results every time.
This sauce keeps beautifully—3-4 days in the fridge—so make extra. The battered fish? Best eaten fresh since the crust loses crispiness after 24 hours. For meal prep, fry the fish, then store it uncovered on a wire rack to keep it from getting soggy. Reheat the sauce separately and toss the fish in it before serving. The sauce freezes well too—just thaw and reheat gently. Serve with jasmine rice (steamed, not instant) to soak up every last drop of that tangy glaze.
Why You'll Love This Recipe
- No-Fuss Crispy Bite: I just toss the fillets in cornstarch and flour—no fancy breading, no waiting for it to set. That quick dip in egg and hot oil gives you that addictive crunch without the hassle of rolling in panko. (Yes, even when I’m distracted by the news.)
- Sauce That Sticks: The tangy-sweet glaze clings to every bite, cutting through the flaky fish like it was made for it. Between us, that simple combo of vinegar, sugar, and a splash of water? It’s the kind of balance that makes you reach for seconds without thinking.
- Weeknight Workhorse: This feeds four for under $15, and I’ve served it at BBQs, potlucks, and lazy Fridays—no one ever asks what’s for dinner. The leftovers? Just as good reheated the next day, especially with a sprinkle of sesame seeds for extra flair.
- Pantry Magic: I keep tilapia frozen and the dry ingredients in a jar—when I’m too tired to plan, this is my go-to. The oil stays hot, the fish cooks fast, and the sauce comes together in minutes. Honestly, it’s the kind of recipe that makes me feel like a hero without trying.
Step-by-step instructions for sweet and sour tilapia
Here's how to create golden, crispy tilapia with a tangy pineapple glaze that's bursting with flavor.
Prepare the Battering Station and Pat Dry the Tilapia
Start by patting the 1.5 lb fresh tilapia fillets completely dry with paper towels—this is absolutely critical for crispiness. Any moisture left on the fish will prevent the batter from adhering properly and create a soggy texture instead of that perfect golden crust.
In a shallow dish, whisk together the 0.75 cup cornstarch and 0.25 cup all-purpose flour with 1 tsp salt and 0.5 tsp black pepper. This dry mixture is your secret weapon for that ultra-crispy exterior. Set this aside while you prepare the next components.
Create the Egg Wash and Heat the Oil
In a separate bowl, crack the 2 whole large eggs and whisk them vigorously until they're completely smooth. The room temperature eggs will coat the fish evenly without clumping. Here's the thing—don't skip this step. The egg wash acts as a glue between the dry batter and the fish, ensuring that crispy crust stays intact.
While the eggs are whisking, pour the 2 cups vegetable oil into a deep fryer or heavy pot. Heat it over medium heat until it reaches 350°F—this is where you'll need a thermometer. If you don't have one, test the oil by dropping in a small piece of batter. When it sizzles and floats to the surface within 30 seconds, it's ready. Too hot, and you'll burn the outside before the inside cooks through.
Batter and Fry the Tilapia to Golden Perfection
Working with one fillet at a time, dip each piece into the egg wash first, letting any excess drip off. Then immediately coat it thoroughly in the cornstarch mixture, pressing gently to ensure full coverage. Place the battered fillet on a wire rack to let any excess batter drip off—this prevents a gummy texture.
Carefully slide the fillet into the hot oil and fry for 3-4 minutes per side until it reaches 180°F internally and the exterior turns a beautiful golden brown. You'll see the batter puff up slightly as it cooks—this is your visual cue that it's working. Don't overcrowd the fryer, or the oil temperature will drop and your fish won't get crispy. Transfer the cooked fillets to a paper towel-lined plate to drain excess oil.
Make the Tangy Pineapple Glaze
In a saucepan, combine the 1 cup fresh pineapple chunks, 0.33 cup rice vinegar, 0.5 cup granulated sugar, 0.25 cup low-sodium soy sauce, 4 cloves minced garlic, 1 tbsp grated fresh ginger, and 0.5 cup diced red bell pepper. Bring this mixture to a boil over medium-high heat, then reduce to a simmer and let it cook for 8-10 minutes until the sauce thickens slightly.
While the sauce simmers, prepare the 1 tbsp cornstarch slurry by mixing 1 tbsp cornstarch with 2 tbsp water in a small bowl. Stir this slurry into the simmering sauce and cook for another 2-3 minutes until it reaches your desired consistency—it should coat the back of a spoon but still be pourable. Taste and adjust seasoning if needed, adding a pinch more sugar or soy sauce if desired.
Combine and Serve Immediately
Return the crispy tilapia fillets to the saucepan with the pineapple glaze and gently toss to coat them evenly. Let everything heat through together for 1-2 minutes—this ensures the fish absorbs that beautiful tangy flavor. Serve immediately over steamed rice or noodles while the fish is still crispy and the sauce is warm.
Here's where it gets amazing—the contrast between the crispy, golden exterior and the tender, juicy fish, all smothered in that sweet and sour pineapple glaze, makes every bite unforgettable. The key to success is keeping everything hot until serving—cold fish and sauce just won't deliver the same experience.
Pro Tips For Making Sweet And Sour Tilapia
- PAT THE FILLETS DRY: Tilapia stays soggy when fried if it’s damp—trust me, I’ve ruined batches by skipping this. Grab paper towels and press firmly on both sides before dredging in flour. The extra 30 seconds saves you from a gummy crust.
- FRIED IN BATCHES: Crowding the pan drops the oil temp, and that’s how you end up with greasy, unevenly cooked fish. Fry 2 fillets at a time, max—your oil will stay hot enough for that perfect golden crust, and you won’t be waiting for the whole pan to reheat.
- SEPARATE THE EGG WASH: I used to mix the egg with flour in one bowl, and the coating always clumped. Whisk the egg separately in a shallow dish, then dip the floured fillets in—it sticks better and makes for a cleaner, crisper finish. Yes, it’s an extra bowl, but it’s worth it.
- SAVE THE SAUCE STARCH: That leftover cornstarch from dredging? Don’t toss it—toss it into your sweet-and-sour sauce. A tablespoon or two thickens it faster than plain flour and keeps it glossy. (I learned this after slurping through a watery sauce once.)
Best sauces and condiments for this recipe
Classic Pineapple Glaze
The signature sauce in this recipe is all about balance—1 cup fresh pineapple provides natural sweetness, while ⅓ cup rice vinegar delivers that essential tang. I use Kikkoman rice vinegar for its clean, bright acidity that cuts through the richness of the fish.
The ½ cup sugar caramelizes slightly as it simmers, creating a glossy finish that clings beautifully to the crispy batter.
For extra depth, I add 4 minced garlic cloves and 1 tbsp grated ginger—these aromatics infuse the sauce with warmth that complements the fish perfectly. The ½ cup diced red bell pepper adds color and a subtle crunch when tossed with the fish.
Don’t skip the cornstarch slurry—it thickens the sauce just enough to coat the fillets without making it syrupy.
Spicy Chili-Lime Twist
For a kick, stir 1 tbsp lime juice and ½ tsp chili powder into the finished sauce. The lime brightens the flavors while the chili powder adds a smoky heat that pairs wonderfully with the sweetness.
I like to add 2 thinly sliced jalapeños to the saucepan during the final 2 minutes of cooking so they soften slightly but still retain some bite. 🌶️
This variation works especially well if you prefer your sweet and sour dishes with a little fire. The acidity from the lime also helps balance the sugar, making the sauce taste even more vibrant.
For an extra layer of complexity, add ½ tsp smoked paprika to the batter before frying—it infuses the crust with a subtle smokiness that ties everything together.
Creamy Coconut Variation
Swap the rice vinegar for ½ cup coconut milk and reduce the sugar to ⅓ cup to create a richer, tropical version. The coconut milk adds a velvety texture that contrasts beautifully with the crispy batter.
I also add 1 tsp coconut aminos for a deeper umami note that works surprisingly well with the pineapple. For extra richness, stir in 1 tbsp toasted coconut flakes at the end to garnish the dish.
This variation is perfect if you love the flavors of Southeast Asian cuisine. The coconut milk mellows out the tang slightly, making it ideal for those who prefer their sweet and sour dishes on the sweeter side.
The toasted coconut flakes add a delightful crunch that complements the crispy fish perfectly.
Umami Boost with Mushrooms
For a deeper, earthier flavor profile, sauté ½ cup sliced shiitake mushrooms in a little oil until golden before adding them to the sauce. The mushrooms add a meaty texture and a rich umami that pairs exceptionally well with the fish.
I also reduce the soy sauce to ¼ cup since the mushrooms contribute their own savory depth.
This variation is inspired by Japanese sweet and sour dishes, where mushrooms are often used to enhance the umami without overpowering the other flavors. The mushrooms also add a nice contrast in texture when tossed with the crispy fish. For an extra touch, garnish with thinly sliced scallions before serving.
Sweet and Sour Sauce Storage
This sauce keeps beautifully in the refrigerator for up to 5 days in an airtight container. I recommend making extra because it’s so versatile—it works just as well on grilled chicken or pork.
To reheat, warm it gently over low heat and stir in 1 tbsp water if it thickens too much. The sauce can also be frozen for up to 3 months—just thaw it in the fridge overnight before using.
For the best results, store the sauce separately from the fried fish. The crispiness of the battered fillets suffers if kept in the sauce for more than 24 hours.
Instead, fry the fish fresh and toss it in the reheated sauce just before serving. This keeps the texture perfect while ensuring maximum flavor.
Nutrition facts
Frequently asked questions
Can I use frozen tilapia for this recipe?
Fresh tilapia works best for that perfect crispy texture, but you can use frozen fillets if needed. Thaw them completely in the refrigerator overnight, then pat them very dry before battering. Never thaw at room temperature, as this can make the fish mushy. For best results, look for individually quick-frozen (IQF) fillets that maintain better texture.
How do I adjust the sweetness or tanginess of the sauce?
The sauce's balance is key! For more sweetness, add 1-2 tablespoons extra sugar during the last 2 minutes of cooking. For extra tang, increase the rice vinegar by 1 tablespoon and simmer for an additional 1-2 minutes to let the flavors meld. Taste as you go—this sauce is highly customizable!
Can I bake the tilapia instead of frying?
Preheat your oven to 425°F and brush the battered fillets with oil. Bake on a wire rack for 12-15 minutes until golden and crispy. For extra crispiness, broil for 1-2 minutes at the end. The texture will be slightly different but still delicious. Just be careful not to overcook—the fish should reach 145°F internally.
What's the best way to store leftovers?
Store the sauce separately in an airtight container for up to 5 days in the fridge. For the fish, keep it uncovered on a wire rack to maintain crispiness. Reheat the sauce separately and toss the fish in it just before serving. The sauce can also be frozen for 3 months—thaw overnight in the fridge before reheating gently.
Can I make this gluten-free?
Yes! Replace the all-purpose flour with 0.25 cup gluten-free flour blend and use a 1:1 cornstarch substitute for the 0.75 cup cornstarch. For the egg wash, use a gluten-free egg wash substitute if needed. The texture may be slightly different but still crispy. Always check your gluten-free flour blend for proper frying performance.