
Desserts
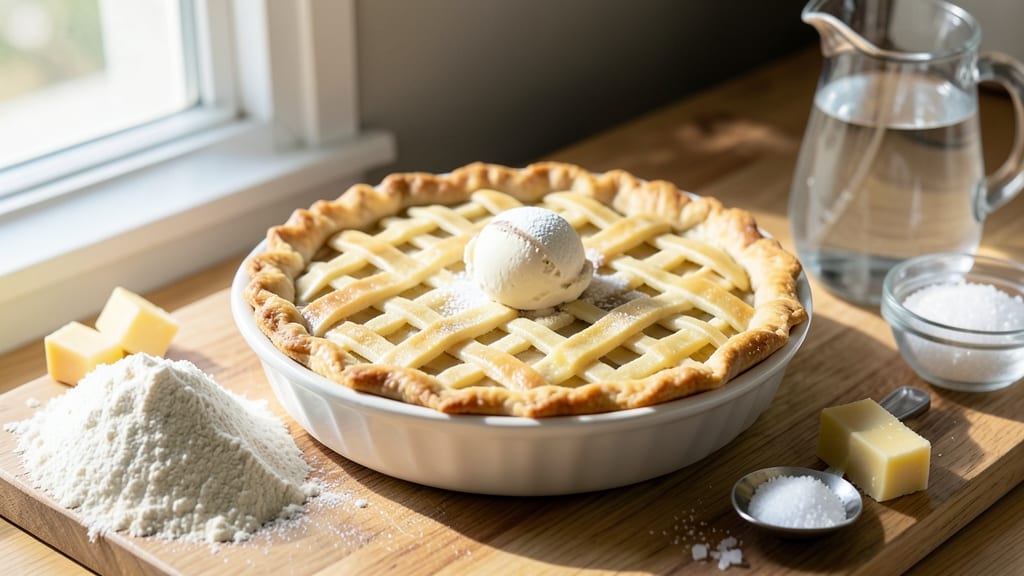
A flaky preppy kitchen pie crust transforms any dessert from ordinary to elegant—think crisp golden edges, delicate layers, and that satisfying crunch that makes every bite feel special. I developed this recipe after years of testing, perfecting the balance between buttery richness and tender flakes that melt in your mouth.
The secret lies in proper chilling and gentle handling, techniques that ensure your crust shines whether it's a classic apple pie or a savory chicken pot pie.
This recipe delivers restaurant-quality results with just five simple ingredients and 30 minutes of hands-on time (plus chilling). We'll use a high-fat butter-to-flour ratio for maximum flakiness, and I’ll show you how to roll, fit, and blind-bake the crust like a pro—no shrinking or soggy bottoms here.
The dough is sturdy enough for lattice designs but tender enough to handle delicate fillings without cracking.
By the end, you’ll have a crust so perfectly golden and crisp that it’ll make your kitchen smell like a cozy bakery. The flaky layers will hold up to both sweet and savory fillings, and the edges will stay crisp even after baking.
This is the kind of crust that makes you feel like you’ve just served tea at a charming English countryside gathering—without the jet lag.
Whether you're making a traditional apple pie, a berry tart, or a savory hand pie, this crust is your foundation. Let’s get started—your first bite will be worth every minute of chilling time.
Ingredients for preppy kitchen pie crust
Five simple ingredients create the perfect flaky, golden crust for any pie—elegant enough for tea time.
| Ingredient | Amount | Notes |
|---|---|---|
| All-Purpose Flour 🌾 | 2 ½ cups | Sifted for flakiness |
| Unsalted Butter 🧈 | 1 cup | Cold, cubed for layers |
| Granulated Sugar 🍚 | ½ tsp | Balances butter richness |
| Kosher Salt 🧂 | ½ tsp | Enhances flavor |
| Ice Water 💧 | ½ cup | Binds dough gently |
The butter is non-negotiable here—European-style butter has more fat, which means more flakes. Grab a block from Whole Foods or Gelson's if you can, but regular unsalted works too. Keep it cold until you're ready to mix—soft butter means tough crust. The flour should be sifted (I use a fine-mesh sieve) to avoid dense layers. If you're in a rush, pulse it in your food processor instead. Store flour in an airtight container to keep it fresh—stale flour makes for a bland crust.
No ice water? Cold water from the fridge works, but don't use warm tap. Short on sugar? Skip it—this crust is delicious without it. If you're making a savory pie, reduce the salt to 1/4 teaspoon and add 1/2 teaspoon of lemon juice for brightness. For extra flakiness, freeze the butter cubes for 15 minutes before mixing—they'll stay cold longer. And if you're feeling fancy, swap half the flour for all-purpose flour with 1 tablespoon of cornstarch for a lighter texture.
This dough needs at least 1 hour of chilling—no shortcuts. Wrap it tightly in plastic and press it flat in the container. It'll keep in the fridge for up to 3 days or freeze for 3 months. When you're ready to roll, let it sit at room temp for 10 minutes. The crust reheats beautifully—wrap leftovers in foil and warm at 350°F for 10 minutes to restore that crispy edge. Perfect for pie day prep!
Why You'll Love This Recipe
- No-Fuss Butter Love: This crust is basically foolproof—I’ve made it with cold butter straight from the fridge and never once had a flaky fail. The sugar in the dough gives it that signature preppy sweetness without overpowering, and the ice water keeps it tender. Honestly, it’s the kind of recipe that makes me feel like a baking pro, even when I’m just winging it.
- Sweet & Crisp Magic: That little pinch of sugar in the dough? It’s the secret weapon. When baked, it caramelizes just enough to give every bite a subtle sweetness that pairs perfectly with anything from fruit fillings to savory chicken pot pies. And between us, the butter-to-flour ratio is spot-on—not greasy, not dry, just that perfect golden crust you dream about.
- Weeknight & Holiday Star: I use this crust for everything—weeknight dinners (hello, pot pie), holiday desserts (apple or pumpkin, obviously), and even as a crispy top for breakfast stratas. It freezes like a champ, too, so I always keep a batch on hand. Here’s what sold me: it’s the one crust that works for both my lazy Tuesday and Thanksgiving spread.
- Budget-Friendly Staple: Five ingredients, all pantry basics. No weird shortcuts, no specialty flours—just good old-fashioned flour, butter, and a splash of ice water. I’ve made this crust for years, and it’s never let me down. Plus, a single batch stretches to two pies or a giant galette, so you’re always covered without breaking the bank. My wallet and my taste buds thank me.
Step-by-step instructions for preppy kitchen pie crust
Here's how to create the perfect flaky crust that will impress at any tea party.
Cut and Chill the Cold Butter
Take the 1 cup unsalted butter and cut it into ½-inch cubes. Place them on a plate and refrigerate for 15 minutes. This chilling step is crucial—it prevents the butter from melting too quickly when it hits the flour, which would create a tough crust instead of flaky layers.
While the butter chills, sift the 2.5 cups all-purpose flour into a large bowl. This aerates the flour and helps create those signature delicate layers. Add the ½ teaspoon granulated sugar and ½ teaspoon kosher salt, then whisk together gently to combine. The sugar balances the richness of the butter, while the salt enhances every flavor in your pie.
Work the Butter into the Flour
Add the chilled butter cubes to the flour mixture. Using your fingertips or a pastry cutter, work the butter into the flour until you have a texture similar to coarse crumbs with some pea-sized butter pieces remaining. This is called the "cut-in" method, and it's what creates those beautiful flaky layers in the final crust.
Be careful not to overwork the mixture—just until the butter is evenly distributed. If the dough starts to look too shaggy, it's okay; we'll fix that in the next step. The key here is to keep everything cold so the butter stays firm and creates those air pockets when baked.
Gradually Add Ice Water
Pour the ½ cup ice water into a small measuring cup. Slowly add the ice water, 1 tablespoon at a time, to the flour-butter mixture. Use a fork or a small spatula to gently stir after each addition. You're looking for the dough to just come together when pressed—it should hold its shape but not be sticky.
Here's the thing—don't add all the water at once. You might not need it all, and adding too much too quickly can make the crust tough. The ice water is essential because it binds the dough without warming it up, which keeps those butter layers intact. Once the dough forms a rough ball, stop adding water.
Shape and Chill the Dough
Turn the dough onto a lightly floured surface and gently shape it into a disk about 1-inch thick. Wrap it tightly in plastic wrap and refrigerate for at least 1 hour—this resting period relaxes the gluten and allows the butter to firm up again. If you have time, chill it overnight; this makes rolling out the dough much easier and results in an even flakier crust.
During this time, preheat your oven to 375°F if you're planning to blind-bake the crust. The chilled dough is ready when it's firm and cold to the touch. If it's too soft, give it another 15-20 minutes in the fridge. Patience here ensures that beautiful flaky texture you're aiming for.
Roll and Fit the Crust
On a lightly floured surface, roll the chilled dough into a 12-inch circle, about ⅛-inch thick. The goal is to keep the dough as cold as possible while rolling—this prevents the butter from melting and losing its flakiness. If the dough starts to stick, use more flour, but don't overdo it or the crust will be tough.
Carefully transfer the rolled dough to your pie dish, gently shaping it to fit the bottom and sides. Trim any excess dough hanging over the edge with a sharp knife. For a classic look, you can crimp the edges using your fingers or a fork. Place the pie crust on a parchment-lined baking sheet to catch any drips if you're blind-baking.
Pro Tips For Making Preppy Kitchen Pie Crust
- CHILL THE BUTTER FIRST: Take that unsalted butter straight from the fridge—yes, even if it’s been sitting out for a minute. Cold butter creates flaky layers, while warm butter turns your crust into a greasy mess. I learned this after making a pie crust that looked like a sad, dense pancake.
- WEIGH YOUR FLOUR: Scooping flour from the bag packs in extra air, which means your crust will be dry and tough. Use a kitchen scale for precision—1 cup of all-purpose flour is actually 120 grams, not the 160 grams you might scoop. Trust me, your crust will thank you.
- WORK FAST WITH ICE WATER: Once you add ice water to the dry ingredients, stop fiddling. Overmixing develops gluten, and your crust will turn out tough instead of tender. Wet your fingers if needed, but don’t knead—just shape it gently and get it into the pan.
- SALT THE BUTTER, TOO: If you’re using unsalted butter, skip the extra salt in the flour. The butter already has salt, and adding more will make your crust taste flat. Taste a pinch of the butter before mixing—if it’s bland, add a tiny bit of kosher salt directly to the butter before cutting it in.
Flavor customization for this recipe
Sweet vs. Savory
This versatile crust shines equally in sweet and savory pies. For apple or berry pies, add 1 tablespoon of lemon zest to the dough for brightness—it cuts through the sugar beautifully.
For savory options like chicken pot pie or mushroom tart, reduce the sugar to ¼ teaspoon and add ½ teaspoon of black pepper to the flour mixture. The crust stays crisp even with wet fillings, making it ideal for both dessert and dinner. 🍏
Herb-Infused Variations
Elevate your crust with fresh herbs that add subtle complexity. For rosemary shortbread, mix 1 teaspoon finely chopped rosemary into the flour before cutting in the butter.
For a sage and onion tart, add 1 tablespoon of minced fresh sage and 1 tablespoon of caramelized onion powder to the dough. These herbs infuse the butter beautifully during baking, creating layers of flavor.
Store herb-infused dough in the fridge for up to 2 days—the flavors deepen over time. 🌿
Spiced Crust Twists
Warm spices transform this crust into a cozy centerpiece for fall and winter pies. For pumpkin pie, add ½ teaspoon of ground cinnamon and ¼ teaspoon of ground nutmeg to the flour.
For a gingersnap-inspired crust, replace the sugar with ½ teaspoon of ground ginger and ¼ teaspoon of ground cloves. These spices pair perfectly with pecan, apple, or sweet potato fillings, adding warmth that complements the buttery richness. 🍂
Gluten-Free Adaptation
For a gluten-free version, replace the all-purpose flour with a 1:1 gluten-free flour blend (like Bob’s Red Mill or King Arthur). Add ½ teaspoon of xanthan gum to improve texture, and reduce the ice water by 1 tablespoon—gluten-free dough absorbs less moisture.
Chill the dough for 2 extra hours to prevent cracking when rolling. This adaptation works beautifully for fruit tarts or quiches, though it may lack the classic flakiness of traditional crusts. 🌾
Crunchy Add-Ins
For texture lovers, fold in ¼ cup of chopped nuts or seeds during the final dough shaping. Toasted pecans add Southern charm to pecan pies, while walnuts complement berry tarts.
For a crunchy bottom crust, sprinkle 2 tablespoons of crushed graham crackers or cornflakes into the pie dish before adding the filling. These add-ins stay crisp even after baking, adding delightful contrast to creamy or juicy fillings. 🌰
Colorful Edges
Make your pie crust stand out with decorative edges that scream "preppy kitchen." For a braided edge, roll out two strips of dough, twist them together, and press onto the crust’s rim. For a lattice top, cut the dough into strips and weave them over the filling.
To create a golden crust, brush the edges with egg wash (1 egg + 1 tablespoon water) before baking. These techniques add visual elegance that’s perfect for tea parties or holiday gatherings. ✨
Nutrition facts
Frequently asked questions
Can I make this crust ahead of time?
This dough stays fresh in the fridge for up to 3 days when wrapped tightly in plastic. For longer storage, freeze the shaped disk for 3 months. Thaw overnight in the fridge before rolling. The extra chilling time actually improves flakiness by allowing gluten to relax further.
Why does my crust turn out tough instead of flaky?
Overworking the dough or using warm butter are the most common culprits. Keep everything cold and work quickly—never knead the dough. Also ensure your butter stays in pea-sized pieces during the cut-in process. If the dough feels sticky after adding water, you've added too much. Start with 1 tablespoon at a time and let the dough rest between additions.
What's the best way to prevent a soggy bottom?
Pre-bake your crust for 10-12 minutes at 375°F before adding filling (cover with parchment and pie weights or dried beans). For fruit pies, sprinkle 1 tablespoon of cornstarch on the crust's bottom before filling. The crust's high butter content helps it hold up to juicy fillings when properly pre-baked.
Can I use this crust for hand pies?
Perfectly! This dough is sturdy enough for hand pies when rolled 1/8-inch thick. Cut into circles using a biscuit cutter, fill with 1-2 tablespoons of filling, then seal by pinching the edges with a fork. Brush with egg wash for a golden finish. The high butter ratio makes it ideal for these smaller shapes.
How do I fix shrinking during baking?
Shrinking usually happens when the dough warms up too quickly. Roll your crust on a chilled surface and keep the dough as cold as possible. For deep-dish pies, use a 13-inch pan and let the dough relax for 30 minutes after rolling before transferring. If it still shrinks, your butter may have been too soft—next time chill it 30 minutes longer before cutting in.