Soups & Stews
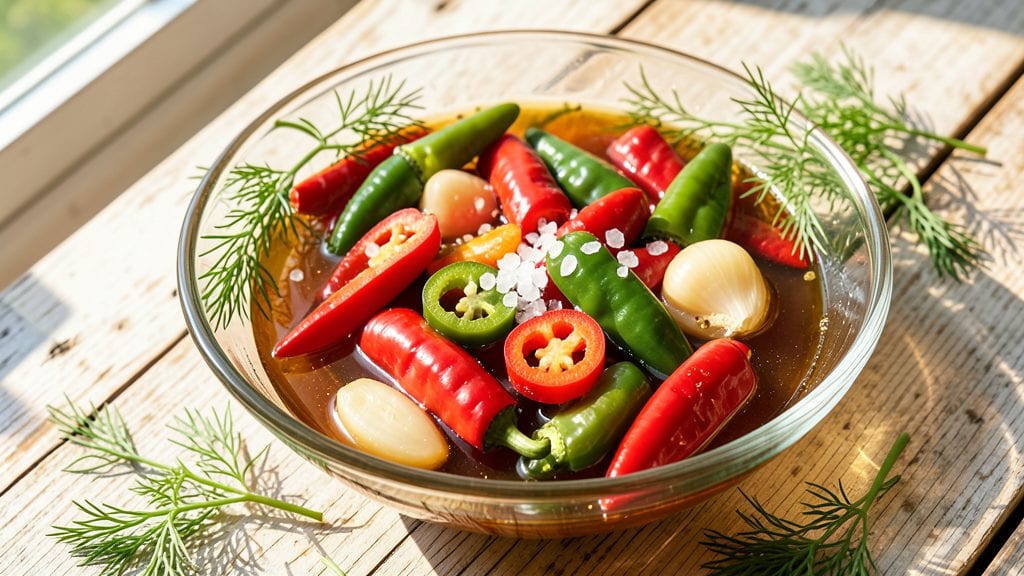
This pickled chili peppers recipe transforms fiery fresh peppers into vibrant, tangy condiments that add depth to everything from tacos to cocktails. The process is surprisingly simple—just 10 minutes of prep followed by a quick brine or vinegar bath, yet the results deliver restaurant-quality heat with balanced acidity.
I developed this method after struggling to find store-bought pickled peppers that didn’t taste artificial or overly sweet.
The secret lies in the balance: garlic, salt, and sugar create the perfect preservation trio while keeping the peppers crisp and flavorful. Unlike traditional fermentations that require weeks, this recipe delivers ready-to-use peppers in just 10 minutes—ideal for last-minute meal prep or gifting.
The vinegar brine not only preserves but also enhances the natural spice, creating a zesty kick that lingers without overpowering.
What you’ll end up with are glossy, vibrant peppers packed with bright heat and tangy crunch—perfect for topping tacos, brightening salads, or adding a fiery garnish to cocktails. The recipe scales effortlessly, so you can make a small batch for personal use or a large jar to share.
Storage is simple: keep them refrigerated for up to 3 months, where the flavors continue to develop over time.
This isn’t just another condiment—it’s a versatile heat booster that elevates dishes without dominating them. Whether you’re a home cook looking to add professional flair or a fermenting novice eager to try something simple, these pickled peppers deliver bold flavor with minimal effort.
Let’s get started on transforming fresh peppers into your new go-to condiment.
Ingredients for pickle chili peppers
Eight simple ingredients create restaurant-quality heat in minutes—no fermentation required.
| Ingredient | Amount | Notes |
|---|---|---|
| Fresh Chili Peppers 🌶️ | 1 lb | Jalapeño, serrano, or habanero preferred |
| White Vinegar 💧 | 1 cup | Distilled white vinegar preferred |
| Granulated Sugar 🍚 | ½ cup | White or raw sugar works |
| Kosher Salt 🧂 | 1 ½ tbsp | Diamond Crystal preferred |
| Garlic Cloves 🧄 | 4 cloves | Fresh, peeled, thinly sliced |
| Fresh Dill 🌿 | ¼ cup | Chopped, stems removed |
| Black Peppercorns 🌶️ | 1 tsp | Crushed, for subtle depth |
| Red Wine Vinegar 🍷 | ¼ cup | For deeper flavor profile |
| Water 💧 | 1 cup | Filtered preferred |
| Cayenne Pepper 🔥 | ½ tsp | Adjust for heat preference |
The peppers are the star, so pick fresh, firm ones—the brighter the color, the better. Mexican markets often have the best selection of jalapeños and serranos, but any grocery store will do. If you can’t find fresh dill, dried dill at half the amount works, though fresh is ideal. The vinegar matters too—white vinegar for classic tang, red wine vinegar for depth. I always grab Diamond Crystal kosher salt because it dissolves perfectly, but any kosher salt works. For extra heat, swap some of the jalapeños for habaneros—just wear gloves!
No fresh dill? Substitute dried dill or even a pinch of oregano—it’s all about the heat and acidity. Running low on red wine vinegar? Extra lemon juice works, but it’ll be brighter. The sugar isn’t just for sweetness—it helps preserve the peppers and balances the acidity. Brown sugar or honey can replace white sugar, though they’ll add a different flavor note. If you love smoky flavors, add a dash of smoked paprika to the brine. And if you’re feeling fancy, a bay leaf in the jar adds aromatic depth without overpowering.
These peppers keep for 3 months in the fridge, with flavors deepening over time. Glass jars with airtight lids are best—sterilize them first if you’re nervous about bacteria. For gifting, use mason jars with ribbed sides—they look gorgeous and keep the peppers crisp. If you make a big batch, portion into smaller jars so you’re not digging into one giant container. The brine gets richer as it sits, so the second batch is always the best!
Why You'll Love This Recipe
- Five-Ingredient Magic: I swear by this recipe—no fancy techniques, just a knife, a pot, and 20 minutes. Slice the peppers, toss them in vinegar and sugar, and let them sit while you make dinner. That’s it. Honestly, the hardest part is waiting for them to pickle.
- Sweet Heat Balance: The sugar and vinegar create this perfect tangy bite that lingers. I’ll be real: the first time I made these, I ate a whole pepper straight off the jar. That crisp, garlicky crunch? It’s the kind of flavor that makes you pause mid-bite.
- Pantry Staple Power: Between us, these peppers turn any meal into something special. Toss them on tacos, stir into pasta, or just snack straight from the jar. I keep a batch in my fridge for when I’m craving something quick but still want that restaurant-worthy kick.
- Lasts for Weeks: One batch feeds me for a month—yes, really. The vinegar preserves them so well, they stay fresh and vibrant. And since they’re so cheap to make, I don’t feel guilty when I grab one for lunch every day. Budget-friendly? More like budget-savvy.
Step-by-step instructions for pickled chili peppers
Here's how to transform fresh peppers into vibrant, tangy pickles in under 10 minutes.
Prepare and Sterilize the Peppers
Start by washing the 1 lb fresh chili peppers thoroughly under cool running water. I like to pat them completely dry with paper towels—any moisture will dilute the final flavor. Using a sharp knife, slice each pepper into ¼-inch thick rings or leave whole if you prefer larger pieces. The key here is uniformity; consistent slices ensure even pickling.
Next, bring a large pot of water to a boil. Add the 1.5 tbsp kosher salt and stir until fully dissolved. Place the sliced peppers in a heatproof bowl and pour the boiling salt water over them. Let them sit for exactly 3 minutes—this sterilizes the peppers and begins the pickling process. Drain well in a colander and set aside. This step is crucial for food safety and flavor development.
Create the Pickling Brine
In a medium saucepan, combine the 1 cup white vinegar, 0.25 cup red wine vinegar, 0.5 cup granulated sugar, and 1 cup water. Bring to a gentle simmer over medium heat, stirring occasionally until the sugar fully dissolves. You'll see the mixture turn clear and slightly syrupy—this signals the sugar has integrated completely.
While the brine heats, crush the 1 tsp black peppercorns in a mortar and pestle or with the flat side of a knife. Add them to the simmering liquid along with the 0.5 tsp cayenne pepper and 4 cloves garlic cloves. Let the mixture simmer for 2 minutes to infuse the flavors. Remove from heat and let it cool for 5 minutes. This aromatic blend forms the flavor foundation for your pickles.
Combine and Pack the Pickles
Transfer the sterilized peppers to a clean, sterilized quart-sized mason jar. Add the chopped 0.25 cup fresh dill, spreading it evenly among the peppers. Pour the cooled brine over the peppers until they're completely submerged, leaving about ½ inch of headspace at the top. Tap the jar gently on the counter to remove any air bubbles trapped between the peppers.
This is where precision matters—ensure every pepper is fully submerged in the brine. If any peppers float to the surface, use a clean utensil to press them down. Seal the jar tightly with the lid. The brine should cover all peppers completely; if not, add a bit more from the saucepan. This step guarantees proper preservation and flavor distribution throughout the jar.
Rest and Develop Flavors
Let the sealed jar sit at room temperature for 10 minutes to allow the initial flavors to meld. This brief resting period helps the peppers absorb the brine more evenly. After 10 minutes, transfer the jar to the refrigerator and let it rest for at least 24 hours before using. The longer you wait—up to 2 weeks—the more complex the flavors become.
After refrigeration, the peppers should be tender yet still retain their shape, with a vibrant color and tangy bite. The brine will develop a rich, aromatic depth from the garlic, dill, and spices. Taste one to check the balance—it should be zesty with a subtle heat from the cayenne. If you prefer more heat, add an extra pinch of cayenne to future batches. These pickles will keep in the fridge for up to 3 months, making them perfect for quick flavor boosts in any dish.
Pro Tips For Making Pickle Chili Peppers
- SLICE THIN, SLICE EVEN: A knife isn’t just a knife here—uneven slices mean some peppers stay crunchy while others turn to mush. Aim for ⅛-inch thickness, and if your knife skills are rusty, freeze the peppers for 10 minutes first. They’ll hold their shape better, and you’ll avoid the frustration of peppers splitting mid-slice.
- SALT THE PEPPERS FIRST: Tossing them with ½ teaspoon salt per pound before anything else draws out moisture, which keeps the final texture crisp. Skip this, and you’ll end up with soggy peppers that cling together like wet newspaper. (Yes, even if you’re impatient like me.)
- DON’T RUSH THE GARLIC: Smash those cloves with the flat side of your knife before mincing—it releases more flavor without burning. Then, cook them low and slow in the vinegar mixture until they’re golden, not brown. Burnt garlic turns bitter, and nobody wants that in their pickles.
- USE HOT VINEGAR, NOT COLD: Heat the vinegar to a bare simmer (just until tiny bubbles form) before adding peppers and sugar. Cold vinegar means the sugar dissolves unevenly, leaving some peppers clinging to undissolved crystals. Hot vinegar = smooth, consistent flavor every time. (Your future self will notice the difference.)
Make-ahead tips for pickle chili peppers
Prep Ahead Strategy
I always recommend prepping the peppers and brine separately up to 24 hours ahead of pickling day. Sterilize and slice the peppers, then store them in an airtight container in the fridge. The brine ingredients can be measured and stored in a separate jar.
This way, you only need 10 minutes on the actual pickling day to combine everything. The peppers stay fresh and crisp when refrigerated this way. 💡
Batch Cooking Tips
For large gatherings, make multiple jars at once using the same ratio of ingredients. I typically double the recipe to make 2 quart jars simultaneously. Use a large pot to heat the brine and sterilize the peppers in batches if needed.
Label each jar with the date—they’ll keep for 3 months in the fridge, but the flavor peaks after 2-3 weeks. 🌶️
Freezing for Long-Term
While pickled peppers aren’t ideal for freezing, you can extend their shelf life by freezing the brine separately. After pickling, remove the peppers and store them in a separate container with their brine.
Freeze the peppers for up to 1 month—they’ll soften slightly but still retain their flavor. Thaw in the fridge before using. The brine can be reheated and reused for fresh batches. ❄️
Gifting Ready
These pickles make fantastic gifts! Package them in mason jars with ribbed sides for a rustic, appealing look. Add a handwritten tag with the recipe and flavor profile. I like to include a small wooden spoon for serving.
Store them in a cool, dark place until gifting—transport them in a cooler bag to keep them fresh. The jars also make great hostess gifts for dinner parties. 🎁
Reusing Brine
Don’t waste that flavorful brine! After removing the peppers, store the leftover liquid in a sealed jar in the fridge for up to 1 week. Use it as a quick marinade for proteins like chicken or shrimp, or drizzle it over roasted vegetables.
The tangy, spicy notes elevate any dish. I’ve even used it as a cocktail garnish for margaritas—it adds a surprising depth. 🍹
Peppers for Parties
For events, prep the peppers and brine ahead, then assemble the jars just before serving. Keep them in a chilled bowl lined with ice packs to maintain crispness. Offer small bowls of the pickles as a garnish station—guests can add them to tacos, salads, or even their cocktails.
This keeps the peppers fresh and lets everyone customize their heat level. 🎉
Nutrition facts
Frequently asked questions
Can I use dried chili peppers instead of fresh?
Fresh peppers work best for this recipe because they hold their texture and vibrant color. Dried peppers lose their crispness when pickled. If you must use dried, rehydrate them first in warm water for 15 minutes, then proceed with the recipe—but expect softer results. For maximum heat and texture, stick with fresh jalapeños or serranos!
How do I adjust the heat level?
The recipe uses 0.5 tsp cayenne pepper for subtle heat. For milder peppers, reduce or omit the cayenne. For extra spice, add 1-2 extra teaspoons or swap some jalapeños for habaneros. Always taste the brine before packing—you can always add more cayenne later if needed!
Can I make this recipe without vinegar?
Vinegar is essential for both preservation and tangy flavor. Without it, the peppers won't pickle properly and may spoil faster. For a fermented version (like kimchi-style), you'd need a 5% brine solution and 2-4 weeks of fermentation—but that's a completely different process requiring careful monitoring.
What are the best ways to use these pickled peppers?
These versatile pickles elevate everything! Try them as a topping for tacos, nachos, or grilled meats. Add a few slices to cocktails like margaritas or Bloody Marys for a spicy kick. They also brighten salads, pasta dishes, and even sandwiches. For extra flavor, crush a few peppers into dressings or marinades!
Why did my peppers turn mushy?
Mushy peppers usually mean they weren't fully submerged in brine or the jar wasn't sealed properly. Always ensure peppers are completely covered and the lid is tight. For extra crispness, add 1 tsp lemon juice to the brine—it helps maintain texture. Also, don't overcrowd the jar!