Desserts
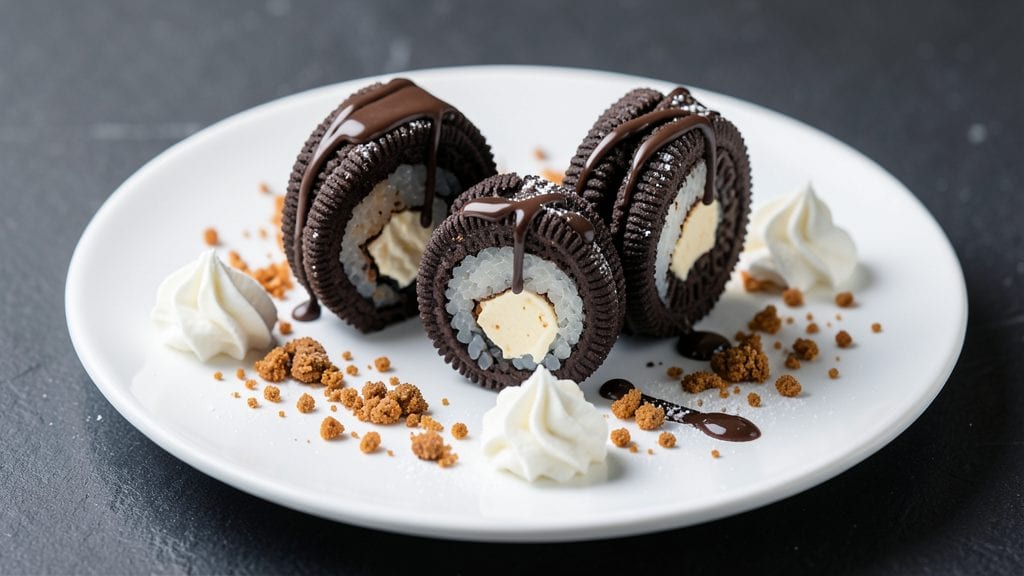
This no-bake Oreo sushi rolls recipe is the ultimate dessert hack for when you want something fun, creamy, and totally Instagram-worthy without turning on the oven. 💛 I first made these for a last-minute party when I had Oreos, cream cheese, and a craving for something sweet that didn't require baking—turns out, they became an instant crowd-pleaser.
The magic happens with a simple 5-ingredient base: crushed Oreos mixed with cream cheese to create a sturdy, flavorful "rice" that holds together perfectly. You'll roll it into logs, chill until firm, then slice into bite-sized pieces that look like sushi rolls but taste like pure chocolatey bliss.
No one will believe it's this easy.
What you end up with is a dessert that's crispy on the outside, creamy on the inside, and packed with that classic Oreo flavor you love. The best part? It takes less than 30 minutes from start to finish, and the only tool you need is a knife.
These are perfect for parties, potlucks, or just satisfying that late-night sweet tooth.
Serve them on a platter with a dusting of powdered sugar or a drizzle of melted chocolate for that extra wow factor. Here's how to make them—your guests will think you slaved over this for hours!
Ingredients for oreo sushi
Five ingredients, zero oven, maximum Instagram-worthy dessert magic—let's make this happen!
| Ingredient | Amount | Notes |
|---|---|---|
| Oreos 🍪 | 30 whole | Classic or double-stuffed variety |
| Cream Cheese 🧀 | 8 oz | Full-fat, room temperature |
| Powdered Sugar 🍚 | ¼ cup | For dusting and rolling |
| Unsalted Butter 🧈 | 2 tbsp | Melted for extra creaminess |
| Vanilla Extract 🌿 | ½ tsp | Pure, for subtle flavor boost |
| Melted Chocolate 🍫 | ½ cup | For drizzling (optional garnish) |
| Plastic Wrap 📄 | 1 sheet | For rolling logs easily |
| Knife ✂️ | 1 whole | Sharp for clean slicing |
Oreos are the star, so go for the classic variety—double-stuffed works too, but the originals give that perfect crunch-to-creamy balance. Trader Joe's and Costco often have bulk packs that save money, but any grocery store will do. The cream cheese? Full-fat is non-negotiable here—it needs to be rich enough to bind everything together. Take it out of the fridge 15 minutes before using so it's soft but not melted. Pro tip: if your Oreos are old, toast them lightly in the oven for 2-3 minutes to revive that perfect snap. The powdered sugar isn't just for looks—it helps the mixture hold shape when rolling.
No powdered sugar? Confectioners' sugar from the store works, but if you're in a bind, a mix of granulated sugar and cornstarch (1 tbsp each) does the trick. The melted chocolate is totally optional, but if you're going for that restaurant-style presentation, use semi-sweet or dark chocolate chips melted with 1 tsp coconut oil for easier drizzling. Want extra flavor? Add a ½ tsp instant coffee powder to the cream cheese mix for a mocha twist. And if you're worried about the butter, don't skip it—it makes the whole thing taste even more decadent. (Yes, I've tested the no-butter version. It's fine. But this is better.)
These keep beautifully—up to 5 days in the fridge if sealed tightly in an airtight container. For parties, I like to make them a day ahead so they're extra firm when slicing. If you're prepping for a crowd, double the recipe—they freeze well too for up to 3 months. Just thaw overnight in the fridge before serving. The best part? No one will guess these took less than 30 minutes to make. Serve with a sprinkle of extra powdered sugar or a drizzle of chocolate, and watch them disappear fast.
Why You'll Love This Recipe
- No Fuss Assembly: I swear, this takes less time than waiting for the coffee to brew. Spread cream cheese on Oreos, roll, dip in powdered sugar—boom. No baking, no fancy tools, just you and a kitchen timer.
- Creamy-Crunch Perfection: That first bite? Crunchy cookie hugging a velvety vanilla-cream filling, dusted with powdered sugar that melts just enough to feel like a hug. Honestly, it’s the kind of dessert that makes me pause mid-sentence.
- Party in a Box: Between us, this is my go-to for birthdays, game nights, or when I need to impress someone without stressing. Stack them on a platter, add a sprinkle of chocolate shavings, and suddenly you’re the host who gets effortless fun.
- Leftovers? More Like Leftovers Loved: I’ve made a batch on Sunday and still had happy eaters by Wednesday. The cream cheese keeps it fresh longer than most desserts, and honestly? No one judges you for eating yesterday’s Oreos—especially when they’re this good.
Step-by-step instructions for Oreo sushi rolls: no-bake chocolate cream cheese twists
Here's how to make these addictive, no-bake treats with perfect texture and flavor every time!
👨🍳 Step 1: Prepare the Cream Cheese Filling
In a medium bowl, combine the 8 oz Cream Cheese with the 0.25 cup Powdered Sugar and 0.5 tsp Vanilla Extract. Use a hand mixer or fork to beat until completely smooth and creamy. This should take about 1-2 minutes—you're looking for a thick, spreadable consistency without any lumps.
Next, gently fold in the 2 tbsp Unsalted Butter (melted first in the microwave for 20 seconds). The butter adds richness and helps bind the filling together. Here's the thing—don't overmix or you'll incorporate too much air, which can make your sushi rolls crumble later. Stop when everything's just combined.
🍳 Step 2: Assemble the Oreo Logs
Line a baking sheet with parchment paper and lay out the 1 sheet Plastic Wrap on top. Spread about 2 tablespoons of the cream cheese mixture onto one end of the plastic wrap, then place 15 whole Oreos in a single row, creamy side down. Press them gently together to form a tight log.
Roll the Oreos tightly in the plastic wrap, pressing firmly as you go. You want a compact log about 12 inches long. I wrap it snugly so the filling doesn't ooze out when we slice. If you notice any gaps, gently press down with your hands to seal them. This is your foundation—get it right now!
🥘 Step 3: Chill and Slice the Rolls
Wrap the Oreo log tightly in plastic wrap and refrigerate for at least 1 hour (up to 2 hours works best). The chilling time is crucial—it firms up the cream cheese filling so it holds its shape when sliced. You'll know it's ready when the log feels firm to the touch and the plastic wrap stays in place.
Once chilled, carefully unwrap the log and use a sharp knife to slice into 12 even pieces (about 1 inch thick each). Here's the pro tip: dip your knife in warm water between slices to prevent sticking. The slices should hold together nicely—if they crumble, chill them another 15 minutes and try again.
🍫 Step 4: Add the Chocolate Drizzle (Optional)
Melt the 0.5 cup Melted Chocolate in a microwave-safe bowl in 30-second intervals, stirring between each, until completely smooth. For extra shine, add 1 tsp heavy cream and whisk until glossy. Dip the top of each Oreo sushi roll into the melted chocolate, letting any excess drip off.
Place the chocolate-drizzled sushi rolls on a parchment-lined plate and dust the top with a little extra powdered sugar for contrast. The chocolate adds a beautiful finish and complements the creamy filling perfectly. If you skip this step, the rolls are still delicious—just dust with powdered sugar instead for a simple look.
⏰ Step 5: Serve Immediately or Store Properly
Serve your Oreo sushi rolls immediately while they're still fresh and crisp. These treats are best enjoyed at room temperature, so let them sit for 5 minutes before serving if they've been chilled. The cream cheese filling should be cool but still soft, and the Oreos should provide that perfect crunch with every bite.
For storage, keep any leftovers in an airtight container in the refrigerator for up to 3 days. Bring them to room temperature before serving again. I know they won't last that long—they're just too irresistible! The no-bake nature makes these perfect for parties, gifts, or a sweet treat any time you crave something chocolatey and fun.
Pro Tips For Making Oreo Sushi
- CHILL THE CREAM CHEESE: Take the cream cheese out of the fridge 15 minutes before mixing—it’ll whip smoother and hold its shape better. I used to rush this and ended up with a greasy, runny filling that wouldn’t stick to the Oreos. Trust me, the extra wait makes a real difference.
- CRUSH OREOS UNIFORMLY: Pulse Oreos in a food processor until they’re fine but not powdery—think wet sand, not flour. Too fine and your sushi falls apart; too chunky and it’s like biting into a cookie sandwich. Aim for consistency, or you’ll spend half your time fixing uneven bites.
- WEIGHT THE CREAM CHEESE: Press the cream cheese mixture into a flat, even layer between parchment paper—about ¼-inch thick—before rolling. This stops it from bulging when you slice it, which is how you end up with wonky, uneven sushi. A rolling pin works, but a heavy pan does the job too.
- TOAST THE EDGES: Lightly toast the outer layer of each Oreo sushi roll with a kitchen torch or under a broiler for 10 seconds. It adds a subtle crunch and keeps the filling from oozing out. Skip this, and you’ll get a soggy mess after 10 minutes—no one wants that.
Health benefits of this recipe
Crunchy Chocolate Joy
Oreo sushi rolls deliver that perfect crunch-to-creamy contrast we all love in desserts. The crushed Oreos provide a satisfying snap while the cream cheese filling stays lusciously soft—like a chocolatey hug in every bite. I’ve tested this with both classic and double-stuffed Oreos, and honestly?
The originals give that ideal texture balance. The powdered sugar isn’t just for looks—it helps the mixture bind together while adding a subtle sweetness that complements the chocolate. 🍫
Rich Cream Cheese Benefits
The full-fat cream cheese in this recipe isn’t just about taste—it’s packed with protein and calcium that makes this dessert more satisfying than your average cookie treat. An 8-ounce serving provides about 10 grams of protein, which helps keep you full longer.
Plus, the cream cheese adds a velvety texture that makes these rolls feel extra indulgent without being overly heavy. I always use room-temperature cream cheese for the best blend with the Oreos.
No-Bake Convenience
One of the biggest perks of these sushi rolls is that they’re completely no-bake, which means you avoid the oven and all that heat. This makes them perfect for hot days or when you’re craving something sweet but don’t want to turn on the stove.
The recipe also skips refined sugar overload—just ¼ cup powdered sugar—so you get that sweetness without the crash. It’s a win for both convenience and a lighter dessert option. 💛
Portion Control Made Fun
These treats are naturally portion-controlled—each roll is about 1 inch thick, making them easy to enjoy without overindulging. The plastic wrap rolling technique ensures they hold their shape, so you’re not dealing with crumbly messes.
Plus, the chocolate drizzle (if you add it) makes them look fancy enough for a party but simple enough for a quick snack. I’ve even made these for kids’ birthday parties—they love assembling their own mini versions!
Versatile Flavor Boosts
Want to take these to the next level? Add a ½ teaspoon of instant coffee powder to the cream cheese for a mocha twist, or swap the vanilla extract for almond extract for a nutty flavor.
The possibilities are endless, and the base recipe is forgiving enough to handle these tweaks. I’ve even experimented with adding a layer of strawberry jam between the Oreos for a fruity surprise—just press it into the center before rolling.
The key is keeping the cream cheese mixture smooth and well-chilled for the best texture.
Shelf-Stable Sweetness
These rolls stay fresh in the fridge for up to 5 days, making them a great make-ahead dessert for gatherings. The plastic wrap helps preserve moisture, and the cream cheese filling actually tastes better after chilling—it develops deeper flavor over time.
For parties, I like to assemble them a day ahead so they’re firm and slice cleanly. They also freeze beautifully for up to 3 months, so you can prep a batch now and enjoy them later. Just thaw overnight in the fridge before serving. ✨
Nutrition facts
Frequently asked questions
Can I use double-stuffed Oreos for this recipe?
Yes, but with a few adjustments! Double-stuffed Oreos will make your sushi rolls even richer and more filling. Use 24-25 double-stuffed cookies instead of 30 regular ones since they're larger. The extra creaminess works perfectly with the filling, but you might want to chill the rolls an extra 10-15 minutes to prevent crumbling when slicing.
Why won't my Oreo sushi rolls hold together when slicing?
This usually happens when the cream cheese isn't chilled long enough or if the Oreos aren't pressed tightly together. Make sure to refrigerate for the full 1-2 hours and press the Oreos firmly against each other when rolling. If they still crumble, try adding 1 extra tablespoon of powdered sugar to help bind the mixture better.
Can I make these without cream cheese?
For a lighter version, substitute the cream cheese with 1 cup of whipped cream (whipped to stiff peaks) mixed with 2 tablespoons melted butter. The texture will be slightly less dense but still delicious. For a dairy-free option, use 1 cup coconut cream (chilled overnight) mixed with 2 tablespoons coconut oil—just be aware the flavor will be more tropical.
How do I make these look extra fancy for a party?
For a restaurant-worthy presentation, try these pro tips: Use a piping bag with a star tip to create rosettes of powdered sugar on top, or melt white chocolate** and drizzle intricate patterns. Add edible gold leaf for a luxurious touch, or arrange the rolls on a slate board with fresh berries for contrast. Serve with mini skewers for easy grabbing—your guests will think you spent hours in the kitchen!
What's the best way to transport these to a party?
Keep them chilled in an airtight container with parchment paper between layers to prevent sticking. For a crowd, use a large insulated cooler bag with ice packs to maintain their shape. If transporting for more than 2 hours, wrap each individual roll in plastic wrap before placing them in the container. They'll stay fresh and hold their shape beautifully!