Side Dishes
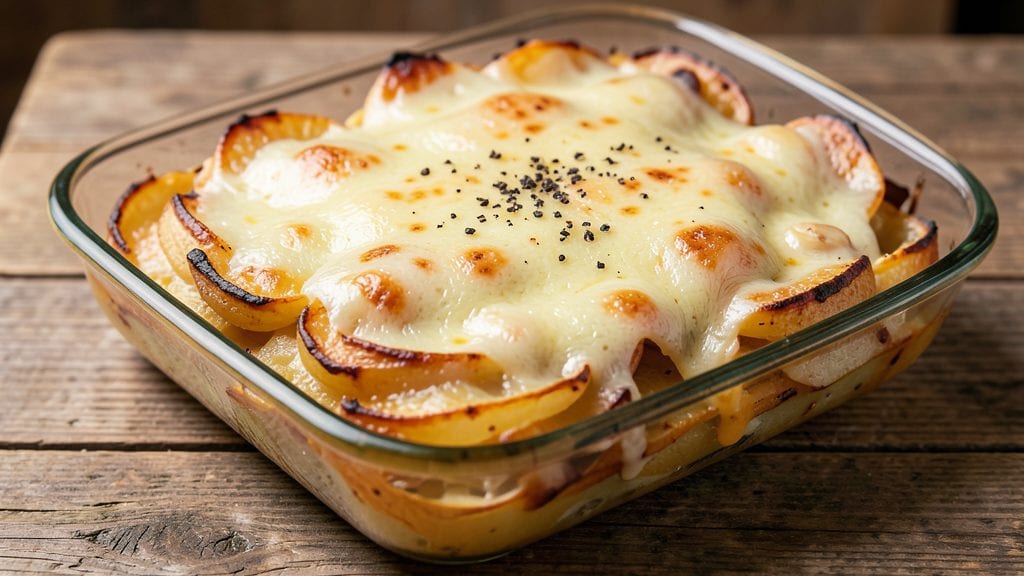
This mom's scalloped potato recipe delivers the comforting, golden layers of childhood—crispy on top, creamy in the middle, with buttery richness in every bite. The secret lies in thin, even slices layered with just the right amount of cream and cheese, baked until the edges turn irresistibly crisp.
I first learned this technique from my mother, who perfected it over decades of holiday dinners and family gatherings.
The magic happens in the layering—each slice should overlap slightly for maximum crispiness, and the baking time is key to achieving that signature top without drying out the potatoes underneath.
With just a handful of ingredients and about an hour in the oven, you'll have a side dish that feels like a hug on a plate. This recipe is foolproof, delivering restaurant-quality results without the fuss.
What makes these scalloped potatoes truly special is how they elevate any meal, from Sunday roasts to holiday feasts. The crispy top gives way to tender, fluffy layers that soak up the creamy sauce perfectly.
Serve them alongside roasted chicken, steak, or even as a hearty vegetarian main with a fresh green salad. The aroma alone will have everyone at the table asking for seconds.
For added richness, consider folding in crispy bacon or sharp cheddar cheese between layers—these variations take the classic dish to the next level. The beauty of this recipe is its flexibility, yet the core technique remains the same: thin slices, careful layering, and patience in the oven.
Let's get started on creating your own family tradition.
Ingredients for mom's scalloped potato
Buttery potatoes, crispy edges, and creamy layers—just a handful of ingredients for comfort food perfection.
| Ingredient | Amount | Notes |
|---|---|---|
| Russet Potatoes 🥔 | 3 lb | Thinly sliced, peeled |
| Heavy Whipping Cream 🥛 | 2 cups | Full-fat for best texture |
| Sharp Cheddar Cheese 🧀 | 1 ½ cups | Freshly grated, block preferred |
| Unsalted Butter 🧈 | ½ cup | Melted, salted added later |
| Garlic Cloves 🧄 | 4 cloves | Minced, for depth |
| Salt 🧂 | 1 ½ tsp | Kosher or sea salt |
| Black Pepper 🌶️ | ½ tsp | Freshly ground preferred |
| All-Purpose Flour 🌾 | 2 tbsp | For thickening sauce |
| Nutmeg 🌿 | ¼ tsp | Freshly grated, optional |
| Bacon 🥓 | ½ lb | Crispy, chopped, optional |
| Parmesan Cheese 🧀 | ¼ cup | Freshly grated, optional |
The potatoes are non-negotiable—Russets hold their shape best when thinly sliced (about 1/8-inch thick). Organic potatoes from Whole Foods or your local farmers market stay crispier longer, but regular Russets work fine. Peeled or not? I peel mine—it keeps the texture consistent. For the cheese, sharp cheddar is key; Kraft or Cabot are reliable brands. The heavy cream should be cold when you start—Trader Joe's or Whole Foods sell it in 32-ounce tubs for the best price. Don't skip the nutmeg—it's subtle but adds warmth that ties everything together. If you're feeling fancy, Parmigiano-Reggiano on top adds a sophisticated finish.
No heavy cream? Half-and-half with an extra tablespoon of butter works in a pinch, though the texture won't be quite as rich. Short on sharp cheddar? Gruyère or Gouda both bring depth—just grate them yourself. The bacon is optional but worth it; thick-cut from Costco cooks up perfectly crispy. For the garlic, fresh is a must—jarred minced garlic has a metallic aftertaste. The flour is just for thickening, but if you're watching carbs, you can skip it and rely on the cream's natural thickening. Pre-sliced potatoes? Toss them in cold water to prevent browning while you prep the rest.
This dish reheats beautifully—350°F for 15-20 minutes covered with foil—though it's even better fresh. Store leftovers in the fridge for up to 4 days, covered tightly to keep the top crispy. For make-ahead meals, assemble the dish in the baking dish, cover, and refrigerate for up to 24 hours before baking. The cheese will melt slightly, but the texture stays perfect. Freezing isn't recommended—potatoes get watery when thawed. Serve with a dollop of sour cream or extra bacon bits for that restaurant-quality touch.
Why You'll Love This Recipe
- One-Pan Magic: I swear by this recipe because it’s literally just slice, layer, and bake. No fancy gadgets, no chopping marathons—just a sheet pan, a knife, and 20 minutes of hands-off time while the oven does the work.
- Creamy-Cheesy Crunch: That sharp cheddar melting into the creamy garlic-whipped cream? It’s the kind of flavor combo that makes you close your eyes and sigh. The buttery edges on the potatoes? Absolute perfection.
- Leftovers That Don’t Suck: Between us, most casseroles turn into sad, soggy leftovers. Not this one. The next day, it’s still creamy, still crispy in spots, and just as satisfying—packed for lunch or reheated in minutes.
- Budget-Friendly Feast: Russets and cheddar stretch this dish to feed four for under $10, and the heavy cream makes it feel indulgent without breaking the bank. Honestly, it’s my go-to when I need to impress guests or fill hungry bellies on a tight night.
Step-by-step instructions for mom's scalloped potatoes
Here's how to build those golden, crispy layers that make this dish legendary.
Prepare the Potatoes for Perfect Layers
Peel the 3 lb russet potatoes and slice them into even ¼-inch thick rounds using a mandoline or sharp knife. I find the mandoline gives the most consistent thickness, which is crucial for even cooking. As you slice, soak the potatoes in cold water for 10 minutes to remove excess starch - this prevents the layers from becoming gummy. Drain well before using.
Arrange the sliced potatoes in a single layer on a clean kitchen towel and pat them completely dry. Any moisture left on the potatoes will steam instead of crisp during baking. You should end up with about 12-15 slices total, depending on how thick you cut them. Keep them in order so you can rebuild the layers neatly in your baking dish.
Create the Creamy Cheese Sauce
In a medium saucepan, melt the 0.5 cup unsalted butter over medium heat. Once melted, whisk in the 2 tbsp all-purpose flour to create a roux. Cook for 1-2 minutes until the mixture bubbles slightly and smells nutty. This step is what gives the sauce its velvety texture.
Gradually whisk in the 2 cups heavy whipping cream, allowing it to absorb completely before adding more. Bring the mixture to a gentle simmer and cook for 3-4 minutes until it thickens enough to coat the back of a spoon. Stir in the 1.5 cups freshly grated sharp cheddar cheese, minced 4 cloves garlic, 1.5 tsp salt, 0.5 tsp black pepper, and 0.25 tsp nutmeg. Remove from heat and let it cool slightly - it should be thick but still pourable.
Assemble the Layers for Maximum Crisp
Preheat your oven to 375°F. Lightly butter a 9x13-inch baking dish - this prevents sticking and adds to the buttery flavor. Begin building your layers by placing a third of the potato slices in the bottom of the dish. Pour about a third of the cheese sauce over the potatoes, spreading it evenly. Sprinkle half of the chopped bacon (if using) and half of the 0.25 cup parmesan cheese over the sauce.
Repeat with another third of the potato slices, sauce, remaining bacon, and remaining parmesan. Top with the final third of potatoes and the remaining sauce. The key here is to keep the layers even - this ensures consistent cooking and that beautiful crispy top. Press down gently on each layer to help the potatoes absorb the sauce.
Bake Until Golden and Bubbly
Cover the baking dish tightly with aluminum foil and bake for 45 minutes. This initial covered baking time allows the potatoes to soften and absorb the creamy sauce without browning. After 45 minutes, remove the foil and increase the oven temperature to 400°F. Bake uncovered for another 20-25 minutes until the top is deep golden brown and bubbly.
Watch closely during the final 10 minutes - you want that perfect crispy crust to form. If the top browns too quickly, tent it loosely with foil. The potatoes are done when they're tender all the way through and the sauce has thickened to a creamy consistency. Let rest for 10 minutes before serving - this allows the layers to set and makes slicing easier.
Pro Tips For Making Mom'S Scalloped Potato
- PARBOIL POTATOES FIRST: Drop peeled Russets into a pot of salted boiling water for exactly 3 minutes—no more, no less. This softens them just enough to hold their shape when slicing, so they don’t fall apart in the cream. (Yes, even if you’re impatient like me, resist the urge to rush this.)
- GRATE THE CHEESE FINE: Skip the food processor—sharp cheddar needs to melt smoothly, not clump like glue. A box grater with the smallest holes works best, and don’t pack the cheese into the dish. Just sprinkle it evenly so every layer gets that creamy, stretchy goodness. (Trust me, you’ll taste the difference.)
- BAKE LOW AND SLOW: After the initial 20 minutes at 375°F (to set the layers), drop the heat to 325°F and cover with foil. This prevents the top from burning while the center finishes cooking evenly. (I learned this the hard way—charred scallops taste like regret.)
- WHISK THE CREAM COLD: Use heavy cream straight from the fridge—no need to warm it. Whisk it with the butter and garlic until it’s just emulsified, not hot. Cold cream blends better with the melted cheese and keeps the texture silky, not greasy. (Sounds weird, but it works.)
Pro cooking tips for this dish
Layering Like a Pro
For that signature crispy top and creamy layers, I swear by overlapping slices like fish scales—this creates more surface area for browning. Start with the thinnest slices (¼-inch thick) and arrange them in a staggered pattern so each slice touches at least two others.
Use a mandoline slicer for consistency, but if you're slicing by hand, keep your knife at a 15-degree angle for even cuts. 🥔
Before assembling, pat the potatoes bone-dry with paper towels—moisture is the enemy of crispiness. I like to arrange the slices in a single layer on a baking sheet first to ensure uniformity.
For extra insurance, sprinkle each layer with a pinch of salt before adding sauce—this draws out moisture and enhances flavor as they bake.
Sauce Thickness Secrets
The sauce should coat the back of a spoon but still be pourable—too thick, and it won’t distribute evenly; too thin, and the potatoes will steam instead of crisp.
I use a slotted spoon to gently press the sauce through the potato layers, ensuring each slice gets coated without sogging the bottom. For a silkier texture, whisk in 1 tablespoon cold butter at the end while the sauce is still warm. 🧈
If your sauce separates, don’t panic—just whisk vigorously over low heat for 1-2 minutes until smooth. For a nutty depth, toast the flour in the butter for 30 seconds before adding cream.
This adds complexity that store-bought roux can’t match. Pro tip: Taste the sauce before assembling—adjust salt and pepper now, not later!
Baking Temperature Tricks
The two-stage bake is non-negotiable: 375°F for 45 minutes covered, then 400°F uncovered for the final crisp. Use heavy-duty aluminum foil for the first stage—it reflects heat better than parchment. I place the dish on the middle rack to ensure even heat distribution.
If your oven runs hot, reduce the initial temp to 350°F to prevent burning before the sauce sets. 🌡️
For a restaurant-worthy finish, broil for 1-2 minutes at the very end—just watch like a hawk! If the top browns too fast, tent loosely with foil.
The internal temp should reach 205°F for creamy, fork-tender potatoes. Let it rest 10 minutes before serving—this lets the layers set and makes slicing cleaner.
Equipment Upgrades
Skip the mandoline? A sharp chef’s knife and a ruler work fine—just measure your slices against the ruler for consistency. For the baking dish, ceramic or dark metal conducts heat better than glass, but glass is easier to monitor browning.
I use a 9x13-inch Pyrex dish—it’s sturdy and handles the two-stage bake without warping. 🔥
Invest in a digital meat thermometer to avoid guesswork—insert it into the thickest potato slice. For extra crispiness, I brush the top layer with melted butter before the final bake. And if you’re feeling fancy, sprinkle breadcrumbs mixed with Parmesan on the top layer before baking for a crunchy crust.
Nutrition facts
Frequently asked questions
Why do my scalloped potatoes turn out soggy instead of crispy?
Soggy potatoes usually mean too much moisture or uneven baking. First, ensure your potato slices are completely dry before layering. The sauce should coat the back of a spoon but not be watery—thicken it longer if needed. Also, don’t skip the foil cover during the first 45 minutes of baking; this steams the potatoes gently before creating that crispy top. Finally, check your oven temperature—375°F is critical for the first stage.
Can I make this dish ahead of time?
Assemble the dish in your baking pan, cover tightly with foil, and refrigerate for up to 24 hours before baking. The cheese will melt slightly, but the texture remains perfect. For a quick version, bake straight from the fridge, adding 10-15 extra minutes covered. Never freeze scalloped potatoes—they’ll turn watery when thawed.
What’s the best way to slice potatoes for even layers?
Use a mandoline slicer for perfectly even ¼-inch slices, but a sharp knife works too. Place a ruler beside your cutting board to guide thickness. Soak slices in cold water for 10 minutes to remove starch, then pat bone-dry with paper towels. Arrange them in a single layer on a baking sheet first to check uniformity before assembling.
How do I make this dish vegetarian?
Skip the bacon and use vegetarian cheddar (like Daiya or Violife) or nut-based cheeses for a dairy-free option. Boost flavor with roasted garlic, smoked paprika, or a splash of vegetable broth in the sauce. For extra richness, stir in cashew cream (blend soaked cashews with water) instead of heavy cream. The technique stays the same—just focus on the creamy, crispy layers!
Can I use sweet potatoes instead of russets?
Sweet potatoes work but require adjustments. Their natural moisture means you’ll need to pat them extra dry and reduce the sauce by ¼ cup to prevent sogginess. Bake at 350°F for 50-55 minutes covered, then 400°F uncovered for 15 minutes—they take longer to soften. The flavor will be sweeter and nuttier, but the texture won’t be as crispy as russets.