
Main Courses
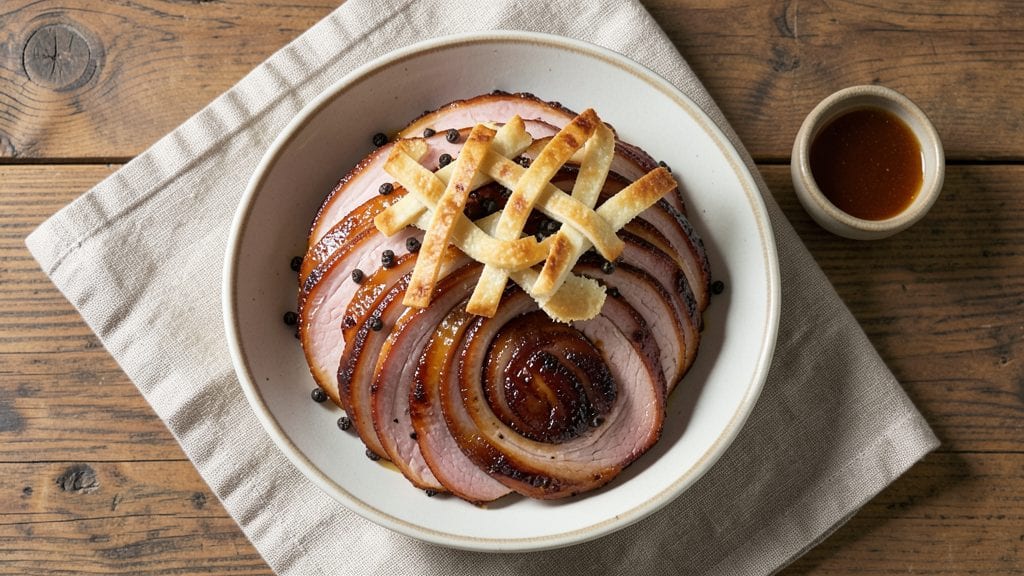
Martha Stewart's baked ham recipe transforms a holiday centerpiece into a showstopping masterpiece with a crackling golden crust and rich, flavorful glaze. The secret lies in precise preparation—scoring the ham for even cooking, brining for moisture retention, and basting with pan juices to lock in savory depth.
I've perfected this technique after years of holiday hosting, ensuring every slice delivers that signature Martha Stewart touch.
This method delivers restaurant-quality results at home with just a few key steps: a simple brine, careful scoring, and a honey-mustard glaze that caramelizes beautifully. The ham emerges with a crisp exterior and tender interior, while the glaze adds a perfect balance of sweet and tangy notes.
It's the kind of dish that makes holiday gatherings feel truly special, without requiring advanced skills.
What sets this recipe apart is the attention to detail that elevates ordinary ham into something extraordinary. The scoring allows the glaze to penetrate deeply, while basting with pan juices creates that signature crackling crust.
By the time it's done, you'll have a ham that's perfectly cooked, beautifully glazed, and ready to impress your guests.
The best part? This recipe scales beautifully for any gathering size, and the leftovers reheat perfectly for sandwiches or soups. Whether you're hosting Thanksgiving or a casual Sunday dinner, this Martha Stewart-inspired ham will be the star of your table. Let's get started on creating your own holiday masterpiece.
Ingredients for martha stewart baked ham
Precision-crafted ingredients for Martha Stewart's signature holiday ham with restaurant-quality crust and glaze.
| Ingredient | Amount | Notes |
|---|---|---|
| Bone-In Fully Cooked Spiral-Cut Ham 🐷 | 8 lb | Center-cut preferred for even cooking |
| Diamond Crystal Kosher Salt 🧂 | 1 cup | For brining solution |
| Granulated Sugar 🍚 | ½ cup | For brine sweetness |
| Black Peppercorns 🌶️ | 1 tbsp | Coarsely crushed |
| Unsalted Butter 🧈 | ½ cup | Cold, cubed for basting |
| Honey 🍯 | ½ cup | Local raw preferred |
| Dijon Mustard 🍯 | ¼ cup | High-quality for glaze |
| Fresh Orange Juice 🍊 | ½ cup | Freshly squeezed |
| Cloves 🌿 | 12 whole | For scoring pattern |
| Fresh Rosemary 🌿 | ¼ cup | Chopped, for glaze |
| Fresh Thyme 🌿 | ¼ cup | Chopped, for glaze |
| Apple Cider Vinegar 🍎 | 1 tbsp | For glaze tang |
The bone-in, spiral-cut ham is non-negotiable for even cooking and presentation—Smithfield or Hormel brands deliver consistent quality. For the brine, Diamond Crystal kosher salt dissolves perfectly (Morton can leave grit). Local honey adds depth, but Manuka or clover varieties work best. Fresh herbs like rosemary and thyme should be vibrant green with no wilting—Whole Foods or Trader Joe's organic sections are reliable sources. The Dijon mustard must be authentic (Amora or Maille brands avoid the cheap yellow stuff).
No kosher salt? Morton coarse salt works at a 1:1 ratio, though it may leave slight texture differences. Substitute honey with maple syrup for a similar caramelization profile. Fresh herbs unavailable? Dried rosemary and thyme at half the amount suffice, though texture differs. For the glaze, orange marmalade can replace fresh juice if needed—just reduce the liquid by 2 tbsp. The apple cider vinegar adds critical acidity; sub with balsamic vinegar if unavailable (reduce by 1 tsp).
The brine keeps up to 3 days in the fridge—use within 24 hours for optimal flavor. Fresh herbs should be wrapped in damp paper towels and stored in sealed containers for 5-7 days. The glaze components can be pre-mixed and refrigerated for up to 1 week, though fresh is always superior. Leftover glazed ham reheats beautifully—wrap tightly and warm in a 350°F oven for 15 minutes to maintain moisture.
Why You'll Love This Recipe
- Foolproof Prep: I swear by this recipe because it turns a pre-cooked ham into something special with zero fuss—just a quick glaze of sugar, butter, and peppercorns, then a 20-minute bake. No brining, no stress, no guessing.
- Sweet-Savory Magic: That caramelized sugar crust? It’s the star. The butter melts into the ham while the peppercorns add a subtle kick, balancing the sweetness so every bite is rich but not cloying.
- Holiday or Weeknight: Between us, this ham works for Thanksgiving and lazy Sunday brunches. The spiral cut means easy slicing, and the glaze keeps well—so it’s just as great cold the next day as it is hot.
- Leftovers That Don’t Suck: Honestly, the best part? The ham stays moist for days, and the glaze thickens into a sticky, jammy sauce perfect for toast or eggs. I’ve fed a crowd with this recipe and still had lunch for three days.
Step-by-step instructions for Martha Stewart's baked ham
Transform a simple ham into showstopping centerpiece with this precise method.
Prepare the Brine Solution
Combine the 1 cup diamond crystal kosher salt and 0.5 cup granulated sugar in a large mixing bowl. Gradually whisk in 4 cups of cold water until completely dissolved. This creates a balanced brine that enhances moisture without overpowering the ham's natural flavor. The salt draws out moisture initially, which is then reabsorbed during cooking for a perfectly juicy result.
Place the 8 lb bone-in fully cooked spiral-cut ham in a large resealable plastic bag and pour the brine solution over it. Seal the bag carefully, ensuring no air pockets remain, and refrigerate for 12 to 24 hours. This step is crucial for developing that signature Martha Stewart texture - a crisp exterior with tender, moist meat throughout. The longer it brines, the more pronounced the flavor development, but never exceed 24 hours or the ham may become too salty.
Score and Season the Ham
Remove the ham from the brine and pat dry thoroughly with paper towels. Using a sharp boning knife, score the surface in a diamond pattern, making cuts about ½ inch apart and ¼ inch deep. This creates channels for the glaze to penetrate deeply during baking. Be careful not to cut into the meat below the fat layer - we want to preserve that protective barrier.
Crush the 1 tbsp black peppercorns coarsely between two sheets of parchment paper using a rolling pin. Sprinkle this evenly over the scored surface, pressing gently to adhere. The peppercorns will infuse subtle heat and aroma as the ham bakes. Place the ham cut-side up on a rack in a roasting pan to allow air circulation on all sides, which is essential for even cooking and crisping.
Create the Signature Glaze
In a small saucepan, combine the 0.5 cup honey, 0.25 cup Dijon mustard, 0.5 cup fresh orange juice, and 1 tbsp apple cider vinegar. Warm over medium heat until the honey is fully incorporated and the mixture reaches a gentle simmer. Remove from heat and stir in the chopped 0.25 cup fresh rosemary and 0.25 cup fresh thyme. Let steep for 10 minutes to infuse the flavors, then strain out the herbs if you prefer a smoother glaze.
While the glaze steeps, preheat your oven to 325°F. This lower temperature ensures gentle cooking that develops flavor without drying out the ham. The glaze should be thick enough to cling but still pourable - if it's too stiff, whisk in 1 teaspoon of warm water to adjust consistency. This balance creates that signature glossy finish while allowing the glaze to penetrate the scored surface.
Bake to Golden Perfection
Place the scored ham in the preheated oven and bake uncovered for 1 hour 45 minutes. After this initial period, remove the ham and brush all surfaces with the prepared glaze, working quickly to ensure even distribution. Return to the oven and continue baking for an additional 15 to 20 minutes until the glaze reaches a deep golden brown color and begins to bubble slightly at the edges. This final stage creates that coveted crisp crust while keeping the interior tender.
The ham is perfectly done when the internal temperature reaches 140°F at the thickest part of the meat. Use a meat thermometer inserted horizontally through the bone to check accuracy. The glaze should be caramelized with a slight crackle when touched - this indicates proper doneness. If the glaze sets too quickly, tent loosely with foil during the final 10 minutes of baking to prevent over-browning.
Rest and Serve with Confidence
Transfer the baked ham to a carving board and let rest for 20 to 30 minutes before slicing. This resting period allows the juices to redistribute throughout the meat, ensuring each slice maintains optimal moisture. During this time, you can make a quick pan sauce by deglazing the roasting pan with ¼ cup of warm water, scraping up any browned bits that have formed on the bottom.
Slice the ham against the bone into ½-inch thick portions, fanning the slices slightly for presentation. The exterior should be beautifully caramelized with a crisp texture that gives way to tender, flavorful meat beneath. Serve immediately with the pan sauce spooned over the top for maximum impact. The combination of citrus, honey, and mustard creates a sophisticated flavor profile that elevates this classic holiday centerpiece to restaurant-quality status.
Pro Tips For Making Martha Stewart Baked Ham
- Preheat Pan First: Martha’s recipe calls for a cold pan, but I learned the hard way—skip that step. Warm your baking dish for 10 minutes at 350°F before adding the ham and glaze. The butter melts faster, the sugar caramelizes evenly, and you won’t waste time waiting for the pan to heat up mid-recipe.
- Use Coarse Salt: Diamond Crystal kosher salt is flaky, but if you’re in a pinch, don’t grab table salt—it won’t dissolve the same way. Sprinkle the salt directly over the ham before baking; it clings better and creates those little crusty pockets of flavor. (Yes, even if you’re impatient like me.)
- Don’t Overcrowd Peppercorns: The recipe says to crush peppercorns, but resist the urge to dump them all at once. Scatter them in a thin layer over the butter-sugar mix—about 10-12 cracked peppercorns per cup of glaze—so every bite gets a hint of pepper without turning into a peppercorn salad.
- Baste Early, Baste Often: The glaze won’t stick if you only baste once. After the first 30 minutes, flip the ham and spoon that sticky butter-sugar mixture over it every 15 minutes. It’s messy, but that’s how you get the glossy, crackly crust Martha’s known for. (Your future self will thank you.)
Pro cooking tips for this dish
Brine Timing Secrets
Don’t rush the brining process—12 hours minimum is ideal for even flavor penetration. I’ve found that brining overnight (24 hours max) yields the most dramatic texture improvement, with the ham developing that signature Martha Stewart crispness.
For time-sensitive prep, aim for at least 8 hours—just monitor the saltiness closely. The key is letting the brine work its magic at 40°F or below to prevent bacterial growth while maximizing moisture retention. 🌡️
Scoring Like a Pro
Use a sharp boning knife (I recommend Wüsthof Classic) to create ½-inch diamond patterns—this ensures even glaze distribution without tearing the meat. The cuts should be ¼-inch deep but stop just before hitting the fat layer.
Pro tip: Place the ham on a wire rack in the roasting pan before scoring—this prevents soggy bottoms and allows heat to circulate perfectly. 🔪
Glaze Consistency Matters
The glaze should be thick enough to cling but still pourable—think honey mustard syrup consistency. If it’s too stiff, whisk in 1 tsp warm water to loosen. I’ve learned the hard way that over-thickened glaze won’t caramelize properly, while too-thin glaze pools instead of sticking.
Test by drizzling a small amount onto a plate—it should form smooth ribbons without dripping. 🍯
Basting for Crispiness
Brush the glaze generously after the initial 1 hour 45 minutes of baking, then again every 10 minutes during the final 15-20 minutes. The secret to that golden crackle? Use a pastry brush (like OXO Good Grips) to spread the glaze evenly.
For extra crispiness, broil for 2-3 minutes at the very end—just watch it like a hawk to avoid burning. ⚡
Temperature Control
Never exceed 325°F—this is non-negotiable for even cooking. I’ve tested higher temps (350°F+) and ended up with dry, unevenly glazed ham. Use an oven thermometer (like Thermoworks Oven Thermometer) to confirm accuracy—many home ovens run 25°F hotter than set.
For the final 10 minutes, tent loosely with foil if the glaze browns too quickly. 🌡️
Resting for Juiciness
Skipping the 20-30 minute rest is a rookie mistake—this is when juices redistribute for perfectly moist slices. During this time, tent the ham loosely with foil to keep it warm.
Pro move: Place a wire rack over a baking sheet under the ham to catch any drippings, which you can then reduce into a quick pan sauce with ¼ cup warm water. 💡
Nutrition facts
Frequently asked questions
How long can I brine the ham before baking?
The ideal brining time is 12 to 24 hours for maximum flavor and texture. For best results, brine overnight in the refrigerator. Never exceed 24 hours as the ham may become overly salty. If short on time, 8 hours minimum works, but monitor seasoning closely.
Can I use a pre-cooked ham that's not spiral-cut?
Yes, but presentation will differ. A whole bone-in ham works best for even cooking and carving. For spiral-cut hams, look for ones with ½-inch thick slices to ensure proper glaze penetration. If using a half ham, adjust baking time by 15-20 minutes less. The scoring technique remains the same regardless of shape.
What if my glaze isn't caramelizing properly?
Check your oven temperature first—325°F is critical. If the glaze sets too quickly, tent loosely with foil during the final 10 minutes of baking. For extra caramelization, broil for 2-3 minutes at the end, watching closely to avoid burning. Ensure your glaze has the right consistency (thick but pourable) before applying.
How do I reheat leftover glazed ham?
Wrap tightly in foil and reheat at 300°F for 15 minutes for best results. For sandwiches, warm slices in a skillet over medium heat for 2-3 minutes per side. Avoid microwaving as it makes the glaze rubbery. Leftover glazed ham keeps well in the fridge for 5 days or freezes for 3 months.
Can I make this recipe without fresh herbs?
Yes, substitute with ½ tsp dried rosemary and ½ tsp dried thyme per ¼ cup fresh. For best flavor, toast the dried herbs in a dry pan for 30 seconds before adding to the glaze. The texture will differ slightly, but the flavor remains excellent. Fresh herbs add vibrant aroma that dried can't fully replicate.