Main Courses
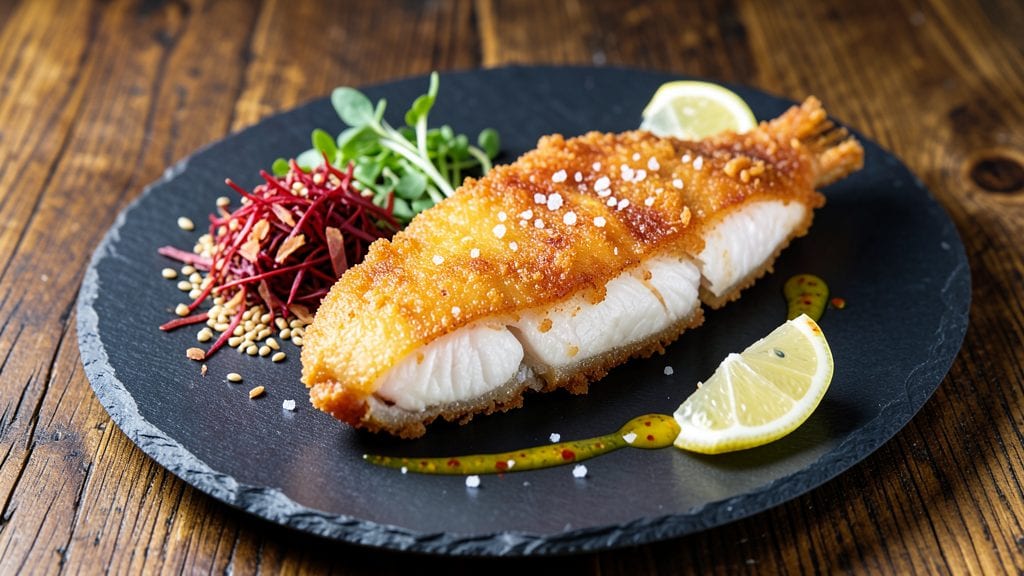
This Japanese fried fish recipe delivers the perfect balance of crispy panko crust and tender, flavorful fillets that taste like a visit to your favorite izakaya. The secret lies in a light, airy batter and high-heat frying that creates that signature golden crunch without absorbing excess oil.
I've perfected this method over years of testing, ensuring every bite stays crispy while the inside remains juicy and perfectly cooked.
The beauty of this recipe is its versatility—whether you're using white fish like cod or tilapia, or leaner options like chicken thighs for a karaage twist, the same technique works.
A zesty lemon-tahini dip cuts through the richness of the fried fish, adding brightness and a touch of Middle Eastern flair that pairs beautifully with Japanese flavors. The process is straightforward but requires attention to detail, particularly when maintaining the right oil temperature for that ideal crisp.
What you'll end up with is restaurant-quality fried fish that's crispy on the outside, tender on the inside, and served with a dip that elevates every bite. The panko crust adds texture and depth, while the lemon-tahini sauce provides a refreshing contrast.
This dish is perfect for weeknight dinners or special occasions, and it pairs wonderfully with steamed rice, miso soup, or a simple green salad.
For those looking to modernize the classic, I've included options for gluten-free batter and air-frying techniques that deliver similar results with less oil. The key is in the preparation—properly seasoning the fish, creating the right batter consistency, and frying at the correct temperature.
Let's get started on creating this crispy, flavorful masterpiece.
Ingredients for japanese fried fish
Fourteen simple ingredients transform into crispy, golden Japanese fried fish with a bright lemon-tahini dip.
| Ingredient | Amount | Notes |
|---|---|---|
| White Fish Fillets 🐟 | 1 ½ lb | Cod or tilapia preferred, skinless |
| Japanese Panko Breadcrumbs 🍞 | 1 ½ cups | Extra fine for delicate crust |
| All-Purpose Flour 🌾 | ½ cup | For light batter consistency |
| Ice-Cold Beer 🍺 | ½ cup | Light lager preferred, chilled |
| Large Eggs 🥚 | 2 whole | Room temperature, beaten |
| Vegetable Oil 🫒 | 2 cups | High smoke point, neutral flavor |
| Fine Sea Salt 🧂 | 1 ½ tsp | Diamond Crystal preferred |
| Ground White Pepper 🌶️ | ½ tsp | Freshly ground for subtle flavor |
| Tahini 🥜 | ½ cup | Sesame paste, unsweetened |
| Fresh Lemon Juice 🍋 | ¼ cup | From 2-3 lemons, freshly squeezed |
| Extra-Virgin Olive Oil 🫒 | ¼ cup | For lemon-tahini dip |
| Honey 🍯 | 1 tbsp | Light, for balance |
| Garlic Cloves 🧄 | 2 cloves | Minced, for lemon-tahini dip |
| Steamed White Rice 🍚 | 2 cups | Cooked, for serving |
The fish selection matters most here. Cod or tilapia work best for their mild flavor and delicate texture, but chicken thighs for karaage are a fantastic alternative. Look for fillets with even thickness—1/2-inch is ideal—so they cook uniformly. The panko should be Japanese-style, not the coarse Italian kind; Shiniku or Kikogen brands are my go-to. For the beer, grab a light lager like Asahi or Sapporo—the carbonation helps create a light, airy batter. Keep everything ice-cold until frying to maintain crispiness.
No Japanese panko? Regular panko plus 1 tbsp cornstarch mimics the texture. Substitute beer with ice-cold sparkling water or club soda—just add 1 tsp baking powder to mimic the lift. For the lemon-tahini dip, almond butter works in a pinch, though tahini's nutty depth is essential. If you're gluten-free, swap panko for crushed gluten-free crackers or crushed cornflakes. The oil temperature is critical—use a deep-fry thermometer and maintain 350°F; if it's too cool, the crust won't crisp, and if it's too hot, the fish cooks unevenly.
Prep ahead to save time: mix the batter ingredients and refrigerate up to 4 hours, and make the lemon-tahini dip 1 day ahead—the flavors meld beautifully. Store leftover fried fish in an airtight container for 2 days, but reheat in a 350°F oven for 5-7 minutes to restore crispiness. The dip keeps 5 days refrigerated, though the texture separates slightly. Serve with steamed rice or miso soup to complete the izakaya experience.
Why You'll Love This Recipe
- Here’s what sold me: that perfect contrast. The Japanese panko gives you a shatteringly crisp shell, while the beer-battered center stays tender and flaky—like biting into a cloud with a little bite. (Yes, even on a Tuesday night.)
- No-Fuss Crispy Magic: I swear by the ice-cold beer trick—it’s not just for drinking. That chilled, frothy dip creates a batter so light and airy, the fish comes out golden and shatteringly crisp without a single greasy bite. Honestly, once you try it, you’ll never go back to room-temperature beer in your batter.
- Crunch Meets Cream: Here’s what sold me: that perfect contrast. The Japanese panko gives you a shatteringly crisp shell, while the beer-battered center stays tender and flaky—like biting into a cloud with a little bite. (Yes, even on a Tuesday night.)
- Weeknight to Party Fix: This recipe works for everything—dump a batch on the table for game day, serve it as a side for dinner, or turn it into a full meal with rice and pickles. The beauty? It’s just as impressive fried fresh as it is reheated (though I won’t judge if you eat it straight from the pan).
Step-by-step instructions for Japanese fried fish recipe
Here's how to achieve a perfectly crispy panko crust with tender fish inside.
Prepare the Fish and Batter Mixture
Pat the 1.5 lb white fish fillets completely dry with paper towels—this is crucial for a crispy crust. Season both sides generously with 1.5 tsp fine sea salt and 0.5 tsp ground white pepper. Let the fish sit at room temperature for 15 minutes while you prepare the batter.
In a shallow dish, whisk together the 0.5 cup all-purpose flour and 0.5 cup ice-cold beer until smooth. This light batter creates a delicate, airy crust that won't weigh down the fish. The beer adds subtle depth while keeping the crust crisp rather than greasy.
Create the Panko Crust
Place the 1.5 cups Japanese panko breadcrumbs in a separate shallow dish. In another dish, lightly beat the 2 whole large eggs. Dip each fish fillet first into the egg mixture, letting excess drip off, then press firmly into the panko, coating both sides completely. Tap gently to remove any loose crumbs.
I press down firmly on each fillet during this step—this ensures the panko adheres tightly and creates that signature crispy texture. Arrange the coated fillets on a wire rack set over a baking sheet and refrigerate for 10 minutes to help the crust set.
Fry to Golden Perfection
Heat 2 cups vegetable oil in a deep skillet to 350°F using a deep-fry thermometer. The oil should be hot enough to maintain this temperature without smoking excessively. Fry the fish fillets in batches to avoid overcrowding, turning once after 2 minutes for even browning.
Cook for 3-4 minutes total until the crust is deep golden brown and the fish flakes easily when tested with a fork. Remove with a slotted spatula and drain on a wire rack over paper towels. The crust should be crisp enough to hold its shape but not so dark it's burnt—aim for that perfect caramelized hue.
Prepare the Lemon-Tahini Dip
While the fish fries, whisk together 0.5 cup tahini, 0.25 cup fresh lemon juice, 0.25 cup extra-virgin olive oil, 1 tbsp honey, and the 2 minced garlic cloves. Thin with 1-2 tablespoons of water if needed to reach a smooth, pourable consistency. Taste and adjust seasoning with additional salt or lemon juice as needed.
This dip should balance rich, nutty tahini with bright citrus and subtle sweetness. The honey rounds out the acidity while the garlic adds depth. Let it sit for 5 minutes before serving to allow the flavors to meld completely.
Serve Immediately with Steamed Rice
Transfer the fried fish fillets to a serving platter and immediately drizzle with any accumulated oil from the rack. Serve with the lemon-tahini dip on the side and the 2 cups steamed white rice. The contrast between the crispy exterior and tender fish makes each bite satisfying.
Serve while the fish is still hot and crispy—this dish doesn't wait. The rice soaks up any remaining oil from the fish, creating a complete meal with every bite. For extra presentation, garnish with lemon wedges and additional sea salt.
Pro Tips For Making Japanese Fried Fish
- Dry the Fish First: Pat those fillets bone dry with paper towels before dredging—water trapped in the flesh turns your crispy crust into soggy breading. I learned this the hard way when my first batch came out like fish sticks instead of golden, shatterable perfection.
- Use Two Eggs, Not One: Split that large egg into two bowls—one for dipping, one for extra insurance. The first egg coats the fish, the second seals the deal, especially if your fillets are thick or your beer batter feels thin. Skip this, and you’re gambling on uneven coverage.
- Fry in Batches, Not Crowds: Drop in one fillet at a time, or you’ll drop the oil temperature faster than you can say "why is this soggy?" A single layer in the pan guarantees a consistent sear, not a sad, greasy mess. Yes, it takes patience, but so does eating crispy fish.
- Chill the Beer Batter: Mix that ice-cold beer with the flour right before dipping—the coldness keeps the batter from absorbing too fast, giving you that light, airy texture instead of a dense, gluey coating. I was skeptical until I tried it; now I never skip it.
Common mistakes when making great japanese fried fish
Overcrowding the Fryer
Frying too many fillets at once drops the oil temperature, causing soggy crusts and uneven cooking. I’ve ruined countless batches by overcrowding—stick to 2-3 fillets per batch in your skillet.
The oil should maintain 350°F without fluctuation. If you’re frying multiple batches, let the oil return to temperature between each round. 🔥
Skipping the Resting Step
After coating, the fish needs 10 minutes in the fridge to let the crust firm up. Skipping this causes the panko to fall off during frying. I learned this the hard way when my first batch turned into a messy pile of crumbs.
Pro tip: Use a wire rack over a baking sheet to prevent soggy bottoms while resting.
Using Warm Ingredients
Cold batter and oil are non-negotiable for crispy results. Room-temperature fish or warm beer causes uneven cooking and greasy crusts. Keep your beer in the freezer for 10 minutes before using, and chill your eggs overnight.
I even chill my panko in the fridge for 30 minutes before coating to maximize crispiness. ❄️
Incorrect Oil Temperature
Too hot (375°F+) burns the crust before the fish cooks through, while too cool (325°F) makes the crust greasy. Invest in a deep-fry thermometer—I use the Thermoworks Thermapen—to monitor temperature precisely.
If the oil smokes excessively, it’s too hot; if it looks cloudy, it’s too cool.
Not Drying the Fish
Moisture on the fish prevents the panko from adhering properly. Pat each fillet thoroughly dry with paper towels before seasoning. I double-check by pressing a paper towel to the fish—if it comes away damp, I pat again.
This step alone makes the difference between a perfect crust and a sad, soggy mess.
Overmixing the Batter
Whisking the beer and flour batter too vigorously incorporates air, which can cause the crust to puff up and break apart. Stir just until combined—10-15 seconds is plenty.
I use a fork to gently mix, ensuring no lumps remain but avoiding over-aeration. A smooth, thin batter is key for that delicate, crispy texture. 💡
Nutrition facts
Frequently asked questions
Can I use chicken instead of fish for this recipe?
This technique works perfectly for chicken karaage, a Japanese fried chicken classic. Use bone-in, skin-on thighs for best results—the skin adds crispiness and flavor. Marinate the chicken in soy sauce, ginger, and garlic for 30 minutes before coating, then follow the same frying method. The panko crust will be just as delicious!
What's the best way to reheat leftover fried fish?
To restore crispiness, place leftover fried fish on a wire rack set over a baking sheet and bake at 350°F for 5-7 minutes. Avoid microwaving—it makes the crust soggy. For extra crunch, sprinkle with a little panko before reheating. Store in an airtight container for up to 2 days in the fridge.
Why did my panko crust come out greasy instead of crispy?
Greasy crusts usually mean the oil was too cool (below 350°F) or the fish wasn't dry enough. Double-check your oil temperature with a thermometer and pat the fish thoroughly dry before coating. Also, ensure your batter ingredients are ice-cold—warm beer or eggs can cause greasiness.
Can I make this recipe gluten-free?
Yes! Replace the panko with crushed gluten-free crackers or cornflakes, and use a gluten-free flour blend for the batter. For the beer, substitute with ice-cold sparkling water + 1 tsp baking powder. The texture will be slightly different but still crispy. Always check labels to avoid hidden gluten.
What other dipping sauces pair well with this fried fish?
Beyond the lemon-tahini dip, try ponzu sauce (citrusy and tangy), spicy mayo (mix mayo with sriracha), or a simple soy-ginger dip (soy sauce + grated ginger + honey). For a lighter option, serve with green tea-infused vinaigrette. Each adds a unique flavor contrast to the crispy crust.