
Side Dishes
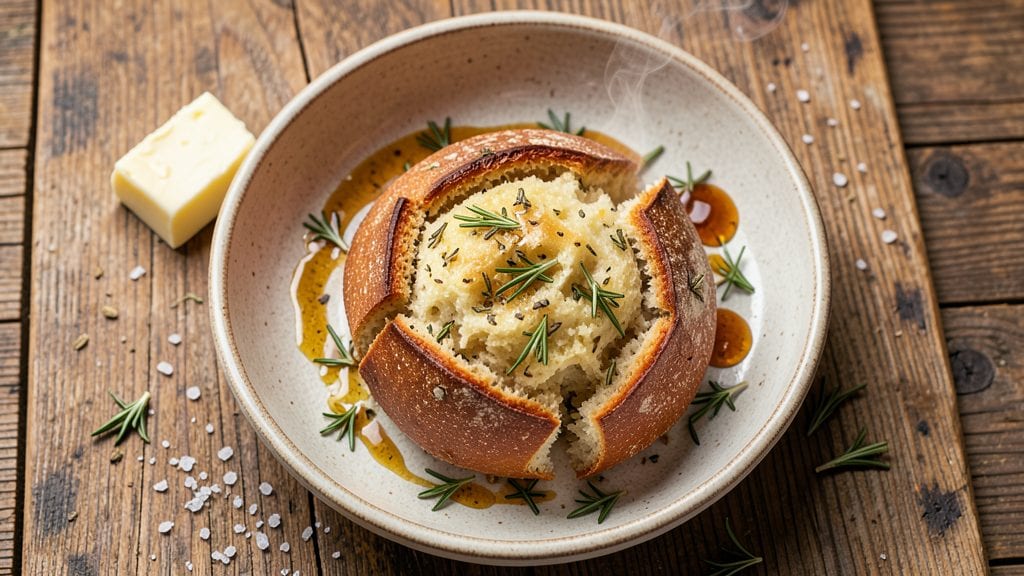
This herby bread recipe transforms simple dough into aromatic, pull-apart perfection with rosemary and garlic—ideal for soaking up soups or pairing with roasted meats. The secret lies in balancing fresh herbs with yeast activation, creating a crust that crackles with flavor while staying tender inside.
I developed this after years of testing, and it never fails to impress at dinner tables.
What sets this bread apart is the layered herb infusion: finely chopped rosemary and minced garlic are kneaded directly into the dough, ensuring every bite delivers bright, piney notes and savory depth.
The dough requires two rises—one at room temperature, one in the fridge—to develop maximum flavor and texture. Professional bakers swear by this method for consistent results.
By the time it emerges from the oven, you’ll have a golden loaf with crisp edges and a soft, airy crumb—perfect for tearing into warm slices. The rosemary’s aroma lingers long after baking, while the garlic adds a subtle warmth that pairs beautifully with butter or olive oil.
This bread is versatile enough for everyday meals yet feels special enough for gatherings.
For variations, try adding fresh thyme or parsley for a brighter profile, or mix in grated parmesan for a savory twist. The recipe scales easily, so double the batch for holiday feasts. Let’s get baking—your kitchen will smell like a Mediterranean bakery in minutes.
Ingredients for herby bread
Six simple ingredients transform into aromatic, pull-apart herby bread perfection with rosemary and garlic.
| Ingredient | Amount | Notes |
|---|---|---|
| All-Purpose Flour 🌾 | 4 ½ cups | Sifted for even texture |
| Active Dry Yeast 🍞 | 2 ¼ tsp | One packet for convenience |
| Granulated Sugar 🍚 | 1 tbsp | Feeds yeast activation |
| Warm Water 💧 | 1 ¼ cups | 110°F for yeast activation |
| Unsalted Butter 🧈 | ½ cup | Cold, cubed for kneading |
| Fresh Rosemary 🌿 | ¼ cup | Finely chopped, stems removed |
| Garlic Cloves 🧄 | 4 cloves | Minced, for savory depth |
| Sea Salt 🧂 | 1 ½ tsp | Kosher preferred for balance |
| Extra-Virgin Olive Oil 🫒 | 2 tbsp | For dough elasticity |
| Cornmeal 🌽 | ¼ cup | For dusting bread pan |
| Coarse Sea Salt 🧂 | 1 tbsp | For final crust sprinkle |
The fresh rosemary is non-negotiable here—dried loses its piney aroma. Look for vibrant green sprigs at the grocery store’s produce section, preferably organic. Whole Foods or local markets often carry the freshest varieties, but even the supermarket’s herb aisle works if the sprigs are firm and fragrant. For garlic, Spanish or Italian varieties have the most flavor, but any fresh clove will do. The yeast? Always check the expiration date—one packet is fresher than jarred granules. Store-bought flour is fine, but for professional results, sift it before mixing to eliminate lumps. The butter should be cold—cut it into small cubes to distribute evenly during kneading.
No fresh rosemary? Dried works at one-third the amount, but the flavor will be milder. Substitute garlic with garlic powder at half the quantity, though fresh is ideal. Running low on olive oil? Avocado oil or melted butter works in a pinch. For the sugar, honey or maple syrup can replace granulated sugar, but adjust to taste. The dough requires precise measurements—use a kitchen scale for accuracy—especially the yeast and water temperature. Too hot, and it kills the yeast; too cold, and it won’t activate. Aim for 110°F water (just warm to the touch).
This dough doubles in size during the first rise, so use a large mixing bowl that won’t overflow. After the initial rise, refrigerate the dough for up to 24 hours—this enhances flavor and texture. The shaped loaf keeps well in an airtight container at room temperature for 3 days, or freeze portions for 3 months. For reheating, wrap slices in foil and warm in a 350°F oven for 5 minutes. The crust stays crisp for hours, but the interior softens quickly—ideal for serving warm.
Why You'll Love This Recipe
- Pantry Staples Only: I swear by this recipe because it uses things I always have—flour, yeast, butter, and a pinch of sugar. No fancy imports or last-minute grocery runs. The butter alone makes it feel special, even though I’m mixing it in my trusty stand mixer bowl.
- Herb Bomb Flavor: That moment when you pull it out of the oven and the rosemary or thyme scent hits you? Worth the wait. The butter infuses the dough with richness while the herbs add a bright, earthy punch—simple but unforgettable.
- Weeknight Hero: I make a double batch on Sundays and freeze half. Toast it straight from frozen for breakfast or pack it for lunches. No reheating needed—just slice, toast, and serve. It’s my go-to when I’m too tired to plan.
- Budget-Friendly Luxury: This bread costs pennies per serving but tastes like a bakery loaf. The yeast does all the work, and the butter keeps it moist for days. I’ve fed my whole family for under five bucks—with leftovers for snacks.
Step-by-step instructions for herby bread recipe
Here's the method for creating aromatic, pull-apart perfection with rosemary and garlic infused throughout.
Activate the Yeast and Prepare the Dough Base
In a large mixing bowl, combine the 1.25 cups warm water (it should feel like bathwater, around 110°F) with the 1 tbsp granulated sugar and 2.25 tsp active dry yeast. Let this sit for 5-10 minutes until frothy—this confirms your yeast is alive and ready to work. If it doesn't bubble, your yeast may be dead, and you'll need to start over.
While waiting, sift the 4.5 cups all-purpose flour into the bowl. Add the 1.5 tsp sea salt and 4 cloves minced garlic. Mix just until combined, creating a shaggy dough. Here's the thing—don't overmix yet. We want to preserve the gluten structure for that perfect pull-apart texture later. The dough will look dry at first, but that's normal.
Incorporate Wet Ingredients and Develop the Dough
Cut the 0.5 cup unsalted butter into small cubes and add them to the flour mixture. Using your hands or a dough hook attachment on low speed, gradually incorporate the butter while adding the 2 tbsp extra-virgin olive oil. The butter should begin to coat the flour, creating a crumbly texture that will soon come together.
Now add the 0.25 cup finely chopped fresh rosemary (stems removed) and mix until evenly distributed. Knead the dough for 5-7 minutes by hand or 3-4 minutes with a mixer until it becomes smooth and elastic. You'll know it's ready when it springs back slightly when pressed. If the dough feels sticky, add 1-2 tablespoons more flour—just enough to make it manageable without making it dry.
First Rise and Shape the Dough
Lightly oil a large bowl and place the dough inside. Cover with a damp towel or plastic wrap and let it rise in a warm place for 1-1.5 hours, or until doubled in size. This first rise is crucial—it develops the gluten structure that gives this bread its signature pull-apart quality. The dough should be soft and airy when ready.
Once risen, punch down the dough to release air, then turn it out onto a lightly floured surface. Gently shape it into a 12x8-inch loaf (or a round boule if you prefer). For the pull-apart effect, fold one short end toward the center, then the other, creating three pleats. This technique creates those beautiful layers when baked.
Second Rise and Final Preparation
Place the shaped dough in a 9x5-inch loaf pan that's been lightly greased with olive oil. Sprinkle the bottom with 0.25 cup cornmeal to prevent sticking. Cover again and let rise for another 30-45 minutes until the dough has expanded just above the pan's rim. This final rise ensures maximum volume and that signature pull-apart texture.
Preheat your oven to 375°F while the dough rises. When ready, sprinkle the top with 1 tbsp coarse sea salt for that perfect crust. Bake for 30-35 minutes until the bread is deep golden brown and sounds hollow when tapped on the bottom. The internal temperature should reach 190-200°F when measured with an instant-read thermometer.
Cool and Serve for Maximum Flavor
Remove the bread from the pan immediately and place it on a wire rack to cool completely. This cooling step is critical—it allows the bread to set properly and prevents a gummy texture. While it cools, you'll notice that beautiful pull-apart quality developing as the layers separate naturally.
For best results, serve the bread warm or at room temperature. The aroma of fresh rosemary and garlic will fill your kitchen, and each pull-apart bite will reveal that perfect balance of crispy crust and tender interior. This bread pairs beautifully with soups, stews, or simply on its own with a pat of butter.
Pro Tips For Making Herby Bread
- Bloom the Yeast: Mix your warm water (110°F—use a thermometer, not guesswork) with sugar first, then sprinkle in the yeast and wait exactly 5-10 minutes until it foams like a tiny beer. If it sits there flat, your bread will taste flat too—start over with fresh yeast.
- Cut Cold Butter: Grate or finely dice that unsalted butter and toss it into the flour mixture before adding water. The cold fat distributes evenly, giving you those buttery pockets without melting into a greasy mess. (Yes, it looks weird, but it works.)
- Skip the Over-Kneading: After the first 5 minutes of kneading, stop when the dough springs back slowly instead of bouncing like a trampoline. Overworked gluten makes herby bread dense—this recipe relies on the herbs, not chewiness, to shine.
- Proof in a Warm Spot: Place your dough in a bowl with a damp towel over it, tucked near the oven’s pilot light or a turned-off broiler (not inside—just close enough for warmth). Too-cold air slows rising, and too-hot air kills the yeast. Aim for a spot where it doubles in 1-2 hours.
Troubleshooting this recipe
Dough Too Sticky
If your dough feels too sticky during kneading, resist the urge to add too much extra flour. Instead, try wetter hands or a dough scraper to handle it—this preserves the gluten structure for that perfect pull-apart texture.
I often dust my work surface with just 1 tablespoon of flour and use my hands to gently shape the dough while it's still slightly tacky. Over-flouring makes the bread dense and dry. 💪
Yeast Not Activating
If your yeast doesn’t bubble after 10 minutes in warm water, it’s dead—likely from age or cold water. Replace it with fresh yeast and check your water temperature (should be 110°F, like bathwater).
I keep a small jar of yeast in the fridge for emergencies, but store-bought packets usually work fine if stored properly. Never skip the sugar—it feeds the yeast and helps activate it faster.
Uneven Rise
Cold kitchen? Place your dough bowl near a warm oven (turned off) or on top of a 100°F water bath to create a consistent environment. Uneven rises often happen when one side of the dough gets warmer than the other.
I cover my dough with a damp towel and place it in a slightly warm spot (like near the stove) for even rising. Avoid drafty areas—this can cause the dough to rise too quickly on one side.
Flat or Dense Bread
Over-kneading or under-proofing are the usual culprits. For this recipe, knead just until the dough is smooth and elastic (5-7 minutes by hand). If your bread turns out dense, it might need more time to rise—try letting it rise for 1.5-2 hours the first time.
I also recommend using a kitchen scale for accuracy—too much flour can weigh down the dough and prevent proper expansion.
Herbs Not Infusing
Fresh herbs need to be finely chopped and evenly distributed during kneading. If your rosemary or garlic flavor is weak, try mincing the garlic even smaller and chopping the rosemary leaves (not stems) into tiny pieces.
I pulse mine in a food processor for 10 seconds before adding to the dough. For extra infusion, let the dough rest in the fridge for 12-24 hours before baking—this gives the flavors time to meld.
Crust Too Pale
A pale crust usually means the bread didn’t bake long enough or the oven wasn’t hot enough. Preheat your oven for at least 30 minutes before baking and use an oven thermometer to confirm it’s at 375°F.
For a deeper color, sprinkle the top with 1 tablespoon coarse sea salt before baking—it helps create a crispier, browner crust. I also recommend brushing the crust with a little olive oil after 20 minutes of baking for extra color and shine.
Nutrition facts
Frequently asked questions
Can I make this herby bread without a stand mixer?
This recipe works perfectly with just your hands. Knead the dough for 5-7 minutes on a lightly floured surface until it becomes smooth and elastic. The key is consistent pressure—press down with your knuckles to check elasticity. For extra flavor infusion, work the chopped rosemary and minced garlic into the dough thoroughly during kneading.
What's the best way to store leftover herby bread?
Keep it fresh in an airtight container at room temperature for 3 days. For longer storage, wrap individual slices in plastic wrap and freeze for up to 3 months. To revive, warm frozen slices in a 350°F oven for 5 minutes wrapped in foil. The crust stays crispy, while the interior remains soft and aromatic.
How can I adjust this recipe for a gluten-free diet?
Replace the all-purpose flour with a 1:1 gluten-free baking flour blend (like Bob's Red Mill) and add 1 tsp xanthan gum to the dry ingredients. Use the same measurements, but expect a slightly denser texture. For extra moisture, reduce the water by 1-2 tablespoons. The pull-apart effect may be less dramatic, but the herby flavor will still shine.
Can I substitute other herbs in this recipe?
Yes! Swap rosemary for thyme, parsley, or oregano (use same quantity). For a Mediterranean twist, combine 0.125 cup rosemary + 0.125 cup dried oregano. Avoid heavy herbs like basil—they can make the dough too wet. Always chop fresh herbs finely for even distribution. The garlic remains essential for that savory depth.
Why does this bread need two rises?
The first rise develops gluten structure for that signature pull-apart texture, while the second rise in the pan creates maximum volume. The cold proof in the fridge (12-24 hours) enhances flavor by allowing enzymes to break down starches slowly. This two-step process ensures a light, airy crumb with intense herb aroma. Think of it as flavor development on steroids!